
Advanced JSON Form Specification - Chapter 6: Capture Widgets
5.00/5 (2 votes)
A JSON form specification
Chapters
- Chapter 1: Introduction
- Chapter 2: Input Widgets
- Chapter 3: Input List Widgets
- Chapter 4: Options Widgets
- Chapter 5: Options List Widgets
- Chapter 6: Capture Widgets
- Chapter 7: Date and Time Widgets
- Chapter 8: Advanced Form Features
Introduction
This chapter introduces form screens that together are referred to as capture screens. Capture screens allow the user to take a photo, collect signatures, scan bar codes or collect location coordinate information.
As has been the tradition in the last 5 chapters of this article, the reader is strongly encouraged to download, unzip and copy the Capture Widgets form to the Android device. The reader should complete an instance of this form using the CCA-Mobile app. When the form is completed, the user should backup the form to the device. The backed up instance should be broadly similar to what is shown in the code block below:
/*

{
"Any Photo":  {
"fileName": "cca_photo_06730794-a5d4-4753-bc72-d8f94da57b71.jpg"
},
"Car Photo":  {
"fileName": "cca_photo_d6e20a4e-e89f-46cb-b687-dd0aa57b9846.jpg"
},
"My Sig":  {
"fileName": "cca_signature_7a016a3a-5cb5-43fb-9e03-c9797119a98f.jpeg"
},
"QR Scan": "Advanced JSON Forms",
"My Location":  {
"latitude": 51.500083,
"longitude": -0.126182,
"altitude": 19.097,
"accuracy": 4.90000009536743,
"bearing": 27.179992675781,
"provider": "gps"
}
}

*/
Image Capture and Annotation Screens
A photo capture screen should ideally allow the user to capture an image using the device’s camera or add a photo from the device’s storage.
The image on the left above shows an example of a photo form capture screen and the one on the right shows the same screen after the image has been captured or added to the form.

The code block below shows the JSON definition for the screens shown above:
/*

{
"mainScreen":  {
"screenID": "Any Photo",
"screenDisplayArray": [
{
"localeCode": "en",
"screenLabel": "1.  Take a photo of an object
",
"screenHint": "Any object would do
"
}],
"screenwidgetType": "photo",
"inputRequired": true,
"widgetSchema": "
\"Any Photo\": {
\"type\": \"object\",
\"properties\":  {
\"fileName\": {
\"type\": \"string\"
},
\"filePath\": {
\"type\": \"string\"
},
\"fileObject\": {
\"type\": \"string\"
}
},
\"required\": [\"fileName\"],
\"minProperties\": 1,
\"maxProperties\": 4,
\"additionalProperties\": false
}"
}
}
*/
The reader can see in the code block above that the screenwidgetType is set to photo.
For a photo capture screen, the widgetSchema value is a JSON object that consists of at least three properties, i.e., fileName, filePath and fileObject. Of these three properties only the fileName property is required or compulsory for an instance of the photo screen input. If present, the filePath string property holds the Uniform Resource Identifier (URI) to the image file. Also, if present, the fileObject property holds the binary representation of the image file in its base-64 encoding format.
Notice that the maxProperties is set to 4, suggesting a fourth property exist. This fourth property is discussed alongside the next screen.
The code block shows what an instance of the completed photo screen looks like in its JSON format:
/*

{
"Any Photo":  {
"fileName": "cca_photo_06730794-a5d4-4753-bc72-d8f94da57b71.jpg"
},
...
}

*/
A photo form screen also allows for image annotation as shown in the example screens depicted below:

To allow for image annotation, a fourth property, i.e, annotate with a default value of true, is added to the other three properties (filePath, fileName and fileObject) as shown in the widgetSchema of the code block below:
/*

{
"mainScreen":  {
"screenID": "Car Photo",
"screenDisplayArray": [
{
"localeCode": "en",
"screenLabel": "2. Take a photo of a car
",
"screenHint": "Click on the photo and circle the wheels on the car
"
}],
"screenwidgetType": "photo",
"inputRequired": true,
"widgetSchema": "
\"Car Photo\": {
\"type\": \"object\",
\"properties\":  {
\"fileName\": {
\"type\": \"string\"
},
\"filePath\": {
\"type\": \"string\"
},
\"fileObject\": {
\"type\": \"string\"
},
\"annotate\": {
\"type\": \"boolean\",
\"default\": true
}
},
\"required\": [\"fileName\"],
\"minProperties\": 1,
\"maxProperties\": 4,
\"additionalProperties\": false
}"
}
}
*/
A completed instance of the Car Photo form screen is shown below:
/*

{
...,
"Car Photo":  {
"fileName": "cca_photo_d6e20a4e-e89f-46cb-b687-dd0aa57b9846.jpg"
},
...
}

*/
Signature Pad Screen
A signature capture screen, at the click of a button, displays a pad on which signatures can be scribbled on, as represented in the images shown below:

A collected signature is saved to the device as an image. Since signatures are captured as images, the definition for a signature screen is similar to that of a photo capture screen with only two differences; the first is that the screenwidgetType is set to signature and the second is that only 3 properties are allowed for the object defined by the schema held in the widgetSchema as shown in the example below:
/*

{
"mainScreen":  {
"screenID": "My Sig",
"screenDisplayArray": [
{
"localeCode": "en",
"screenLabel": "3.  Please enter you signature
",
"screenHint": "Click on the button below to sign
"
}],
"screenwidgetType": "signature",
"inputRequired": true,
"widgetSchema": "
\"My Sig\": {
\"type\": \"object\",
\"properties\":  {
\"fileName\": {
\"type\": \"string\"
},
\"filePath\": {
\"type\": \"string\"
},
\"fileObject\": {
\"type\": \"string\"
}
},
\"required\": [\"fileName\"],
\"minProperties\": 1,
\"maxProperties\": 3,
\"additionalProperties\": false
}"
}
}
*/
Below is an example of a completed instance of a signature screen:
/*

{
...,
"My Sig":  {
"fileName": "cca_signature_7a016a3a-5cb5-43fb-9e03-c9797119a98f.jpeg"
},
...
}

*/
Code Scan Screen
A code scan screen uses the device’s digital camera to scan/read bar code. The images below show an example of the code scan screen before and after the code has been scanned:

It is pertinent to state here that the CCA-Mobile app relies on the ZXing library for code scanning functionalities.
The JSON definition for an example code scan screen is shown in the code block below:
/*

{
"mainScreen":  {
"screenID": "QR Scan",
"screenDisplayArray": [
{
"localeCode": "en",
"screenLabel": "4. Click the button to scan any QR code
",
"screenHint": "Make sure your surroundings are adequately lit.
"
}],
"screenwidgetType": "codeScan",
"inputRequired": true,
"widgetSchema": "
\"QR Scan\": {
\"type\": \"string\"
}"
}
}
*/
The screenwidgetType is set to codeScan and the widgetSchema value is an escaped JSON string schema that holds the text of the scanned content.
Below is an example of a completed instance of this screen:
/*

{
...,
"QR Scan": "Advanced JSON Forms",
...
}

*/
Location Screen
Location screens are used to read, amongst other values, the longitude and latitude of the present physical location of the device. Location values could come from the embedded GPS chip on the device, read from the mobile or WIFI networks, etc. Below is an example of the rendering of such a screen.
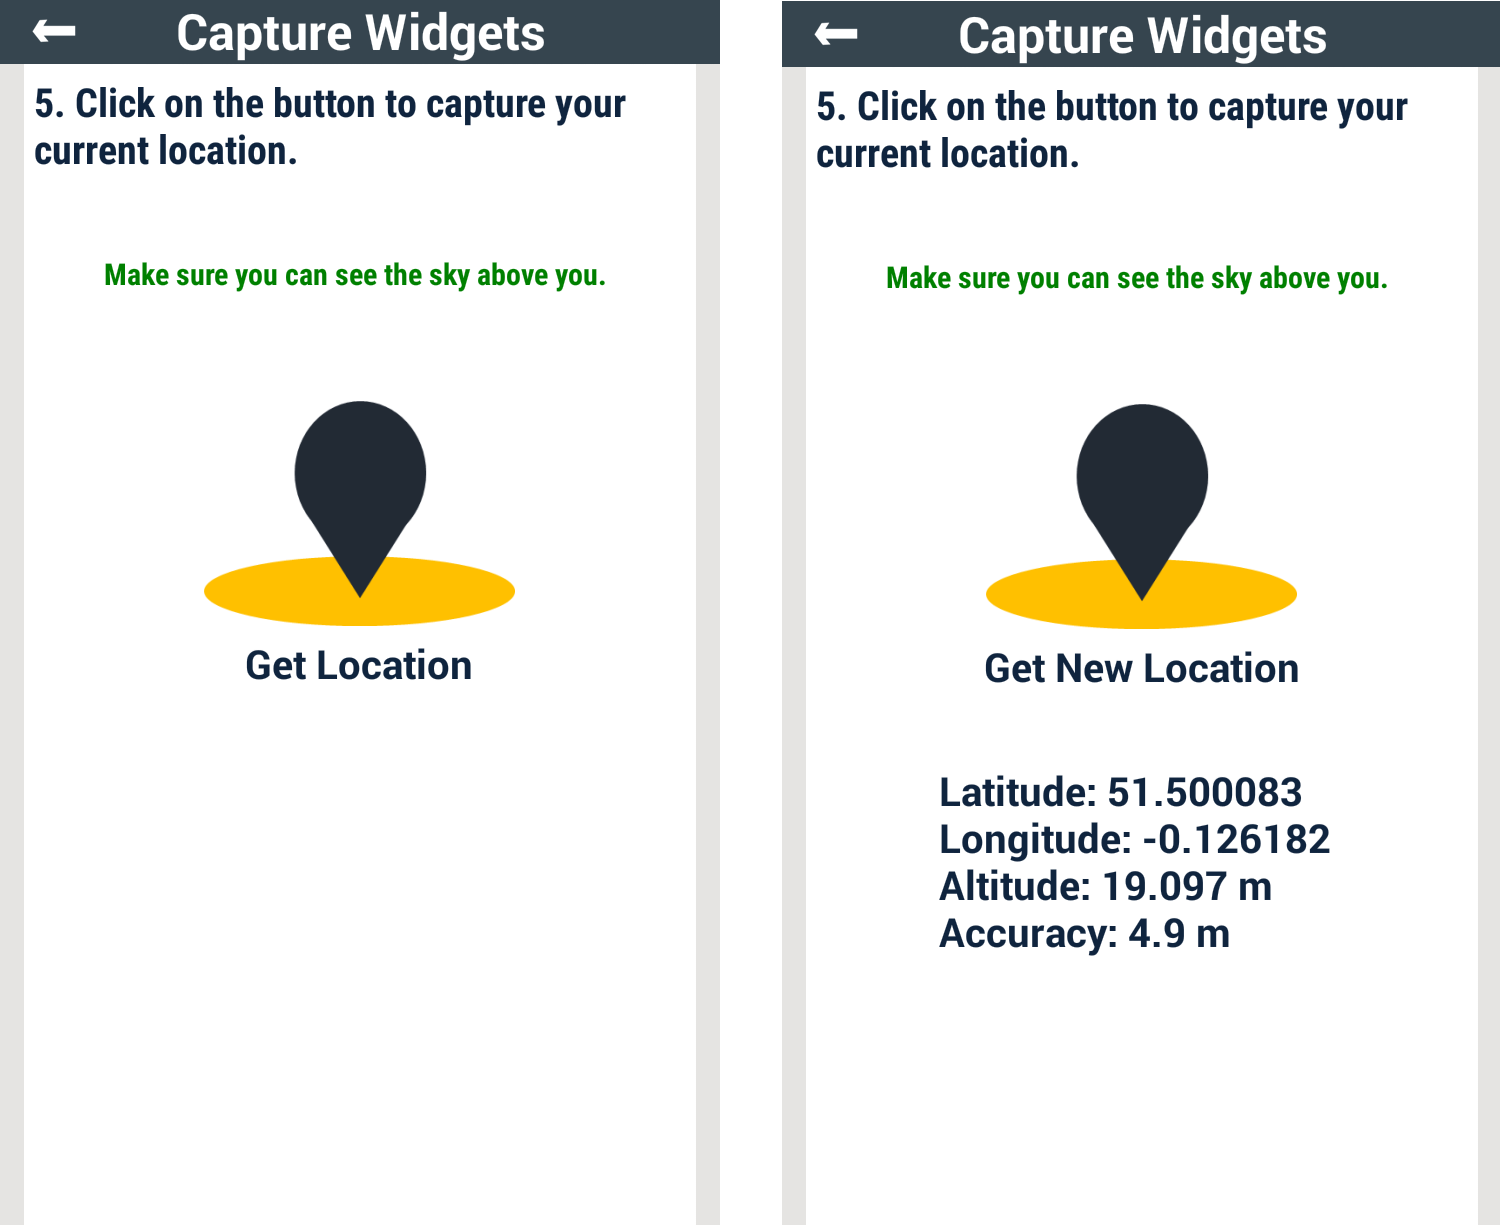
As can be seen in the code block below, the screenwidgetType is set to location.
/*

{
"mainScreen":  {
"screenID": "My Location",
"screenDisplayArray": [
{
"localeCode": "en",
"screenLabel": "5. Click on the button to capture your current location.
",
"screenHint": "Make sure you can see the sky above you.
"
}],
"screenwidgetType": "location",
"inputRequired": true,
"widgetSchema": "
\"My Location\": {
\"type\": \"object\",
\"properties\":  {
\"longitude\": {
\"type\": \"number\"
},
\"latitude\": {
\"type\": \"number\"
},
\"altitude\": {
\"type\": \"number\"
},
\"accuracy\": {
\"type\": \"number\",
\"maximum\": 5
},
\"bearing\": {
\"type\": \"number\",
\"default\": 0
},
\"provider\": {
\"type\": \"string\"
}
},
\"required\": [\"longitude\", \"latitude\", \"altitude\",
\"accuracy\", \"bearing\", \"provider\"]
}"
}
}
*/
The widgetSchema value is an escaped schema for a JSON object -- My Location, in this example – that has 6 properties, viz; longitude, latitude, altitude, accuracy, bearing and provider. Values for all of these properties are required.
Notice that the schema for the accuracy property allows for an acceptable maximum value of 5. This means that only location values that have an accuracy of 5 meters or less are accepted as valid input for this example form screen. The maximum accuracy value can vary according to what is required by the form designer. The provider property value is an indication of the source of the read location values, e.g., GPS, Mobile Network, WIFI network, etc.
Below is an example of a completed instance of this screen:
/*

{
...,
"My Location":  {
"latitude": 51.500083,
"longitude": -0.126182,
"altitude": 19.097,
"accuracy": 4.90000009536743,
"bearing": 27.179992675781,
"provider": "gps"
}
}

*/
Ongoing Work
It is pertinent to say here that two other capture screens exist, i.e., Video and Audio recording screens, that have not been demonstrated in this chapter. These screen definitions have not yet been completed because some of the parameters are not currently well understood. For example, a Video/Audio recording screen should have parameters or constraints that define the allowable length and quality of recording, recording format, etc. It is currently unclear how to go about defining these parameters and as such, it is difficult to give a precise definition for these screens. As soon as this happens, this chapter will be updated to reflect same. With that said, please find the basic JSON definition for these screens in the code blocks below:
/*

{
"mainScreen":  {
"screenID": "Any Audio",
"screenDisplayArray": [
{
"localeCode": "en",
"screenLabel": "1. Record an audio of your favourite Cold Play song",
"screenHint": "Thank you very much :)"
}],
"screenwidgetType": "audio",
"inputRequired": true,
"widgetSchema": "
\"Any Audio\": {
\"type\": \"object\",
\"properties\":  {
\"fileName\": {
\"type\": \"string\"
},
\"filePath\": {
\"type\": \"string\"
},
\"fileObject\": {
\"type\": \"string\"
}
},
\"required\": [\"fileName\"],
\"minProperties\": 1,
\"maxProperties\": 3,
\"additionalProperties\": false
}"
}
}
*/
/*

{
"mainScreen":  {
"screenID": "Any Video",
"screenDisplayArray": [
{
"localeCode": "en",
"screenLabel": "1. Record a video of your best dance moves",
"screenHint": "C'mon, do it for the vine :)"
}],
"screenwidgetType": "video",
"inputRequired": true,
"widgetSchema": "
\"Any Video\": {
\"type\": \"object\",
\"properties\":  {
\"fileName\": {
\"type\": \"string\"
},
\"filePath\": {
\"type\": \"string\"
},
\"fileObject\": {
\"type\": \"string\"
}
},
\"required\": [\"fileName\"],
\"minProperties\": 1,
\"maxProperties\": 3,
\"additionalProperties\": false
}"
}
}
*/
Next Chapter
- Chapter 7 discusses date and time collection screens.
Point of Interest
The interested reader should follow the form design sections of these walkthroughs and use this GUI tool to learn more about designing forms based on a number of use case scenarios.
History
- 18th July, 2016: First version
- 3rd November, 2016: Made corrections to this work