
Learn Sharepoint step by step in 8 hours - Part 3
1.00/5 (1 vote)
In this article we will learn how to customize Master Pages of SharePoint.
Contents
Learn SharePoint step by step in 8 hours – Hour 3
Introduction
Master Pages (Theory)
Step 1:- Enable SharePoint publishing infrastructure
Step 2:- Know your currently used master page
Theory: - HTML Master Page concept
Step 3:- Creating our own HTML Custom Master page
Step 4:-Convert HTML page to master page
Theory: - Code snippets for master page
Step 5:-Code snippet 1 :- For Dynamic content
Step 6:-Code snippet 2 and 3 :- Vertical & Horizontal menu
Step 7:-Applying logo to the master page
Step 8:-Complete HTML master page
Step 9:-Reuploading the master page
Step 10:- Publish and Apply the master page
Step 11:-Enjoy your final output
What’s next?
To refer to the complete article index of Learn SharePoint step by step please go to the first article click here.
Introduction
In this article we will see how to customize SharePoint master pages.
In case you are new to Learning sharepoint I would recommend you to start from the below 1 hour youtube video

Master Pages (Theory)
Consistency in look and feel is one the most important thing for a website. When you browse professional websites from one page to other page you will always see there is consistency in the structure. For example you can see many professional websites have menus at the left, logo at the top, copy right footer at the bottom and dynamic content displayed in the middle.

SharePoint understands the importance of consistency and implements the same using a concept termed as “MasterPages”. If you have seen our current SharePoint site it already has a master page which has left menu, logo at the top, dynamic content in middle and links at the top.

But now let us say we want to customize the master page as follows:-
- Move the logo to the top i.e. above the top links.
- Move the left menus to the right.
- Keep the top menus as it is.
- And the dynamic content would be displayed in the middle.

Step 1:- Enable SharePoint publishing infrastructure
In order to customize SharePoint master page we need to first enable “SharePoint publishing infrastructure” feature. So click on settings, goto site collection administration and click on site collection features as shown in the below figure.

Once you click on site collection feature you will have list of features in that hunt for “SharePoint server publishing infrastructure” and activate it. By enabling this feature we are now ready to customize SharePoint master page.

Step 2:- Know your currently used master page
But before we proceed we would like to know the master page our SharePoint site is using currently. So go back to site settings and in the look and feel section you should see something called as the “Design manager” as shown in the below figure.
Note :- If you do not see this menu that means the publishing infrastructure is not enabled properly. Do iterate step 1 once again.

To know which master page is used click on “Publish and apply design” and then click on “Assign matter master page to your site based on device channel.”
Let me also talk a bit on device channels. In today’s modern world we have varied devices like mobile, desktop, laptops and so on. Each one of these devices have different screen sizes and we would like to display website differently as per their screen size. This is where device channels helps us. We will see some in-depth labs on device channels later on. For now hold your horses about device channels.


You can see two drop downs “seattle” and “oslo” these are nothing but readymade master pages. By default “seattle” master page is the default master page. Both these master pages are very much alike with some differences in CSS and layouting.
But the biggest difference is “oslo” was designed thinking anonymous access in mind and meant especially for public facing websites while “seattle” needs authentications.

Also let’s see what kind of code “seattle” master page has. Go back to design manager main menu and click on “Edit master pages” -> click on “convert html file to SharePoint MasterPage” as shown in the below figure.

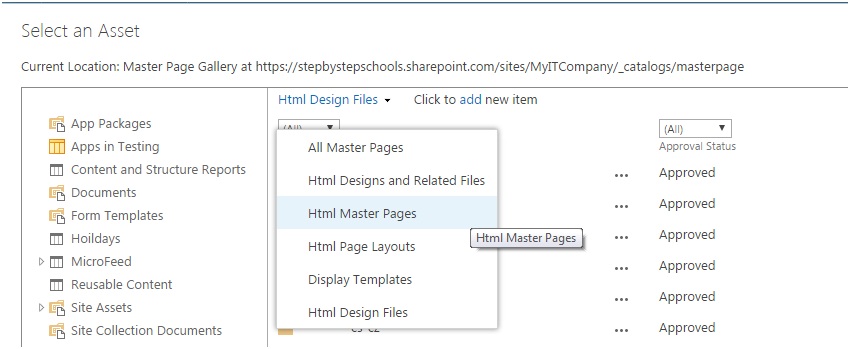
You would then be shown list of files, filter it by “Html Master Pages” as shown in the below figure.

You would then see those readymade master pages “oslo.html” and “seattle.html” as shown in the below figure. Click on “Seattle.html” and download and see the code.

You can see lot of cryptic code in that and changing this master page would be very complex. So how about creating our own master page from scratch and applying to our site.

Theory: - HTML Master Page concept
HTML master page is nothing but a simple HTML file which outlines the structure of SharePoint site. So to create a custom master page we first need to create a simple HTML file which has the initial structure with all place holders and then this HTML file is uploaded to SharePoint.
SharePoint then converts this HTML Master page to SharePoint master page. In this conversion he injects SharePoint code snippets so that this master page can run inside SharePoint environment.
Step 3:- Creating our own HTML Custom Master page
So as discussed in step 1 we would like to create a customized master page as follows:-
- Move the logo to the top i.e. above the top links.
- Move the left menus to the right.
- Keep the top menus as it is.
- And the dynamic content would be displayed in the middle.

So as per the above needs let us add create a simple HTML page (you can use visual studio for this) and create the necessary place holders for our section. You can see in the below HTML code we have a table in which we has three rows and inside that we have four sections:-
- Logo section where we will put our logo image.
- Horizontal menu section where links of horizontal menu will be displayed.
- Page section which will display the current page the user is surfing. This section is dynamic and will change as per user navigation. Other parts would remain constant.
- Vertical menu section where our vertical menu links will be.
So the below HTML page defines our structure for the master page.
<!DOCTYPE html>
<html xmlns="http://www.w3.org/1999/xhtml">
<head>
<title>Welcome to Our Company Portal</title>
</head>
<body>
<table>
<tr><td><img src="" /></td></tr>
<tr><td>Horizontal Menu</td></tr>
<tr><td>Our Page Data</td><td>Vertical Menu</td></tr>
</table>
</body>
</html>
Step 4:-Convert HTML page to master page
In order to convert the HTML page to SharePoint master page we need to upload the above HTML page to SharePoint. So go to design manager section and click on edit master pages and click on “Convert a HTML file to SharePoint Master page” link. In case you are not aware how to go to design manager section read step 1 again.

Click on Add new item and upload the HTML master page.


While uploading the page ensure you select it as the “HTML Master” page.

SharePoint has been around for a long time and master page concept exists right from the start. So if you wish you want your masterpage compatible with previous SharePoint versions you can select the version check box accordingly.
4 :- Check MasterPage compatibility with SharePoint 2010 and less version.
15:- Check MasterPage compatibility with SharePoint 2013.
16 :- Check master page compatibility with SharePoint 2016.
For now we will select all versions as our MasterPage is extremely simple.

Once the master page is added click on insert.

Once the page is inserted it will be seen in draft version as shown in the below figure. Draft version means that the master page is converted but is not alive and cannot be applied to SharePoint site.

Let’s browse our master page. So right click on the page and click open.

When you view the master page you can see all our placeholder sections of the master page. So this ensures that our master page is working and the conversion was successful.

The yellow section is the section which will load and unload the dynamic content of the site while the end user navigates. The comment in that yellow section states that your master page structure should be design around this yellow section.
If you browse all pages you can see the “HTML” master page and the converted “MasterPage” from sharepoint.

Theory: - Code snippets for master page
Our HTML master page is dead until we do not put SharePoint code snippets in the placeholder sections. Currently we need four things ( 3 code snippets and logo) as below :-
- Code snippet 1:- We need the code snippets which loads the dynamic part of the master page when the user navigates from one page to other.
- Code Snippet 2 :- We need code snippet for vertical menu
- Code snippet 3:- We need code snippet for horizontal menu.
- We also need to fix the logo by uploading the image and linking the same in the master page.
Step 5:-Code snippet 1 :- For Dynamic content
So let’s first get the code snippet for the dynamic content section. Code snippet for dynamic section will be found in the SharePoint master page which was created from the HTML master page.
In order get that master page go to settings and click on master pages link as shown in the below figure.

You can see that we have two files of our master page one is the “MyCustomMasterPage.html” which is the HTML master page we have created and the second one is the “MyCustomMasterPage.master” which is created by SharePoint.
The dynamic code snippet is in the “.master” file.

So let’s right click and download the file.

When you open the “.Master” file you will see a “div” tag with name “ContentPlaceHolderMain” which has some code snippets. This code snippet is responsible for loading the dynamic section.

So copy the above “div” tag and move it to the dynamic placeholder section of your HTML master page as shown in the code snippet below.
<body>
<table>
<tr><td>This placeholder for image</td></tr>
<tr><td>This placeholder for Vertical menu</td></tr>
<tr><td><div data-name="ContentPlaceHolderMain">
<SharePoint:AjaxDelta ID="DeltaPlaceHolderMain" IsMainContent="true" runat="server">
<asp:ContentPlaceHolder ID="PlaceHolderMain" runat="server">
</asp:ContentPlaceHolder>
</SharePoint:AjaxDelta>
</div></td>
<td>This placeholder for Horizontal menu</td></tr>
</table>
</body>
Step 6:-Code snippet 2 and 3 :- Vertical & Horizontal menu
For vertical and horizontal menu code snippet we need to preview you master page. In case you are not aware how to preview master page please read “Step 4:- Convert HTML page to master page” again.
Once you preview master page click on “Snippets” link as shown below.

Once you click on snippets link you will provided with a tool bar and a code snippet section to get the snippet. For vertical code snippet click on vertical icon in the tool bar and copy the code snippet and place it in the appropriate placeholder.
And repeat the same for horizontal menu and put the code snippet in the respective place holder.


Step 7:-Applying logo to the master page
Now the final thing we need to fix our logo. So grab a good image and upload the same from the master page section. Go to master pages and click on add image as shown below.

Put a nice name to the image.

Once the image is uploaded browse to the image and grab the image URL.


But the image url in the image place holder as shown in the below code snippets.
<table>
<tr><td><img
src="https://stepbystepschools.sharepoint.com/sites/MyITCompany/_catalogs/
masterpage/Preview%20Images/QuestPond.jpg" /></td></tr>
Step 8:-Complete HTML master page
The final code of the HTML master page would look something as shown below. I have commented the section start and end in the code.
<!DOCTYPE html>
<html xmlns="http://www.w3.org/1999/xhtml">
<head>
<title>Welcome to Our Company Portal</title>
</head>
<body>
<table>
<tr><td>
<!—Image section starts -- >
<imgsrc="https://stepbystepschools.sharepoint.com/sites/MyITCompany/_catalogs/
masterpage/Preview%20Images/QuestPond.jpg" />
<!—Image section ends -- >
</td></tr>
<!—Top navigation section starts -- >
<tr><td><div data-name="TopNavigationNoFlyoutWithStartNode">
<!--CS: Start Top Navigation Snippet--><!--SPM:<%@Register
Tagprefix="SharePoint" Namespace="Microsoft.SharePoint.WebControls"
Assembly="Microsoft.SharePoint, Version=16.0.0.0, Culture=neutral,
PublicKeyToken=71e9bce111e9429c"%>--><!--MS:<SharePoint:AjaxDelta
ID="DeltaTopNavigation" BlockElement="true" CssClass="ms-displayInline ms-
core-navigation ms-dialogHidden" runat="server">--><!--PS: Start of READ-
ONLY PREVIEW (do not modify)--><!--PE: End of READ-ONLY PREVIEW--><!--
MS:<SharePoint:DelegateControl runat="server"
ControlId="TopNavigationDataSource" Id="topNavigationDelegate">--><!--PS:
Start of READ-ONLY PREVIEW (do not modify)--><span
style="display:none"><table cellpadding="4" cellspacing="0"
style="font:messagebox;color:buttontext;background-color:buttonface;border:
solid 1px;border-top-color:buttonhighlight;border-left-
color:buttonhighlight;border-bottom-color:buttonshadow;border-right-
color:buttonshadow"><tr><td nowrap="nowrap"><span style="font-
weight:bold">PortalSiteMapDataSource</span> -
topSiteMap</td></tr><tr><td></td></tr></table></span><!--PE: End of READ-
ONLY PREVIEW--><!--MS:<Template_Controls>--><!--MS:<asp:SiteMapDataSource
ShowStartingNode="True" SiteMapProvider="SPNavigationProvider"
ID="topSiteMap" runat="server" StartingNodeUrl="sid:1002">--><!--
ME:</asp:SiteMapDataSource>--><!--ME:</Template_Controls>--><!--
ME:</SharePoint:DelegateControl>--><a name="startNavigation"></a><!--
MS:<asp:ContentPlaceHolder ID="PlaceHolderTopNavBar" runat="server">--><!--
MS:<SharePoint:AspMenu ID="TopNavigationMenu" runat="server"
EnableViewState="false" DataSourceID="topSiteMap"
AccessKey="<%$Resources:wss,navigation_accesskey%>"
UseSimpleRendering="true" UseSeparateCss="false" Orientation="Horizontal"
StaticDisplayLevels="2" AdjustForShowStartingNode="false"
MaximumDynamicDisplayLevels="0" SkipLinkText="">--><!--PS: Start of READ-
ONLY PREVIEW (do not modify)--><link rel="stylesheet" type="text/css"
href="/_layouts/15/1033/styles/menu-21.css" /><div
id="zz7_TopNavigationMenu" class=" noindex ms-core-listMenu-horizontalBox"
onclick="return AjaxNavigate$OnClickHook(event, this);"><ul
id="zz9_RootAspMenu" class="root ms-core-listMenu-root static"><li
class="static"><a class="static menu-item ms-core-listMenu-item ms-
displayInline ms-navedit-linkNode"
href="/sites/MyITCompany/SitePages/DevHome.aspx" accesskey="1"><span
class="additional-background ms-navedit-flyoutArrow"><span class="menu-
item-text">MyITCompany</span></span></a><ul class="static"><li
class="static"><a class="static menu-item ms-core-listMenu-item ms-
displayInline ms-navedit-linkNode" href="/sites/MyITCompany/HR"><span
class="additional-background ms-navedit-flyoutArrow"><span class="menu-
item-text">HR</span></span></a></li><li class="static"><a class="static
menu-item ms-core-listMenu-item ms-displayInline ms-navedit-linkNode"
href="/sites/MyITCompany/Accounts"><span class="additional-background ms-
navedit-flyoutArrow"><span class="menu-item-
text">Accounts</span></span></a></li></ul></li><li class="static ms-
verticalAlignTop ms-listMenu-editLink ms-navedit-editArea"><span class="ms-
navedit-editSpan" id="zz7_TopNavigationMenu_NavMenu_Edit"><a
id="zz7_TopNavigationMenu_NavMenu_EditLinks" class="ms-navedit-
editLinksText" href="#" onclick="g_QuickLaunchMenu = null;
EnsureScriptParams('quicklaunch.js', 'QuickLaunchInitEditMode',
'zz7_TopNavigationMenu', 1, 0, 0, '\u002fSITES\u002fMYITCOMPANY');
cancelDefault(event); return false;" title="Edit Links"><span class="ms-
displayInlineBlock"><span class="ms-navedit-editLinksIconWrapper ms-
verticalAlignMiddle"><img class="ms-navedit-editLinksIcon"
src="/_layouts/15/images/spcommon.png?rev=43" alt="Edit Links"
/></span><span class="ms-metadata ms-verticalAlignMiddle">Edit
Links</span></span></a><span id="zz7_TopNavigationMenu_NavMenu_Loading
class="ms-navedit-menuLoading ms-hide"><a
id="zz7_TopNavigationMenu_NavMenu_GearsLink" href="#" onclick="HideGears();
return false;" title="This animation indicates the operation is in
progress. Click to remove this animated image."><img
id="zz7_TopNavigationMenu_NavMenu_GearsImage"
src="/_layouts/15/images/loadingcirclests16.gif?rev=43" alt="This animation
indicates the operation is in progress. Click to remove this animated
image." /></a></span><div id="zz7_TopNavigationMenu_NavMenu_ErrorMsg"
class="ms-navedit-errorMsg"></div></span></li></ul></div><!--PE: End of
READ-ONLY PREVIEW--><!--ME:</SharePoint:AspMenu>--><!--
ME:</asp:ContentPlaceHolder>--><!--PS: Start of READ-ONLY PREVIEW (do not
modify)--><!--PE: End of READ-ONLY PREVIEW--><!--
ME:</SharePoint:AjaxDelta>--><!--CE: End Top Navigation Snippet-->
</div>
<!—Top navigation section end -- >
</td></tr>
<!—Dynamic section starts -- >
<tr><td><div data-name="ContentPlaceHolderMain">
<SharePoint:AjaxDelta ID="DeltaPlaceHolderMain" IsMainContent="true"
runat="server">
<asp:ContentPlaceHolder ID="PlaceHolderMain" runat="server">
<div class="DefaultContentBlock" style="border:medium black solid;
background:yellow; color:black; margin:20px; padding:10px;">
This div, which you should delete, represents the content
area that your Page Layouts and pages will fill. Design your Master Page
around this content placeholder.
</div>
</asp:ContentPlaceHolder>
</SharePoint:AjaxDelta>
</div>
<!—Dynamic section ends -- >
</td>
<!—vertical section starts -- >
<td><div data-name="QuickLaunch">
<!--CS: Start Vertical Navigation Snippet--><!--SPM:<%@Register
Tagprefix="SharePoint" Namespace="Microsoft.SharePoint.WebControls
Assembly="Microsoft.SharePoint, Version=16.0.0.0, Culture=neutral,
PublicKeyToken=71e9bce111e9429c"%>--><!--SPM:<%@Register
Tagprefix="PublishingNavigation"
Namespace="Microsoft.SharePoint.Publishing.Navigation"
Assembly="Microsoft.SharePoint.Publishing, Version=16.0.0.0,
Culture=neutral, PublicKeyToken=71e9bce111e9429c"%>--><div id="sideNavBox"
class="ms-dialogHidden ms-forceWrap ms-noList"><!--MS:<SharePoint:AjaxDelta
ID="DeltaPlaceHolderLeftNavBar" BlockElement="true" CssClass="ms-core-
navigation" runat="server">--><!--MS:<asp:ContentPlaceHolder
ID="PlaceHolderLeftNavBar" runat="server">--><!--MS:<asp:ContentPlaceHolder
ID="PlaceHolderLeftNavBarTop" runat="server">--><!--
ME:</asp:ContentPlaceHolder>--><!--MS:<asp:ContentPlaceHolder
ID="PlaceHolderQuickLaunchTop" runat="server">--><!--
ME:</asp:ContentPlaceHolder>--><!--MS:<asp:ContentPlaceHolder
ID="PlaceHolderLeftNavBarDataSource" runat="server">--><!--
ME:</asp:ContentPlaceHolder>--><!--MS:<asp:ContentPlaceHolder
ID="PlaceHolderCalendarNavigator" runat="server">--><!--
ME:</asp:ContentPlaceHolder>--><!--MS:<asp:ContentPlaceHolder
ID="PlaceHolderLeftActions" runat="server">--><!--
ME:</asp:ContentPlaceHolder>--><!--MS:<SharePoint:SPNavigationManager
ID="QuickLaunchNavigationManager" runat="server"
QuickLaunchControlId="v4QuickLaunchMenu" ContainedControl="QuickLaunch"
EnableViewState="false">--><!--MS:<SharePoint:DelegateControl
runat="server" ControlId="QuickLaunchDataSource">--><!--
MS:<Template_Controls>--><!--
MS:<PublishingNavigation:PortalSiteMapDataSource runat="server"
ID="SiteMapDS" SiteMapProvider="CurrentNavigation" EnableViewState="false"
StartFromCurrentNode="true" ShowStartingNode="false"
TrimNonCurrentTypes="Heading">--><!--
ME:</PublishingNavigation:PortalSiteMapDataSource>--><!--
ME:</Template_Controls>--><!--ME:</SharePoint:DelegateControl>--><!--
MS:<SharePoint:AspMenu ID="V4QuickLaunchMenu" runat="server"
EnableViewState="false" DataSourceId="QuickLaunchSiteMap"
UseSimpleRendering="true" Orientation="Vertical" StaticDisplayLevels="3"
AdjustForShowStartingNode="true" MaximumDynamicDisplayLevels="0"
SkipLinkText="">--><!--ME:</SharePoint:AspMenu>--><!--
ME:</SharePoint:SPNavigationManager>--><!--
MS:<SharePoint:SPNavigationManager ID="TreeViewNavigationManagerV4"
runat="server" ContainedControl="TreeView" CssClass="ms-tv-box">--><!--
MS:<SharePoint:SPLinkButton runat="server"
NavigateUrl="~site/{0}/viewlsts.aspx" ID="idNavLinkSiteHierarchyV4"
Text="<%$Resources:wss,treeview_header%>"
accesskey="<%$Resources:wss,quiklnch_allcontent_AK%>" CssClass="ms-
tv-header">--><!--ME:</SharePoint:SPLinkButton>--><!--
MS:<SharePoint:DelegateControl runat="server"
ControlId="TreeViewAndDataSource">--><!--MS:<Template_Controls>--><!--
MS:<SharePoint:SPHierarchyDataSourceControl runat="server"
D="TreeViewDataSourceV4" RootContextObject="Web"
IncludeDiscussionFolders="true">--><!--
ME:</SharePoint:SPHierarchyDataSourceControl>--><!--
MS:<SharePoint:SPRememberScroll runat="server"
ID="TreeViewRememberScrollV4"
onscroll="javascript:_spRecordScrollPositions(this);" style="overflow:
auto;">--><!--MS:<SharePoint:SPTreeView ID="WebTreeViewV4" runat="server"
ShowLines="false" DataSourceId="TreeViewDataSourceV4" ExpandDepth="0"
SelectedNodeStyle-CssClass="ms-tv-selected" NodeStyle-CssClass="ms-tv-item"
SkipLinkText="" NodeIndent="12" ExpandImageUrl="/{0}/images/tvclosed.png"
ExpandImageUrlRtl="/{0}/images/tvclosedrtl.png"
CollapseImageUrl="/{0}/images/tvopen.png"
CollapseImageUrlRtl="/{0}/images/tvopenrtl.png"
NoExpandImageUrl="/{0}/images/tvblank.gif">--><!--
ME:</SharePoint:SPTreeView>--><!--ME:</SharePoint:SPRememberScroll>--><!--
ME:</Template_Controls>--><!--ME:</SharePoint:DelegateControl>--><!--
ME:</SharePoint:SPNavigationManager>--><!--MS:<asp:ContentPlaceHolder
ID="PlaceHolderQuickLaunchBottom" runat="server">--><hr /><!--
MS:<SharePoint:ClusteredSPLinkButton ID="idNavLinkViewAllV4" runat="server"
Permissions="ViewFormPages" NavigateUrl="~site/{0}/viewlsts.aspx"
Text="<%$Resources:wss,quiklnch_allcontent_short%>"
accesskey="<%$Resources:wss,quiklnch_allcontent_AK%>" CssClass="ms-
core-listMenu-item">--><!--ME:</SharePoint:ClusteredSPLinkButton>--><!--
ME:</asp:ContentPlaceHolder>--><!--ME:</asp:ContentPlaceHolder>--><!--
ME:</SharePoint:AjaxDelta>--></div><!--CE: End Vertical Navigation Snippet-->
</div>
<!—vertical section ends -- >
</td></tr>
</table>
</body>
</html>
Step 9:-Reuploading the master page
Now that we have made so many changes in the HTML master page it’s time to upload the changed HTML master page. So repeat step 4 and create master page again.
If you view your preview of your master page you should see the following master page with the structure what you wanted. You can see the how the magic of SharePoint code snippets has been sprinkled on our HTML master page.

Step 10:- Publish and Apply the master page
So now that our HTML master page is completed and saved in draft version lets publish and apply the master page.
In order to publish the master page select MyCustomMasterPage.html -> options -> Advance -> Publish as Major version as shown in the below figure.

You can now see that your master page has changed from draft to approved status.

In order to apply master page we need to go to the Design Manager -> Select Publish and Apply Design -> select Assign master page to your site based on device channel.

You can now see the master page in the drop down beside “oslo” and “seattle” master pages. So lets select our master page and apply.

Step 11:-Enjoy your final output
So that completes everything now browse your site and you should see the changed master page has been applied.

What’s next?
In the next article we will see how to add custom fields to list and documents.