
Fun with the Arduino 101 - Genuino 101
The Arduino 101, also known as Genuino 101, is as easy to use as you would expect from an Arduino board. You can use the Arduino IDE, sensor kits, interact with the Arduino community online.
Get access to the new Intel® IoT Developer Kit, a complete hardware and software solution that allows developers to create exciting new solutions with the Intel® Galileo and Intel® Edison boards. Visit the Intel® Developer Zone for IoT.
It’s Christmas ! I must have done something right this year because I had:
- Lots of foie gras (I live in Gers, SouthWest of France, where we make lots of it)
- Crazy warm weather (22C)
- A Very Murray Christmas ( https://www.youtube.com/watch?v=f46ivuCahK4 )
- And … an Arduino 101 board ! (also known as Genuino 101 outside the US)
https://www.arduino.cc/en/Main/ArduinoBoard101
While we digest the foie gras and meditate on global warming, let’s pay with the Arduino 101.

You may have heard of the launch of the Arduino 101 at the Maker Faire Rome earlier this year, I was lucky to be there and it was amazing. https://blog.arduino.cc/2015/10/16/intel-and-banzi-just-presented-arduino-101-and-genuino-101/
First thing to understand about the Arduino 101: it may be small and cheap, but it’s packed with great technologies. 32-bit Intel® Quark™ microcontroller for minimal power consumption, 384 kB of flash memory, 80 kB of SRAM (24kB available for sketches), an integrated DSP sensor hub, Bluetooth* Low Energy radio, and 6-axis combo sensor with accelerometer and gyroscope. All that thanks to the Intel Curie module. http://download.intel.com/newsroom/kits/ces/2015/pdfs/Intel_CURIE_Module_Factsheet.pdf
Today, I’ll try to run the basic Analog/Digital examples, but also focus on the Inertial Monitoring Unit (IMU) and Bluetooth Low Energy (BLE).
Hello World
So, where do we start? First, plug your Arduino 101 board to your computer with a simple USB cable, then download Arduino IDE 1.6.7 https://www.arduino.cc/en/Main/Software and install the required board package with the board manager:


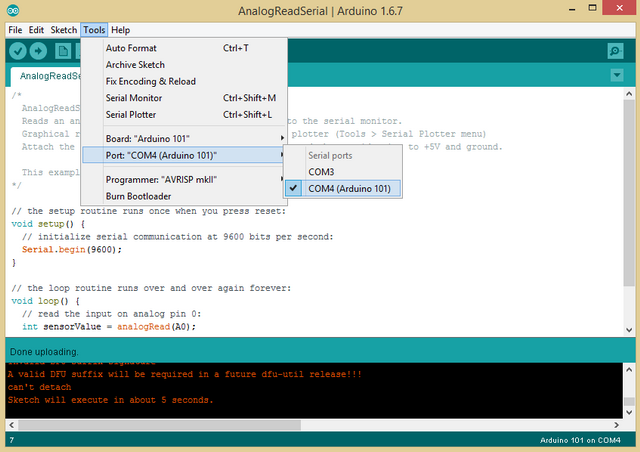
After the installation is complete, you should see a new board "Arduino 101" in the menu:

And the right COM port should be selected:
Now that the software is up-to-date and link established, let’s try a simple example, "blink".
It does not require additional sensors as it is using the on board LED. Load the example from the menu:

Then click on the "upload" button (the arrow):

It’s compiling the code, then uploading over the USB cable to the board. After a few second, the LED on the board should blink. You may want to change the period in the source core and compile-upload to see the difference.
Analog sensor
Blinking the LED was OK, now let’s try to plug some sensors. Today, I’m using the Grove Starter Kit Plus http://www.seeedstudio.com/depot/Grove-starter-kit-plus-Intel-IoT-Edition-for-Intel-Galileo-Gen-2-and-Edison-p-1978.html First plug the extension shield on the Arduino 101.
I’ll start with something simple: using an analog input like a potentiometer ("rotary angle sensor") and read the values in real time.
Plug the potentiometer to the first analog input (A0):

Load the example file from the menu:

Upload and open a "serial monitor" (in the tools menu):

You can now see values changing in real time as you turn the potentiometer.
Next step: open the "analog plotter" (tools menu) and see the plot drawn in real time:

Digital sensor
Some sensors are analog, others are digital. The sensor manufacturer will tell if your sensor is analog or digital and how to use them.
A simple digital sensor in the Grove toolkit is the touch sensor. Let’s plug it on the digital 2 (D2) and load the example file:

When you upload and open a serial monitor, you’ll see 0 if you don’t touch the sensor and 1 if you do. It’s a binary digital sensor.

Inertial Monitoring Unit
Because the Arduino 101 is using the Intel Curie module, you have an Inertial Monitoring Unit (IMU) included. No need for a shield and additional sensors, it’s part of the Intel Curie module.
No need to use a shield, just load the "RawIMUDataSerial" example, upload, open a serial monitor and move the board. You’ll see the 6 degrees of freedom values corresponding to acceleration and gyroscope.
This data can be processed locally to detect things like steps and shocks, as shown in the IMU shock example:

For advanced examples, check the Arduino page : https://www.arduino.cc/en/Tutorial/Genuino101CurieIMUOrientationVisualiser
Bluetooth Low Energy
Bluetooth Low Energy is also included thanks to the Intel Curie module. No need for an additional BLE dongle! And it’s simple to use, too.
Load the "BatteryMonitor" example and plug an analog input like the potentiometer to A0. This code will take the input from the potentiometer and send it as a Bluetooth Low Energy message as a battery level. In BLE, you have message profiles for typical information like battery level or heart rate.
When the example is running, your board is now waiting for Bluetooth Low Energy devices to initiate a pairing. Use you smartphone or laptop (BLE capable !) and pair with the device called "BatteryMonitorScketch":

During the pairing process, you’ll see the device name (Genuino 101):

OK, we have the Arduino 101 paired with our Windows laptop. What’s next ?
You need an app that will use the BLE libraries to get the value from the battery level simulator. I installed "Newbit BLE Tool" in the Windows App Store. Then selected my BLE device and the service with ID "*180f*". 180f is for battery (you have the list on the left):

When the service is selected, scroll right and read the value. You can also subscribe and get new values when they change:

Conclusion
The Arduino 101, also known as Genuino 101, is as easy to use as you would expect from an Arduino board. You can use the Arduino IDE, sensor kits, interact with the Arduino community online.
But it also packs very interesting technologies like the IMU and BLE.
It makes the Arduino 101 a great platform to learn, but also a very powerful platform for professionals to prototype and prepare a connected IoT solution very quickly. When your prototype is working with Arduino 101, you can design a custom product using Intel Curie. It will be the same chip, same wireless as Arduino. Easier, faster, cheaper path from prototyping to production.
Have Fun ! Paul