
An ASP.NET Application using Typescript, AngularJS, RequireJS, AngularJS-BootStrap UI, WebAPI, Entity Framework.
4.83/5 (24 votes)
This article provides simple steps for creating a template for ASP.Net application using AngularJS, RequireJS and Typescript using AMD module system.
Introduction
This is an article about the fullstack development of an application which allows sharing of resources. By resources what I mean is files of most mime types available and articles or opinions to share. Uses various client and server development tools and techniques including Typescript, RequireJS, AMD, AngularJS and several others too.
Background
This article was the result of my search for a similar technical content but no avail. My sincere hope is that at the end of this article you will be able to combine a minimum of AngularJS,Typescript and RequireJS to have a working template. The application part of this article is developed using Visual Studio 2015 Community Edition.
Most of the coding practices in this article assumes you have a comfortable command over Visual Studio and have developed ASP.Net MVC projects, WebAPI and Entity Framework before. The reason is to focus more on the AngularJS, RequireJS and Typescript development and not going to the details of ASP.Net and WebAPI or SQL coding.
Steps for Developing the Template
The article is divided into steps describing units of work. Each step contains explanation of Visual Studio use along with pictures and if any code that is relevant to that part in the step. Sometimes code may be given as part of the pictures and you need to look at the picture to edit the code yourself. You will see more pictures that gives you ideas of what to do than reading a lot.
This article is not about Object Oriented Design, Database normalizations, or how to do effective modularizing of your client code into modules and naming them.
The goal of this article is to provide a working prototype of mainly three client side frameworks/language/libraries. They are Typescript, AngularJS and RequireJS. All others are introduced as a means of achieving the goal.
Here is a list of tools, languages , packages and the version in use for the underlying application.
- Visual Studio 2015 Community Edition.
- .Net 4.6.1
- Microsoft ASP.Net MVC 5
- Microsoft ASP.Net WebAPI 2.1
- AngularJS 1.4.9
- Twitter bootstrap 3.0.0
- RequireJS 2.1.22
- TypeScript 1.7
- Angularjs.TypeScript.DefinitelyTyped 5.2.1
- Nuget Package Manager
- EntityFramework 6.1.3
- Angular.UI.Bootstrap 1.1.1
- C#
- Microsoft SQLServer
Eventhough the list is long, some of these items are very easy to use with the help of Visual Studio template and code generators.
Here are some links for some of the topics of interest.
- ASP.NET MVC | The ASP.NET Site
- ASP.NET Web API | The ASP.NET Site
- Entity Framework | The ASP.NET Site
Let us start by going through Step 1.
Step 1
The goal of this step is to have a single page web application (SPA). If any tools or packages required are missing, you might need to add them to your Visual Studio Edition before the end of this step. At the end of this step, you can exceute or debug the project to show a web page in your browser without any content in it.
Open Visual Studio and start a new ASP.Net Web Application project. You may name the project of your choice. As you can see, I am using .Net Framework 4.6.1. There is not much of a hard dependency on the version as it might work for lower versions. I haven't tested that though.

I am selecting an empty template with support for WebApi. This project uses MVC framework only for namesake and I will show you, how Visual Studio automatically add suport for MVC later during development.

Now we are done with the project creation and the below picture shows the resulting folder structure of the project.

Next I am adding a local SQLServer Database to the project. Right click on the project in the solution explorer and navigate through the menu to add a new item. Select Data on the installed templates on the left side and choose SQLServer Database. Give a name of your choice. Click "Add" button to add the database.

The wizard will ask the location of the database file and accept App_Data as the location since it provides ASP.Net default security for the folder.

The Database created above is not used until Step 3. The reason for including it here is to have a basic Web Application ready by the end of this step.
Next is to add an MVC empty controller. Keep in mind that we did not add any support for MVC while creating the project. So during this controller addition, Visual Studio must add the necessary folders, references, and files to the project. The controller only works as a means of opening the default view and don't include any read/write actions or using the Entity Framework to do any database operations.

The controller is named as LoginController. The name is important and if you name it anything else, the RouteConfig file need to be edited accordingly below.

You can click "Add" and unless there are no issues with the Visual Studio setup, you should get the controller added. There could be scenarios where you may get some error related to MVC framework support addition.
(In that error scenario, it will be possible to circumvent the visual studio process and manually add the folders, edit the web.config file inside the view folder and create and add the view before adding the controller. If any such thing happens, you may add some comments, and I can provide alternate steps to overcome the problems. Another step is to start from scratch again and create a brand new project and repeat the steps.)
Once the MVC controller is added, you can see the resulting folder structure as below. There are some files and folders not required for the AngularJS,Typescript and RequireJS template and we can remove them in the next substeps.

The "Shared" folder, the layout and error html files are not needed since this is a SPA (single page application).
Some of the javascript files inside Scripts folder are also not required and they can be removed later when you deal with the Nuget package manager.
When the controller is added, a readme file is opened in the source editor window. The steps in that file are followed to get default routing is working for both MVC and WebApi. The WebApi config registration must be before the MVC routing support is added.

Here is the resulting code content of the Global.asax.cs file.
using System.Web.Mvc;
using System.Web.Routing;
using System.Web.Http;

namespace ShareIt
{
    public class WebApiApplication : System.Web.HttpApplication
    {
        protected void Application_Start()
        {
            AreaRegistration.RegisterAllAreas();
            GlobalConfiguration.Configure(WebApiConfig.Register);
            RouteConfig.RegisterRoutes(RouteTable.Routes);
            FilterConfig.RegisterGlobalFilters(GlobalFilters.Filters);
        }
    }
}
Right click on the "Shared" folder and select the "Delete" menu item.

We don't need to bundle any javascript or css files as we are dependent on RequireJS to load the modules we needed and also use Typescripts importing of modules as and when required. We also use AngularJS directives in the last step to pull some html templates which is provided free as part of the AngularJS-UI-Bootstrap package. If you want to see the downloading of the files in action use the Development tools by clicking F12 and see them while the pages are loading.
Next delete the BundleConfig.cs file from the "App_Start" folder.

Delete the ViewStart.cshtml next.

The RouteConfig.cs file is edited to have the default controller set. If you don't set this, the application won't be able to route the traffic to the correct controller and may end up in an error page.

Here is the code in the RouteConfig.cs file after it is edited.
namespace ShareIt
{
    public class RouteConfig
    {
        public static void RegisterRoutes(RouteCollection routes)
        {
            routes.IgnoreRoute("{resource}.axd/{*pathInfo}");

            routes.MapRoute(
                name: "Default",
                url: "{controller}/{action}/{id}",
                defaults: new { controller = "Login", action = "Index", id = UrlParameter.Optional }
            );
        }
    }
}
If you get any code warnings, add the "using" using the intellisense.
Right click on the "Login" folder and add an HTML page. Name the page as Index.cshtml. Since this is an MVC project, the extension expected is cshtml, but the content of this file will not have any Razor syntax in it.

We modify the content of the head as follows. The body will be added in Step 2 of this article.

<!DOCTYPE html>
<html>
<head>
    <meta charset=utf-8 />
    <meta http-equiv=X-UA-Compatible content="IE=edge">
    <meta name=viewport content="width=device-width, initial-scale=1">
    <link rel="Shortcut Icon" type="image/ico" href="~/Content/image/favicon.ico">
    <title>Share It</title>
    <link href="~/Content/bootstrap.css" rel="stylesheet" />
    <link href="~/Content/Site.css" rel="stylesheet" />
</head>
<body>

</body>
</html>
Step 2
This step starts with adding the required Nuget packages for Angular, RequireJS, DefintelyTyped for Angular, Typescript support and bootstrap.
Right click on the project in Solution Explorer and open the Nuget Package Manager window. We need to search for the packages and for making it easier, do not open the console and install using the command prompt. If you know the package names and versions in advance, you are free to follow that path. I will post the content of the packges.config later at the end of this step so that advanced users may use the console instead.
Select the "Browse" tab and type requirejs. Install RequireJS v2.1.22 as shown.

Next we are installing the Typescript definitions for RequireJS. A typescript project looks for definitions as classes and not as traditional javascript functions. The type-definition files provide these definitions. Download and install requirejs.TypeScript.DefinitelyTyped package v0.2.9 now.

Once the package is installed, a new dialog will come up asking for adding the support for typescript in your project. You need to answer "Yes" for this dialog so that all typescript typings for all the javascript libraries included are installed by the package manager.

Next add the AngularJS core package. We don't need to add all of the AngularJS modules but only selective ones like core, routing and sanitize which is enough for this project.

Next download and install the routing module.

Download and install Sanitize which is required as part of some advance Angular support later in the steps.

It is time to add the typescript definitions for the angular packages now.

We are adding some AngularUI components like Accordian and Collapse later in the last step. Add the AngularUI Bootstrap package.

Next two are very important parts and without it, the project will not build and I could see a lot of searches in Google for how to solve these build errors. The errors are because of the version that is installed as default and the update is a must. Type jquery in the browse tab of Nuget package manager and install the typescript definitely typed for jquery. Angular uses these jquery definitions.

Update the installed jquery version to the stable 2.2.0.

As promised in the beginning of this step, the package.config file image is as below. Some of the existing packages like modernizer are removed.

It is time to add some typescript code to the project.
Right click on the "Scripts" folder in Solution Explorer and add a new folder named "appScripts" now. All the typescript code for the angular controllers, services and routing will reside here. I could have added separate folders for controllers and other artifacts but as I said in the beginning of this article, what we need is just a prototype and folder structure is not a goal.

Right click on "Scripts" folder and add a new typescript file as shown below. Let the name of the file be main.ts.

Drag and drop "angular.d.ts" and "angular-route.d.ts" from inside the typings/angularjs folder to the main.ts file opened in the source editor as below.

Add a new typescript file "mainControllers.ts" inside "appScripts" folder. This is to define the collection of controllers that will be used in the application. In this step there will be only a single controller called MainController and its responsibility is trivial like adding a couple of variables to the $scope. (The code is formatted as javascript since no typescript formatting is available.)
This typescript file exports a class called mainControllers to any other typescript file which can import this class and instantiate it to create a new object of its type and invoke publicly exposed methods in it. Inside the constructor of this class, a new angular module named "mainControllers" is created. This module has a single controller "MainController" which will be used to inject the scope and populate the scopes variables to be used in the view.
Add the content of the file as follows.
"use strict";

export class mainControllers {
    constructor() {
        var app = angular.module("mainControllers", []);

        app.controller('MainController', ($scope, $location) => {
            $scope.name = "John";
            $scope.lastName = "Doe";
        });
    }
}
Add a new typescript file "shareApp.ts" inside "appScripts" folder. Copy the content of the file as below.
"use strict";
import mainCtrlsModule = require("mainControllers");

export class shareApp {
    constructor() {
        var ngApp = angular.module('shareApp', ["ngRoute", "ngSanitize", "ui.bootstrap", "mainControllers"]);
        var mainCtrls = new mainCtrlsModule.mainControllers();
    }
}
As mentioned before we use RequireJS to specify the module and call it "mainCtrlsModule". We instantiate the mainControllers class from it. The application module that we are using is "shareApp" and we are injecting "ngRoute", "ngSanitize", "ui.bootstrap" and "mainControllers" to the ngApp module we created. The picture gets more clear when we modify the main.ts to include more code in it. Here is the code to be added to the main.ts file.
requirejs.config({
    baseUrl: "Scripts/appScripts",
    paths: {
        "jquery": "../jquery-2.2.0.min",
        "bootstrap": "../bootstrap",
        "app": "./shareApp",
        "angular": "../angular",
        "ngRoute": "../angular-route",
        "ngSanitize": "../angular-sanitize",
        "mainCtrls": "./mainControllers",
        "ui.bootstrap": "../angular-ui/ui-bootstrap-tpls"
    },
    shim: {
        "ngRoute": ['angular']
        "ngSanitize": ['angular'],
        "ui.bootstrap": ['angular'],
        "bootstrap": ['jquery']
    }
});

requirejs(["app", "bootstrap", "angular", "ngRoute", "ngSanitize", "ui.bootstrap"], (app) => {
    var shareApp = new app.shareApp();

    angular.element(document).ready(() => {
        angular.bootstrap(document, ['shareApp']);
    });
});
The content added now to the main.ts file does the RequireJS module definition and dependancy management.
In the config call, the base folder where the code for the application resides is specified. The paths below lists all the code paths and they are relative to the baseUrl folder specified. The shim is used to mention about the dependencies of each module. For example, bootstrap is dependent on jquery. In the main page, when responsive layout is used and when the menus are collapsed, a click will expand it only when bootstrap javascript code calls the jquery code. Similarly the angular-route module is dependant on angular module.
We are creating the main requirejs object by passing the app module as argument and creating an instance of shareApp class. We don't specify ng-app in the html file. This is because, the routing will not be loaded correctly by the time the document is ready. So we do a manual bootstrap of angular only when the HTML document is ready.
In this step there is no routing involved and we might use ng-app angular directive but for preparing for Step 3, the manual bootstrap is included here.
Next part is the modification of the index.cshtml file.
Before the end of the head section, we add the following
<script data-main="/Scripts/main" src="~/Scripts/require.js"></script>
This is like adding a normal javascript file reference to any html file. The data-main is the important part here. What it is saying is the RequireJS should look inside a file called main.js in "Scripts" folder to get more information about the configuration and the initialization. Even though we added "main.ts" which is a typescript file, the typescript compiler converts it to javascript file.
We will now add some menu items and default angular bindings for the trivial scope variables added. The resulting index.cshtml file will be like below.
<!DOCTYPE html>
<html>
<head>
    <meta charset=utf-8 />
    <meta http-equiv=X-UA-Compatible content="IE=edge">
    <meta name=viewport content="width=device-width, initial-scale=1">
    <title>Share It</title>
    <link href="~/Content/bootstrap.css" rel="stylesheet" />
    <link href="~/Content/Site.css" rel="stylesheet" />
    <script data-main="/Scripts/main" src="~/Scripts/require.js"></script>
</head>
<body  ng-controller="MainController as ctrl">
    <div class="navbar navbar-inverse navbar-fixed-top center">
        <div class="navbar-inner">
            <div class="container center">
                <div class="navbar-header">
                    <button type="button" class="navbar-toggle collapsed" data-toggle="collapse" data-target="#navbar" aria-expanded="false" aria-controls="navbar">
                        <span class="sr-only">Toggle navigation</span>
                        <span class="icon-bar"></span>
                        <span class="icon-bar"></span>
                        <span class="icon-bar"></span>
                    </button>
                    <a class="navbar-brand" href="/">
                        <span class="color-white">Share It</span>
                    </a>
                </div>
                <div id="navbar" class="collapse navbar-collapse">
                    <ul class="nav navbar-nav">
                        <li><a href="/">Login</a></li>
                        <li><a href="/Register">Register</a></li>
                        <li ng-class="{disablea:!ctrl.loggedIn}"><a href="/Buddies" ng-class="{disablea:!ctrl.loggedIn}">Add Buddies</a></li>
                        <li ng-class="{disablea:!ctrl.loggedIn}"><a href="/Share" ng-class="{disablea:!ctrl.loggedIn}">Share</a></li>
                    </ul>
                </div>
            </div>
        </div>
    </div>
    <div id="container" class="container leftrightjustify">
        <p>Name : {{name}}</p>
        <p>LastName : {{lastName}}</p>
    </div>
</body>
</html>
There is a final step before building the project. Right click on the project and open properties.
Go to TypeScript Build property page and select the ECMAScript version as ECMAScript 5. Also specify the module system as AMD. This will enable the export of typescript classes and import of them.

Any build before enabling the module system might end up in build failures. So build the project only after modifying the Typescript Build properties.
Execute or debug to see the page below.

Source code for this step is provided below. It does not contain the project file or database file. They have to be created by following the steps. Some of the package vesrions are new since the original write up is done about 3 months back.
Download ShareIt Step2 Source Code - No project file and DB - 1.5 MB
Step 3
This step has more code to be added unlike the previous two steps.
First is an addition of a CSS3 stylesheet. This is the only style sheet for this project and includes styles required for the UI elements to be added in the next step.
Right click on the "Content" folder and add a new stylesheet. Name the css file as "main".

Copy the following content to the main.css file and save.
html, body {
    width: 100%;
    height: 100%;
    color: #004989;
    -moz-user-select: none;
    -webkit-user-select: none;
    -ms-user-select: none;
    user-select: none;
}

html {
    display: table;
    padding-top: 10em;
    padding-bottom: 7em;
}

head {
    background-image: url(image/favicon.ico);
}

.navbar.center .nav, .navbar.center .nav > li {
    float: none;
    display: inline-block;
    *display: inline;
    *zoom: 1;
    padding-top: 2%;
}

.center .navbar-inner {
    text-align: center;
}

.navbar-brand {
    float: left;
    height: 19%;
}

.navbar-inverse .navbar-brand:focus, .navbar-inverse .navbar-brand:hover {
    outline: none;
    cursor: default;
}

.navbar-inverse .navbar-collapse, .navbar-inverse .navbar-form {
    float: right;
}

.navbar-brand span {
    font: 32px/1.1em Signika,sans-serif;
    text-transform: uppercase;
}

.navbar-inverse {
    background-color: #004989;
}

    .navbar-inverse .navbar-nav > li > a:focus, .navbar-inverse .navbar-nav > li > a:hover {
        color: #fff;
        outline: none;
    }

    .navbar-inverse .navbar-nav > li > a:hover {
        background-color: #000;
    }

    .navbar-inverse .navbar-nav > li > a {
        color: #8eafe6;
        text-transform: uppercase;
        font-size: 12px;
    }

.in.navbar-collapse {
    overflow-x: hidden;
}

.footer-sign {
    font-size: xx-small;
    float: right;
}

.footer-desc {
    color: #fff;
    padding-top: 10px;
}
.btn-posn {
    margin-top: 2em;
}

.btn-default {
    color: #fff;
    background-color: #444;
    border-color: #444;
    cursor: pointer !important;
}

    .btn-default.active, .btn-default.focus, .btn-default:active, .btn-default:focus, .btn-default:hover, .open > .dropdown-toggle.btn-default {
        color: #fff;
        background-color: #ADADAD;
        border-color: #ADADAD;
    }

.btn.focus, .btn:focus, .btn:hover {
    color: #333;
    text-decoration: none;
}

input.ng-valid.ng-dirty {
    border: #11f61d 2px solid;
    box-shadow: 2px 2px 2px 2px;
}

[contenteditable].ng-invalid,input.ng-invalid.ng-dirty {
    border: #ee2d12 2px solid;
    box-shadow: 2px 2px 2px 2px;
}

[contenteditable] {
  border: 1px solid black;
  background-color: white;
  min-height: 8em;
  margin-bottom:20px;
}

.resourceCell {
    overflow-y: auto;
    max-height: 150px;
    border: outset 2px #8eafe6;
    box-shadow: 1px 2px 1px 1px #004989;
    border-radius: 5px;
}

.linkCollection{
    width:100%;
}

.linkCollection > a:link {
    background-color: transparent;
    display: block;
    overflow: hidden;
    text-overflow: ellipsis;
    border: 2px #8eafe6 solid;
    border-radius: 5px;
    box-shadow: 2px 2px 2px 2px #004989;
    text-decoration: none !important;
    padding-left: 3px;
    line-height: 2em;
}

.linkCollection>a:visited {
    text-decoration: none !important;
    background-color: #337ab7;
}

.linkCollection > a:hover {
    text-decoration: none !important;
    background-color: #ffd800;
    cursor:pointer;
}

.linkCollection>a:active {
    text-decoration: none !important;
   background-color: #ffd800;
}

.tooltip-inner{
    background-color:#ffd800 !important;
    color:#004989;
}

.disablea{
    cursor:none;
    opacity:0.5;
}
Add the reference to the css file in the main.cshtml file as shown below.

An optional icon file for the application can be added at this point. Create a folder "image" inside "Content" folder and create a file "favicon.ico". This is optional and how to create it can be found from browsing internet.
Now double-click on the mdf file inside "App_Data" folder and open the Server Explorer.

Right click on the Tables and click on the menu item "New Query" to open the SQL query editor window.

In the query editor, paste the following SQL code.
CREATE TABLE [dbo].[Student] (
    [Id]        INT           IDENTITY (1, 1) NOT NULL,
    [FirstName] NVARCHAR (50) NOT NULL,
    [LastName]  NVARCHAR (50) NOT NULL,
    [UserName]  NVARCHAR (8)  NOT NULL,
    [Password]  NVARCHAR (10) NOT NULL,
    PRIMARY KEY CLUSTERED ([Id] ASC),
    UNIQUE NONCLUSTERED ([UserName] ASC)
);

GO

CREATE TABLE [dbo].[Buddy] (
    [Id]        INT IDENTITY (50, 1) NOT NULL,
    [StudentId] INT NOT NULL,
    [BuddyId]   INT NOT NULL,
    PRIMARY KEY CLUSTERED ([Id] ASC),
    UNIQUE NONCLUSTERED ([StudentId] ASC, [BuddyId] ASC)
);

GO

CREATE TABLE [dbo].[Resource] (
    [Id]        INT             IDENTITY (100, 1) NOT NULL,
    [StudentId] INT             NOT NULL,
    [resource]  VARBINARY (MAX) NOT NULL,
    PRIMARY KEY CLUSTERED ([Id] ASC)
);

GO
In Database development, to support the DB principles, I should have made the StudentId in the Buddy table a foreign key of the Student table. Same is true in the case of resource table too. But as I mentioned, there are no Database principles followed here and just want to get the data stored and retrieved for the sake of data.
In the Buddy table, StudentId and BuddyId are unique so that no duplication is allowed. Password is only name sake and not used for login. But some string need to be entered while logging in.
Execute the query so that we have the three tables created.

Now is the time to create the model which followes the tables created in the database. Right click on the "Models" folder and click add new item.

We are adding ADO.Net Entity Data Model and we get all the supporting code for DataContext and reading and writing the application data free from the template generator. Give a name for the model. I use ShareItModel.

Next in the wizard step is to choose the content of the model. I choose Entity Framework Designer. The edmx file is generated and the diagram of all the entities generated can be viewed.

Accept the defaults in the next wizard step as this contains the connection properties to be added in the web.config file.

In the next step, all the three tables created are selected to generate the classes for them and the supporting code to populate them and retrieve data from them.

We can end the wizard and the supporting classes are created. The edmx diagram can be closed as this is not useful and we are not changing it as part of this project.
At this pont the project need to be built. If the project is not built now, adding the WebApi controllers which uses these model classes will not succeed.

Execute or debug the project to see the CSS3 added before came to effect.

The next item is adding WebApi controller. Right click the "Controllers" folder and click on "Controller..". This is to add a new controller. The WebAPI 2 controller with actions using entity Framework is chosen.

Next is to name the controller and choose the model class and the Data context class.

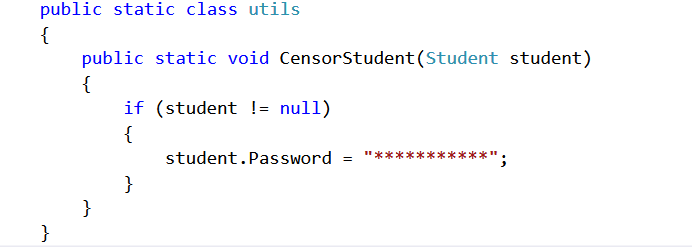
Click "Add" and the resulting code is a file named StudentsController.cs inside Controllers folder. The file need to be modified to support a login api call and to censor the password data. The password is not used in this application for any authentication or authorization, but just to demonstrate it. Add a static class called "utils" and add a method. (Prolonged use of javascript is making me to do mistakes like naming a class without uppercase letter in the beginning).
The index.cshtml file content is modified to remove the trivial scope variables and to add support for the student login.

The code for the additional api call in the Students controller is below. Before the student is returned, it is censored by making the call to utils.CensorStudent.
        // GET api/Students?userName="test"
        [ResponseType(typeof(Student))]
        public IHttpActionResult GetStudent(string userName)
        {
            Student student = db.Students.Where(s => s.UserName == userName).First();
            if (student == null)
            {
                return NotFound();
            }

            utils.CensorStudent(student);
            return Ok(student);
        }
The html code which supports the Login form is pasted below.
<div id="container" class="container leftrightjustify">
        <h3 ng-show="ctrl.loggedIn">{{ctrl.loggedInUser.FirstName + " " + ctrl.loggedInUser.LastName}} is logged in.</h3>
        <h3 ng-show="ctrl.message.length">{{ctrl.message}}</h3>
        <hr />
        <div ng-view></div>
        <div ng-hide="ctrl.loggedIn || ctrl.location.path() !== '/'"  class="col-lg-4 col-lg-offset-4 form-main">
            <h2>Please Login</h2>
            <form name="loginForm" ng-submit="loginForm.$valid && ctrl.login()" novalidate>
                <div class="form-group">
                    <label>User Name :</label>
                    <input type="text" ng-model="ctrl.user.userName" placeholder="Enter user name" class="ng-pristine ng-valid form-control" required>
                </div>
                <div class="form-group">
                    <label>Password:</label>
                    <input type="password" ng-model="ctrl.user.password" placeholder="***********" class="ng-pristine ng-valid form-control" required>
                </div>
                <input type="submit" class="btn btn-primary btn-default" value="Login" required />
            </form>
        </div>
    </div>
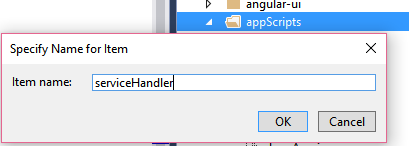
Since the WebAPI controller code is ready, the angular http service calls need to be coded now. A new typescript file is to be added in the "appScripts" folder. Name the file as serviceHandler.ts.
The code in the serviceHandler is below.
"use strict";
import ng = angular;
interface IServiceHandler {
    assign(service: exportService): void;
    validateUser<T>(userName: string): ng.IHttpPromise<T>;
    registerUser<T>(user: T): ng.IHttpPromise<T>;
}

export class exportService {
    $http: any;
    constructor($http: ng.IHttpService) {
        this.$http = $http;
        return this;
    }
}

export class serviceHandler implements IServiceHandler {
    service: exportService;
    constructor() {
    }

    public assign(service: exportService): void {
        this.service = service;
    }

    public validateUser<T>(userName: string): ng.IHttpPromise<T> {
        return this.service.$http({
            method: 'GET',
            url: '/api/Students?userName=' + userName
        });
    };

    public registerUser<T>(user: T): ng.IHttpPromise<T> {
        return this.service.$http({
            method: 'POST',
            url: '/api/Students',
            data: user
        });
    };
}
An interface is declared with the methods to be implemented by any class which implements it. exportService is a class which keeps the injected $http and then assigns the exportService to serviceHandler so that it can be used for subsequent calls.
In Step 2, the mainControllers uses a trivial controller without any name and having a couple of scope variables. Now is the time to add a loginController.ts file in the appScripts folder.

Inside the loginController, the serviceHandler is used to do http calls like Get and Post. The $http is not injected here inside loginController, but by the time this code is executed, Angular already injects $http into serviceHandler. The code is below.
"use strict";
import ng = angular;
import serviceModule = require("serviceHandler");

export class loginController {
    location: ng.ILocationService;
    loggedIn: boolean;
    message: string;
    user: any;
    serviceFactory: serviceModule.serviceHandler;
    loggedInUser: any;

    constructor($location: ng.ILocationService, services: any, serviceClass: serviceModule.serviceHandler) {
        this.serviceFactory = serviceClass;
        this.serviceFactory.assign(services);
        this.location = $location;
        this.loggedIn = false;
        this.message = "";

        this.user = {};
    }

    public login(): void {
        var self = this;
        this.serviceFactory.validateUser(this.user.userName).then(function (response) {
            if (response.status === 200) {
                self.loggedIn = true;
                self.message = "";
                self.loggedInUser = response.data;
            }
        }).catch(function (response) {
            self.loggedIn = false;
            self.message = response.data.Message + ";" + response.data.ExceptionMessage;
        });
        self.user = {};
    };

    public validate(): void {
        if (!this.loggedIn) {
            this.message = "Login before adding buddies or share."
            this.location.path("/");
        }
    };
}
Next is to add a Router. This is a client router and the code and the html are downloaded using XmlHttpRequest. As I said before, use developer tools and see it in action during the pages are loaded when routing happens. Right click the "appScripts" and add a typescript file named configRouter.ts.

The content of the configRouter is below. There are files and controller code to be added for this to function and these are done in the remaining part of this step and in the next step.
"use strict";
import ng = angular;
import ngr = angular.route;
export class configRouter {
    constructor() {
    };

    public configure($routeProvider: ngr.IRouteProvider, $locationProvider: ng.ILocationProvider): void {
        $routeProvider.when("/Register",
            {
                templateUrl: "PartialViews/Register.html",
                controller: "RegisterController"
            }).when("/Buddies", {
                templateUrl: "PartialViews/Buddies.html",
                controller: "BuddiesController"
            }).when("/Share", {
                templateUrl: "PartialViews/Share.html",
                controller: "ShareController"
            }).otherwise({
                redirectTo: "/"
            });

        $locationProvider.html5Mode({
            enabled: true,
            requireBase: false
        });
    }
}
The new files added so far need to be reflected in the paths in the RequireJS main file. See the picture below.
The partial views need to be created now. Create a folder named "PartialViews" in the root level of the project.

Add a new html file with name "Register.html" inside this folder.

The content of this html file is as follows. This content is served as the Angular ng-view content. In otherwords, this html code is inserted inside where the ng-view is specified. That is the reason this file don't follow a standard HTML5 document structure with html, body tags etc.
<div class="col-sm-4 col-sm-offset-4 form-main">
    <h2>Register a new user</h2>
    <form name="registerForm" ng-controller="RegisterController as regCtrl" ng-submit="registerForm.$valid && regCtrl.register()" novalidate>
        <div class="form-group">
            <label>First Name :</label>
            <input type="text" ng-model="regCtrl.user.firstName" class="ng-pristine ng-valid form-control" placeholder="Enter first name" required />
        </div>
        <div class="form-group">
            <label>Last Name :</label>
            <input type="text" ng-model="regCtrl.user.lastName" class="ng-pristine ng-valid form-control" placeholder="Enter last name" required />
        </div>
        <div class="form-group">
            <label>User Name :</label>
            <input type="text" ng-model="regCtrl.user.userName" class="ng-pristine ng-valid form-control" placeholder="Enter user name" required />
        </div>
        <div class="form-group">
            <label>Password:</label>
            <input type="password" ng-model="regCtrl.user.password" class="ng-pristine ng-valid form-control" placeholder="***********" required />
        </div>
        <input type="submit" class="btn btn-primary btn-default" value="Add User" />
    </form>
</div>
Add the controller "RegisterController" next. Right click on the "appScripts" folder to add a new typescript file. Name it "registerController".

The code for the RegisterController is below.
"use strict";
import ng = angular;
import serviceModule = require("serviceHandler");
import loginCtrlModule = require("loginController");

export class registerController {
    location: ng.ILocationService;
    user: any;
    serviceFactory: serviceModule.serviceHandler;
    parent: any;

    constructor($scope: ng.IScope, $location: ng.ILocationService, services: serviceModule.serviceHandler) {
        this.serviceFactory = services;
        this.location = $location;
        this.parent = $scope.$parent;

        this.user = {};
    }

    public register(): void {
        var self = this;
        this.serviceFactory.registerUser(this.user).then(function (response) {
            if (response.status === 201) {
                self.parent.ctrl.message = "";
                self.location.path("/");
            }
        }).catch(function (response) {
            self.parent.ctrl.message = response.data.Message + ";" + response.data.ExceptionMessage;
        });
        self.user = {};
    };
}
Now the wiring of all these controllers, service factory and router need to happen. This will be inside the mainControllers file. The anonymous controller which was doing the two scope variables addition is removed.
The configRouter class instance is created and the public method configure is injected with the $routeProvider. Based on the route, the controller is set and the html template is applied in the client and the view is rendered.
A service is created using the factory and the injected $http is set in the serviceHandler object. The two controllers for now are the loginController and registerController. The parent scope of the register controller is the loginController and is accessed to query the status of the login state.
"use strict";
import ng = angular;
import serviceModule = require("serviceHandler");
import loginCtrlModule = require("loginController");
import routerModule = require("configRouter");
import regCtrlModule = require("registerController");

export class mainControllers {
    constructor() {
        var app = angular.module("mainControllers", []);
        var router = new routerModule.configRouter();
        app.config(router.configure);

        var serviceHandler = new serviceModule.serviceHandler();
        var serviceMod = app.factory("services", ["$http", serviceModule.exportService]);
        app.controller('MainController', ($location, services) => new loginCtrlModule.loginController($location, services, serviceHandler));
        app.controller('RegisterController', ($scope, $location, services) => new regCtrlModule.registerController($scope, $location, serviceHandler));
    }
}
Finally the main.ts file code is below. The main change in this file is the code paths.
   paths: {
        "jquery": "../jquery-2.2.0.min",
        "bootstrap": "../bootstrap",
        "app": "./shareApp",
        "angular": "../angular",
        "ngRoute": "../angular-route",
        "ngSanitize": "../angular-sanitize",
        "mainCtrls": "./mainControllers",
        "loginCtrl": "./loginController",
        "routerCfg": "./configRouter",
        "serviceFactory": "./serviceHandler",
        "ui.bootstrap": "../angular-ui/ui-bootstrap-tpls"
    },
The following pictures are for registering a new student and login in the student. The password is not used for now.


Points of Interest
There were many occassions that the project did not build or not deliver the pages correctly. Here are some of them lsited below.
- The package folder location is very important if the project need to be in version control. I moved the package folder in the same level as the project file to have the references properly updated by the Nuget package manager.
- Typescript module system specification is important for exporting the modules correctly.
- Specifying ECMAScript 6 instead of 5 may generate errors related to "Duplicate identifier 'Promise'"
- The injectable list of modules in the requirejs call is important as otherwise it may end up in not having the dependencies loaded correctly.
- angular routing and requirejs module downloading are connected and it may end up in run time angular javascript errors. Use manual bootstrap