How to Install SharePoint 2016 (Single-Server Farm) on VM
5.00/5 (5 votes)
How to Install SharePoint 2016 (Single-Server Farm) on VM
In my previous article, I explained how to install Windows Server 2012 on VirtualBox VM. In this article, I will explain the process of installing SharePoint 2016 (Single-Server Farm) on VirtualBox VM and creating your first SharePoint 2016 application.
Refer to my previous article for download links for SQL Server 2012 SP1 and SharePoint 2016 Beta 2 trial versions.
Below is the summary of SharePoint 2016 installation process.
- Add 'Active Directory Domain Services' Role to the server and promote the server as Domain Controller.
- Install SQL Server 2012 SP1.
- Install SharePoint 2016 Prerequisites on the server.
- Install SharePoint 2016 Beta 2 on the server.
- Run the SharePoint 2016 Products Configuration Wizard.
- Configure SharePoint Farm.
1. Add 'Active Directory Domain Services' Role to the Server and Promote the Server as 'Domain Controller'
- Open Control Panel > Programs and Features > Turn Windows Features On and Off > Add Roles and Features > Click 'Next' from the Prompt Window and opt for 'Role based and Feature Based Installation.
- Select the Local Server from next Window and click 'Next'.
- Select 'Active Directory Domain Services' from next window. Setup will prompt for dependent features that are required for Active Directory Domain Services installation. Click on 'Add Features'.
- After Clicking 'Add Features' from the previous window, installation will begin. Click 'Close' once the installation is completed.
- Now that the Active Directory domain services are installed, we need to promote the server as Domain Controller and create a Domain. Click on the warning sign appearing on the main Server Manager Window. A popup will appear. From the popup, click on 'Promote this server to a domain controller' link.
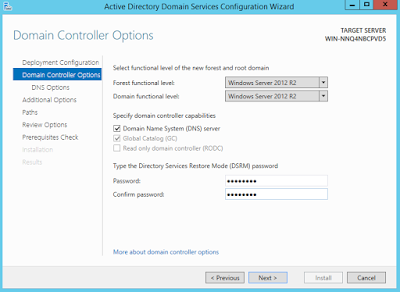
- Active Directory Domain Services Configuration Wizard will start. Select 'Add a new forest' option, give your root domain a domain name and click Next.
- On the next window, provide the password for 'Directory Services Restore Mode' and click Next.
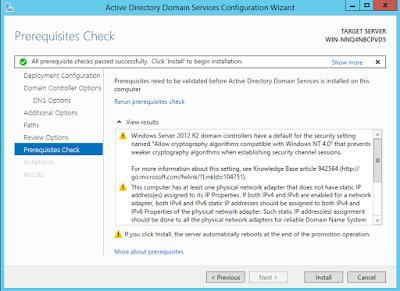
- Click on the Install button and wait for the installation to complete.
You need to restart the server once domain controller is setup. After restart, you will see your domain name prefix with your local admin account. (DEV\Administrator).
2. Install SQL Server 2012 SP1
I assume you already know how to install SQL Server 2012. Run the SQL Server 2012 Wizard and install the server. Refer to this article if you need any help.
Also note that since we are setting up only virtual environment for development purpose, creating separate service accounts for different SharePoint and SQL services is beyond the scope of the article. We will only use default Local Administrator account.
3. Install SharePoint 2016 Prerequisites
(Note that you need to have internet access on your VM to download prerequisites software).
- Mount the SharePoint 2016 ISO file to the VM. Double click on the drive to start the SharePoint 2016 setup (Alternately, you can open the drive and run default.exe or setup.exe).
- SharePoint 2016 installation wizard will start.
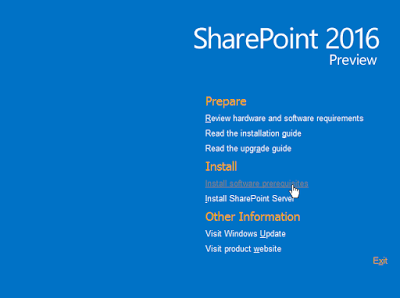
- From the SharePoint 2016 setup wizard, under 'Install', click on 'Install the software prerequisites'.
- Click Next from the welcome window.
- Once the Application Server and Web Server Roles are configured, setup will prompt to restart the Server. Restart your VM.
- After restart, setup will continue installation. Once the installation is successfully completed, click Finish button.
4. Install SharePoint 2016 Beta 2
Here is the main part.
- Run the SharePoint 2016 installation media and click on 'Install SharePoint Server' link from the installation dialog. SharePoint 2016 setup Wizard will start.
- Enter the SharePoint 2016 Trial Beta 2 Version Product Key
NQGJR-63HC8-XCRQH-MYVCH-3J3QRand click continue.If this trial key does not work, please refer to the 'Install Instructions' section of Microsoft SharePoint 2016 Beta 2 trail version download page to get the latest key.
- Accept the Microsoft Software License Term and click Continue.
- From next window, if you want to change default installation path, click Browse and provide location otherwise leave default installation path and click 'Install Now'.
- Installation will start.
- Once the SharePoint 2016 Installation is finished, setup will auto select 'Run the SharePoint Products Configuration Wizard now' option. Leave this option selected and click 'Close'.
5. Run the SharePoint 2016 Product and Configuration Wizard.
- From the SharePoint Products Welcome window, click Next.
- Select 'Create a new server farm' option and click Next.
- Provide the database server name. If database is installed on the same VM, you can just enter dot which means local server. You can also enter local or remove database server name.
Leave the Database name as
SharePoint_Config. This will be the SharePoint central admin configuration database.Provide the Username and Password to connect to the database and click Next.
- Enter the SharePoint Farm Passphrase and click Next. This Passphrase is required to connect with the Farm while adding a new server.
- Select the Role of the Server. Since we are setting up Single Server Farm, select 'Single-Server Farm' from this option and click Next.
- From Next window, specify SharePoint Central Administration Web App port number and click Next. I suggest you to keep the default port.
- SharePoint Product configuration will start.
- Once configuration is completed, copy the central administration URL and click Finished.
6. Configure SharePoint Farm
- Open a new browser and hit SharePoint 2016 Central Administration URL.
SharePoint Farm configuration will start. Click on 'Start the Wizard' button.
- From the Service Application and Services screen, leave the default option selected and click Next.
- SharePoint will configure the SharePoint Farm Level Applications and Services.
- Once Farm Level Application and Service are successfully provisioned, you will receive the Farm Configuration completion message on the screen. Scroll down and click on Finish.
Now you can go to central admin and create your first SharePoint 2016 web application.
Congratulations, you have successfully installed and configured SharePoint 2016 !!


