Workflows in SharePoint 2013 using Visual Studio
4.00/5 (1 vote)
Workflows in SharePoint 2013 using Visual Studio
The SharePoint 2013 workflow architecture has introduced a workflow manager farm. Workflow manager communicates with SharePoint 2013 using the REST API. Workflow manager requires the user profile application to be already created and configured.
Read on to understand workflows in SharePoint 2013. We’ll go over an example of creating a workflow for a contacts list which creates a task to categorize the contact as Developer, Team Lead or Manager instead of the out of box Approve, Reject options in the task form.
SharePoint 2013 workflows using the SharePoint manager only supports declarative workflows. We cannot have embedded code like the SharePoint 2010 style workflows. For adding custom business logic, we can use the Http send activity and make web service calls which handles the business logic.
Sequences
When we create a workflow in Visual Studio, a default empty sequence is created. Sequences are containers for activities. We can add activities within a sequence by dragging and dropping activities from the toolbar.
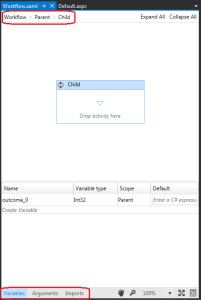
We can rename the sequences by clicking on the name. It is a good idea to rename sequences because we can add sequences within sequences. And, if we double click on the child sequence, it shows only the child sequence in the design window.
This is so that we can focus on only the particular sequence you are working on. There will be breadcrumb on top to navigate back to the parent sequence. So, renaming the sequences will be very helpful to navigate between nested sequences.
Variables and Arguments
At the bottom of designer, you can see a tab where you can add variables. These variables can be used to communicate the values within the workflow. You can specify a scope for a variable which is set to a particular sequence. If the scope is set to the root sequence, then it will be available for the child sequences as well.
There is another tab where you can add arguments. Arguments are used to input and output values from the activities.
Workflow Tasks and Outcomes
Workflow task list in SharePoint 2013 uses a different task content type called Workflow Task (SharePoint 2013). This is inherited from the standard Task content type. This content type adds two additional columns. One of them holds the workflow instance id and the other holds the outcome of the workflow.
If you want to add additional fields or create custom outcomes, you need to create a custom content type that derives from the ‘Workflow Task (SharePoint 2013)’ content type, make the required changes and attach it to the workflow task list.
The outcome of the task is managed by a column called TaskOutcome which is of the type OutcomeChoice (which is derived from Choice). This column has choices such as Approved, Rejected, etc. which are displayed on the task form.
If you want to create custom outcomes, you need to create a custom column of type OutcomeChoice and include in your custom content type. Also, you need to remove the out of box TaskOutcome column. This is a bit tricky, however. We’ll see how to do this in the example.
Walkthrough
Let’s go over an example to understand these concepts in detail. Let’s say we need a contacts list which needs to be categorized as Developer, Team Lead or Manager. So, we’ll attach a workflow which assigns a task to the HR and sends a mail to him or her. HR will select the appropriate role from the task form.
First, Let’s Create a New Project
Create a SharePoint hosted app project in Visual Studio.
Create a List
Right click on the project and add a Contacts list.
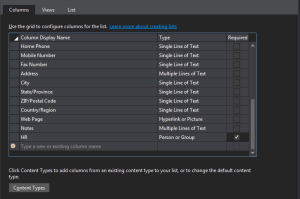
In the Contacts list design window, add a HR column as a Person or Group type and make it required.
Create a Custom Outcome Column
Now, let's create a custom outcome column to hold the required choices. Right click the project and add a site column. Let’s call it RoleOutcome. In the elements.xml, change the type to OutcomeChoice. And add in the required choices. In our case, it is Developer, Team Lead and Manager.
Create a Content Type and Add Custom Outcome Column To It
Next, create a content type which inherits from the ‘Workflow Task(SharePoint 2013)’. Let’s call it RoleAssignTaskCT.
Add our custom outcome column RoleOutcome to this content type.
Add the Workflow
Now add a list workflow to the project. Select the option to create new workflow history and task list.
Click Next. You can select the option ‘The workflow automatically starts when an item is created’. Click on Finish.
A workflow task list will get created. Go to the elements.xml of this list and add a copy of the existing ContentTypeBinding tag and replace the ContentTypeId with the id for the custom outcome content type RoleAssignTaskCT.
Add the Sequences
In the workflow design surface, there will be one sequence. Add two child sequences by dragging and dropping the Sequence activity which will be available in the Control flow section. Rename the sequences as ‘Get Contact Details’ and ‘Assign Task’.
Create Variables
Add a variable called ContactDetails. In the type drop down of this variable, select Browse for types and select DynamicValue (you can search for it on top in type name text box). When we look up the list item, the activity returns data as a DynamicValue.
Add and Configure Activities
In the ‘Get Contact Details’ sequence, drag a LookupSPListItem activity which will be available in the ‘SP – List’ section. In the properties window for this activity, select ListId as (current list) and ItemId as (current item).
And select the Result as the DynamicValue variable created above – ContactDetails.
Now, we need to retrieve the individual values from the DynamicValue type. Add a GetDynamicValueProperties activity below the LookupSPListItem activity in the ‘Get Contact Details’ sequence. Select the DynamicValue variable as the Source in the properties for this activity.
Click on the … button next to the (Dictionary). Select the Entity type as ‘List item of Contacts’. In the Path section, select the columns that you need. You can select First Name, Last Name and HR in this case. Then, click on Populate Variables. This will create the required workflow variables to populate from the Dynamic Value.
Ensure that the HR variable is scoped to parent, because we will need to use it in ‘Assign Task’ sequence.
Assigning the Task
In the ‘Assign Task’ sequence, drag and drop a SingleTask activity. Click on the configure link on this activity.
In the outcome options, select the custom Task content type – RoleAssignTaskCT, outcome field – RoleOutcome and the default outcome.
Drag a WriteToHistory activity below the SingleTask activity. Set the message to “Task outcome is ” + outcome_0.
outcome_0 is the outcome generated based on the selection made by HR in the task.
Removing Default Approve Reject Options from Your Task Form
Now, even though we selected the custom task content type, in the task edit form, it will render both out of box fields as well as our custom outcomes. This is because in the parent content type, the out of box fields are present which we have inherited. I tried to remove the field using RemoveFieldRef but it did not allow me to modify it as it is an out of box content type.
So, we’ll remove the parent id part from our custom content type id (which should be 3365C4474CAE8C42BCE396314E88E51F).
If your generated content type id is 0x0108003365C4474CAE8C42BCE396314E88E51F00983676A53ED54E5787C8F2E381A04271, remove the parent id part which is 3365C4474CAE8C42BCE396314E88E51F.
So, it will become 0x010800983676A53ED54E5787C8F2E381A04271.
Now, we need to update this new id in the workflow list content type binding and workflow XML code (right click on the workflow.xaml and select view code or F7). Replace all occurrences of the ContentTypeId with the update one.
Instead of doing this, you might think that we can directly inherit from the Task content type instead of the ‘Workflow Task(SharePoint 2013)’ but the problem is we won’t be able to select it from the SingleTask activity. Visual Studio only shows content types of that specific type. There may be a workaround by editing the XML of the workflow, however I haven’t tried it yet.
Deploy and Test
Deploy the solution.
Since this is a SharePoint hosted app, you will not have the navigation or the site contents link. So you need to manually navigate to the URL. To do this, navigate to the app and remove everything including and after the /Pages and insert /lists/contacts for the Contacts list or whatever URL you have provided for the list instance. Workflow history list can be navigated using /lists/WorkflowHistoryList and workflow task list can be navigated using /Lists/WorkflowTaskList.
Create a new contact and assign the HR field. Once the HR completes the task by selecting the role of the contact, the workflow should be completed. And we should be able to see the role logged in the workflow history list.
Conclusion
We can extend this to update the contact item with a role field for example. Or, maybe add some other business logic based on the requirement.
We saw the concept of using workflows in SharePoint 2013 with Visual Studio. And, we walked over an example for creating a Visual Studio workflow for SharePoint 2013.
The post Workflows in SharePoint 2013 using Visual Studio appeared first on The SharePoint Guide.


