
Tackling text-to-speech and generating audio file in Windows Store Apps
5.00/5 (4 votes)
In this post, you will learn how to perform text-to-speech actions in Windows Runtime for Windows Store applications, also how to store the speech stream in a waveform file format on your machine.
Introduction and Background
I was adding a few more features to the Windows Store application that I have, “Speak It!“, and while doing so, it became much more complex task as I dig deeper into streams. Remember, streams provided by Windows Runtime are not as much simpler as .NET has. So, in this post, I will talk about a few of those hazards that you may come across. This post consists of two sections, the first one is to talk about the “Text-to-speech” API in Windows Store, sorry, Universal Windows Platform and the second one would talk about the saving the generated speech stream to an audio file.
I have already shared most of the concepts in another article of mine, which covers the basic concepts, prerequisites and other basic stuff to be understood to build a Text-to-speech application. Unfortunately, that was .NET oriented whereas this article covers the concepts for text-to-speech API in Windows Runtime API set. The article can be read at "An app that reads out text for you" as I did not post it as a blog here, sorry.
That article is very much similar, because .NET for Windows Store is pretty much similar to what we have as .NET itself! .NET framework (in my opinion!) is very much simple, easy and intuitive as compared to Windows Runtime API set. You can use the same code provided there to get start with the text-to-speech portion, however there are a few differences that I must warn you about. That article also talks about the audio file generation, in this article post I will discuss the development stages in Windows Runtime too. So, follow up with me and learn how to do that!
1. Building text-to-speech part of the application
First section would be to build the basic foundation of the application. I am not going to talk about the UI or UX guidelines at all, instead I will move on to C# code to share how to actually build the application on the backend, so that it actually does some work instead of just showing up its belly. :)
I don’t know why, but Windows development team would like to add speech APIs to media technologies and thus they have provided the objects (classes) under Windows.Media.SpeechSynthesis namespace. Please understand this fact, text-to-speech in Windows API is very simple and intuitive task, you don’t even have to do anything to perform a function to generate speech for text. Windows manages everything itself. So, I am going to show you the C# code, simple C# code, that can generate the audio results for the text that you enter in the application.
Initializing the synthesizer
The synthesizer is defined in the above mentioned namespace, you can use it by calling a constructor and passing a language (or using the default languages provided by the Windows operating system; which are installed by the user). In most cases you don’t have to set up the engines, you can get them already set up. But if you would want to change the engines up and down, you can still manipulate the object that you create.
// Namespace addition
using Windows.Media.SpeechSynthesis;

// Create the object here...
var synthesizer = new SpeechSynthesizer();

// You can update the properties, such as voice engine being used.
The next step is just to execute the “Synthesize…” function! This function would return the stream, based on what you pass. You can pass text and SSML; which I will not cover, then engine would return the stream for audio speech based on the parameter.
Modifying the properties
Before the final stage, I want to discuss the properties that you may want to update in your engine to provide a better experience to your users and target a wide variety of audience.
Voices and other stuff
First of all, you should consider that an engine would always require a voice to be installed on the system. Each and every voice that you want to use, must be there on the system before your application can think about using it in your application! That is why, I would recommend that you first of all, consider which language have been installed. I use English language, my family members also do, but my friends don’t. Some prefer French whereas some have Urdu or Hindi languages installed. So, if you would hard code anything in the application it may cause a runtime exception when application won’t be able to build an engine with specified language. In such cases, you can loop through the available languages (voices!)
// Object created above
var voices = synthesizer.AllVoices;
Now you can loop over each language voice and then provide the users an interface to select a language from each one installed on the machine. Also, allow users to install more languages so that they can render the text in audio streams in many more voices. Voices are also based on genders, geographic location, pitch and age. So you can also find out if a specific language is installed or not.
Then each of the item in this array would target the Voice object. This object is another type, VoiceInformation, which holds the information about the voice that gets used to render the text into. The voice (as already mentioned!) can hold information about language it speaks, age and gender based information. You can also select a language based on these parameters if you want to select a language and don’t know which language is installed or don’t want to hard code the language name in your application.
You can then change the voice of the synthesizer to the one you want to use. For example,
// Assume you collected a voice information from the AllVoices list
synthesizer.Voice = voiceFromList;
Then you can continue to the next stage, where you get the stream!
Getting and loading the stream of speech
In Windows 10, you do not get an audio from this API, instead you get a stream of data, audio data, you then need a player to play that stream. Windows 10 has a control named, MediaElement. You can use that player to render the stream for you. Easy way, I would say! The thing is, MediaElement would handle most of the headache for you and you wouldn’t have to work around with the codecs and other byte-management concepts, you just send it as a resource to the media element and it would then preview it.
Even the code to do that is pretty much simple and straight-forward, you only have to specify the stream and the content-type so that MediaElement can render the media correctly. Have a look at the two-line code below:
// Generate the stream
var stream = await synthesizer.SynthesizeTextToStreamAsync(message);

// Set it as a source
mediaElement.SetSource(stream, stream.ContentType);
MediaElement would then render the controls, seek bar and other stuff that it requires.
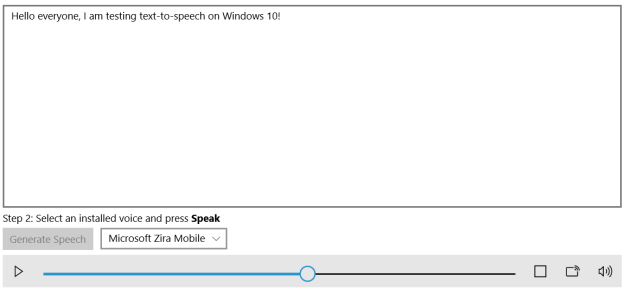
Figure 1: Application showing controls and resources for text-to-speech
In the above image, it is clear that MediaElement displays the controls, renders the stream and allows the users to pause or play the content and even seek it through the audio stream. This makes it better for story-reader applications.
So, this was it for the text-to-stream section. Rest of the stuff is just “extra cheese topping” that I don’t want to talk about, I want to focus on generating the audio content to be saved as a file on the machine. So, head over to the next section.
2. Generating audio files for audio speech streams
This part was tough one and I had to work on it for like 1 and a half hour to get it to work! Actually, there is a bit of confusion between the Stream object in .NET and the .NET for Windows Store. That caused me a lot of trouble, but anyways I want to share the achievement with you so that you don’t have to pull your hairs off your head.
Selecting a file
In Windows Runtime (or, Windows Store applications), you cannot just move from here to there like you could in .NET environment. You are abstracted by permission set and thus it is better to allow the user to select and set up a location for you to work. This way, Windows won’t intervene and would allow your application to have permissions as if user were doing them himself.
The following code does that and the object being used is FileSavePicker, which allows user to select a file where your application would save the data. You can specify the type of file, extension and (optionally) the name of the file.
// Create the object
var picker = new FileSavePicker();

// Set up a few settings
picker.DefaultFileExtension = ".wav";
picker.CommitButtonText = "Save";
picker.FileTypeChoices.Add("Audio", new List<string>() { ".wav" });

// Let the user select a file now; and a location
var file = await picker.PickSaveFileAsync();
Then you can use the file selected and load the data in it. The conceptual point comes after this. If the user has selected the file, you now need to:
- Open a stream to that file, with read/write permissions.
- Create a byte-array for the stream you have.
- For this, you would need to use MemoryStream.
- Write those byte-array values to the file.
- File type would be .wav file so make sure it is that one.
- Commit the changes to the file system and you’re done!
Now, implementing the above logic is also very similar part. Have a look at the following code, FileIO object provided by Windows Runtime is a great object to lets us work around with Input/output across the files. So, using the same object I am going to write a block that does what I want it to…
// If user selected a file
if (file != null)
{
    // Create a memory stream
    using (var mem = new MemoryStream())
    {
        // Get the stream object; Stream of .NET
        var strm = stream.AsStream();
        strm.Position = 0;                  // Change the location index to copy from
        await strm.CopyToAsync(mem);

        // Convert to array of bytes
        var array = mem.ToArray();
        // Write the byte-array to the file.
        await FileIO.WriteBytesAsync(file, array);
    }
}
Just the above code is required! We’re done. The code when I refactored it, amazed me and I was very much shocked as to why did I not get it in the first place. The code is simple and it does what it is intended to do, so if I convert the above speech stream to audio file, it would be like this.

Figure 2: FileSavePicker showing the interface to select a file to save the data to.

Figure 3: Windows File Manager showing the “MyAudio” file just created using the above mentioned application for Windows 10!
So, this way we can store the data in audio file.
Points of Interest
Windows 10 is new, Windows Runtime is also new… Most of the C# programmers are still fond of .NET environment, although Microsoft did provide them with tools to work around in Windows Runtime, but still Windows Runtime API is not as much simple and beautiful as is .NET framework.
This post talks about and shares the information required to build your own text-to-speech application and not just that, it also shares how to convert that audio stream to audio file that can be played later. Of course on this post, I cannot play the file but in real, it does say what I wrote. :-)
It’s almost end of the month, I may write a new post someday earlier, but anyways, Happy new year folks! :-)