
Get Started Developing Intel® RealSense™ SDK for Windows 10 Desktop Apps
This guide will get you up and running quickly with the Intel® RealSense™ SDK on your Windows 10 equipped computer.
Introduction
This guide will get you up and running quickly with the Intel® RealSense™ SDK on your Windows 10 equipped computer. Developing a desktop application for Windows 10 is not much different from developing one for Windows 8.1. So if you have experience creating Intel® RealSense™ applications in Windows 8.1, much of this information will already be familiar to you. On the other hand, if you are new to the Intel RealSense SDK and are working with a computer running Windows 10, this material will give you a head start on creating Intel RealSense applications for desktop projects.
Target Audience
This article provides introductory-level information on incorporating the Intel RealSense SDK in a Windows 10 desktop app using the Visual Studio 2015 integrated development environment (IDE). A basic familiarity with Visual Studio and the C# programming language is helpful, as is some hands on experience with the Intel® RealSense™ camera using the sample apps that come with the SDK.
Install Visual Studio 2015
Assuming you are starting with a "clean" Windows 10 computer (i.e., no development tools or SDK installed), start by downloading and installing Visual Studio 2015. The Visual Studio Community Free version can be downloaded here: https://www.visualstudio.com/en-us/downloads/download-visual-studio-vs.aspx. Complete instructions for installing Visual Studio 2015 are available here: https://msdn.microsoft.com/en-us/library/e2h7fzkw.aspx.
For the code samples discussed in this paper, the "typical setup" installer option will work fine; however, to really explore all the new features and capabilities available in Visual Studio 2015 you may want to opt for a custom setup and handpick the custom components, third-party SDKs, and extensions you want to install. If you decide to go with the typical setup, you can always install any of the custom components at a later time when you’re ready to explore them.
Download and Install Intel® RealSense™ Software Components
The first step in configuring the Intel RealSense application software components on your Windows 10 system is to download and install the Intel® RealSense™ Depth Camera Manager (DCM), which is the camera driver software. There are two flavors of DCM, one for the user facing F200 camera, and the other for the world facing R200 camera.
Download the appropriate DCM for your camera here: https://software.intel.com/en-us/intel-realsense-sdk/download. Next, download the Intel RealSense SDK for Windows from here: https://registrationcenter.intel.com/en/forms/?productid=2383.
Once the DCM and SDK are installed, reboot your computer. To make sure that the camera is operating correctly, run one of the samples provided in the Intel RealSense SDK Sample Browser. Click the Windows 10 Start button in the lower-left side of the screen. Select All Apps and then scroll to the Intel® RealSense™ SDK folder (Figure 1).

Creating a Visual Studio 2015 Project
Perform the following steps to create a Visual Studio 2015 project. For our example, we’ll call the project CameraStreams:
- Launch Visual Studio 2015.
- Select File, New, Project… from the menu options.
- In the New Project screen, expand Templates and select Visual C#.
- Select WPF Application.
- Specify the location for the new project and its name. For this example, our location is C:\MyRealSenseProjects and we’ll name it CameraStreams.
- Click OK to create the new project.
Your Visual Studio project should look similar to Figure 2.
Adding References to the Intel® RealSense™ SDK Libraries
Two dynamic-link libraries (DLL) are required for creating Intel RealSense applications in C#:
- libpxcclr.cs.dll – the managed C# interface DLL
- libpxccpp2c.dll – the unmanaged C++ P/Invoke DLL
There are different approaches available for adding the required Intel RealSense SDK library (DLL) support to your project. In this project we’ll create references to the required DLLs located in folders outside of the project, which were created as part of the SDK installation.
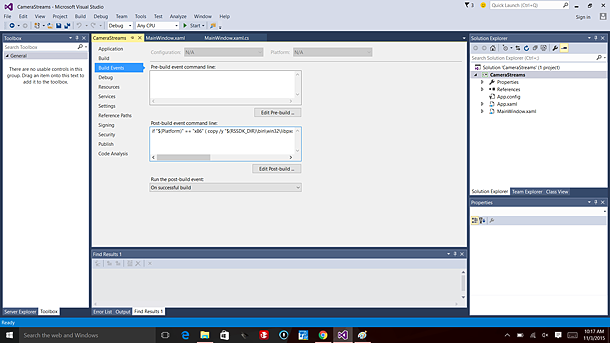
Start by right-clicking the CameraStreams project in Solution Explorer, select Properties, and then select Build Events (Figure 3).
In the post-build event command line, enter the following statement:
if "$(Platform)" == "x86" ( copy /y "$(RSSDK_DIR)\bin\win32\libpxccpp2c.dll" "$(TargetDir)" ) else ( copy /y "$(RSSDK_DIR)\bin\x64\libpxccpp2c.dll" "$(TargetDir)" )
At the end of the build process, the statement shown above directs Visual Studio to copy the unmanaged DLL (libpxccpp2c.dll) from the appropriate x86 or x64 folder in the SDK installation path to the project’s output directory, depending on the specified target platform.
Next, select Build from the left-hand menu. In this example we’re creating a 64-bit app, so select x64 for the target platform from the drop-down list. At this point if you build the project you will find that libpxccpp2c.dll is present in the output folder, for example:
C:\MyRealSenseProjects\CameraStreams\CameraStreams\bin\Debug
The next step is to add a reference to the managed DLL (libpxcclr.cs.dll). As stated in the Intel® RealSense™ SDK 2015 R4 Documentation, it is a known limitation that Visual Studio cannot handle 32-bit and 64-bit references at the same time; so the application must explicitly modify the reference before building a different target.
- In Solution Explorer, expand CameraStreams and then right-click References.
- Select Add References… and then click the Browse… button in the lower-right side of the screen.
- Navigate to the folder containing the 64-bit DLL, which will depend on the destination of the RSSDK folder selected during installation. Figure 4 shows the installation path to the x64 build of libpxcclr.cs.dll used in this example.
- Click the OK button to add the reference to the project.

Now you have the basic framework created to start building an Intel RealSense SDK-enabled Windows desktop application. For more information on application development in C#/WPF, take a look at the Microsoft* article: Walkthrough: Getting Started with WPF.
Try Some Introductory Code Samples
There are a number of codes samples and resources available on IDZ that demonstrate how to build upon the basic framework outlined above. Here are a few introductory articles and code samples you can download to help get started.
Intel® RealSense™ Camera F200
If you are developing for the F200 forward-facing camera, read the walkthrough article that was published earlier this year on IDZ: Using the Intel® RealSense™ SDK to Create "Hello World" Project in C#/WPF. Although the sample code accompanying this article ostensibly targets Visual Studio 2013, you’ll find you can build the app using Visual Studio 2015 on Windows 10 without modification.
Intel® RealSense™ Camera R200
If you are developing for the R200 rear facing camera, here are some code samples available on IDZ that you can download to get started with basic camera streaming, face tracking, and enhanced photography (depth refocus):
- Intel® RealSense™ Depth Camera Code Sample – R200 Camera Streams
- Intel® RealSense™ Depth Camera R200 Code Sample – Face Tracking
- Intel® RealSense™ Depth Camera R200 Code Sample – Depth Refocus
About the Author
Bryan Brown is a software applications engineer in the Developer Relations Division at Intel.