
Creating your first SPA Application using AngularJS and WebAPI – All CRUD Operations
4.38/5 (6 votes)
In this ASP.NET Web API Tutorial, we are going to learn How to create a ASP.NET Web API Application and use it in a SPA AngularJS page in the same project? Technologies being used in this web development tutorial are: ASP.NET Web API AngularJS Bootstrap Followings are the tools and IDE used for this
SPA is an application which is built in a single page to give user much rich windows application experience and impressively increases performance of the website.
In this ASP.NET Web API Tutorial, we are going to learn How to create a ASP.NET Web API Application and use it in a SPA AngularJS page in the same project? Technologies being used in this web development tutorial are:
- ASP.NET Web API
- AngularJS
- Bootstrap
Followings are the tools and IDE used for this project:
- Visual Studio 2012 Update 2 or beyond.
- Localdb in Visual Studio.
Microsoft ASP.NET Web API framework is the best choice for developing HTTP services in more simpler way. It enables us to reach more wider ranger of clients such as browsers as well as mobile devices. In order to understand more about the technology, you can read “Practical Guide to ASP.NET Web API” that is a practical way to learn about Web API.
This AngularJS and Web API Tutorial is not including testing of the project. This article will introduce you to explain how we can use ASP.NET Web API in AngularJS.
What is Single Page Application(SPA)?
Single Page Application (SPA) is a web application which enhances the User Experience by using HTML5 and AJAX. As the below comparison of SPA and Traditional Page Lifecycle, we can easily understand that SPA avoids one extra postback/reload by sending an AJAX request and receiving JSON as response.
Step by Step Approach to Create a SPA Application using AngularJS and ASP.NET Web API
Now, we will follow a step by step approach for creating a SPA Application performing all CRUD (Create, Retrieve, Update, Delete) operations.
Step 1: Create a new “ASP.NET Web Application” in Visual Studio 2013 or above, name it as “Students” and press OK button as below.
Next dialog box asks for selecting the template. Please select the Project Template to be MVC and uncheck the Windows Azure web publish Option (i.e. Host in the cloud) and press OK.
A new solution for ASP.NET Web Application will be created in Visual Studio.
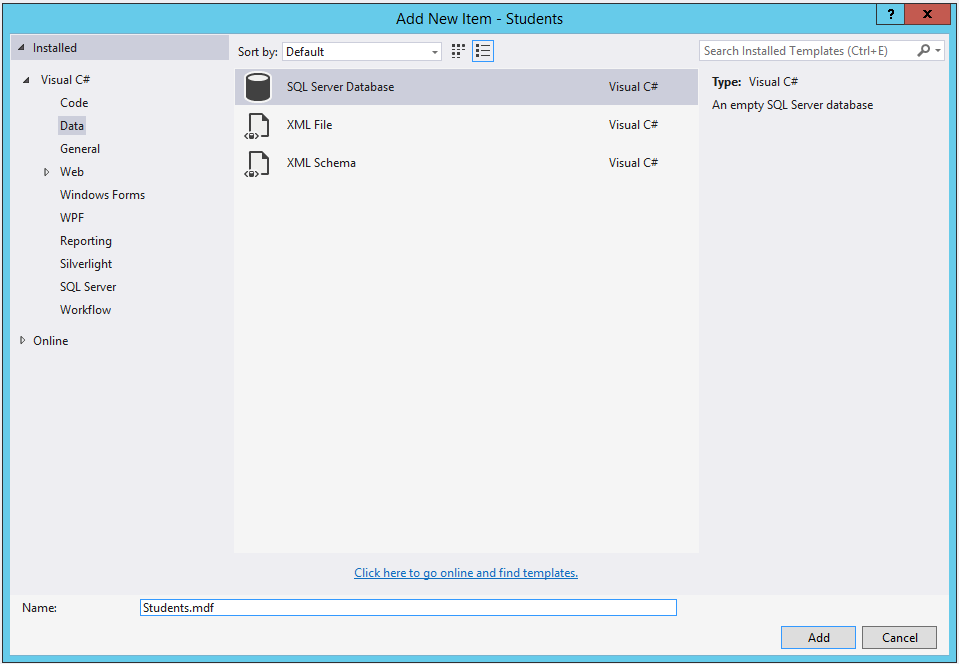
Step 2: In the App_Start folder create a Local Database named “Students“. So, right-click on App_Start and choose “Add -> New Item”. Choose “Data” from left and select “SQL Server Database” and name it “Students.mdf” as below and press “Add” button.
Step 3: Now we have our Database ready, and it’s time to create students table in the database, let’s create a students table in that Database.

 So, we have successfully created a “Students” table with fields as Id, StudentName, StudentRollNo, StudentDepartment, StudentbatchNo, StudentYear etc. In order to keep things simple, we have taken most of the fields as text fields except the Id.
Step 4: Now its time to create an “ADO.NET Entity Data Model”. This will create an Entity framework Database Context to work on for accessing the Database.
These are the 5 steps to create an “ADO.NET Entity Data Model”.
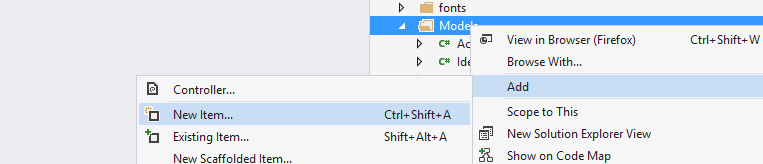
- Select add new item in Models folder to add an “ADO.NET Entity Data Model”.
- Select “ADO.NET Entity Data Model” and name it as StudentsDB.

- Select the option EF Designer From Database (This option lets the configuration knows that we want to use Entity Framework SQL client here).
Here in this Web API Tutorial, we are using EF Designer From Database option, but if you are interested to learn more about Model-First Approach, please follow other web development tutorial “Understanding Model-First Approach in MVC5 with EF6“.

- Select the database that we created.

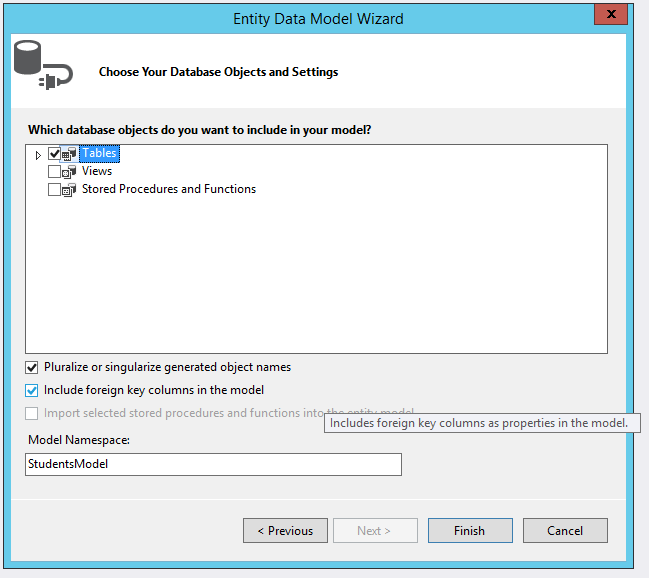
- Now the final step to add the tables in the Database to the Database Context of “ADO.NET Entity Data Model”.
Step 5: Now Build the project and Create a Web API Controller with Scaffolding using the local database “Students” class and the DB Context that we just created:
- Add a New Item in the controllers section:

- Select “WEB API 2 Controller with actions, using Entity Framework”:

- Select the Student’s Entity and Students Model for Scaffolding process and name the controller as StudentsAPIController.

Step 6: Confirm that you have WebApiConfig to define API URL Routing as below:
Note: Routing is mechanism of mapping different URL request to different views of web application. If you are not very much familiar with Routing in ASP.NET MVC, please follow here. Also you can get routing details in AngularJS by following AngularJS Interview Questions here.
Step 7: Make sure your Web API routing and Bundling are defined in the Global.asax as:
Step 8: Add the AngularJS Nuget Package to our project:
We will notice some new scripts are present in the script folder related to AngularJS.
Step 9: Let’s create a folder in scripts as “MyScripts” and add three more script files for our Students Module, Named as:
- Module.js
- Service.js
- Controller.js
 Now I will share the Module, Service and Controller of AngularJS with you.
Let’s start with Module.js. Below is the content of Module.js:
var app;
( function () {
app = angular.module( "StudentModule" , []);
})();
Here we have created the Students Module in Angularjs
Further, I have described the AngularJS Student Service module that I have created for accessing the Web API. Now let me show you the service I created for accessing the ASP.NET Web API of the project:
Below is the content of Service.js:
app.service( 'StudentService' , function ($http) {
//Create new record
this .post = function (Student) {
var request = $http({
method: "post" ,
url: "/api/StudentsAPI" ,
data: Student
});
return request;
}
//Get Single Records
this .get = function (Id) {
return $http.get( "/api/StudentsAPI/" + Id);
}
//Get All Students
this .getStudents = function () {
return $http.get( "/api/StudentsAPI" );
}
//Update the Record
this .put = function (Id, Student) {
var request = $http({
method: "put" ,
url: "/api/StudentsAPI/" + Id,
data: Student
});
return request;
}
//Delete the Record
this .delete = function (Id) {
var request = $http({
method: "delete" ,
url: "/api/StudentsAPI/" + Id
});
return request;
}
});
Now I would like to show you the Angular students controller for the events on the page:
Below is the content of Controller.js
controller( 'studentController' , function ($scope, StudentService) {
$scope.IsNewRecord = 1; //The flag for the new record
loadRecords();
//Function to load all Student records
function loadRecords() {
var promiseGet = StudentService.getStudents(); //The MEthod Call from service
promiseGet.then( function (pl) { $scope.Students = pl.data },
function (errorPl) {
$log.error( 'failure loading Student' , errorPl);
});
}
//The Save scope method use to define the Student object.
//In this method if IsNewRecord is not zero then Update Student else
//Create the Student information to the server
$scope.save = function () {
var Student = {
Id: $scope.Id,
StudentName: $scope.StudentName,
StudentRollNo: $scope.StudentRollNo,
StudentDepartment: $scope.StudentDepartment,
StudentbatchNo: $scope.StudentbatchNo,
StudentYear: $scope.StudentYear
};
//If the flag is 1 the it si new record
if ($scope.IsNewRecord === 1) {
var promisePost = StudentService.post(Student);
promisePost.then( function (pl) {
$scope.Id = pl.data.Id;
loadRecords();
}, function (err) {
console.log( "Err" + err);
});
} else { //Else Edit the record
var promisePut = StudentService.put($scope.Id, Student);
promisePut.then( function (pl) {
$scope.Message = "Updated Successfully" ;
loadRecords();
}, function (err) {
console.log( "Err" + err);
});
}
};
//Method to Delete
$scope.delete = function () {
var promiseDelete = StudentService.delete($scope.Id);
promiseDelete.then( function (pl) {
$scope.Message = "Deleted Successfully" ;
$scope.Id = 0;
$scope.StudentName = "" ;
$scope.StudentRollNo = "" ;
$scope.StudentDepartment = "" ;
$scope.StudentbatchNo = "" ;
$scope.StudentYear = "" ;
loadRecords();
}, function (err) {
console.log( "Err" + err);
});
}
//Method to Get Single Student based on Id
$scope.get = function (Student) {
var promiseGetSingle = StudentService.get(Student.Id);
promiseGetSingle.then( function (pl) {
var res = pl.data;
$scope.Id = res.Id;
$scope.StudentName = res.StudentName;
$scope.StudentRollNo = res.StudentRollNo;
$scope.StudentDepartment = res.StudentDepartmen;
$scope.StudentbatchNo = res.StudentbatchNo;
$scope.StudentYear = res.StudentYear;
$scope.IsNewRecord = 0;
},
function (errorPl) {
console.log( 'failure loading Student' , errorPl);
});
}
//Clear the Scopr models
$scope.clear = function () {
$scope.IsNewRecord = 1;
$scope.Id = 0;
$scope.StudentName = "" ;
$scope.StudentRollNo = "" ;
$scope.StudentDepartment = "" ;
$scope.StudentbatchNo = "" ;
$scope.StudentYear = "" ;
}
});
Step 10: Now lets create an empty Student controller for the only page view of our single page application:
Step 11: I have done some textual modification of the Shared Layout view.
The new layout is:
This is mainly textual changes and adding the angular script files.
Step 12: Now let’s add the students view within the index action and bind it with bootstrap, I have used bootstrap designing in this. Let me share the HTML of the Students Page:
@{
ViewBag.Title = "Index" ;
}
<style type ="text/css">
.tablehover
{
cursor : pointer ;
}
<div class ="container">
<div class ="row" ngcontroller ="studentController">
<div class ="collg4 colmd4 colsm6 colxs12">
<form >
<div class ="formgroup">
<label for ="exampleInputEmail1"> Id
<input type ="text" class ="formcontrol" id ="Id" placeholder ="Enter student ID" readonly ="readonly" ngmodel ="Id">

< div class ="formgroup">
<label for ="StudentName"> Student Name
<input type ="text" class ="formcontrol" id ="StudentName" placeholder ="Enter student Name" required ngmodel ="StudentName">

<div class ="formgroup">
<label for ="StudentRollNo"> Student Roll No
<input type ="text" class ="formcontrol" id ="StudentRollNo" placeholder ="Enter student Roll No" required ngmodel ="StudentRollNo">

<div class ="formgroup">
<label for ="StudentDepartment"> Student Department
<input type ="text" class ="formcontrol" id ="StudentDepartment" placeholder ="Enter student Department" required ngmodel ="StudentDepartment">

<div class ="formgroup">
<label for ="StudentbatchNo"> Student batch No
<input type ="text" class ="formcontrol" id ="StudentbatchNo" placeholder ="Enter student Batch No" required ngmodel ="StudentbatchNo">

<div class ="formgroup">
<label for ="StudentYear"> Student Year
<input type ="text" class ="formcontrol" id ="StudentYear" placeholder ="Enter student Year" required ngmodel ="StudentYear"><button type ="submit" class ="btn btninfo" id ="new" value ="New" ngclick ="clear()"> New
<button type ="submit" class ="btn btninfo" id ="save" value ="Save" ngclick ="save()"> Save
<button type ="submit" class ="btn btninfo" id ="delete" value ="Delete" ngclick ="delete()"> Delete<div class ="collg8 colmd8 colsm6 colxs12">

<table class ="table tablehover textprimary">
<caption > Students List.
<thead >
<tr>
<th> Id
<th> Student Name
<th> Student Roll No
<th> Student Department
<th> Student Batch No
<th> Student Year

<tbody ngrepeat ="Std in Students">
<tr ngclick ="get(Std)">
<td> < span> {{ Std.Id }}
<td> < span> {{ Std.StudentName }}
<td> < span> {{ Std.StudentRollNo }}
<td> < span> {{ Std.StudentDepartment }}
<td> < span> {{ Std.StudentbatchNo }}
<td> < span> {{ Std.StudentYear }}

<div class =”collg12 colmd12 colsm12 colxs12″>< span class =”textdanger”>
{{ Message }}</ span ></ div>
</ div>
</ div>
Step 13 : Since it’s a Single Page Application you should probably select Students Controller and Index method as your default page:

Congratulations!!! Now our website should be ready, Lets try building and running the page and we will see a view like this.
Hopefully, this Web Development article will be helpful for reader in creating his/her First Single Page Application using AngularJS and Web API with all CRUD Operations. Complete source code for the given article will be available soon.
More articles you might also be interested in
- Hybrid Mobile App Development with PhoneGap, AngularJS and Bootstrap
- Practical Guide to ASP.NET Web API
- A Complete Guide about Advantages of HTML5 & CSS3
- jQuery Vs AngularJS – A Good Comparison
- New Features in Visual Studio 2015 | 2013 | 2012 | 2010
- Step by Step using Bootstrap3 with ASP.NET MVC5
- Top New Features in ASP.NET vNext