
Samsung Gear using AngularJS
5.00/5 (3 votes)
Use AngularJS to create Odd Image Out Game for Samsung Gear
Introduction

What is Gear Odd Image Out Game?
In this game app, a total of five questions will be asked. In each question, I will display four sets of Images in that one Image will be different from the other three. User has to pick the odd image from the four images. If user picks the correct odd image from the question, he will get 10 points. If he select the wrong answer, then he will get -5 points. After all the five questions have been answered by the user, the result will be calculated and if the users' points are 50, then he wins the game and if the user get points less than 50, then he loses the game.
What you should know to create this Odd image Out App for Samsung Gear smartwatch?
You need to have basic knowledge of the following:
- TIZEN IDE Web project Development
- AngularJS Development
Prerequisites Needed to Install for Developing the Samsung Gear App
To start developing our first app for Samsung Gear, we need the following software to be installed.
- Tizen SDK (Tizen consists of set of tools for developing Tizen web and native applications. It contains IDE for developing our applications and Emulator to view our output)
- SDK Image
Note: If you are new to Samsung Gear App development using TIZEN IDE, then kindly view my previous article which explains in detail about how to install Tizen SDK and create your first "Hello world" program using Tizen IDE.
- Introduction to Samsung Gear App Development
- Group Messaging for Samsung Gear using MVC, Web API and AngularJS
AngularJS
We might be familiar with what the Model, View, View Model (MVVM) and what Model, View and Controller (MVC) are. AngularJS is a JavaScript framework that is purely based on HTML, CSS and JavaScript.
The AngularJS Model View Whatever (MVW) pattern is similar to the MVC and MVVM patterns. In our example, I have used Model, View and Service. In the code part, let's see how to install and create AngularJS in our MVC application.
If you are interested in reading more about AngularJS, then kindly go through the following link:
How I Developed this Odd Image Out Game Gear App?
First, collect all the images needed to be displayed for the question. Each question carries four sets of images and in that one image should be as different. So collect as many images as possible to make more questions. I will display the questions randomly from the set of questions to avoid repeat question display. So first, we need to make as many questions as possible for the users to not get bored of the game. I have downloaded all the free images from the Icon Finder, since we are creating app for Smartwatch. Here, I have downloaded 48*48 size images.

After downloading all the Images and giving the proper name to each Image and in Image name itself, I have given as answer as O for Ok and N for Wrong Image. For the sample of this demo, I have created a total of 15 Questions with 15 * 4 images total. You can add more questions to make the app more interesting.
Using the Code
As I have already mentioned, if you are new to Tizen IDE development, kindly view my first article which explains in detail about how to download, install and get started with Tizen IDE to create your app for Samsung Gear.
Click -> Start programs -> Click Tizen IDE.
For the first time, it will select your Workspace. You can browse and select folder to create all your projects under the folder. Click OK to start your new project.

Once you are done, click on File -> New -> Tizen Web Project.

Creating our First Wearable UI Template: We can see a window like below. First, we start with Wearable UI Template. Select the Template and Wearable UI and click on Basic. Give name for your project and click Finish.

Once you have created, you can see your Project in the left side of Project Explorer. Create new folder inside your newly created project for adding all the AngularJS reference files. I have created the folder name as “MyAngular”. I have copied all AngularJS and JQuery related reference files to this folder and also created a new JavaScript file as “controller.js” for AngularJS controller creation.

Steps to Create AngularJS controller.js File
Step 1
All our Business logic will be written in AngularJS Controller.js file. As you can see in project “MyAngular” folder, I have created the “controller.js” file to write all our AngularJS code.
In the Controller.JS JavaScript file, we will create for AngularJS Model and Controller like below:
First, we add the reference and create Model for our AngularJS controller.
/// <reference path="angular.js" />
/// <reference path="angular.min.js" />
/// <reference path="angular-animate.js" />
/// <reference path="angular-animate.min.js" />
var app;

(function () {
    app = angular.module("RESTClientModule", ['ngAnimate']);
})();
In controller, I have declared all the variables that need to be used and display the result in our HTML page.
Step 2: Declaration of Local Variables in Controller
Here, I have commented for each variable so that the user can easily understand it.
app.controller("AngularJs_Controller",
function ($scope, $timeout, $rootScope, $window, $http) {
    //Global Variables

    //Counter to increment the Question nos
    $scope.counterval = 0;
    $scope.questionCount = 0;

    //to store Game Image details. Here for each question I have created the ID,
    //four Image Names as Image1,image2 and etc, and the result for each questions.
    $scope.Images = [

                     {"id": "1", "Image1": "A1_N.png",
                     "Image2": "A2_O.png", "Image3": "A3_O.png",
                     "Image4": "A4_O.png", "Result": "1"}
                     , {"id": "2", "Image1": "AN1_O.png",
                     "Image2": "AN2_O.png", "Image3": "AN3_N.png",
                     "Image4": "AN4_O.png", "Result": "3"}
                     ,{"id": "3", "Image1": "C1_O.png",
                     "Image2": "C2_N.png", "Image3": "C3_O.png",
                     "Image4": "C4_O.png", "Result": "2"}
                     , {"id": "4", "Image1": "F1_O.png",
                     "Image2": "F2_O.png", "Image3": "F3_N.png",
                     "Image4": "F4_O.png", "Result": "3"}
                     ,{"id": "5", "Image1": "G1_N.png",
                     "Image2": "G2_O.png", "Image3": "G3_O.png",
                     "Image4": "G4_O.png", "Result": "1"}
                     , {"id": "6", "Image1": "H1_O.png",
                     "Image2": "H2_N.png", "Image3": "H3_O.png",
                     "Image4": "H4_O.png", "Result": "2"}
                     ,{"id": "7", "Image1": "J1_N.png",
                     "Image2": "J2_O.png", "Image3": "J3_O.png",
                     "Image4": "J4_O.png", "Result": "1"}
                     , {"id": "9", "Image1": "S1_O.png",
                     "Image2": "S2_N.png", "Image3": "S3_O.png",
                     "Image4": "S4_O.png", "Result": "2"}
                     , {"id": "9", "Image1": "N1_N.png",
                     "Image2": "N2_O.png", "Image3": "N3_O.png",
                     "Image4": "N4_O.png", "Result": "1"}
                     ,{"id": "10", "Image1": "NW1_O.png",
                     "Image2": "NW2_N.png", "Image3": "NW3_O.png",
                     "Image4": "NW4_O.png", "Result": "2"}
                     , {"id": "11", "Image1": "O1_O.png",
                     "Image2": "O2_O.png", "Image3": "O3_O.png",
                     "Image4": "O4_N.png", "Result": "4"}
                     ,{"id": "12", "Image1": "P1_O.png",
                     "Image2": "P2_N.png", "Image3": "P3_O.png",
                     "Image4": "P4_O.png", "Result": "2"}
                     , {"id": "13", "Image1": "SC1_O.png",
                     "Image2": "SC2_O.png", "Image3": "SC3_O.png",
                     "Image4": "SC4_N.png", "Result": "4"}
                     , {"id": "14", "Image1": "T1_N.png",
                     "Image2": "T2_O.png", "Image3": "T3_O.png",
                     "Image4": "T4_O.png", "Result": "1"}
                     ,{"id": "15", "Image1": "WA1_O.png",
                     "Image2": "WA2_O.png", "Image3": "WA3_N.png",
                     "Image4": "WA4_O.png", "Result": "3"}
                 ];

    //Show table Row. First, I will display the New Game Table Row by default.
    //When user clicks on new Game, I will display Question Table Row.

    $scope.showGameStart = true;
    $scope.showGame = false;
    $scope.showresult = false;

    //Show and to calculate the Total points and final result.
    $scope.totalPoints=0;
    $scope.Resuts ="";
    $scope.wonImage = "Won.png";
Step 3: Display New Game Message

When user clicks on the New Game Button, I will call the FirstQuestion() method and display and hide the relevant table row for displaying the question. And call the displayQuestion() method to display the first question.
Controller Method
$scope.FirstQuestion = function () {
        $scope.showGameStart = false;
     $scope.showGame = true;
     $scope.showresult = false;
     $scope.displayQuestion();
    }
HTML Code
<table>
          <tr  ng-show="showGameStart">
                     <td align="center">
                         <span style="color:#FFFFFF;font-size:x-large">
                           SHANU - Odd Image Out  </span><br><br>
      <input type="submit" value="New Game"
      style="background-color:#3f9835;color:#FFFFFF;border-color:#f6f803;
      border-style:dashed;" ng-click="FirstQuestion()" />
                           <p style="color:#FFFFFF;font-size:xx-small;">
            Find the Odd Image from the Given four Images.You will be having 5 questions.<br>
                           Answer all the 5 Question .
                           <br>Wrong Answer will get -5 points and
                           correct answer will get 10 Points.<br>
                           If user answer all the 5 Questions correctly then they the winner.
                           </p>
                           </td>
                           </tr>
Step 4: Display New Game Question

When user clicks on New Game, I will call the displayQuestion() method to selected the random question from the set of questions which we have created and display Each question Image in HTML page.
Controller Method
$scope.displayQuestion = function () {
         $scope.questionCount =$scope.questionCount +1;
         $scope.randomQuestion=Math.floor(Math.random() * $scope.Images.length);
         $scope.Image1 = $scope.Images[$scope.randomQuestion].Image1;
         $scope.Image2 = $scope.Images[$scope.randomQuestion].Image2;
         $scope.Image3 = $scope.Images[$scope.randomQuestion].Image3;
         $scope.Image4 = $scope.Images[$scope.randomQuestion].Image4;
         $scope.ImageAnswer = $scope.Images[$scope.randomQuestion].Result;
    }
HTML Code
<tr ng-show="showGame">
                    <td align="Center">
                            <table>
               <tr style="background-color:#336699 ;
               color:#FFFFFF ;border: solid 1px #659EC7;">
                        <td align="right" colspan="2">
                            <table >
                                <tr>
                                    <td >
                        <span style="color:#FFFFFF;font-size:xx-small;"> Question :</span>
                                   </td>
                                    <td >
                        <span style="color:#FFFFFF;font-size:x-large;">
                         {{questionCount}}</span>
                                    </td>
                                    <td >
                                     <img src="Images/coin.png"
                                     width="28px" height="28px">
                                     </td>

                                    <td >
                                <span style="color:#FFFFFF;font-size:x-large;">
                                {{ totalPoints }}</span></td>
                                </tr>
                           </table>
                        </td>
                    </tr>
                                <tr>
               <td align="center" style="
               background-color:#FFFFFF; border: dashed 2px #e44a10;
               padding:10px;width:50%;">
                 <img src="Images/{{ Image1 }}" width="54px"
                 height="54px" ng-click="findAnswer(1)">
                                     </td>
      <td style=" background-color:#FFFFFF; border: dashed 2px #e44a10;
      padding:10px;width:50%;">
               <img src="Images/{{ Image2 }}" width="54px"
               height="54px" ng-click="findAnswer(2)">
                                              </td>
                                            </tr>
                                            <tr>
 <td style=" background-color:#FFFFFF; border: dashed 2px #e44a10;
 padding:10px;width:50%;">
   <img src="Images/{{ Image3}}" width="54px"
   height="54px" ng-click="findAnswer(3)">
                                                </td>
      <td style=" background-color:#FFFFFF; border: dashed 2px #e44a10;
      padding:10px;width:50%;">
              <img src="Images/{{ Image4 }}" width="54px"
              height="54px" ng-click="findAnswer(4)">
                                                </td>
                                           </tr>
                                        </table>
                    </td>
                    </tr>
Step 5: Find Answer
Now we have displayed the question so what is next. Yes in each question image click, we need to find the correct answers. In each image click event, I call the findAnswer(1) method to check for each question answer and calculate the result and display the points to the user and then to display the next question. In this method, I will pass the argument as 1,2,3,4 for each question clicked by order in each question answer I will be storing the answers in Number I will compare both the User Clicked image number with each questions answer. If both match, then I will add the Points as 10 and if the answer is wrong, then I will -5 with the total points. Finally, I will display the next question for the user to play.
Controller Method
// to find the Answer
    $scope.findAnswer = function (results) {

         if (results == $scope.ImageAnswer)
         {
        // alert("Wow :) You have enter the correct answer
        // and you have got 10 Points for this Answer")
             $scope.totalPoints = $scope.totalPoints + 10;
         }
         else
         {
             // alert("Sorry :( You have enter the wrong answer and you have got -5 points")
             $scope.totalPoints = $scope.totalPoints-5;
         }
         $scope.counterval=$scope.counterval+1

         if($scope.counterval==5)
         {
            $scope.displayResult();
             return;
         }
         $scope.displayQuestion();
    }
Here, we can see that I will calculate the answer and display the next question to user with total points he earned.

In the mean time, I will check for questions counter value. If the user answers total five questions, then I will call the displayResult() method to display the final results to the user.
Step 5: Display Final Result
In this method, I will check for the total points of the user and display the result.
Won the Game
If the points are greater than or equal to 50, then I will display the message as user won the game.

Lose the Game
If the points are lesser than 50, then I will display the message as user lose the game.

Controller Method
$scope.displayResult = function () {
         if ($scope.totalPoints >= 50)
         {
             $scope.Resuts = "Wow :) You have won the Game.Good Job " ;
           //  alert($scope.Resuts)
             $scope.wonImage = "Won.png";
         }
         else
         {
             $scope.Resuts = "Sorry You lose the game :(.
             Your Total points are " + $scope.totalPoints +" out of 50 points"
             // alert($scope.Resuts);
             $scope.wonImage = "Lose.png";
         }
         $scope.showGameStart = false;
         $scope.showGame = false;
         $scope.showresult = true;
    }
HTML Code
<tr ng-show="showresult">
                    <td align="Center">
   <table align="center" style="
   background-color:#FFFFFF; border: dashed 3px #6D7B8D;
   padding:10px;" >
                 <tr style=" background-color:#336699 ; color:#3f9835 ;
                 border: solid 1px #659EC7;">
                                    <td>
                                     <img src="Images/{{ wonImage }}"
                                     width="68px" height="68px">
                                    </td>
                                    <td width="60%">
                                    <span style="color:#FFFFFF;font-size:x-small;">
                                        {{Resuts}}</span>
                                        <br />
                                        <br />
              <input type="submit" value="Home"
              style="background-color:#3f9835;color:#FFFFFF;
              border-color:#f6f803;border-style:dashed;"
              ng-click="NewQuestion()" />
                                       </td>
                                </tr>
                            </table>
                    </td>
                    </tr>
Step 5: Start New Game
After displaying the result, user can start the new game by clicking on Home Button.
Controller Method
$scope.NewQuestion = function () {
         $scope.showGameStart = true;
         $scope.showGame = false;
         $scope.showresult = false;
         $scope.totalPoints=0;
         $scope.counterval=0;
         $scope.questionCount=0;
    }
Step 6: View Output
Output with Simulator: To view the output with simulator, right click our project from Tizen Ide and select Run AS and click on “Tizen Web Simulator Application”

Once we clicked, we can see the output in simulator.

Output with Emulator
To view our result in Emulator, first we need to run the Emulator. In Connection Explorer, click on Emulator Manager.
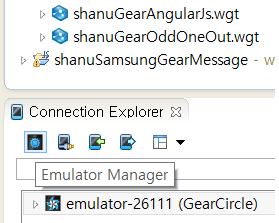
Here, I have selected the emulator type as Circle and click on GearCircle play to open the emulator.

Once the emulator is opened, we need to select our Project and select RUN AS and click on “Tizen Web Application”.

Here, we can see our Odd Image Out app will be running in Samsung Gear Emulator.

Points of Interest
Hope you like this and now you might be having a clearer idea to start working with Samsung gear App development for Smartwatch. Have fun!
History
- 10th October, 2015: Initial version