
The ABC of Android Wear applications
4.79/5 (16 votes)
This article covers the topics required to understand for building and deploying Android Wear applications.
Introduction and background
In this article I am focusing on writing a collection of tips and resources for Android developers who want to port their applications on Android Wear also. Android Wear is a new platform provided by Android OS for smartwatches. The framework is very much compact and poor on resources that not all of the services and features are provided and at the same time developers also have to note that they should restrain their applications from using too much CPU, RAM or battery juice. This article will cover the sections of Android Wear programming, including the design techniques, efficient apps and programmer tips. By the end of this article you will be able to create your own applications for Android Wear.
If you are an old Android developer, then learning how to develop a Wear application won't take much of your time. The SDK is same, IDE is same, procedure is same, there are just a few things to keep in mind while programming and while deploying. All of these cases will be discussed in this guide, keep reading. :-)
Requirements
I wanted to point out the requirements before you head on to Android Wear programming. They will make sure that you understand what is being taught in this guide, you can for sure read it, but to learn something from it you would be needed to have the basic understanding of the core concepts.
IDE for this guide
Well, there are 2 IDEs being used widely. Eclipse and Android Studio. Both can suffice your need to start Android Wear application programming! You can get the tools and plugins for both of the IDEs, Google will automatically push the updates to Android Studio whereas for Eclipse you will need to get some additional plugins for ADT. If you cannot make up your mind, why not head on to Android SDK site and chose which one is better for you. In this guide I am going to use Android Studio since that is official IDE for Android.
Programming languages
Android does support native programming in C/C++ but I haven't read any post by a geek that lets you write applications for Android wear in NDK. So, I will recommend that you have at least beginner-level knowledge of Java language. I am sort of first-person sort of guy, so I will not recommend any third-party tutorials or PDFs, please refer Oracle guides to learn Java.
I will also try to speak as much English as I can, for both, noobs and experts! :-)
Anything else?
Yes, I would like you to have a little bit understanding of device emulation. While debugging mostly emulation is used or a development device is connected to debug. Of course you are not going to upload the APK to Google Play Store to test it on your device, are you? For this sake, you must understand what device emulation is.
If you are entirely new to Android programming itself, I would recommend that you get an overview of Android architecture and programming concepts. CodeProject hosts a great tutorial guide for Android beginners, head over there.
That said, if you are going to read the sections for debugging and deploying the applications in development stages I would also like you to have knowledge of command-line interface. Since emulators we are going to use won't have Google Play Store, we will use command-line to install APKs and to perform other actions on the device using ADB.
A little bit about Telnet is also recommended. In debugging and connections of Android phone and Android wear we will use telnet services to communicate between our device emulators.
What is Android Wear?
Android Wear is an implementation of smartwatch by Android. From a user's perspective it is simply a watch on their wrist with some additional features rather than just timekeeping. From a developer's perspective it is a new platform to create an application or a service for their users. Not just it is a watch, it is a mini-smartphone on the wrist of the user. Users get to use most of their applications already installed on the phone right on their wrist. Sending SMS from their watches have been added to the list of services, getting directions to their destination and other services have been added to the API for Android Wear.
A few key points of Android Wear are:
- It is developer by Android—What more can an Android lover ask for?
- It uses the same SDK.
The applications are created in a same manner, but with lesser features and developers also have to restrain themselves to use those few features to make sure they do not burn resources on both ends. :-) - Customizations are provided.
- Connect it to your handheld Android device.
- Sensors provided to make most of your device!
- Get daily-use applications right on your wrist. For example, users will be able to get directions from their devices.
- Voice commands supported.
- iPhone supported!
- ... and growing.
Well these are just a few points that one can mention, and I can surely write more on them. But you get the point. Android is investing more and more time in building the framework to be more powerful.
In coming sections, I will talk about different components that make up the Android Wear applications and their API. You will, by the end of this article, be able to create your own application by keeping those APIs in your mind plus, you will be able to create something useful with your existing and on-going experience in Android APIs and Android Wear APIs.
Android Wear services—API Packages
In Java, you can create a collection of objects (classes) and interfaces each for a purpose. Then you can merge them into a single package. The package holds the objects and other developers can call those objects using their package names. In Android SDK, Android Wear packages are under android.support.wearable package, there are many of them, each for each API or feature. Currently, Wear supports the following of touchy features:
- Cards
Compact sized notifications! Amazingly helpful, perhaps you can think of them as a notification. But Android team called them "Cards". - Inputs
Did I mention you can use voice commands on Wear? Those kind of features are collected inandroid.support.wearable.inputpackage. - Companion
The companion is actually a handheld application, your Wear application is embedded in this handheld application which is then pushed to the Wear. Android Wear doesn't support direct application downloads from Play Store. You download the application (alongwith the Wear app) on your handheld, and then it is automatically installed on your Wear
For development purposes: You can however install applications directly to Wear for development purposes. - Watchfaces
My favorite feature upto now in Android Wear is the ability to change the face, from Digital to Analog to Gallery preview to Gadget! The package that holds features and objects for this is under,android.support.wearable.watchface.
There are other packages and features provided in Android Wear API, but I will not talk about them to make sure I maintain my English for noobs. The services talked about above are used to create an application in Android Wear, they use the same SDK and same stuff, just that the services and features in a watch are not as much as your handheld would have. The services and resources include most specially,
- CPU — of course your mobile device can span over to Octa-cores, but until now watches have not reached that much cores. So, maintaining the CPU usage is a must for developers.
- RAM — until now I have only found the watches (talking about Android Wear based) to have 512 MB RAM, that is too much for a watch, on the same place is too low for a developer! If you do not use it efficiently, it can waste almost everything on the watch. Starting with the CPU.
- Battery power — the problem with these digital gadgets is that they drain most of the power, users have to recharge their devices regularly. CPU usage, brightness level and graphics are among the factors that can raise the battery usage. You must make sure that you are writing an application that does not voilate these design principles so users don't need to bring their device chargers with the,
That said, now let us continue and learn how to build an application for Wear. I hope you now have the idea of what-to and how-to in Wear. :-) In this article, I will create a simple application for Android Wear, with not much complex functionality. The purpose is to explain everything to its core so that once you start building on top of it, you don't have to face much difficulty.
Creating the application
I am going to use Android Studio to create a new Android Wear application, you can use Eclipse. First of all, make sure that you are having the required SDK versions. These SDK versions are required to create your Android Wear applications.
- SDK Tools must be version 23 or higher.
I am not talking about SDK itself, but the SDK tools. It is a separate option in SDK manager. - Android SDK 20 or higher.
Android KitKat is SDK version 19, whereas the version designed for Wear is 20. Same name, but different version. Look at the following images they will clarify some stuff here.

Figure1: Installing (or confirming) Android SDK Tools in Android Studio.

Figure 2: Installing (or confirming) Android SDK Tools in Eclipse IDE with Android Development setup.

Figure 3: API version 19 and 20. For Wear, minimum SDK version required is 20.
The above images demonstrate the required assemblies for Android Wear programming. Now we need to create a new project, simple. In Android Studio create a new project and name it what-so-ever you want to name it as. They don't need to be followed, I used HelloAndroidWear. One thing that you need to consider is that you need to chose both Phone and Wear while creating a new project. Chose the required platform versions and you're good to go.
- For Phone
The minimum version required for the phone companion application is Android 4.3. You should consider chosing a platform with attention, you can however chose the frameworks previous than Android 4.3 but they won't be compatible with Android Wear.
Android Wear application requires Android 4.3. - For Wear
Android 4.4W or up! :-)

Figure 4: You can chose Android 4.4W; doesn't make any difference but with more audience.
In the next windows, just select "Blank Activity" that is so, because we need to understand how to build the applications from ground up. The blank activity has the ground set up, thus the ground-up. ;-)

Figure 5: Selecting "Blank Activity" on mobile device.

Figure 6: Selecting a "Blank Activity" for Wear device.
Once you have created the application you will have the following project in your studio, there are two projects created, we are only interested in "wear" section. Each of the sections has its own Manifest file, package, resources. These resources are used on both of the devices separately. These manifest also hold separate information based on the framework and device being used. On the handheld, "mobile"'s Manifest and resources are used, whereas on the Wear device, its own are used. It helps to maintain the separate frameworks separately.

Figure 7: Mobile and Wear are categorized under a separate folder.
We are only interested in the "wear" section and we will dissect that section of our project only. The mobile app is just the same Android application which can be installed on a mobile device running Android at its core. If you open up the project, it will have a single activity (the blank activity we selected) along with the backend code it would run. Plus a few other layout and stuff, that is native-Android stuff. So, if you ever developed Android application you will know what that is.

Figure 8: File system heirarchy of Wear application project in Android Studio.
One thing to note here is that Android Wear (upto the time of writing this post) comes in two shapes.
- Round
- Square
The size can alter depending on the manufacturers' design concepts etc. Android Wear manages to maintain the UI for both of these cases. Round and Square, both screens do not necessarily have the same UI features, same UX tasks and same dimensions. To overcome these problems, Android provides you with ability to create a separate UI for both of these screens. This would give you time to think and design your UI, buttons, controls etc for those screens. For that sake, in our activity_main.xml (the file that is used to render the layout) we are only going to create a single WatchViewStub. This object then holds the definitions for our UI.
<?xml version="1.0" encoding="utf-8"?>
<android.support.wearable.view.WatchViewStub
    xmlns:android="http://schemas.android.com/apk/res/android"
    xmlns:app="http://schemas.android.com/apk/res-auto"
    xmlns:tools="http://schemas.android.com/tools"
    android:id="@+id/watch_view_stub"
    android:layout_width="match_parent"
    android:layout_height="match_parent"
    app:rectLayout="@layout/rect_activity_main"
    app:roundLayout="@layout/round_activity_main"
    tools:context=".MainActivity"
    tools:deviceIds="wear">
</android.support.wearable.view.WatchViewStub>
In the above code, focus on the bold text. These attributes define the layouts to be used for each case. You can specify the layout file to be used for each of these screens, so that you can create a better UI and UX for users with round screen and those with square layout.
Creating the UI for application
Next step is to create the UI for our application. The UI is created in the layout files. Eenie meenie minie moo, square screen I'll give you a go! Open up the rect_activity_main.xml and edit it, either in design view or in text-mode. It is same, native Android UI!

Figure 9: Android UI with a Button, TextView and EditText fields.
You can create the views using a mobile device, or you can change the layout or model to a wear. It doesn't make any difference. Either one can work expectedly. Plus, the white box there is to show where the "empty" TextView object exists. I removed the string to write the message once user presses the button.
Handling the events and back-end stuff
Like all other Android applications all of your application's business logic goes in the back-end, in a Java file. The Activity class handles the state, events and other stuff for your actvitiy. Same as it worked in any other Android application, isn't it? The class MainActivity is the one being used here, I will edit that activity to handle the click event on that button of mine.
There is actually one difference, we are going to render a layout on the WatchViewStub before it can do anything at all. The layout (actual layout is still activity_main.xml) is not having anything at all, we are going to apply a layout to it based on the screen. Once that layout is inflated based on the screen we can then apply event handling and other back-end techniques for the activity. Same thing I am going to do here, I am going to apply the click handler to that button plus I am going to change the text in the TextView and say hello to the user. (I know, hint is missing.)
@Override
protected void onCreate(Bundle savedInstanceState) {
    super.onCreate(savedInstanceState);
    setContentView(R.layout.activity_main);
    final WatchViewStub stub = (WatchViewStub) findViewById(R.id.watch_view_stub);

    // Once the layout has been inflated, handle it for view-based actions and handling.
    stub.setOnLayoutInflatedListener(new WatchViewStub.OnLayoutInflatedListener() {
        @Override
        public void onLayoutInflated(WatchViewStub stub) {
            // Initialize the variables (they are declared in class-scope, outside functions
            mTextView = (TextView) stub.findViewById(R.id.text);
            mButton = (Button) stub.findViewById(R.id.button);
            mEditText = (EditText) stub.findViewById(R.id.editText);

            // Handle the event
            mButton.setOnClickListener(new View.OnClickListener() {
                @Override
                public void onClick(View v) {
                    mTextView.setText("Hello " + mEditText.getText().toString() + "!");
                }
            });
        }
    });
}
Until the first line, the code is pretty much same as with other Android activities. Then it comes to a point, where we are handling the OnLayoutInflated event. By handling this event, we can now use the UI components and attach listeners or process them as we want to. That is pretty much Android way of building the application.

Figure 10: Android Wear application running in an emulator.
For our basic application, we just need to understand how-to so for this stage we can build a simple Hello World! application. That is why, I won't go in advanced topics of what can your device do. The application above can get input from user (depending on how device would react) and can run a simple CPU process to greet the user. Until now you will be able to understand how to create an application for your Android Wear. The next section is advanced topic for emulating the Android Wear and establishing the connection etc. In the next section you will learn about:
- Setting up debugging environment; setting up the emulators.
- Running the application and testing it.
Testing in both screens, round and square. - Installing the Android Wear application on your device's emulator.
- Connecting to the device using "Telnet" sessions.
So head on to next section for more of Android Wear development.
Setting up debugging environment
Before you can actually debug the application using emulators, you need to create one on your development machine. Android Studio gives you a great way of doing so, you just have to select a few things and it will create an emulator for you. Good thing is that you get a shell terminal, where you can execute commands such as install a package or uninstall a package. You will get used to them once you get started!
Creating emulators
In this section you will be able to see how to create an emulator for Android Wear and for Android smartphone. Smartphone is only required if you want to learn how to create a connection between the companion app or to see how it actually works. Otherwise, you can only create an emulator for Wear and test your application in it. That would (should) suffice.

Figure 11: Select Wear under category and the device type you want to get. Click Next to continue.

Figure 12: Select the OS version, minimum is KitKat Wear, plus you should consider using the x86 images as they have a better performance factor, HAXM by Intel. (HAXM runs on selected machines only)

Figure 13: Set up a few other emulator settings, hardware profiles, RAM or VM heap size etc and you're done.
Once that has been done, you can now run your emulator and test your applicatins. To test your application in it, either Play the app or Debug the application. Android Studio would let you select the emulator you want to test your application in.
You can create more emulators of different hardware or software to test them on different machines and devices! Pretty handy it is.
Testing the application
To test the application, start it in your emulator. If emulator was created successfully, Android Studio would prompt you to select the emulator you want to run your application in. Android Studio would itself upload the package to the emulator and run it. Just like above in Figure 10.
The application starts (we know, see Figure 10) we can provide it with some input and see what it does,
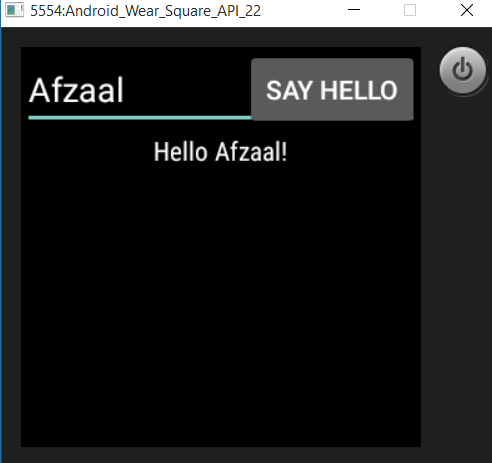
Figure 14: I provided it with "Afzaal" and it greeted me with "Hello Afzaal" — see code above for more.
Testing in round world!
Testing in a round screen Android Wear is also same, but with a little difference. You have to edit the other layout file for the round devices. Otherwise, when you try to reference a UI control, such as by calling
mTextView = (TextView) stub.findViewById(R.id.text);
It will throw exception because that layout does not have a definition for a TextView with ID of text. Take it as a plus point or negative. It has to be done in order to make sure that your application runs as you want it to on both devices.
Bonus sections
Android Wear development and testing has been completed until the last section, this section covers any of the bonus stuff that can help programmers to get started with Android Wear programming. I will continue to add more sections as they come to my mind or come in my sight (with proper reference), until now I find that "connect android emulator to wear emulator" much compelling case.
Connect Android emulator to Android Wear emulator
This is a case in real-devices, for example in real-devices your Android Wear itself doesn't do much but shows you the time. Your Android device brings it to life. That device holds 95% of the data, processes and the apps themselves. Wear just represents them in a compact way. However, for development purposes the apps are directly installed to Wear, to see how it works in real-world that is bit of a separate story.
I was wanting to find a solution to this problem and I stumbled upon this Stack Overflow thread, with somewhat straight-forward explanation. I can give that thread to you, but that would voilate the "English for noobs" rule of this guide. So, let me guide you step-by-step.
I will start off after "Create the emulators" sections and teach you from there onwards. First thing to do is to make sure your both emulators are running because the procedure requires you to set up a Telnet connection. You need to know the ports your emulators are running on.
Heads up! Before moving any further, make sure on your platform Telnet is activated. In Windows, you can turn it on under Program and Features --> Turn Windows features on or off --> Telnet client (Make sure it is checked). It will take some time and then you will have your environment set up for current section.
Now you need to get your hands on the ADB, if you are unclear as to what it is (like I was 5 hours ago), that is a command-line shell that allows you to execute different commands on your devices. You can target a device, get the list of devices, install applications or uninstall applications and so on. All just by this ADB. It is provided in Platform Tools folder of your SDK folder.
C:\Users\<username>\AppData\Local\Android\sdk\platform-tools
If you run it as it is, you won't get it to work. You would have to run a command prompt for that. You can either run a command to change the directory,
cd C:\Users\<username>\AppData\Local\Android\sdk\platform-tools
Or, use the contextual menu and run the command prompt to this folder. You will now be able to execute commands on your ADB, for example run a command to see how many devices are connected.
adb devices
It will give you the list of devices currently running. In my case it returned two results, (the two of the devices running)

Figure 15: Two emulators running currently.
By the name of them you cannot detect which is which, for that, you can see the title of the emulator's window. It would tell you what it is, in nature.

Figure 16: This is an Android Wear device; match the port to the device in list.
Before we connect to the device, note one thing that the device currently shows the status on the screen. That is drawn over the screen to notify the user of the current state.

Figure 17: Status icons showing current status of device.
The device currently shows:
- It is not connected to Android Wear app.
- It is charging.
First you would need to install the Android Wear, if there is a Play Store in your emulator, use that. Otherwise you can download the APK from here and install that emulator using the following ADB command.
adb install <C:\location\of\apk-file.apk>
The location needs to be proper, otherwise you will get "Invalid APK file" or other similar problems. You may also consider enabling USB debugging first. The app would let you communicate with wear devices, connect one device and see what you can do.
Now create the Telnet session, to allow emulators communicate with each other. Execute this in your terminal,
telnet localhost <mobile-emulator-id>
Where in my case it was 5554. You can see which one your mobile device has. Make sure to enter it properly, otherwise it won't work. If everything went good, it will show you the following result,

Figure 18: Showing the response.
Now, you can create the sessions and create a connection based on TCP protocol. Execute the following command,
redir add tcp:5601:5601
It would set up everything for you, if it says something is wrong. You should understand that something really is wrong, try again. ;)
In my case, it gave me the appropriate response and I was able to connect the devices.

Figure 19 The devices are connected and sharing their resources. Android Wear app also shows a "Connected" notifier in the Action bar.
Next, we can also send the stuff from Android phone to Android Wear, have a look.

Figure 20: Idle Android Wear on right side.

Figure 21: Android Wear showing a Card, which was sent from Android Wear app from mobile device.
Well, that's it for now folks. Hope to see you in the next article for Android Wear! :-)
Points of Interest
In this article you have learnt about core Android Wear, their applications and what they are. You were taught how to build applications for Android Wear, plus you were shown how to debug those applications on your own machine with different hardware and software profiles.
The application used was pretty much simple, because I did not want to confuse you folks in the complexity of Android OS, but just to give you an overview of the Android Wear. You barely scratched the surface. The input packages and others provide you with efficient ways of getting input from user. Do not get input in a same way I did, that was teaching purpose, for commercial purpose always think twice about your designs.
Leave your feedback if I missed something, or if you find me ambiguous in a section. I would love to hear it from you! :-)
History
- v2:
Changed the source code, removed compiled binaries. You would need to build the source code yourself.