
Grove Starter Kit with Intel Galileo Gen 2 – Getting Started
Let us see how easily we can get started with Internet of Things with Grove Starter Kit without worrying about electronic component and circuits.
Get access to the new Intel® IoT Developer Kit, a complete hardware and software solution that allows developers to create exciting new solutions with the Intel® Galileo and Intel® Edison boards. Visit the Intel® Developer Zone for IoT.
When I started with IoT I was all confused about electronics stuffs, resistors and circuits, then I got Seeed Studio’s Grove Starter Kit plus. With this we have to just plug the sensor modules instead of managing it through soldering or breadboard. So let us see how easily we can get started with Internet of Things with Grove Starter Kit without worrying about electronic component and circuits.

Grove starter kit is a complete development kit that consists of collection of sensors, actuators and shields. It is hardware and software solution to help you explore the IoT space and create innovative projects. Grove starter kit is a better choice because-
- It accelerates development and testing with IoT
- The Grove shield and sensors have 4 pin connectors that allow us to plug the sensor with ease rather than managing circuits and sensors through breadboard.
- The Grove shield has been tested as compatible with Windows by the Windows IoT team.
- There is a huge variety of sensor modules available with Seeed Studio.

If you are new to IoT, Seed Studio Grove Starter kit will help you to easily get started with development as you need not to worry about circuits and other electronics stuffs. With Grove shield and sensor modules you can easily create anything without worrying about electronic components much. There is no need of managing sensors through soldering or a breadboard. This article will guide you about how to set up and get running with Grove starter kit plus and Intel Galileo.

The booklet contains instructions about basic sketches with Grove Starter Kit Plus.
Required Components
Seeed Studio Grove Starter Kit Plus – Intel IoT Edition for Intel Galileo Gen 2
Setting Up
Download the Seeed Studios Sketchbook Starter
Adding SketchBook to Arduino IDE
- Extract the downloaded Sketchbook Starter
- Open Arduino IDE
- Select "File-> Preferences"
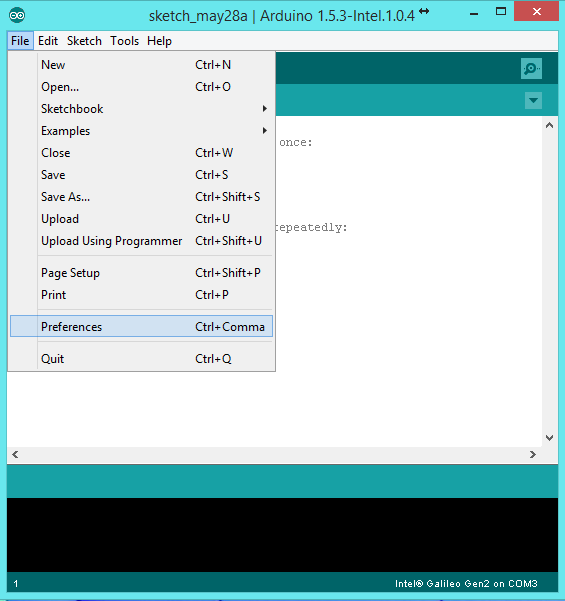
View the "Sketchbook Location" field
- Click "Browse" and copy the Seeed Studios Sketches folder you downloaded into the resulting folder and rename it something like "Sketchbook_Grove."

- Restart your Arduino IDE.
Making Connections
Power up the Galileo, You will see the power led will light up. Galileo will start booting from the customized version of Linux. Wait for few seconds. Note: Unlike Galileo Gen 1 board Galileo Gen2 board uses 12 V power supply. Use the specific power adapter which is provided with Galileo Gen2 board. Now we are ready to make the rest of the connections, we will connect Galileo to computer via USB cable. Now we see the USB led will light up.
Adding Grove Base Shield
In the Grove kit pull up the pink Styrofoam underneath the LED screen to locate the Base Shield.

The Base Shield has a variety of 4-pin plugs for connecting various sensors to Intel Galileo.
Now attach the Base Shield to Intel Galileo board and press down firmly. A green LED on the Base Shield will turn on when it is powered up.

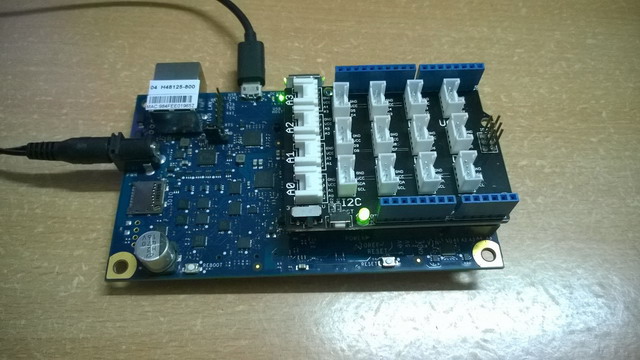
Plugging in the Temperature Sensor Module

In the Grove Starter kit Plus locate the Temperature Sensor Module, On its back side it will be written "Temperature Sensor". Using one of the wires provided in the kit attach it to your Base Shield unit. Make sure to plug it into the port marked as A0 as it is the default port in the sample code but you can change it as desired.

Running up your first sketch
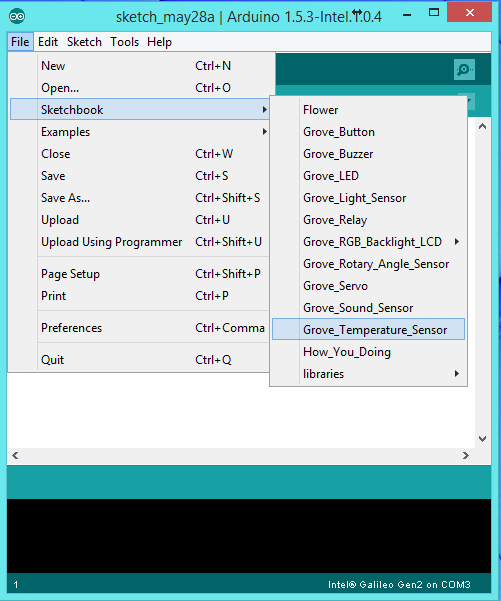
Open Arduino IDE.
Go to "File->Sketchbook-> Sketchbook_Grove->Grove_Temperature_Sensor" to load basic temperature sketch.
// Define the pin to which the temperature sensor is connected.
const int pinTemp = A0;

// Define the B-value of the thermistor.
// This value is a property of the thermistor used in the Grove - Temperature Sensor,
// and used to convert from the analog value it measures and a temperature value.

const int B = 3975;
void setup()
{
// Configure the serial communication line at 9600 baud (bits per second.)
Serial.begin(9600);
}

void loop()
{
// Get the (raw) value of the temperature sensor.
int val = analogRead(pinTemp);
// Determine the current resistance of the thermistor based on the sensor value.
float resistance = (float)(1023-val)*10000/val;

// Calculate the temperature based on the resistance value.
float temperature = 1/(log(resistance/10000)/B+1/298.15)-273.15;

// Print the temperature to the serial console.
Serial.println(temperature);

// Wait one second between measurements.
delay(1000);
}
Click the "Upload" button. You should see a "Transfer Complete" message if it is successfully deployed.

Viewing Sensor Results
To view the temperature reading of deployed sketch, click the "Serial Monitor" button in the upper right hand corner of the Arduino IDE.

The Serial Monitor is a separate pop-up window that acts as a separate terminal that communicates by receiving and sending Serial Data. See the icon on the far right of the image below. You can use the Serial Monitor to debug Arduino Software Sketches or to view data sent by a working Sketch.

You can see the output in Serial Monitor. Now you are ready to do some more complex projects and dive into the world of IoT with many sensor modules provided by Seeed Studio.
Start inventing today with the Intel® IoT Developer Program which offers knowledge, tools, kits and a community of experts to quickly and easily turn your innovative ideas into IoT Solutions.
Dream it, Build it with the Intel® IoT Developer Kit for Intel® Edison and Intel® Galileo platforms. These kits are versatile, performance-optimized and fully integrated end-to-end IoT solutions supporting a variety of programming environments, tools, security, cloud connectivity and hardware.
For more resources and to learn how the new Intel® IoT Developer Kit v1.0 can help streamline your IoT projects:
- Download the Intel® IoT Developer Kit
- Visit the Intel® Developer Zone for IoT
- Attend one of our Roadshows for hands-on training in creating your own IoT projects