
Using SQL Server’s Registered Servers Functionality Effectively
Using SQL Server’s Registered Servers Functionality Effectively
In my last blog, I explained how we can execute a Single Query on multiple servers using SQL Server’s Registered Servers functionality and how to execute a single query on multiple databases using SSMS tool.
In this article, we will learn how we can use SQL Server’s Registered Servers functionality effectively to improve productivity.
In order to deploy a software successfully in production and to prevent any error from being occurred directly on Live environment, we used to test an application in multiple environments before deploying it finally onto Production Servers. Considering full SDLC of an application, majorly 4 environments are built. These environments are Development, Testing, Staging & Production. However, these may vary from project to project based on the complexity of the project.
Each of these mentioned environments may or may not have multiple SQL Servers configured. For our case, we will consider that each of these environments have multiple SQL Servers configured.
Now in day-to-day development life, it seems to be little difficult to remember all the SQL Servers name, if you are connecting these different SQL Servers often and connect them daily manually by providing the UserId & Password in case of SQL Server authentication or by Windows Authentication.
As I explained in the previous blog, we can create multiple Server Groups under Local Server Groups. Each Server Group can represent an environment here and every group can have multiple SQL Servers registered with in them.
The good thing about Registered Servers is that the Servers registered once will always be there and available for future use. It is not required to remember each server name. During registration, you can provide alias to each SQL Server which is convenient to remember, else the SQL Server name will be displayed in Registered Servers list.
For example, in the below image, I have registered 5 environments, Local, Development, Testing, Staging & Production. For these 5 environments, I have created 5 different Groups.

In these groups, I have registered Primary and Secondary SQL Servers for each region and provided them alias to make it easy for me to remember.
Once you expand few nodes, it would look like below:

The beauty I found of Registered Servers is when it was not required to provide all the details again to connect with any of the servers. Just open Registered Servers window and double-click on the Server which needs to be connected. That’s all. SQL Server will open a new window automatically and connecting with the Master Database of that Server.
In case you want to connect with a particular database always, that feature is available too. While Registering for the Server, you can provide the default database which has to be connected every time. The same can be set in Connection Properties in New Server Registration window as shown below.

Along with Default Database, there are few other properties available which can be set. For example, Network Protocol, Connection Timeout, Execution Timeout, Encrypt Connection, etc.
It really takes a lot of time, if you have a big team of 20 people and each of the members has to Register so many servers. The solution to this issue is Export Registered Server details. Using Export functionality, all the Registered Server details can be exported and shared with the whole team. Here, I am assuming that complete team is using the same User Id and Password to connect with SQL Server.
Exporting can be done by right clicking on Local Server Groups as shown below:
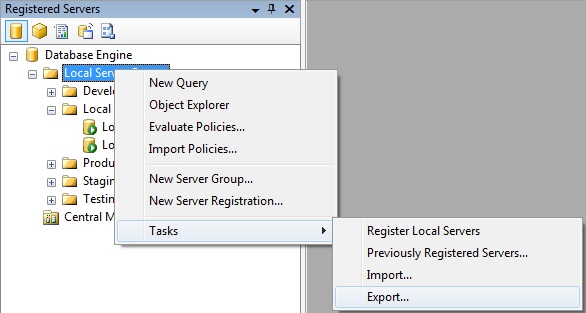
Exporting will save all the settings in a .regsrvr file. This file is an XML file and can be opened in a Notepad, in case you are interested to see the content of the file.
Once the settings are exported, it can be distributed with the team and the team can import it from the Import option shown above.
I hope you like the article and I am sure it would help you and your team to a great extent.
In case you have any feedback or comments about the article, please feel free to leave a comment below.
Happy learning till we meet again..
Filed under: CodeProject, Database, SQL Server Tagged: Database, DB Productivity, DB Tips, SQL Server 


![]()