Introduction
In Part II, we will deal with the initial forms that our application will use. As we progress, we will add more forms to perform other tasks, but to start, we will have 3 main forms: SplashForm, which will be our initial form that will show while our data loads, MDIForm, which will be our main task performing form and the MDI parent form, and PurchaseOrderForm, which will be the child form model for our purchase order documents. This step of this case study, and beyond, will assume that you have a working knowledge of Visual Studio.
Part II - Forms
SplashScreenForm
The first form we want to create is our Splash loading form. This form will perform two functions for us throughout the life cycle of our application. First, it will be the form launched at startup, and will show while our data is loaded in a background thread. Then once all of our data is loaded and ready to go, the Splash form will hide, but will remain active through the lifetime of the application. It will be the master form for the application, and will employ a task bar icon. The task bar icon will give us the ability to provide feedback to the user while our MDIForm is closed or hidden. Aside from using just a simple form for this, we will spice it up a bit using form transparency, to give the splash screen a more modern stylish look. You can download the source project from Part I, or create a new WinForms project, either way your project will contain a Form1 class, and will already be set up to launch this form at startup. First, let's rename the form SplashForm. Visual Studio will refactor your code and change all the references to Form1 to SplashForm for you automatically. To make this form a spash screen form, we want to do the following things:
- Change the forms
Size property to the size of the image we want to display as the splash image, and set this image as the BackgoundImage of the form. In our case, I have made a simple little image of a truck, with our title on it. The image is 480 x 320. - Change the forms
FormBorderStyle to None. This will remove the borders, and top control box, so that all that you see is our image. - We want this to show in the center of the screen each time, so set the
StartPosition to CenterScreen - Lastly, set the
ShowInTaskbar to false. This will be the very last step of our creation process, AFTER we have added the NotifyIcon. The reason for this is, once the form is gone from the Taskbar, there will be no way to easily close the application. Our NotifyIcon will give us an icon in the Windows notification area that we will be able to use to close our application.
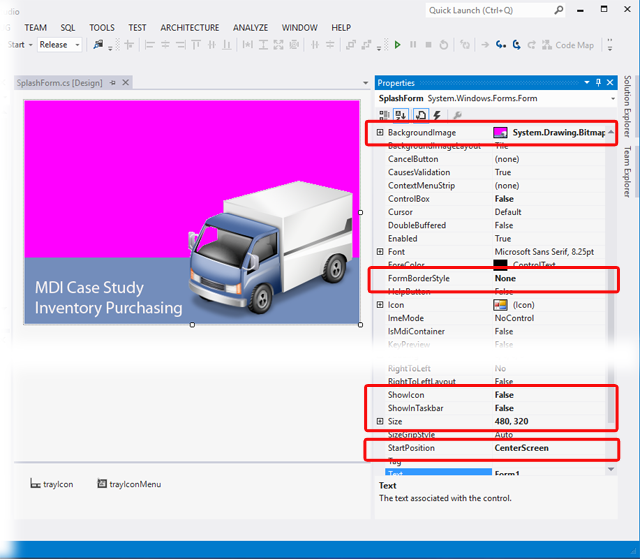
So let's go ahead and set the Size property to 480 x 320, set the FormBorderStyle to None, and the StartPosition property to CenterScreen. Next let's set the BackgroundImage to our splash image:

You'll notice the image looks a bit ugly at first sight, the background whitespace is instead Magenta. This is because we are going to set our form to treat the Magenta color as a transparency indicator. Any part of the form that is this color will be transparent at presentation. Magenta is a typically used color for transparency, but you could certainly use any color, you just have to coordinate the color between what's on the image, and what you set as the TransparencyKey color property of the form. Try to choose wisely, because choosing the wrong color could cause fragmentation of your image presentation as some pixels may inadvertently be the same color and won't render. Just like the weatherman's green stripes on his tie being invisible, same principle. Set the TransparencyKey property to Magenta. Now run your application and you will see that we have a nice less boxy looking splash screen to show our user. Note: Since we changed the FormBorderStyle to None, the control box of the form is now gone, so to close the application you need to right click the task bar and click Close.
Next we will add our NotifyIcon. The NotifyIcon will give us an icon in the Windows notification area. This can be used to house a right click ContextMenu for application processes, and can also be used to pop up bubble notifications to the user. Add a NotifyIcon to SplashForm by dragging NotifyIcon from the toolbox onto the form. Rename it trayIcon. Set the Text to "Inventory Purchasing". This is the text that will show when the user hovers over the icon in the notification area. Next set the Icon property to the icon below, which is a small 32x32 version of the truck in our splash screen.
Download truck32.zip
Now the NotifyIcon needs a ContextMenu. Drag a ContextMenu from the toolbox onto the form. Name it trayIconMenu. Visual Studio shows you the menu at the top of the form when it's selected in the asset area below. You can add items to the menu pretty simply this way. Add an item to the menu titled "Exit". This will allow the user to close the application completely from the notification area.
Once the menu item is added, double click it to create the click event handler. As we progress, there will be several things to check and do at close time, but for now, simply replace the thrown exception with the line this.Close(). Here is what the event handler should look like:
private void exitToolStripMenuItem_Click(object sender, EventArgs e)
{
    this.Close();
}
Now we need to tell the NotifyIcon to use this menu. Go back to the NotifyIcon properties, and set its ContextMenu property to trayIconMenu.
And finally, you can go back to the SplashForm properties and change the ShowInTaskbar property to false. Now you can run your code, and you will have the splash screen shown, but no taskbar entry for it. And you will see the truck icon in the notification area (may be autohidden). You can right click this icon and chose Exit to close the application.
Now, splash screens are not meant to hang around. In the future, when we load our data, after loading, the form will be hidden. This load will take a bit of time, so for now, let's simulate a 5 second delay, and then hide our SplashForm. There are few different ways to do this, you could just sleep the thread but if your splash screen had animation, this would possibly pause it. You could use a BackgroundWorker, which is what we will do to perform our loading later. But for now, I just used a simple timer, and on the first tick, hide the form and stop the timer.
Add a private System.Windows.Forms.Timer to SplashForm, and in the constructor initialize it, set its Interval to 5000 (milliseconds), set its Enabled to true, and a handler to its Tick event, and then call its Start() method.
_hideTimer = new Timer();
_hideTimer.Interval = 5000;
_hideTimer.Enabled = true;
_hideTimer.Tick += hideTimer_Tick;
_hideTimer.Start();
And in the hideTimer_Tick handler, stop the timer, and hide the form.
_hideTimer.Stop();
this.Hide();
Now run the application again and you should see the form shown for 5 seconds, then hidden, but the notification icon will still be there ready for use.
So now let's get to our main form, the MDIForm. Add a new form to your project, and in the dialog, scroll down and select MDI Parent Form, and name it MDIForm.cs.
Immediately, you will see that a lot of the work is already done for us. There is a menu, a toolbar, and a status bar. The menu and toolbar is already populated with the most commonly used items, such as Open, Save, Print, etc. Take a minute and explore the code too and you will see a lot of the events are already defined with some generic code, which will give us a bit of a head start. For now, let's leave the MDIForm as it is, and head back to the SplashForm. Right now, the SplashForm only hides itself after completing the simulated load timer. Now we want to instruct SplashForm to load and show our main MDIForm for us. First, we want a class wide MDIForm instance that we will use throughout the lifecycle of our application, so in the SplashForm class, let's define a private MDIForm and call it _mainForm. Next, in the SplashForm constructor, initialize our MDIForm.
Now since we are still just simulating our load time, let's go down to the hideTimer_Tick event handler, and after hiding the SplashForm, let's show the MDIForm.
private void hideTimer_Tick(object sender, EventArgs e)
{
_hideTimer.Stop();
this.Hide();
_mainForm.Show();
}
Let's go back to our NotifyIcon's context menu, trayIconMenu, and add another menu item titled "Open". This will again show our MDIForm if it is minimized or hidden. Once you have multiple menu items, the Visual Studio design view will allow you to rearrange the items by dragging them within the menu. Move the "Open" item to the top of the menu. Also, add a new item with title "-". This will create a horizontal divider line in the menu, for separating unrelated selections.
Again move this up in between the "Open" and "Exit" items. Now double click the "Open" item to create the click event handler for it. In this handler, we want to check to again call _mainForm.Show(), then check the WindowState property to see if it is FormWindowState.Minimized, and if so set it to FormWindowState.Maximized. Now your Taskbar Icon has two menu items.
Also, while we're at it, let's make things a bit easier on the user, and allow them to also reopen the MDIForm by double clicking the notification icon. With trayIcon selected, go to the properties window, and at the top of the list, is a button that looks like a lightning bolt, click it. This will list the object's available events. Find the MouseDoubleClick event, and double click it to have the handler created for you.
You could just define this event exactly like the "Open" menu item click event, or you could also call the PerformClick() method of the "Open" menu item. The only caveat to that method is, if you have visible menus, calling the PerformClick() method will show a visible click animation on the menu item. Since the "Open" menu item won't be visible, that would be an acceptable approach. Here is what the event should look like:
private void openToolStripMenuItem_Click(object sender, EventArgs e)
{
    if (_mainForm != null)
    {
        _mainForm.Show();
        if (_mainForm.WindowState == FormWindowState.Minimized)
        {
            _mainForm.WindowState = FormWindowState.Maximized;
        }
    }
}
The designed behavior for out MDIForm is to never actually close until the end of the application lifecycle. If the user closes the MDIForm, we instead want the form to hide. To achieve this, we want to high jack the FormClosing event of the MDIForm, cancel the event, and hide the form. There are two ways to do this. One, you can override the OnFormClosing() method witching the MDIForm class, which makes the behavior completely within the scope of MDIForm and all its properties, which is necessary if you need to any sort of cleanup before proceeding. The other method would be to handle the FormClosing event of the MDIForm instance within SplashForm. In fact, there may be a call to employ both measures, because of you need to clean up internal assets within MDIForm AND do something within SplashForm. Since all we are going to do for now is hide, and SplashForm really never needs to know MDIForm is now hidden, we will handle this within MDIForm by overriding the OnFormClosing() method.
protected override void OnFormClosing(FormClosingEventArgs e)
{
    e.Cancel = true;
    this.Hide();
}
Setting the FormClosingEventArgs.Cancel to true causes the event cycle to end after this event. Notice I omitted the call to base.OnFormClosing(e). This is because we don't need any parent class to be notified of this event. If you are also planning to handle this event in SplashForm, you will still need to call base.OnFormClosing(e). If you need to handle internal business first, then the base call needs to be the last line of the event handler.
That's it for Part II. In Part III, we will begin constructing the child form template PurchaseOrderForm.
Taking It Further - Thread Safe Calls
Let's revisit the SplashForm we've constructed, and provide a bit of feedback to the user, something to show that the program is working. First we will switch from using the Timer, to using a BackgroundWorker. Lets add a bit of text, as well as a progress bar, running in Marquee mode. We'll add a status text label and a progress bar, and use them to keep the user updated. Since we will be using a BackgroundWorker to perform our loading, this means that we will be creating some cross thread traffic when changing the properties of our label or progress bar, so we need to make some thread safe methods for doing this. First, let's add our 2 components to SplashForm, a Label and a ProgressBar. In the top left corner of SplashForm, add a Label, name it progressText, and set it's Font size to 16, Bold. Set its ForeColor to Window, or White, and set its BackColor to Magenta. Setting the BackColor to Magenta will cause the text only to float over the transparent area, which is a nice effect. Next add a ProgressBar, name it progressBar. Place it just below the progressText and stretch it across the form. Set its Style to Marquee. Set Visible on both progressText and progressBar to False. We will make them visible at runtime.
Now we need to make 3 thread safe calls over the lifetime of SplashForm, one for setting the Visible property of progressText and progressBar, and one for setting the Text property of progressText. To do this, we need a delegate method, and we need to check the InvokeRequired property of the control we are modifying. If InvokeRequired is True, we have to create a delegate and invoke it.
private delegate void SetProgressTextVisibleCallback(bool visible);
private void SetProgressTextVisible(bool visible)
{
    if(progressText.InvokeRequired)
    {
        Delegate d = new SetProgressTextVisibleCallback(SetProgressTextVisible);
        progressText.Invoke(d, visible);
    }
    else
    {
        progressText.Visible = visible;
    }
}

private delegate void SetProgressBarVisibleCallback(bool visible);
private void SetProgressBarVisible(bool visible)
{
    if(progressBar.InvokeRequired)
    {
        Delegate d = new SetProgressBarVisibleCallback(SetProgressBarVisible);
        progressBar.Invoke(d, visible);
    }
    else
    {
        progressBar.Visible = visible;
    }
}

private delegate void SetProgressTextCallback(string text);
private void SetProgressText(string text)
{
    if(progressText.InvokeRequired)
    {
        Delegate d = new SetProgressTextCallback(SetProgressText);
        progressText.Invoke(d, text);
    }
    else
    {
        progressText.Text = text;
    }
}
Next let's create the BackgroundWorker, and define it's RunWorkerCompleted and DoWork events. Comment out or delete the lines for _hideTimer, as we won't be needing it anymore
_loader = new BackgroundWorker();
_loader.DoWork += _loader_DoWork;
_loader.RunWorkerCompleted += _loader_RunWorkerCompleted;
_loader.RunWorkerAsync();
First for the DoWork event, let's just cause the BackgroundWorker thread to sleep 3 times for 5 seconds each, setting progressText each time. At the start we will set the progressText and progressLabel to visible.
private void _loader_DoWork(object sender, DoWorkEventArgs e)
{
    SetProgressText("Loading Phase 1 .....");
    SetProgressTextVisible(true);
    SetProgressBarVisible(true);
    for(int i = 0; i < 3; i++)
    {
        System.Threading.Thread.Sleep(5000);
        SetProgressText("Loading Phase " + (i + 2).ToString() + " .....");
    }
}
Lastly, in the RunWorkerCompleted event we just want to set the Visible of progressText and progressBar back to False
private void _loader_RunWorkerCompleted(object sender, RunWorkerCompletedEventArgs e)
{
    SetProgressTextVisible(false);
    SetProgressBarVisible(false);
}
Now test run the program, and you'll see the text changing, and the progress bar running. And we've done all this in thread safe calls.
Points of Interest
NotifyIcon- Splash screen
- Form transparency
- Overriding event handlers
- Canceling
FormClosing event
This member has not yet provided a Biography. Assume it's interesting and varied, and probably something to do with programming.


 General
  News
News  Suggestion
  Question
  Bug
Bug  Answer
  Joke
Joke  Praise
  Rant
Rant  Admin
Admin 


