Introduction
If you do any fair amount of development work in SharePoint, chances are you will be required at some point to work with Business Data Connectivity (BDC) objects. BDC is a great technology to use for connecting to non-SharePoint data sources because it enables connections to a wide variety of data sources while exposing the data to the code base in a universal object-based manner. With BDC, you do not need to worry about how to connect and interact with different types of data sources, since the BDC model handles this for you.
While SharePoint has many built-in features that allow you to surface and consume BDC data, there are some scenarios where the out-of-the-box implementations will not be sufficient. In these instances you may want to create your own custom Web Parts that can work with the data to fit your needs.
When building custom web parts, you may want to make use of some of the out-of-the-box controls in ASP.NET such as
GridView and DetailsView. These controls work best when bound to a
DataSource object which gives the control the information it needs to properly Add/Edit/Update data automatically without requiring any special code (outside any optional validation, etc).
To date, all articles on this subject that I have found use messy methods of binding to Grid controls that involve manually handling updating events and getting the changed field values by reading the textbox controls on the web part with a switch statement. You can imagine the amount of typing required to do this with large tables. Thankfully, SharePoint comes with its own handy DataSource type called
BdcDataSource that you can use to wrap and manipulate BDC entities. Unfortunately, the documentation on MSDN does not (at the time of writing) have any examples of how to properly initialize and use these objects. That is where this article comes in.
Before you begin
To properly follow along in this article, you will need to have some knowledge of BDC in .NET, as well as ASP.NET controls. For an overview of BDC, check out the MSDN article here.
For development examples and tutorials on using BDC in code, check here.
The samples in this tutorial were written in Visual Studio 2013 for SharePoint 2010. This article however is valid for Visual Studio 2010, 2012 and 2013 as well as SharePoint 2010 and 2013.
Prerequisites
Before we can begin, we will need a SharePoint project with a pre-created BDC model. For a walkthrough on how to do this, check out this MSDN walkthrough article. The article linked uses an out-of-date AdventureWorks database, but you can follow along using the Person.Person table in place of the Person.Contact table.
*Note that if you are using the Person.Person table as an example, do not add TypeDescriptors for the AdditionalContactInfo, Demographics, and ModifiedDate columns, as they require extra setup to work properly with BDC Updates that will not be covered in this article. *
The examples in this tutorial will be using the Microsoft AdventureWorks sample database as well as the BDC model from the walkthrough article which represents the Person.Person table from the database. For this article, you should have a
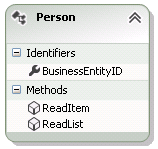
SpecificFinder (ReadItem) and Finder (ReadList) method created as in the example image below:
With these methods created, we need to set an additional property that the MSDN article did not specify. For a
BdcDataSource to be able to correctly update, we need to ensure the Person BDC Entity knows what its identity column
is for the Person Entity. On both the ReadItem and ReadList methods within the Method Details window, click on the drop-down arrow on the Person
TypeDescriptor and select <edit>.
The BDC Explorer window should appear (usually on the top right) with your Person entity selected within the the method. Expand the Person entity and select the BusinessEntityID property.
In the properties window, there is a property called Identifier. If it is not already set, use the drop-down in this property field to select BusinessEntityID and save your changes. Ensure this is done for both the
ReadItem and ReadList methods.

Additionally, within the
ReadItem method, select the In parameter (in my example called
businessEntityIdTypeDescriptor) and open up the drop-down menu on the Identifier Entity property and select the Person entity (it should be the only option). After that, select the Identifier drop-down menu and select
BusinessEntityID. This helps the BdcDataSource to understand which entity the parameter exists in, as well as the property within the entity to get the value from.
To properly implement a BbcDataSource with the Person model, we will need a web part to present it in. Right click on the project in the Solution Explorer and select Add-->New Item. On the Add New Item Menu, browse the left-side tree to the relevant version of SharePoint and select Visual Web Part. Give it the name PersonWebPart and then click Add. Now that we have a web part in the project, open the PersonWebPart.ascx
in designer mode and drag a GridView control onto the design window. Give it the ID: GridViewPerson.
With the GridViewPerson selected, go to the properties pane and ensure the property
AutoGenerateColumns is false (We can't update with AutoGenerateColumns because it adds a column called BdcIdentity which cannot be updated back to the table (since it doesn't exist in the person table).
Select the columns property and click the ... button to open the Fields editor. Add 5 BoundField fields and set their order and properties according to the table below
| HeaderText | DataField | ReadOnly |
| ID | BusinessEntityID | True |
| Title | Title | False |
| First Name | FirstName | False |
| Middle Name | MiddleName | False |
| Last Name | LastName | False |
The GridViewPerson is now configured to display the BDC data.
Creating the BdcDataSource
Now that we have the project prepared, we can get down to creating and configuring our BdcDataSource. Unfortunately, Microsoft's current designer implementation of BdcDataSource in Visual Studio is non-existent so we will need to add the control in the .aspx markup. Switch over to the markup view on
PersonWebPart.aspx and add the following line just above the asp:Gridview control we just added:
<SharePoint:BdcDataSource runat="server" ID="PersonDataSource" Mode="List"></SharePoint:BdcDataSource>
The Mode property represents how the data is being displayed. There are
three choices:
- List - Used to display a list of items (i.e. results from the Person Finder or
ReadList method). This is best used when binding a BdcDataSource to a Gridview. - Item - Used to display a single item (i.e. results from the Person
SpecificFinder or ReadItem method). Best used with the DetailsView control. - AssociationList - Used to display related entities created through BDC entity associations. For more information on Associations, check out this MSDN article.
For this example we will be using List because we are binding the data to a GridView and we will want to see multiple results.
Add the Web Part to SharePoint
At this point, we should build the project and ensure there are no errors. Go ahead and deploy it in debug mode to your chosen SharePoint site. Once the browser window opens, choose a web part page to add the web part to (for ease of testing, I chose the home page of my test site), and open it in edit mode by selecting Page on the ribbon, and then clicking the Edit Page button.
Now select a Web Part zone to add your Web Part to, and click the Add a Web Part link. The ribbon should pop-up the web-part selection menu at the top. Browse to the Custom category on the left and select the PersonWebPart, and click the Add button.
At this point, all you will see is the title of the Web Part "[ProjectName] - PersonWebPart". This is expected. We just want to make sure it displays without error. Click the Stop Editing button in the top-left corner and close the browser window to end the debugging session.
Nothing to see here
Connecting the Person Entity to the BdcDataSource
We are now ready to connect our Person BDC entity to the data
source. Before we can do that, we'll need to add a reference to the project and a few using statements. Right-click on the projects References folder and select
Add Reference... and add the Extension (under extensions in Visual Studio 2012/2013) Microsoft® SharePoint® Foundation Business Data (Microsoft.BusinessData.dll) to the project.
Open up the PersonWebPart.ascx.cs and add the following using statements to the top of the file:
using Microsoft.SharePoint;
using Microsoft.SharePoint.BusinessData.SharedService;
using Microsoft.SharePoint.Administration;
using Microsoft.BusinessData.MetadataModel;
using System.Web.UI.WebControls;
Now we will create a new method to configure our BdcDataSource to display results from the
ReadList method of our Person BDC Entity. Add the following method to your
PersonWebPart class:
private void InitializeBdcDataSource()
{
    BdcService service = SPFarm.Local.Services.GetValue<BdcService>(string.Empty);

    IMetadataCatalog catalog =
        service.GetDatabaseBackedMetadataCatalog(SPServiceContext.Current);

    IEntity entity = catalog.GetEntity("BdcDemo.AdventureWorksModel", "Person");

    ILobSystemInstance lobSystemInstance =
        entity.GetLobSystem().GetLobSystemInstances()[0].Value;

    this.PersonDataSource.EntityName = entity.Name;
    this.PersonDataSource.EntityNamespace = entity.Namespace;
    this.PersonDataSource.EntityId = entity.Id;
    this.PersonDataSource.LobSystemInstanceName = lobSystemInstance.Name;
    this.PersonDataSource.FinderName = "ReadList";
}
Note that the catalog.GetEntity method requires that you provide the namespace and name of your entity. If you named yours differently than the one in the project, you can find out what the values are by going to the BDC Explorer for your BDC model (The
<BdcModelName>.bdcm file) and selecting the
Person entity. You will see the values in the properties window under the
Namespace and Name properties respectively.
What we are doing in the method above is querying the BDC Service in SharePoint for our entity, and then using it's properties to set the
BdcDataSource properties. We do this because we cannot know for sure what SharePoint has set for the Name and ID and LobSystemInstanceName of our entity (it generates these itself, and may be different if there are duplicate names in BDC already). The
FinderName property tells the BdcDataSource the name of our Finder method. Since we have not specified any filter parameters, the
BdcDataSource will expect a Finder method with no parameters (if your ReadList method takes parameters, you will need to create one without them for it to work). If your
Person finder method has a different name, make sure you set the
FinderName property to whatever that name is.
Now that our BdcDataSource is configured to display list data, we can test it in our web part. We just need to bind the data source to the
GridView. Add the following code to the Page_Load method of your web part:
protected void Page_Load(object sender, EventArgs e)
{
    if (!Page.IsPostBack)
    {
        this.InitializeBdcDataSource();

        this.GridViewPerson.DataSourceID = this.PersonDataSource.ID;
        this.GridViewPerson.DataBind();
    }
}
Ensure your GridView has the AutoGenerateColumns property set to
false and then build and deploy the project to SharePoint. Browse to the page that you added the web part to and you should see the data from the person table displaying in the web part.
Sweet, sweet BDC data...
Updating the BdcDataSource through the GridView
GridView, in all its handiness, has built-in support for
CRUD methods through
IDataSource objects. The BdcDataSource is no exception. In this next step we'll configure an Updater method in our
Person Entity so that we can attach that method to the PersonDataSource. Navigate back to the BDC Explorer view and select the
Person entity. In the BDC Method Details window (usually on the bottom of the window) scroll to the very bottom and select the <Add a Method> column and use the drop-down menu to select Create Updater Method.
You should now see a method named Update appear. In the method tree within the BDC Method Details window we can see it has been created with one parameter named person. Under the TypeDescriptor column, we can see that it is a Person object type. Edit the TypeDescriptor for the Update Person variable and select the
BusinessEntityID TypeDescriptor column in the BDC Explorer view. On the properties window, ensure that the
Pre-Updater Field property is set to True. Also, as done with the TypeDescriptors for the parameters on the other 2 Read methods, ensure that the
Identifier property is set to BusinessEntityID (This should be done automatically but it's good to check).
*Note* The Pre-Updater Field should only be set to true for Identifier columns that are not auto-generated (i.e. if SQL is not generating the column value for you).
Now we need to add in the actual code needed to update. Double-click the
Update method in the Person entity within the BDC Explorer View to quickly generate our Update method stub and copy the code below into it. Note that you may have to set the
ServerName string to whatever your SQL Server name is. Also change your DataContext name and connection String to whatever you used when setting up your BDC model in the prerequisites section.
public static void Update(Person person)
{
const string ServerName = "<Your Server Name>";
AdventureWorksDataClassesDataContext datacontext =
new AdventureWorksDataClassesDataContext("Data Source=" + ServerName + ";" +
"Initial Catalog=<Your Database Name>;Integrated Security=True");
Person personToUpdate =
(from persons in datacontext.Persons
where persons.BusinessEntityID == person.BusinessEntityID
select persons).SingleOrDefault();
personToUpdate.EmailPromotion = person.EmailPromotion;
personToUpdate.FirstName = person.FirstName;
personToUpdate.MiddleName = person.MiddleName;
personToUpdate.LastName = person.LastName;
personToUpdate.NameStyle = person.NameStyle;
personToUpdate.PersonType = person.PersonType;
personToUpdate.EmailPromotion = person.EmailPromotion;
personToUpdate.rowguid = person.rowguid;
personToUpdate.Suffix = person.Suffix;
personToUpdate.Title = person.Title;
datacontext.SubmitChanges();
}
Now that we have set the Identity, column and created the Update method, our
PersonDataSource will be able to properly update. Lets go back to
PersonWebPart.ascx.cs and add an extra line into our
InitializeBdcDataSource method:
private void InitializeBdcDataSource()
{
<span style="font-size: 9pt;">
this.PersonDataSource.UpdateCommand = "Update";
<span style="font-size: 9pt;">} </span><span style="font-size: 9pt;"> </span>
Our PersonDataSource is now configured to update Person Entities. All that is left to do is make some small additions to our
GridViewPerson to get it to enable this functionality. Navigate back to the PersonWebPart.ascx design view and select the
GridViewPerson control. Under the properties window, set
AutoGenerateEditButton to True. Also, select the
DataKeyNames property and click the
... button to open the String CollectionEditor. Type in
BusinessEntityID in the first line and click OK. This tells the BDC DataSource which column represents the Identifier used in update operations.
Next, switch over to the Event View in the properties window and double click on the empty cells next to RowEditing,
RowUpdated, and
RowCancelingEdit to auto-generate event methods for them. Copy the code for the events below into the respective events in your PersonWebPart.ascx.cs file:
protected void GridViewPerson_RowEditing(object sender,
System.Web.UI.WebControls.GridViewEditEventArgs e)
{
GridView gridView = sender as GridView;
gridView.EditIndex = e.NewEditIndex;
gridView.DataBind();
}
protected void GridViewPerson_RowUpdated(object sender, GridViewUpdatedEventArgs e)
{
GridView gridView = sender as GridView;
gridView.EditIndex = -1;
gridView.DataBind();
}
protected void GridViewPerson_RowCancelingEdit(object sender,
System.Web.UI.WebControls.GridViewCancelEditEventArgs e)
{
GridView gridView = sender as GridView;
gridView.EditIndex = -1;
gridView.DataBind();
}
Now that we have the events configured, compile and deploy your solution. Browse to your web-part, choose a row to edit, make some changes, and update it. You should see your updated results appear in the grid.
Summary
The BdcDataSource enables us to integrate SharePoint BDC data into traditional ASPX controls and avoid the tedium of manually coding the the read and update methods yourself for every operation. It also allows a universal way of connecting to any data source regardless of its back-end, as long as it has a BDC connector defined. By exposing BDC to traditional Web Controls, we can create more flexible web applications than that what is built-in to SharePoint.
Moving Forward
With the knowledge in this article, you should have enough information to continue forward with Creator and Delete methods, as well as Filters to further expand the functionality of your web parts. For more information on these items, see the
Before You Begin section at the top of this article.


 General
  News
News  Suggestion
  Question
  Bug
Bug  Answer
  Joke
Joke  Praise
  Rant
Rant  Admin
Admin 


