
Simple Demo WCF AJAX Web Service
4.83/5 (7 votes)
A quick look at a Simple WCF AJAX Web Service!
Contents
- Introduction
- WCF AJAX Service- Introduction
- Look at our project TweetBL defining simple Business Functionality
- Creating a WCF AJAX Service project (for TweetBL Project's Business Functionality)
- Running the default WCF AJAX Service project
- Building WCF AJAX Service project (for TweetBL Project's Business Functionality)
- Running the WCF AJAX Service project (now with our Business Code)
- Switching from JSON to XML for WCF AJAX Web Service
- Creating WCF AJAX Web Service Client
- Testing WCF AJAX Web Service using our Service Client
- Final Thoughts
Introduction
In this article, we will be looking into creating a WCF AJAX Web Service!
I would recommend giving a quick read to this article to get a brush up on basic WCF details.
I will focus on covering WCF AJAX Service related topics in this article and will not divulge into basic WCF related details example - explaining Operation Contracts. The above linked article explains these topics.
We will be using a simple business layer project called TweetBL in this article to start things up. During the course of this article, we will expose the business functionality of TweetBL as a WCF AJAX Web Service.
We will be focusing on churning out a WCF AJAX Web service in this article and I have tried my best to keep it as simple as one can.
Following the KISS concept: "Keep it Simple Stupid."
So let's get the ball rolling...
WCF AJAX Service - Introduction
"Asynchronous JavaScript and XML" is a web development technique that supports creating an interactive website with rich client presentation. AJAX facilitates retrieval of data from a server: asynchronously - what this means is AJAX invokes a new request (for data) without disrupting the client's current view!
AJAX enables us to fetch Server-Side content dynamically and makes it look like client-side dynamic content... the user is subjected to no interruptions whatsoever! while AJAX does this dynamic server-side content fetching under the covers. Once this fetching of data form server is done, client's current view is updated with the retrieved data.
Finally, the main purpose of AJAX is to improve speed, usability and performance of a web application.
A business example could be a Rating Functionality on a Web Page. When a user rates something - their rating of say 5 is stored into the database without the need to refresh or reload the web page. The user just selects the 5 stars and goes on by his/her business on the web page whilst AJAX works on the background vigorously to please its masters by doing the needful.
Lastly, AJAX employs the below listed technologies (but is not limited too) and mechanisms to make a developers life easier:
- JavaScript
- XML
- Asynchronous requests to server
"WCF AJAX Web Service"
Windows Communication Framework (WCF) is as interesting as the Marvel Universe! no kidding.
WCF is a framework which supports message-based communication between Client and server.
WCF is highly configurable... We will leverage this trait of WCF by employing EnableWebScript behaviour configuration option!
EnableWebScript behaviour provides for XML and/or JSON serialization instead of using the traditional SOAP envelopes! It also creates a default JavaScript Proxy (this default JavaScipt Proxy includes client code for sending and receiving data between the client and server along with information regarding the required transport objects to exchange data) for each AJAX service that is defined... and this generated JavaScipt proxy can be consumed by any web client.
Other important factor is that WCF AJAX service is an example of Web API Web Service. This is because WCF AJAX service uses HTTP standards to send and receive data and does not rely on WSDL which the traditional WCF SOAP over HTTP services use. We will be using multiple HTTP verbs (like Get/Post/Delete) to communicate with the server.
All of the above just by tweaking WCF Configuration!
Finally, AJAX clients are Web pages running JavaScript code and accessing these WCF services using HTTP requests.
We will be developing a WCF AJAX Web Service which will be consumed by a client Web Page running JavaScript via HTTP requests.
Time to roll-up our sleeves and get started!
Look at Our Project TweetBL Defining Simple Business Functionality
We will expose TweetBL projects Business Functionality as a Web Service!
The project that we will be exposing as a Web Service is a simple class library project called TweetBL. Project TweetBL represents the business code that has been identified to be made available over the web as a WCF AJAX web service.
TweetBL project has the following business functionality (methods) that will be exposed as a service. Business functionality methods are:
- Update tweet
- Save/insert a tweet
- Delete a tweet
- Retrieve tweet by id and
- Retrieve all tweets
TweetBL Project:

Tweet.cs is simply the data class identifying all data members that we have to fetch/update/insert and delete to manage tweets. Think of Model (Data Model).

ManageTweet.cs is the class that houses the business methods that do all the necessary processing on the Tweet Data to manage and maintain it. Note: There is a bit of housekeeping code as well because we are not using an actual database to keep things fairly simple.

Creating a WCF AJAX Service Project (for TweetBL Project's Business Functionality)
Now that we have had a quick trip of our TweetBL Project, it is time to jump into some real code... Let us start by adding a new project called Tweet.WCFService.AJAX which will be our WCF AJAX Service project.

Select the Empty option and nothing else.


The above step has created an empty ASP.NET Web Application for us!
Now, we will add a WCF AJAX Service to Tweet.WCFService.AJAX project. Go to add new item (on Tweet.WCFService.AJAX project) and follow the screen-shot below:


As soon as we add the AJAX service, a few changes were made to our project.
A few references and libraries from .NET were added to our project. We will cover a few interesting bits!
Our Web.config file has also been modified! Let us have a look at that...

A behaviour has been added to our Web.config file (above screen-shot) to enable Web Scripting for our project. An <endpointBehavior> has been added which will enable listening of request calls for web services. <enableWebScript /> behaviour maps Operation Contracts to specific URIs. <enableWebScript /> also creates a JavaScript proxy file for us for our services which we will have a look at shortly. <enableWebScript /> also enables a few ways for us to serialize data. We have options between JSON or XML to serialize data. The important thing to note here is that all this is part of Web API.
Notice the binding used "webHttpBinding". This allows our web service clients to communicate with our service using HTTP get and post verbs. Note only the methods decorated with Operation Contract attribute are exposed as services.
Along with the above changes, we are also provided with a template file for our TweetService.svc class.

Here unlike: SOAP over HTTP Web Services, we do not have an interface class. The Service Contract and Operation Contract attributes are directly defined on the class. Also, take a note of AspNetCompatibilityRequirements attribute: this attribute indicates that this service integrates with the ASP.Net pipeline. Now that we have created a project and have had a quick tour of what we have been given by default to work with, let's start building the real thing!
Running the Default WCF AJAX Service Project
So in our WCF project Tweet.WCFService.AJAX, let's start things by running the default code that we got after creating the project. This can be done by right clicking on TweetService.svc and selecting view in browser!


Beauty! the auto generated HTML page. Now this is a Web API service so no WSDL is generated!
Of course, we have come this far and there is no harm in testing the default DoWork method that we saw in class TweetService.svc. To do this, all we have to do is add a new attribute to the DoWork Method. The new attribute is WebGet shown below in the screen-shot.

Naturally, you would want to know what WebGet attribute does? Basically, WebGet attribute exposes operations (decorated with it) using the GET verb! Now our DoWork service is directly accessible via a Web browser by typing the URI to the service (TweetService.svc in our case) followed by the method/operation name (DoWork in our case) into the address bar. This is what we will do next.
After adding this new attribute, again, we go right click on TweetService.svc and select view in browser. Type in method DoWork at the end of the path... and hit enter.

the fruits of our labour...

{"d":null} is the response that we got back by making a call to DoWork service operation. This is in JSON format.
Calling AJAX Services is this simple! We start with the service file name in this case TweetService.svc followed by the name of the method, in this case DoWork. Remember we have decorated DoWork with the WebGet attribute which enables the operation to be accessible via the HTTP get request.
The format of the returned result for DoWork has to do with the default generated JavaScript Proxy class for our WCF Service. <enableWebScript /> helps generate this default proxy. The return result is an object that has come back with a "d" parameter. This is also done on purpose to work with above mentioned proxy.
If you wish to look at this default generated proxy - all you have to do is append the service file name TweetService.svc with a js as shown in the screen-shot below:

Some interesting things regarding the default proxy - Apart from the apparent constructor at the start of the proxy file and from the boiler plate code - Towards the bottom of the file, we find the following interesting bits:
Highlighted is the exact URL to access our AJAX web service...

Highlighted is the function definition of our default DoWork method...
![]()
So, including this script in our web page will enable us to connect to our service and call our DoWork method using JavaScript!
The last interesting bit is the function definition to call our method DoWork.
![]()
So, the above screen-shot indicates that a call to DoWork method takes 3 arguments.
onSuccess: This is a handler that will execute once the AJAX service call has completed successfully. Any data passed on by the web method call will be passed onto thisonSuccessfunction.onFailed: This is a handler that will execute if the AJAX service call has failed due to some reason. Any error data passed back will be passed onto thisonFailedfunction.userContext: This allows to pass User related data.
Now that we have created a WCF AJAX Web Service project and have spent a fair bit of time running and understanding it... it is now time for us to introduce some relevant business code in our WCF AJAX Service project: Tweet.WCFService.AJAX. This is done in the following section.
Building WCF AJAX Service Project (for TweetBL Project's Business Functionality)
Time to build our real AJAX Service and remove DoWork method! Let us tap into TweetBL Project - ManageTweet.cs: this class has all the business code that we would need to manage a Tweet. We will expose all these methods as an AJAX Web Service.

In TweetService.svc of Tweet.WCFService.AJAX project, we have included a reference to ManageTweet.cs of TweetBL Project and as demonstrated in the screen-shot above, all we do is pass the call that we receive for any TweetService.svc method to ManageTweet class methods to do the actual work.
Simply put, all we do in our service class is call the business class to do the actual job.
Running the WCF AJAX Service Project (now with our Business Code)
So now we are ready - to actually run our Tweet Service! It is not going to be much different... but yes, there are a few extra steps that we will need to follow to run some of the methods! which do not implement the GET verb (WebGet attribute) but implement WebInvoke attribute. The ones pointed out (in TweetService.svc) below:

Trust me, it is good fun...
Testing GetTweets() Method: Follow the steps highlighted in screen-shots below: Run the service:

Type the method name GetTweets:

GetTweets method result (unformatted):

Notice k__BackingField appended to each of our Tweet property... this is because we have not marked our Tweet Class (TweetBL Project) with DataContract attribute and its fields with the DataMember attribute.

Quick refresher: Data Contracts defines the type and the format of data that will be sent out and received by the web service operations. Data Member attribute is applied to the fields of the DataContract class that are to be serialized.
I have described a fair bit about WCF contracts in one of my previous articles, the relevant section can be found here.
Applying the attributes to Tweet.cs:

Ouch! the red squiggly lines.. ahh.. This just indicates that you do not have reference to the "Serialization" assembly in your TweetBL Project!
namespace TweetBL
{
    using System;
    using System.Runtime.Serialization;
	.... remaining code...
Let us quickly add reference to "Serialization" assembly:


and the world is a happy place again...

Running TweetService.svc again... we get the following result: k__BackingField is no longer appended.

Let's run GetTweetById() method. This method is decorated with WebGet attribute, but it also expects a Parameter! of type int to be passed in as well... sweet...

Running the TweetService.svc and invoking GetTweetById method without passing an int parameter will yield the following result of NULL:

We got null because, WCF tried its best to match the needed parameter (in this case int) and when it failed, it assigned the default value for the required parameter. So, in this case for int - WCF assigned it a value of 0. Stating the obvious here, we do not have a record with id = 0 so, null is returned.
All we need to do is pass on the needed parameter (check below):

Note: The parameter name in the get URI should match the parameter name declared on the method!

So, this was a simple demonstration of how to run a service operation/method that is decorated with WebGet attribute!
It's time to look at the other operations that are decorated with WebInvoke attributes TweetService.svc class...

The key difference between WebGet and WebInvoke attribute is that it uses a POST verb instead of a GET verb that WebGet uses.
Why use WebInvoke? Well, the WebInvoke attribute exposes service operations/methods using other HTTP verbs such as POST, PUT, and DELETE. These operations are meant to MODIFY a resource; therefore, the WebInvoke attribute is used to make modifications to a resource. Note: The default option is POST but you can change it by setting the Method Property of the WebInvoke attribute. Demonstrated below:
[OperationContract]
[WebInvoke(Method = "PUT")]
public void PutQuestion(int id, Question question)
{
    // Put question in database
}
Note* We will stick to default POST in this article.
Another interesting thing to keep in mind is that all web browsers are optimised to cater for GET verb requests. They cache the result of Get requests and any-time the browser is refreshed, the results are drawn back from browser cache instead of making a trip to the Web Server.
So, for obvious reasons, now when you are performing create, update or delete operations, you do not want browsers to cache the results of these operations! So, we use a different verb like Put, Post and others to indicate that we do not wish to cache the result of these operations and will always like to do a refresh on data once the Put, Post operation has been completed successfully. It is a Win Win!
Now, moving on... if we try to run the WebInvoke decorated operations, the way we invoked operations decorated with WebGet attribute, we get the following result:

We get Method not allowed message because we specified WebInvoke attribute for CreateTweet operation.
The question we are asking now is... How do we test our WebInvoke method CreateTweet? The simple answer is we use "POSTMAN".
POSTMAN: is a plugin for Google Chrome that allows us to create HTTP Get/Put/Post/Delete requests! Just what we need!
There are answers to questions that are to be found... well this question is not one of them. :) thanks to Google.

Without further ado, add it to the browser...

Running POSTMAN is as simple, open new tab on Chrome, click on the app grid and there you should find it.


Enter the URL for our local CreateTweet operation. 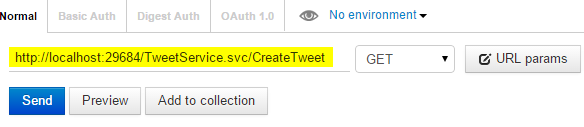
Remember it is a WebInvoke method, so change the option to POST.

Click on the Header Button! We want to indicate that we will be sending JSON formatted data to server:

Let's put in the Header and Value... so that our request is crystal clear to the server!

Switch to RAW Mode and select JSON..

Time for some action! We will send in a specifically formatted request... in this case, it will be a Tweet Object - with all its 3 properties.

Flashback the 3 Tweet Properties! - Tweet.cs (in TweetBL project)

Time to click SEND.

Ouch, that hurt...

We got an error back - WCF passed us some options that we can use to get more details regarding the issue that occurred on the server! Example: In the above screen-shot, we are advised to turn on includeExceptionDetailInFaults so let's do that...
In our Tweet.WCFService.AJAX project, let's update Web.config file to set includeExceptionDetailInFaults option to true. This is a debug option and should be leveraged only while development makes sure you turn it to off (to false) once the service is about to be deployed.
// Let us add the following service behaviour to our Web.Config file
<serviceBehaviors>
  <behavior name="reportIssues">
    <serviceDebug includeExceptionDetailInFaults="true"/>
  </behavior>
</serviceBehaviors>
reportIssues is the name we have given to the behaviour. includeExceptionDetailInFaults has been set to true to indicate we would like exception details passed to the client that have occurred on the server. Note* includeExceptionDetailInFaults is set under the serviceDebug element.
Now, we need to associate this new behaviour with our service.
// Associating the new behaviour with our service
<service name="Tweet.WCFService.AJAX.TweetService"
    behaviorConfiguration="reportIssues" >
  <endpoint
      address=""
      behaviorConfiguration =
             "Tweet.WCFService.AJAX.TweetServiceAspNetAjaxBehavior"
      binding="webHttpBinding"
      contract="Tweet.WCFService.AJAX.TweetService" />
</service>
Here is the screen-shot of the Web.config file after making the above mentioned changes.

Web.config has been updated. Let's run the service again.

Now, we get the above highlighted information back!
The server is complaining that the object reference is not set to an instance of an object...
I must admit this is not that helpful but we have to work with what we have.. and as I have burned myself before with this issue, I can tell you what the problem is!
Screen-shot of CreateTweet Operation (Notice: the Parameter Name):

Screen-Shot of our JSON request message (Notice: the name of our Tweet Object):

and bang, it is the parameter name mismatch! issue. Let us correct the object name in our json request and try again...

and there... the operation call was successful! Operation returned null because it has return type of void.

Running the GetTweets method to establish that the new record was successfully inserted and there... highlighted below are the fruits of our labour.

I hope this was simple enough to be followed. You are welcome to test all the other Service operations using POSTMAN.
I will leave the remaining service operations for you to play with on your own. Screen-shots of my unit testing of UpdateTweet and DeleteTweet Operations are given below.
UpdateTweet Operation (Remember to pass in the Id for the Tweet that is to be updated):
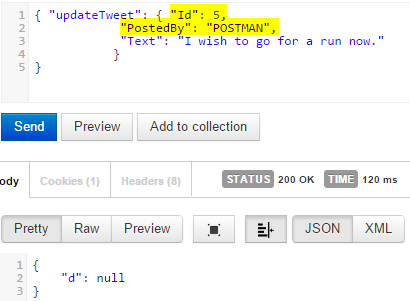
GetTweets method call after UpdateTweet operation:

DeleteTweet Operation (Notice: our request JSON Object):

GetTweets method call after DeleteTweet operation: Tweet with Id = 5 was not returned! as it has been deleted.

Switching from JSON to XML for WCF AJAX Web Service
The default set-up for WCF AJAX Web Services expects to send and receive data in JSON format. The main reason is because WCF AJAX Web services are geared to using JavaScript and JavaScript prefers and works very well with JSON. We can change this to say XML by following the steps below:
// Tweet.WCFService.AJAX Project
// TweetService.svc
//
// Changing the GetTweets Operation to return XML rather than JSON
// Default is JSON.
//
// Modifying ResponseFormat to XML for WebGet Attribute.
[OperationContract]
[WebGet(ResponseFormat=WebMessageFormat.Xml)]
public IList<Tweet> GetTweets()
{
   return _businessLayerTweetService.GetTweets();
}
Re-running the GetTweets Operation: 
The result is in XML format!
Creating WCF AJAX Web Service Client
Postman was good for some quick unit testing. Now it's time to build our own web service client. Let us have a quick re-look at the generated JavaScipt library for our service. We have all the Tweet Operation(s) that we defined available now. 
Also, to look at the debug feature... you can go to the following URL. This file basically will help us with code completion in Visual Studio while we are working on the test client (web service client). 
Now, let us move on to writing a proper client for our service. WCF AJAX Web Service are really developed to work well with HTML-JavaScript based clients. Developing HTML-JavaScript based clients is much easier because we do not have to worry about serialization and de-serialization among many other factors. This all is done for us by default. If for some reason we choose to write our own standalone client (we can choose any client side technology), then we will be responsible for creation of request and response objects, serializing and de-serializing the request-response objects ourselves and many other such requirements would have to catered by us! This is because there is No WSDL generated for WCF AJAX Web Service. To keep things simple here, we will develop a simple HTML-JavaScript based client for our Tweet Service! We will be using the default generated JavaScript proxy class in our client web page. We need to add a Web Form, go to add new item in Tweet.WCFService.AJAX Project and select Web Form.

TweetClient.aspx has been added to the Project!


We will add a ScriptManager to TweetClient.aspx: This ScriptManager will be responsible for downloading the default JavaScript Proxy class that was generated for our TweetService! To do this, we need to provide a Service Reference (which will be declared inside a Service tag) to ScriptManager. The reference will require us to pass it a Path to our Tweet Service.
// Tweet.WCFService.AJAX Project
// TweetClient.aspx
//
// ~: the tilde refers to the current application
<body>
 <form id="form1" runat="server">
  <asp:ScriptManager runat="server">
   <Services>
     <asp:ServiceReference Path="~/TweetService.svc" />
   </Services>
  </asp:ScriptManager>
  <div>
  </div>
 </form>
</body>
TweetClient.aspx:

So, now the Script Manger will include the generated JavaScript Proxy file for Tweet Service and it will also include some other required libraries that this web page (TweetClient.aspx) would need to make use of the TweetService Proxy class under the covers.
This is it... we can start writing JavaScript to call our TweetService methods.
We will do the following in TweetClient.aspx's Script tag:
- Create a tweet
- Update a tweet
- Delete a tweet
- Retrieve all tweets
Screen-Shot of TweetClient.aspx Script tag:

Time to test our web page. We will do this in the next section.
Testing WCF AJAX Web Service using our Service Client
Well, so here we are! Finally almost there... follow the Screen-shots below to run the test:


Type in TweetClient.aspx...

Fruits of our labour! First the Success Alert Message of CreateTweet is displayed!

and now the final GetTweets result!

The last tweet (Id = 5) is the record that we added through TweetClient.aspx Script tag!
Interesting bit
Quick inspection of the page will reveal that a few other Script tags were added to our HTML page which were not added by us!
ScriptManager added them for us.
Example: Web Resource and Script Resource were added by the ScriptManager. These resources take charge of serialization and de-serialization activities among many others that they perform under the covers for WCF AJAX Web Services!


Important Note* Calls to Create/Update/Delete and get will not be executed in synchronous order.. any of them can be called before or after. They are executed asynchronously!
I know - I have stated the obvious! AJAX rings a bell! :)
Quick look at DeleteTweet method in TweetClient.aspx: I have commented the code for Create and Update Tweet as I just want to focus on Delete and Get.

Running the test for DeleteTweet:


Fortunately, for me DeleteTweet was called before making the call to GetTweets! Tweet with Id = 2 has been successfully deleted.
Quick look at UpdateTweet method in TweetClient.aspx: I have commented the code for Create and Delete Tweet as I just want to focus on Update and Get.

Running the test for UpdateTweet:

Fortunately, this time for me UpdateTweet was called after making the call to GetTweets! Tweet with Id = 1 has been successfully updated, but the data retrieved does not reflect the change! This is AJAX for you.
Refreshing the page will reflect the change: Note* It will also execute the UpdateTweet call again! but it would be harmless for us. Usually in production code, we have validations which will stop this second update.

I have left Update and Delete Tweet Code commented in TweetClient.aspx.
...and we are DONE!
Final Thoughts
Here is an article on WCF Web Service! written by me. It is a simple demo demonstrating the power and simplicity of WCF.
It's time for me to sign off. Feel free to ask questions, provide feedback and everything in between as I am on the same boat with you. P.S.: The Boat is called "Burn and Learn".
History
- 14th March, 2015: Version 1 submitted