
Simple and Reusable Numbers only Textbox in C# (V2) (With step by step guide and explanation for beginners)
4.43/5 (5 votes)
This article shows how to create a reusable numbers only TextBox that will *never* hold anything but numbers. You can even toggle if it should hold negative numbers!
Introduction
A few weeks ago, I posted a concept for a numbers only textbox here. The idea was good but the design was not exactly flawless. Now, I decided to make up for my mistakes and rework my design. I'll show you how to set up a reusable control step by step.
Background
This solution will check all characters of the Textbox.Text property as soon as the TextChanged event is activated. This can use slightly more resources that other solutions (especially if your Textbox holds much text), but make sure that the text is always clean and ready to process, even if multiple characters are pasted in.
I'm using a UserControl with a textbox in it to make this control useable in all your projects.
Using the Code (Step by step guide for beginners)
This is the beginner firendly guide. If you're more experienced and just looking for the code, scroll down to Using the Code (for experienced).
First off, we're going to create a new UserControl so that we can use the Textbox in other projects later on.
The UserControl will then hold the TextBox that the user can interact with.
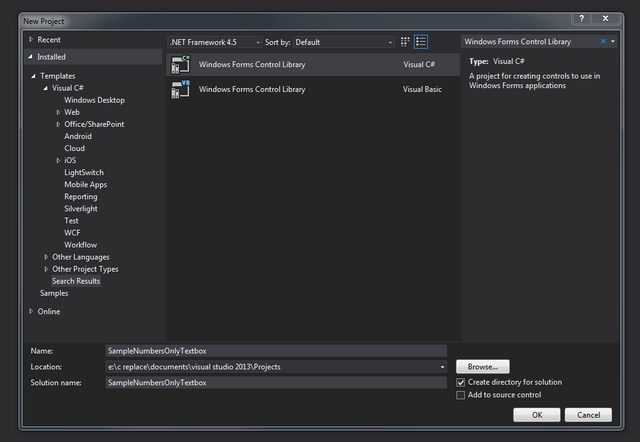
In Visual Studio, create a new project. Make sure that you have "Templates" selected, then search for "Windows Forms Control Library" and select the Visual C# preset. Name your Control and click OK.
Now you are in the designer. Click on the white flat and in the properties, rename your control to something like "NumTextBox". After that, press F7 once to get to the code.
For this, you'll need the following usings:
using System;
using System.Collections.Generic;
using System.ComponentModel;
using System.Windows.Forms;
using System.Windows.Forms.Design;
Now, we need to add one more reference. In the Solution Explorer, right-click on References and select Add Reference. Make sure to select Assemblies -> Framework on the left and then search for System.Design. Check the checkbox in front of it and hit "OK"
The sizing
Now, we need to do some technical stuff. Above public partial class [your control's name] : UserControl, add this:
[Designer(typeof(CustomSizeDesigner))]
Then, below your class but still in the namespace, add annother internal class:
internal class CustomSizeDesigner : ControlDesigner
{
    CustomSizeDesigner()
    {
        base.AutoResizeHandles = true;
    }

    public override SelectionRules SelectionRules
    {
        get
        {
            return SelectionRules.LeftSizeable | SelectionRules.RightSizeable | SelectionRules.Moveable;
        }
    }
}
And one more step: In your class, add following method:
protected override void SetBoundsCore(int x, int y, int width, int height, BoundsSpecified specified)
{
    height = 22;
    base.SetBoundsCore(x, y, width, height, specified);
}
These things will make sure that our UserControl always has a Height of 22 (like a textbox), so it won't cover anything else. You can now fold in the internal class, as we won't need to edit it again.
To finalize the this, we'll need to one more thing. The TextBox does not yet scale it's Width, so we're going to add this. Go back to the design editor, select the while flat and in the properties window, click the small lightning. In the list below, search for ControlAdded and doubleclick it. VS will generate a new function and show it to you. In the function header, make sure to change ControlEventArgs e to EventArgs e. Now, write down the following:
originalTextBox.Width = this.Width;
originalTextBox.Height = 22;
originalTextBox will be underlined in red, but we'll sort that out in a few moments. This will essentially make sure that our TextBox will be sized correctly. And just to make sure that the TextBox also resizes if our UserControl is resized at runtime, go back to the design editor, click the white flat and lightning again, search for Resize, select the field to it's right, click the little arrow and select [your control's name]_ControlAdded and you're done.
The actual TextBox
Now that we have the framework, we're going to add the centerpiece of our control: the TextBox that the user can interact with. At the top of your class, declare two new variables:
private bool acceptsNegative;
private TextBox originalTextBox = new TextBox();
The first bool will determine, if your TextBox will accept a minus at the front of the number or not. The second variable will be our TextBox.
Next, we'll add a AcceptsNegative property, which will allow us to allow or prohibit negative numbers in our TextBox. add the following code to your class:
[Description("Determines if the textbox will accept negative numbers."),Category("Input")]
public bool AcceptsNegative
{
    get { return acceptsNegative; }
    set { acceptsNegative = value; }
}
The [Description] tag adds some information that will show up in the design editor and the get and set statements are used to read out and change the acceptsNegative bool from above.
Now, we need to do the same thing for the Text property of our TextBox, so that we can later access it from the code:
[Description("The Text of the textbox"),Category("Data")]
public string Text
{
    get { return originalTextBox.Text; }
  set { originalTextBox.Text = value; }
}
This will just "forward" the Text property of our TextBox to a property of our UserControl.
The next thing to do is to actually add our TextBox to the UserControl. Search for the following constructor (it is auto-generated):
public NumTextBox()
{
    InitializeComponent();
}
This constructor will be called when your control is added to the Form you may put it in later. So this is the perfect place to bring in our TextBox. Just add the following two lines:
originalTextBox.TextChanged += originalTextBox_TextChanged;
this.Controls.Add(originalTextBox);
The first line will add an EventHandler that will call the method originalTextBox_TextChanged as soon as you change the text in our TextBox. We didn't create the method originalTextBox_TextChanged yet, so it will be underlined in red, but you can just ignore that. The second line adds the TextBox to our control, so it will show up later. There is just one step left now: creating the method that actually makes our TextBox a numbers only TextBox.
If VS didn't do it for you yet, create the function originalTextBox_TextChanged and populate it like this:
void originalTextBox_TextChanged(object sender, EventArgs e)
{
    string text = originalTextBox.Text;
    int selectionIndex = originalTextBox.SelectionStart;
    List<char> invalidTokens = new List<char>();

    foreach (char c in text)
    {
        if (!Char.IsNumber(c))
        {
            if (!invalidTokens.Contains(c))
                invalidTokens.Add(c);
        }
    }

    if (invalidTokens.Count > 0)
    {
        foreach (char c in invalidTokens)
        {
            if (c == '-' && acceptsNegative)
            {
                int index;
                while (true)
                {
                    index = text.LastIndexOf(c);
                    if (index == 0 || index == -1)
                        break;
                    else
                        text = text.Remove(index, 1);
                }
            }
            else
                text = text.Replace(c.ToString(), string.Empty);
        }

        originalTextBox.TextChanged -= originalTextBox_TextChanged;
        originalTextBox.Text = text;
        originalTextBox.TextChanged += originalTextBox_TextChanged;

        if (originalTextBox.Text.Length > selectionIndex)
            originalTextBox.SelectionStart = selectionIndex;
        else
            originalTextBox.SelectionStart = originalTextBox.Text.Length;
    }
}
How it works
We'll go over this step by step. First off, we save the Text of our TextBox to a new string named text. After that, we save the position of the text-edit cursor. Last but not least, we create a new List<char> named invalidTokens. After that, in the foreach loop, we go over every character in our string (the current character will be saved to the variable c). We then check if the character is a number and if not (and it's not yet in our List<char>), we add it to our List<char>. The reason that we don't directly remove it is because it's dangerous to edit the data you're looping though (and this will also throw an error more often than not).
When our loop has finished, we check if any invalid characters got added to our List<char>. If this is not the case, the function will simply return. If there are any, we'll go through them again in the next foreach loop. First off, we check if the current invalid character is a minus and if we accept negative numbers (= acceptsNegative is true). If one of these is not the case, we replace all instances of this character in our text with string.Empty, effectively removing it (We first convert the char to a string, since you can't replace a char with a string). But if the character is a minus and we allow negative numbers, we need to do some more work. There may be mutiple instances of the minus, but we can't delete them all since this would also remove the minus at the front of the text, which we want to have there. So we get the index of the last minus in the string. If the index is not 0 (which would mean the minus is at the front of the numbers) or -1 (which would mean there is no minus, this may happen if we've removed all), then we know that there is a minus inside or at the end of the string, which is a illegal position for it. We then remove 1 character at the position of the minus (this is the minus ;) ) check again. If the last minus is at index 0, so at the front, or at -1, which means there is no, we can be sure that the text is free of minuses and break out of our infinite loop. We then proceed to removing the other invalid characters.
When we are done with removing all invalid characters, our string is now clear and we can put it into our TextBox. First off, we remove the EventHandler so the function won't call itself (to save some resources), then we set the Text property of our TextBox to our cleaned string and after that, we add the EventHandler again, so next time the Text property changes, it will be cleaned again.
The last step is to position the cursor right. First off, we check if the Text is longer than the position that the cursor was (you know what I mean). If yes, we position the cursor where it was before. If no, the Text is now shorter than before and the cursor would be 'behind' the Text (and throw an error), so we just put it at the end, which is the closest position to the old one.
Using the Code (for experienced)
Create a custom UserControl and add System.Design as a reference. Make sure to edit the classes name according to the name of your UserControl.
This is the code:
using System;
using System.Collections.Generic;
using System.ComponentModel;
using System.Windows.Forms;
using System.Windows.Forms.Design;

namespace SampleNumbersOnlyTextbox
{
    [Designer(typeof(CustomSizeDesigner))]
    public partial class NumTextBox: UserControl
    {
        private bool acceptsNegative;
        private TextBox originalTextBox = new TextBox();

        public NumTextBox()
        {
            InitializeComponent();
            originalTextBox.TextChanged += originalTextBox_TextChanged;
            this.Controls.Add(originalTextBox);
        }

        void originalTextBox_TextChanged(object sender, EventArgs e)
        {
            string text = originalTextBox.Text;
            int selectionIndex = originalTextBox.SelectionStart;
            List<char> invalidTokens = new List<char>();

            foreach (char c in text)
            {
                if (!Char.IsNumber(c))
                {
                    if (!invalidTokens.Contains(c))
                        invalidTokens.Add(c);
                }
            }

            if (invalidTokens.Count > 0)
            {
                foreach (char c in invalidTokens)
                {
                    if (c == '-' && acceptsNegative)
                    {
                        int index;
                        while (true)
                        {
                            index = text.LastIndexOf(c);
                            if (index == 0 || index == -1)
                                break;
                            else
                                text = text.Remove(index, 1);
                        }
                    }
                    else
                        text = text.Replace(c.ToString(), string.Empty);
                }

                originalTextBox.TextChanged -= originalTextBox_TextChanged;
                originalTextBox.Text = text;
                originalTextBox.TextChanged += originalTextBox_TextChanged;

                if (originalTextBox.Text.Length > selectionIndex)
                    originalTextBox.SelectionStart = selectionIndex;
                else
                    originalTextBox.SelectionStart = originalTextBox.Text.Length;
            }
        }

        [Description("Determines if the textbox will accept negative numbers."), Category("Input")]
        public bool AcceptsNegative
        {
            get { return acceptsNegative; }
            set { acceptsNegative = value; }
        }

        [Description("The Text of the textbox"),Category("Data")]
    public string Text
    {
      get { return originalTextBox.Text; }
      set { originalTextBox.Text = value; }
    }

        protected override void SetBoundsCore(int x, int y, int width, int height, BoundsSpecified specified)
        {
            height = 22;
            base.SetBoundsCore(x, y, width, height, specified);
        }

        private void NumTextBox_ControlAdded(object sender, EventArgs e)
        {
            originalTextBox.Width = this.Width;
            originalTextBox.Height = 22;
        }
    }

    internal class CustomSizeDesigner : ControlDesigner
    {
        CustomSizeDesigner()
        {
            base.AutoResizeHandles = true;
        }

        public override SelectionRules SelectionRules
        {
            get
            {
                return SelectionRules.LeftSizeable | SelectionRules.RightSizeable | SelectionRules.Moveable;
            }
        }
    }
}
Customizing the NumTextBox
Of course you may want to edit for example the look or function of your NumTextBox. You can easily add the option to edit any property of your NumTextBox as long as it's a property of a normal TextBox. I'll demonstrate it with the BorderStyle property here.
All you need to do is create a new property (in your class) like this and set the get and set to the textbox:
[Description("Sets the BorderStyle of your TextBox"),Category("Appearence")]
public BorderStyle TextBoxBorderStyle
{
    get { return originalTextBox.BorderStyle; }
   set { originalTextBox.BorderStyle = value }
}
In the designer, this will now show up as a property of your UserControl and you can also edit this property at runtime. You can do that for every property of your TextBox.
Including the NumTextBox in WinForms applications
Now that your UserControl is finished, you can try it out by clicking the Start button (don't forget to set AcceptsNegative to true while debugging to be able to enter negative numbers). If you want to include your NumTextBox in other projects like your WinForms application, we need to include it there. We will use the .dll file so you don't need to import this whole project everytime you want to use the UserControl.
First off, start your UserControl once in Release mode instead of Debug mode. Just hit Start and close it down again.
Now, in the solution explorer, right click on your solution (It's called Solution '[your solution's name]') and select 'Open Folder in File Explorer'. Then open the topmost folder, navigate to bin -> Release and copy to .dll file to your clipboard. You can then paste it anywhere you want, for example just on the desktop or into your .dll collection if you have one.
Now you can close the solution and open any other WinForms project. Go to the Toolbox, rightclick anywhere and select "Choose items...". Wait for the list to load, click on "Browse...", select your .dll and hit OK when you're done. You now have your NumTextBox in your Toolbox and you can simply drag it onto your Form and use it.
Have fun!
Note: I posted the sample project that is ready to use. Feel free to download and use everywhere.