Introduction
While creating a program for a Windows Phone, I wanted to provide help to the user in a format that was compatible with device settings but fairly flexible in handling different device configurations. The solution I chose was embedding HTML pages in the code file and rendering them according to the device settings.
Background
To make best use of this project, you need some background in XAML and C#, but (I hope) you can take a fairly boiler plate approach to using this code and still get decent results.
What's Included
I've delivered this code as a working Universal App, it builds both a Windows Modern program and a Windows Phone 8.1 program - they are pretty much equivalent, just run on different platforms. Unzip the files and load the solution into Visual Studio 2013 (I was using update 4) and you should be able to build it and run the resulting code on a device or emulator. When you do it builds a Windows Phone app capable of displaying help text that looks like this:
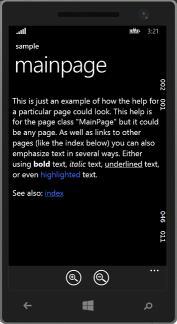
There's also a Windows 10 Universal Application version that compiles with Visual Studio 2015, it is pretty similar to the Windows 8.1 version, but there are some differences. Mainly these are focused around managing platform differences at run time (the Windows 10 model) versus managing them at compile time using multiple builds (the Windows 8.1 model). Other necessary changes relate to using predefined names for resources (the names changed in Windows 10). Some changes (those in Helper.cs, for example) are simply improvements to the code and/or taking advantages of new features in C# 6 (the new one with VS 2015).The help pages themselves are structurally identical.
This has not been tested on a Windows 10 phone because I don't have one, but it has been tested using the phone emulator and on the desktop.
Using the Code in Your Own Project
To use this code, you'll need to copy some files to your project. you'll need Helper.cs, which renders no UI, but has various useful classes. Then you'll need a page to actually show the help (copy my HelpPage.xaml and HelpPage.cs as a starting point).
From somewhere in your program, you'll want to allow the user to navigate to the help page, to do that add a resource (the HelpViewModel, see below) and some number of controls (probably buttons, also below). You'll also need to author one or more help pages in HTML and put them in a "Help" directory in your project.
Replace "UniversalHelp" with the name of your program in the files you copy.
In each page you want to put a help control on, you'll add something like this:
<Page.Resources>
<local:HelpViewModel x:Key="HelpContext" />
</Page.Resources>
The actual controls look like this:
<Button Content="Help for this page"
   Command="{Binding Help, Source={StaticResource HelpContext}}"/>
Take a look at "MainPage.xaml" in the sample for an example of how this looks in context.
The Help Files Themselves
The individual files that make up the help system for your program are pretty standard but they do have some requirements, here's an example file (an index file with links to other pages):
<!DOCTYPE html>
<html lang="en" xmlns="http://www.w3.org/1999/xhtml">
<head>
<meta charset="utf-8" />
<meta name="viewport" content="width=device-width" />
<title>help index</title>
<link href="default.css" rel="stylesheet" type="text/css" />
</head>
<body>
<p>Other information:</p>
<ul>
<li><a href="introduction.html">Introduction</a></li>
<li><a href="main.html">Main Page</a> (sample text)</li>
</ul>
</body>
</html>
The most critical line is the one that defines the stylesheet as "default.css". That's important because the code automatically generates a stylesheet of that name with the right values in it to match the current device settings.
The "viewport" is important, because without it lines in bulleted lists (the ones starting with <li>) will not change font size when the font size is adjusted.
The <title> is what will appear at the top of each page of help text when it is displayed.
I found the best way to edit these files was in Expression Web which is free from Microsoft, and to make this easier I normally put a "default.css" file in the help directory, additionally Expression Web adds a "web.config" file, neither file is needed by your program at run time, so if you put them in your project you can use a build action of "none" (in the properties of each file that VS2013 maintains). The other files (HTML, PNG and so on) should default to a build action of "content" which will put them in the application package VS generates for your program.
You can give the help files any name and provide the name explicitly as a "CommandParameter" string value, but if you don't the name will default to the page class name with the word "page" eliminated from the end, so for example if your page class is declared as "class MainPage ..." the corresponding help file would be "main.html" (or "Main.html" the file names are not case sensitive).
How it works
This section is a discussion of how the code works, and why. You don't need to understand this to use the code to provide help text facilities within your own program, but if you want to understand what's going on, read on. This discussion focuses on the Windows Phone version of the code, but the "Big Windows" version is analogous or, in many cases, identical.
The Basic Parts
The starting point is a page to display help on, since HTML is the underlying format, a page with a WebView control on it is an obvious choice and there's a simple way to point a WebView at content within the package (the ms-appx:// URI prefix). It is handy to have a controllable title on the page, so you need at least a couple of fields, a TextBlock (called pageTitle) and a WebView (called webView). In order to read the HTML page title so it can be shown in the TextBlock a NavigationCompleted event is defined on the WebView, it looks like this:
private void webView_NavigationCompleted(WebView sender, WebViewNavigationCompletedEventArgs args)
{
   if (args.IsSuccess)
      pageTitle.Text = webView.DocumentTitle;
   else
      pageTitle.Text = "Helpless, sorry";
}
The hardware 'back' button ought not to simply exit the program, it ought to undo the most recent web page navigation if there is one, and return from the help page of not, so I attach a method to do just that to the back button event Windows.Phone.UI.Input.HardwareButtons.BackPressed. That method just needs to do this:
if (webView.CanGoBack)
   webView.GoBack();
else
   Frame.GoBack();
There's also a little machinery to allow immediate exit from nested help (see CancelAppBarButton).
So that's it, define a page in XAML with a WebView on it, and navigate to a named web page stored in the application package when the XAML defined page is entered. That works pretty well, but the displayed HTML has a preset color and font size, meaning it's not sensitive to device configuration (theme selection) and has a fixed font size.
Controlling Help Text Formatting
By defining a CSS file to control color and font size, and generating it dynamically as these things change it is possible to control the help rendering to make it match the current configuration of the device. Unfortunately a WebView using local files cannot (for security reasons) use a CSS file.
However, by using the WebView.NavigateToLocalStreamUri method and passing an object which implements IUriToStreamResolver all the URI references are resolved locally. In that case CSS references are allowed and the "default.css" contents can be dynamically generated based on current device settings.
The object I used is a StreamUriWinRTResolver and it needs to know about three colors (background, foreground and highlight) and the font size. The font size can be varied by the user, the colors are based on the current device settings (alas in resources with different names on the Phone and Big Windows), so on a phone you might set them like this:
StreamUriWinRTResolver myResolver = new StreamUriWinRTResolver();
Color foreground = (Color)App.Current.Resources["PhoneForegroundColor"];
Color background = (Color)App.Current.Resources["PhoneBackgroundColor"];
Color highlight = ((SolidColorBrush)App.Current.Resources["PhoneAccentBrush"]).Color;
StreamUriWinRTResolver.SetColors(foreground, background, highlight);
The actual creation of the CSS data is in StreamUriWinRTResolver.CreateStyle and consisats mostly of converting data from the program into a CSS compliant format.
The HTML files, images, etc. can be consumed directly out of the release package, they don't need to be copied to local storage. The creation of a stream on the stored data is actually done in StreamUriWinRTResolver.GetContent, where the relevant bit of code is:
Uri localUri = new Uri("ms-appx:///help" + path);
StorageFile f = await StorageFile.GetFileFromApplicationUriAsync(localUri);
stream = await f.OpenAsync(FileAccessMode.Read);
With this done, there's enough to permit you to use the help page by simply adding
Frame.Navigate(typeof(HelpPage), "HelpFileName");
in the code behind of any page that needs access to help text.
Code Behind Considered Harmful
Code behind is discouraged in MVVM, and anyway repeating this sort of code on every page, but with subtle differences, is both tedious and error prone. So it's better to present a command interface that any page can use directly from XAML. That means declaring an object that inherits from ICommand and defining at least one method - Execute. The Execute method does not have access to the page variable as the code behind would, but it is available using Window.Current.Content so you can get the correct page name (in order to derive a default help file name) using:
((Frame)Window.Current.Content).CurrentSourcePageType.ToString();
The same trick lets you navigate to the help page:
((Frame)Window.Current.Content).Navigate(typeof(HelpPage), whichHelp);
You could define the required command object using the standard RelayCommand implementation that Microsoft provides (in "RelayCommand.cs") but an explicit implementation is easier to understand. That implementation is provided in HelpCommandClass and a public property called Help of that class is defined within the HelpViewModel class.
With that done any page can use the command via the Help property by defining a resource referencing HelpViewModel and then referencing that resource in the Command attribute of any control that needs to use it (see "Using the Code in Your Own Project") .
The last detail is that it's helpful to allow the user to change the help text size, but whenever that's done the WebView control needs to be redrawn to reflect the new size. The size change request is handled by a HelpCommandZoom object, and a change notification is handled via a delegate back to the page called RefreshView.
Possible Improvements
One obvious improvement would be to respond to dynamic changes of theme - while these are rare they currently do not take effect until the user enters the help page, (in other words they are ignored if the user is already viewing help text).
History
- January 2015: First release
- August 2015: Windows 10 Version
I programmed professionally for several decades, first on Burroughs mainframes, then, after it became Unisys, on Windows systems, first using C++ and COM on Win32, then C# on .NET on desktop and phone platforms. My professional life eventually did not involve much programming and now I'm retired, so programming is more of a personal passion.


