WPF documentation can be very minimalistic and confusing, especially when it comes to how layouting and rendering really work and what you need to do in your code to make best use of it. This article is for you if you are interested in technical details.
WPF Control Inheritance
Before we go into the details of the layouting (i.e., measuring how much screen space a control needs and placing it on the screen), we need to briefly discuss the objects which get layouted. In this article, I will call them control, which can be anything that inherits from FrameworkElement like Control or TextBox or ...
Object -> DispatcherObject -> DependencyObject -> Visual -> UIElement -> FrameworkElement -> Control -> TextBoxBase -> TextBox
The following classes are important for the layouting discussion:
DispatcherObject: is very simple and has only the property Dispatcher, which controls the execution of the WPF UI thread. The Dispatcher also manages in which sequence controls get measured, arranged and rendered.DependencyObject: an object that can own WPF dependency propertiesVisual: is an abstract class holding the properties needed to render (paint) a control to the screenUIElement: contains among other stuff the properties deciding if layouting and rendering is needed for this control. Some layout related properties: DesiredSize, IsArrangeValid, IsMeasureValid, RenderSizeFrameworkElement: contains among other stuff logical tree (Parent, LogicalChildren) and visual tree information (VisualChildrenCount, GetVisualChild()) and some sizing information (ActualHeight, Height, VerticalAlignment, Margin, Padding).
Overview WPF Layouting Process
WPF uses two threads, one for rendering and one for managing the UI. The WPF code you write runs on the UI thread. The rendering thread runs behind the scene, filling the GPU (graphics processing unit) with rendering instructions. There is hardly any documentation about the rendering thread, but luckily we don't need to know any details about it.
WPF using only one thread for all our code has the huge advantage that there are no multithreading problems, i.e., two threads trying to change the same data at the same time.
The execution of the UI code is not linear but runs in three phases, which get repeated again and again:
Phase 1
At the beginning of a Window lifetime, code calling its constructors or executing XAML creates a tree consisting of Visuals, where a Window might be the root of everything else the user can see in the window. Once construction has completed, phase 2 starts. At a later time, phase 1 might run again due to some events raised because a property has changed, the mouse was clicked, the window size changed and for many other reasons. The advantage of finishing all phase 1 code before phase 2 starts is that if different code parts require that a control gets layouted again, that layouting gets performed only once instead immediately each time it gets requested.
Phase 2
Once WPF has done everything that wants to run in phase 1, it measures all controls by travelling the tree and asking every child in the tree to measure itself.
Phase 3
- Once the children are measured, they get arranged, i.e., each parent tells its children where they should get painted and how much space they get.
- If necessary, once the child is arranged, it gets a
DrawingContext, which it can use to write drawing instructions (= rendering).
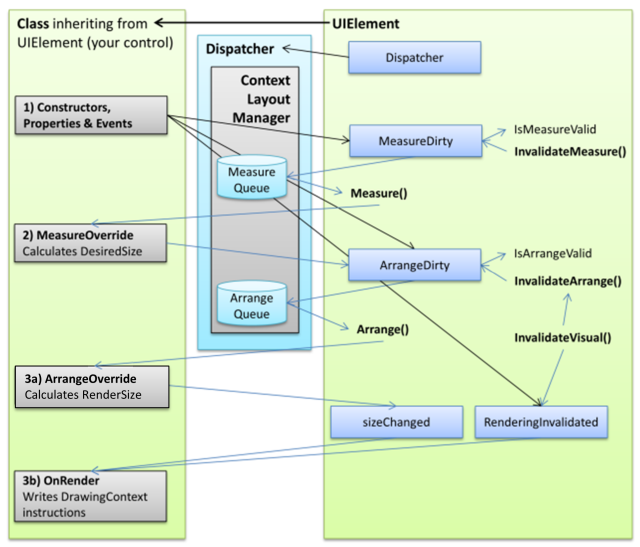
The UI thread is controlled by the Dispatcher. The Dispatcher selects activities based on their priority. Activities from phase 1 have the highest priority (Normal). Even if a method running in phase 1 marks a Visual for layouting, this doesn’t happen immediately. Instead, that Visual gets assigned to the MeasureQueue in the ContextLayoutManager. Once the Dispatcher has processed all activities with Normal priority, it tells its ContextLayoutManager to process the Visuals in the MeasureQueue (phase 2). Once all of them are processed, the Dispatcher tells its ContextLayoutManager to process all the Visuals in the ArrangeQueue (phase 3, DispatcherPriority.Render).
Initiating Layouting From Your Own Code
WPF often knows when a control needs to be layouted again, for example, if the user changes the size of the Window in which that control is located. But sometimes, only your code knows that your control needs to be layouted again, for example, because the user clicked on a Button or a timer ticked. Your control might still have the same size, so strictly speaking no new measurement and arranging is needed, just a rendering, alas, WPF does not let you request only rendering.
A list of UIElement methods your code can call to force layouting and rendering:
InvalidateMeasure(): Adds the Visual to the MeasurementQueue and sets its MeasureDirty flag. The measurement executes at a later time (Phase 2). If then the DesiredSize of that Visual changes, that Visual's Arrange() will be called after all Visuals are measured.InvalidateArrange(): Adds the Visual to the ArrangeQueue and sets its ArrangeDirty flag. The arranging executes at a later time (Phase 3). If then the RenderSize of that Visual changes, UIElement.Arrange() calls immediately OnRender() as part of its code. Note that when using InvalidateArrange(), no rendering is performed if your control's size doesn't change, even your control's content might have changed.InvalidateVisual(): One would expect that your code could tell WPF that only rendering of your Visual is needed, but no layouting. Alas, WPF doesn't allow you to do that. OnRender() only gets called from within UIElement.Arrange(). Therefore InvalidateVisual() has to add the Visual to the ArrangeQueue and also sets the RenderingInvalidated flag.
DependencyProperty and Layouting
WPF uses its own property system. When defining a WPF property, one can indicate if changing that property's value requires a new layouting of that FrameworkElement. For example, the Width property of a FrameworkElement is defined like this:
public static readonly DependencyProperty WidthProperty =
  DependencyProperty.Register(
    "Width",
    typeof(double),
    typeof(FrameworkElement),
    new FrameworkPropertyMetadata(
      Double.NaN,
      FrameworkPropertyMetadataOptions.AffectsMeasure,
      new PropertyChangedCallback(OnTransformDirty)),
      new ValidateValueCallback(IsWidthHeightValid));
For our discussion, interesting is FrameworkPropertyMetadataOptions.AffectsMeasure, which indicates that if the property value changes, the FrameworkElement needs to get measured. That FrameworkElement gets added automatically to the MeasureQueue and its MeasureDirty flag set.
There are actually five different FrameworkPropertyMetadataOptions.AffectsXxx flags:
AffectsArrangeAffectsMeasureAffectsParentArrangeAffectsParentMeasureAffectsRender
Interestingly, a property value change cannot only force a new layout of the control it belongs to, but also a new layouting of the control's Parent. Another interesting point is that a property value change can signal that just rendering is needed, which is impossible with the InvalidateXxx() methods.
Who Calls UIElement.Measure() and UIElement.Arrange()?
A WPF container like Window or Grid are the parents of other WPF controls. It is the parent who calls Measure() and Arrange() of its child or children, because only the parent knows how much screen space is available for a child. Therefore, it doesn't make sense to measure or arrange a child before its parent. When layouting is needed, WPF has to start at the root of the tree, for example, with Window and traverse from there through the complete tree, or, if only a part of the tree needs layouting, start at the root of that part tree. Finding the right controls for layouting is the job of the ContextLayoutManager.
ContextLayoutManager
I discovered the ContextLayoutManager only while writing this article, meaning my following description might not be 100% accurate. On the other hand, the ContextLayoutManager does its job behind the scene and we don’t really need to know all the details.
The Dispatcher has a queue of all activities the UI thread might need to execute, like reacting to a mouse click or timer tick or opening a window or doing layouting or… These activities are sorted by priority, one reason being to ensure that all normal UI activities are completed before the layouting starts. The Dispatcher also owns a ContextLayoutManager, which basically maintains a queue for all Visuals needing to be measured and a queue for all Visuals needing to be arranged. Once the time has come for measurement (=Phase 2, all higher priority actions have been completed and at least part of the tree needs layouting), the ContextLayoutManager searches the Visual closest to the root which needs measuring and calls its Measure(), which then calls all the Measure() of its children, which do the same thing for all their children and so on. Each Visual which gets measured removes itself from the MeasureQueue. Once that subtree is completely measured, some Visuals might be left in the MeasureQueue, because they belong to another subtree and ContextLayoutManager starts to process that tree, until MeasureQueue is empty. Upon which the same thing happens again for the ArrangeQueue (=Phase3).
It can happen that only measurement gets executed, but no arranging, if no size has changed and no arranging is explicitly required by setting the ArrangeDirty flag.
It can happen that only arranging gets executed, but no measurement, if measurement had been executed earlier on and no new measurement is required.
Phase 2: Measurement
YourControl.Measure()
UIElement.Measure()

  FrameworkElement.MeasurementCore()

    virtual FrameworkElement.MeasureOverride()
    override YourControl.MeasureOverride()
A parent calls YourControl.Measure() which is actually a call of UIElement.Measure() which later calls FrameworkElement.MeasureCore() which later calls FrameworkElement.MeasureOverride() which is overridden by your YourControl.MeasureOverride() where your control has the code measuring itself.
Note: The following is pseudo code, which tries to show only the essentials. The actual code is much more complicated. The pseudo code includes code from different classes, like when the UI code calls MeasureCore() which is overridden by FrameworkElement.MeasurementCore().
You can find the actual source code here:
UIElement
FrameworkElement
void UIElement.Measure(avialableSize){
if (IsNaN(availableSize) throw Exception
if (Visibility==Collapsed) return;
if (avialableSize==previousAvialableSize && !isMeasureDirty) return;
ArrangeDirty = true;
desiredSize = MeasureCore(availableSize);
virtual Size UIElement.MeasureCore(Size availableSize) {}
override Size FrameworkElement.MeasureCore(availableSize){
frameworkAvailableSize = availableSize - Margin;
if (frameworkAvailableSize>UIElement.MaxSize)
frameworkAvailableSize = UIElement.MaxSize;
if (frameworkAvailableSize<UIElement.MinSize)
frameworkAvailableSize = UIElement.MinSize;
desiredSize = MeasureOverride(frameworkAvailableSize);
virtual Size FrameworkElement.MeasureOverride(Size availableSize){}
override Size YourControl.MeasureOverride(Size constraint){
return desiredSize;
}
desiredSize += Margin
if (desiredSize<UIElement.MinSize)
desiredSize = UIElement.MinSize;
if (desiredSize>UIElement.MaxSize)
desiredSize = UIElement.MaxSize;
return desiredSize;
}
if (IsNaN(desiredSize) throw Exception
if (IsPositiveInfinity(desiredSize) throw Exception
MeasureDirty = false;
}
The pseudo code might look a bit confusing. The important points are:
- If your control is collapsed or the available space has not changed since the last
Measure() call, the code returns immediately. Measure() will not force to run Arrange() later, if the available space has not changed. - If the available size has changed,
Arranged() will later get executed, even if desiredSize does not change ! -
FrameworkElement subtracts Margin from availableSize. The FrameworkElement makes sure that the availableSize is smaller equal than your control’s MaxSize. MaxSize is not really a WPF property. I use it as shorthand for MaxWidth and MaxHeight. The FrameworkElement makes sure that the availableSize is greater equal than your control's MinSize. - To do your own measurement of your control, override
MeasureOverride() in your control. - Once your code has returned the
desiredSize, FrameworkElement adds Margin to desiredSize. FrameworkElement makes sure that desiredSize is greater equal MinSize and smaller equal MaxSize. If Width or Height are defined, they overrule MinSize and desiredSize becomes whatever Width or Height dictate. - Finally,
UIELement throws exceptions when desiredSize is not a number or infinite.
Interesting here is that the input availableSize can be infinite, but the output desiredSize cannot be infinite. Infinite size as input makes sense for example when the parent is a ScrollViewer. In a ScrollViewer, every child can use as much space as it wants. Basically, when the parent gives the child infinite space, it asks the child how much space it wants, without any limitation.
If the child doesn’t know how much space it should use, it could just return constraint, but it is also possible to return new Size(0,0). During Arrangement, the parent might not care about how much space the child asked for and give it even more space than required. An example would be when the child's Alignment is set to Stretch, in which case the parent gives all available space, even the child asked for less.
Note that FrameworkElement takes care of Margin, MaxSize and MinSize, but does nothing for Border and Padding, which means you have to handle Padding in your code, if your control should support it.
Phase 3: Arrangement (Including Rendering)
YourControl.Arrange()
UIElement.Arrange()

  FrameworkElement.ArrangeCore()

    virtual FrameworkElement.ArrangeOverride()
    override YourControl.ArrangeOverride()

  virtual UIElement.OnRender()
  override YourControl.OnRender ()
A parent calls YourControl.Arrange() which is actually a call of UIElement.Arrange() which later calls FrameworkElement.ArrangeCore() which later calls FrameworkElement.ArrangeOverride() which is overridden by your YourControl.ArrangeOverride() where your control has the code measuring itself.
If the control’s RenderSize has changed or its RenderingInvalidated flag is set, UIElement also calls UIElement.OnRender() which is overridden by your YourControl.OnRender() where your control has the code creating the rendering instructions.
void UIElement.Arrange(Rect finalRect) {
if (IsNaN(finalRect) throw Exception
if (IsPositiveInfinity(finalRect) throw Exception
if (Visibility==Collapsed) return;
if (MeasureDirty){
UIElement.Measure(PreviousConstraint)
}
if (finalRect==previousFinalRect && !isArrangeDirty) return;
UIElement.ArrangeCore(finalRect);
virtual void UIElement.ArrangeCore(Rect finalRect){}
override void FrameworkElement.ArrangeCore(Rect finalRect){
Size arrangeSize = finalRect.Size;
arrangeSize = Math.Max(arrangeSize - Margin, 0);
if (Alignment!= Stretch) arrangeSize = desiredSize;
if (arrangeSize>MaxSize) arrangeSize = MaxSize;
RenderSize = ArrangeOverride(arrangeSize);
virtual Size UIElement.ArrangeOverride(Size finalSize){}
override Size YourControl.ArrangeOverride(Size arrangeBounds) {
}
}
ArrangeDirty = false;
if ((sizeChanged || RenderingInvalidated || firstArrange){
DrawingContext dc = RenderOpen();
OnRender(dc);
virtual void UIElement.OnRender(DrawingContext drawingContext)
override void YourControl.OnRender(DrawingContext drawingContext) {
}
}
- For measurement, it is ok if the parent gives infinite space. But if the parent passes infinite space for arrangement, an
Exception is thrown. If your control is collapsed, Arrange() just returns. - In theory, a control should always be measured before arranged. But when
Arrange() notices that Measure() was not properly called before, i.e., the MeasureDirty is still set, Arrange() calls Measure() immediately. - If the available space has not changed and
isArrangeDirty is not set, Arrange() returns. arrangeSize might also be adjusted because of clipping, which is not shown in the pseudo code. arrangeSize might also be adjusted because of LayoutTransform, which is not shown in the pseudo code.Arrange(Rect finalRect) receives a Rect, which contains the coordinates X, Y and a Size, whereas ArrangeOverride(Size finalSize) receives only finalRect.Size. When the child arranges itself, it doesn't know its own X and Y coordinates within its Parent. To do your own arrangement and rendering of your control, override ArrangeOverride() in your control.- Once your control has finished arranging and writing rendering instructions,
UIElement.Arrange() continues with some clipping and layout transformation calculations. - If the rendering size has changed or the
RenderingInvalidated flag is set, UIElement.Arrange() calls UIElement.OnRender() which is overridden in your control. There, you place your rendering instructions.
Note that if alignment is set to stretch, the parent gives the child all available space and not just the desiredSize required by the child.
Meaning of Different Size Properties
When I started with WPF, I often wrongly assumed that Control.Width will tell me what is the width of the control on the screen, which not true at all:
Width: A property that can be used to suggest what width your control should have, could be set in XAML, default is double.Nan (i.e., not used).Height: A property that can be used to suggest what height your control should have, could be set in XAML, default is double.Nan (i.e., not used).DesiredSize: The size your control requested at the end of MeasureOverride(), plus Margin gets added and Width/Height, MinWidth/MinHeight and MaxWidth/MaxHeight get enforced, if they are defined. DesiredSize is used by parents for arrangement.RenderSize: The size the parent gives your control for rendering. RenderSize is different from DesiredSize because a) DesiredSize is with Margin while RenderSize is without and b) parent might decide to give child a different size than requested.ActualWidth: is actually RenderSize.WidthActualHeight: is actually RenderSize.Height
Future Articles
I was writing a new article explaining how you can write your own user control from code behind, hosting other controls and writing directly to the screen, when I realised that explaining how layouting and rendering work in WPF requires its own article, which is the one you are presently reading. However, this article does not explain how to write the code for layouting and rendering in your control, for that, you have to wait for my next article. Which will be followed by a third explaining how to test and debug your control, which is rather complex.
Update: I published the "third" article (testing) already and the "second" comes later:
Must Read for WPF Developers: WPF Control Test Bench
Writing the last article might take a while. In the meantime, I recommend you to read some other highly rated WPF articles I wrote here on CodeProject:
History
- 13th February, 2022: Initial version
- 4th March, 2022: Improved description of
DesiredSize and RenderedSize - 8th March, 2022: Corrected error in Layouting.png


 General
  News
News  Suggestion
  Question
  Bug
Bug  Answer
  Joke
Joke  Praise
  Rant
Rant  Admin
Admin 


