
Create a LibGDX Game in JRuby
5.00/5 (2 votes)
Use the LibGDX Java gaming framework and JRuby to create a simple 2D game for desktop
(J)Ruby
Ruby is a well known object oriented dynamic programming language. Although it is a general purpose language and several game libraries for it exist like Gosu, Gamebox, Rubygame and others, Ruby is not considered a good choice for game development.
If you don't mind using JRuby (Ruby on the Java Virtual Machine) you can choose to use one of the Java gaming libraries from Ruby. Java is also not considered a prime language for game development:
Quote:In the old days, you needed "direct access" for performance and UI. This predates VM languages like Java and C#.
Most consoles (e.g., 360, PS3) do not have a JVM, so you cannot reuse code from the PC version. It is much easier to compile C++ code to support various devices.
Most mainstream game engines (e.g., Unreal) have C++ bindings. There are some Java connectors (e.g., for OpenGL) but nothing like it.
For PC gaming, DirectX doesn't really have strong Java support (if at all).
Web based games run in JavaScript or Flash. You could write them in Java though using things like GWT.
The iPhone runs an Objective-C variant.Java is primarily used in Android games these days, simply because it's the primary language for that platform.
Java also has several gaming libraries/frameworks and the most prominent of them seems to be libGDX.
libGDX
libGDX is a cross-platform Java gaming framework that lets you target several different environments:
- Windows
- Linux
- MacOS
- Android
- BlackBerry
- iOS
- Java Applet
- JavaScript / WebGL
One good thing about libGDX is that it can be easily integrated in a Swing application.
Differences between GLFW and LWJGL
When developing a libGDX game for the desktop (both Windows and Linux) you need to choose between the two available libGDX backends: GLFW and LWJGL. The differences are explained here:
Quote:For now LWJGL will stay the default, but we may eventually make the GLFW backend the default.
Creating a libGDX project
If you are set to create a game with libGDX and Java the best way to start is to download the libGDX setup application (a jar file caled gdx-setup.jar) from the libGDX Downloads page and run it with
java -jar gdx-setup.jar
Having started the setup you are presented with this screen:

It lets you choose the platforms the game will target (Desktop, Android, Ios, Html) and, in advanced options:

lets you create an Eclipse or Idea project for your game so that it can easily be imported in those IDEs.
gdx-setup.jar creates a directory structure for you game, downloads necessary jars and adds support for IDEs you chose in the advanced options. You can find more information on creating and working with libGDX Java projects here.
There is no such automated tool to create a Ruby libGDX project but creating it manually is not difficult:
- On the libGDX Downloads page click on the 'Nightlies' button.
- From the Index of /nightlies/ select libgdx-nightly-latest.zip and download it.
- Unpack libgdx-nightly-latest.zip.
- Create a new Ruby project in Eclipse (assuming you have installed the Eclipse Ruby plugin).
- Create three directories in the project: assets, lib and src. In the assets directory you will keep game assets like images or sounds. In the lib folder copy the jars from libgdx-nightly-latest.zip that you will use in your game. (for a desktop game you will at minimum need these four: gdx.jar, rdx-natives.jar, gdx-backend-lwjgl.jar, gdx-backend-lwjgl-natives.jar). You will put your Ruby scripts in the source directory.
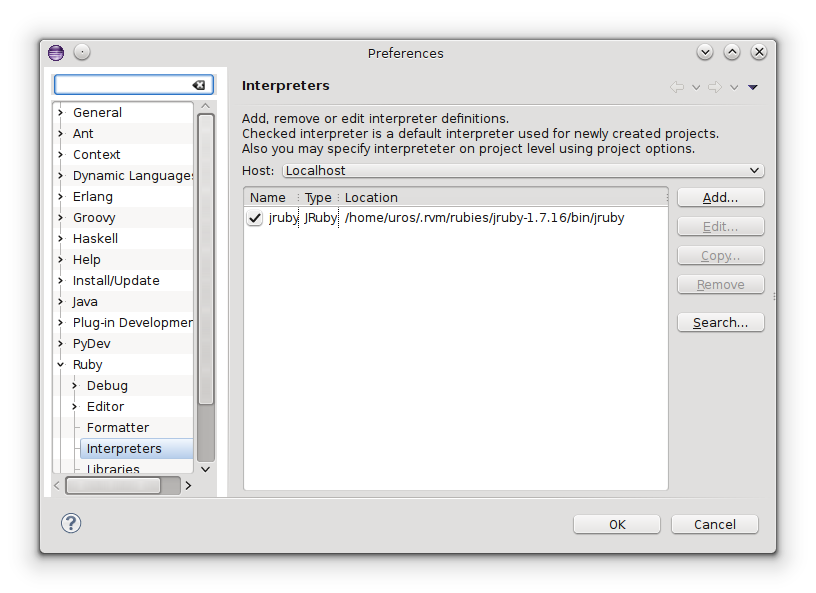
- In the Eclipse preferences make sure that JRuby is set as a default Ruby interpreter(Window -> Preferences ... In the left pane tree -> Ruby -> Interpreters)
Having followed these steps you should have a JRuby Eclipse project you can use to create a libGDX game with.
libGDX: the Drop Tutorial
The Drop tutorial is a Hello, World! tutorial for creating libGDX games in Java. It covers:
Quote:
- Basic file access
- Clearing the screen
- Drawing images
- Using a camera
- Basic input processing
- Playing sound effects
The outcome of the tutorial is a simple game:
- Every second a new raindrop appears at the top of the game surface.
- Raindrops fall at constant speed.
- A bucket is created at the botom center of the screen.
- The bucket can only move left and right and stays at the bottom of the screen.
- The player can move the bucket using left and right arrows in which case the bucket moves at the same speed as the speed the raindrops fall.
- The player can use mouse click to move the bucket in which case the bucket instantaneously moves under the point of the mouse click.
The goal of the game is to capture the raindrops in the bucket. There is no scoring and the game ends when the player closes the game window.
The game needs four assets:
- Raindrop splash sound (can be downloaded here). This sound is played eash time a raindrop hits the bucket.
- Rain sound (can be downloaded here). The rain serves as a background sound for the game and it loops for the entire game duration.
- Raindrop sprite (can be downloaded from here). Represents raindrops.
- Bucket sprite (Can be downloaded here). Represents the bucket.
All the assets are placed in assets directory.
I recreated the tutorial in JRuby. The completed game should look like this:

Coding the Game
- Create a Ruby script named imports.rb and save it in the project src directory. imports.rb contents:
script_directory = File.expand_path(File.dirname(__FILE__))
root_directory =  File.dirname(script_directory)

require "#{root_directory}/lib/gdx.jar"
require "#{root_directory}/lib/gdx-backend-lwjgl.jar"
require "#{root_directory}/lib/gdx-backend-lwjgl-natives.jar"
require "#{root_directory}/lib/gdx-natives.jar"

java_import com.badlogic.gdx.backends.lwjgl.LwjglApplication
java_import com.badlogic.gdx.backends.lwjgl.LwjglApplicationConfiguration
java_import com.badlogic.gdx.ApplicationListener
java_import com.badlogic.gdx.graphics.Texture
java_import com.badlogic.gdx.Gdx
java_import com.badlogic.gdx.graphics.OrthographicCamera
java_import com.badlogic.gdx.graphics.g2d.SpriteBatch
java_import com.badlogic.gdx.math.Rectangle
java_import com.badlogic.gdx.graphics.GL20
java_import com.badlogic.gdx.math.Vector3
java_import com.badlogic.gdx.Input
java_import com.badlogic.gdx.utils.TimeUtils
java_import com.badlogic.gdx.math.MathUtils
java_import com.badlogic.gdx.math.Rectangle
java_import com.badlogic.gdx.graphics.FPSLogger
The four #require() method calls at the top of the listing make libGDX jars available to the Ruby script. #java_import() calls import libGDX classes that will be used in the project.
- Create a Ruby script named main.rb and save it in the project src directory. main.rb contents:
require File.join(File.dirname(__FILE__), 'imports')
require File.join(File.dirname(__FILE__), 'drop')

configuration = LwjglApplicationConfiguration.new()
configuration.title = 'Ruby libGDX simple game'
configuration.width = 800
configuration.height = 480
configuration.resizable = false

LwjglApplication.new(Drop.new(), configuration)
The first #require() call makes the libGDX classes from imports.rb available to the main script. The second #require() imports a Ruby class named Drop into the main script (the Drop class is not yet created).
The LwjglApplicationConfiguration libGDX class lets you configure the application. In this case the application window title is set to 'Ruby libGDX simple game', window width is 800, window height 480 and the application window can not be resized.
The last line:
LwjglApplication.new(Drop.new(), configuration)
starts the libGDX application, so main.rb is the game entry point and must be executed in order to start the game.
The LwjglApplication constructor accepts an ApplicationListener interface implementation as the first argument so the Drop Ruby class needs to implement this interface.
The AplicationListener interface has six methods that the Drop class needs to implement:
#create()-called when the application is first created. You can use it to initialize constants that will be used in the game, to load images and sounds and initialize libGDX objects like camera.#dispose()- called when the application is destroyed. It is a good place to release loaded assets, like images and sounds.#pause()- only useful for Android projects. On desktop projects#pause()is called only once - immediately before#dispose()is called.#render()- called when the application should render itself. This the most important method of theApplicationListenerinterface. It gets executed every game loop.#resize()- called when the application is resized.#resume()- called when the application is resumed from a paused state. This method is not useful in a desktop project.
- Create a Ruby script named main.rb and save it in the project src directory. drop.rb contents:
class Drop

  include ApplicationListener

  def create()

    @viewport_width = 800
    @viewport_height = 480

    # Both bucket and raindrop sprites have the same dimensions.
    @sprite_width = 64
    @sprite_height = 64

    # Raindrop and bucket speed is 200 units per second.
    @sprite_speed = 200

    # 1 000 000 000 nanos = 1 s
    # Spawn a new raindrop every second.
    @second_in_nanos = 1000000000

    script_directory = File.expand_path(File.dirname(__FILE__))
    root_directory =  File.dirname(script_directory)

    droplet_image_file = Gdx.files.absolute("#{root_directory}/assets/droplet.png")
    bucket_image_file = Gdx.files.absolute("#{root_directory}/assets/bucket.png")
    drop_sound_file = Gdx.files.absolute("#{root_directory}/assets/drop.wav")
    rain_music_file = Gdx.files.absolute("#{root_directory}/assets/rain.mp3")

    @drop_image = Texture.new(droplet_image_file)
    @bucket_image = Texture.new(bucket_image_file)
    @drop_sound = Gdx.audio.new_sound(drop_sound_file)
    @rain_music = Gdx.audio.new_music(rain_music_file)

    @rain_music.looping = true
    @rain_music.play()

    @camera = OrthographicCamera.new()
    @camera.set_to_ortho(false, @viewport_width, @viewport_height)

    @batch = SpriteBatch.new()

    # Initially place the bucket image at the center
    # of the screen, 20 units from the bottom edge.
    @bucket = Rectangle.new()
    @bucket.x = @viewport_width / 2 - @sprite_width / 2
    @bucket.y = 20
    @bucket.width = @sprite_width
    @bucket.height = @sprite_height

    # A raindrop is added to this array every second
    # and removed from it when it reaches the bottom
    # of the screen or touches the bucket.
    @raindrops = []
    spawn_raindrop()

    @logger = FPSLogger.new()

  end

  def render()

    # Fill the screen with the color blue.
    Gdx::gl::gl_clear_color(0, 0, 0.2, 1)
    Gdx::gl::gl_clear(GL20::GL_COLOR_BUFFER_BIT)

    @camera.update()

    # Create a new raindrop every second.
    if TimeUtils.nano_time - @last_drop_time > @second_in_nanos
      spawn_raindrop()
    end

    # Each raindrop moves down 200 units(pixels) per second.
    # Gdx.graphics.delta_time is ~ 0.017s, so raindrops move down:
    # 200 × 0,017s (~3.4) units(pixels) each game loop.
    @raindrops.each do |raindrop|
      raindrop.y -= @sprite_speed * Gdx.graphics.delta_time
      @raindrops.delete(raindrop) if raindrop.y + @sprite_height < 0
    end

    @batch.projection_matrix = @camera.combined

    # Draw the bucket and all the raindrops in one SpriteBatch.
    @batch.begin()

    @batch.draw(@bucket_image, @bucket.x, @bucket.y)

    @raindrops.each do |raindrop|
      @batch.draw(@drop_image, raindrop.x, raindrop.y)
      if raindrop.overlaps(@bucket)
        @drop_sound.play()
        @raindrops.delete(raindrop)
      end
    end

    @batch.end()

    # Handle mouse click events to move the bucket.
    # Click coordinates are translated to camera coordinates
    # and the bucket position is set to them.
    if Gdx.input.touched?
      @touch_position = Vector3.new()
      @touch_position.set(Gdx.input.x, Gdx.input.y, 0)
      @camera.unproject(@touch_position)
      @bucket.x = @touch_position.x - @sprite_width / 2
    end

    # Handle left and right arrow key input.
    # As the raindrops, the bucket moves 200 units per second.
    # ie. ~3.4 units each game loop.

    if Gdx.input.key_pressed?(Input::Keys::LEFT)
      @bucket.x -= @sprite_speed * Gdx.graphics.delta_time
    end

    if Gdx.input.key_pressed?(Input::Keys::RIGHT)
      @bucket.x += @sprite_speed * Gdx.graphics.delta_time
    end

    # Keep the bucket on the screen

    @bucket.x = 0 if @bucket.x < 0

    if @bucket.x > @viewport_width - @sprite_width
      @bucket.x = @viewport_width - @sprite_width
    end

    # output the FPS

    @logger.log()

  end

  def resize(width, height)

  end

  def pause()

  end

  def resume()

  end

  def dispose()

    @drop_image.dispose()
    @bucket_image.dispose()
    @drop_sound.dispose()
    @rain_music.dispose()
    @batch.dispose()

  end

  def spawn_raindrop()

    # All raindrops as well as the bucket are created
    # as Gdx.math.Rectangle instances.
    # This allows us to detect if the bucket has touched
    # a raindrop using Rectangle#overlaps() method.

    raindrop = Rectangle.new()
    raindrop.x = MathUtils.java_send(:random, [Java::int], @viewport_width - @sprite_width)
    raindrop.y = @viewport_height
    raindrop.width = @sprite_width
    raindrop.height = @sprite_height

    @raindrops << raindrop
    @last_drop_time = TimeUtils.nano_time

  end

end
The Drop#create() method
The first two constants that are set in #create() are @viewport_height and @viewport_width. Their values are the same as the main window width and height. You can read more about cameras and viewports here. All sprites will have the same size (64x64 pixels).
Raindrops fall down speed is 200 units (pixels). The game loop code is executed ~60 times per second so raindrops will move down 1/60 ~ 0.017 pixels each game loop. The game window height is 480 pixels so a raindrop reaches the bottom of the screen in 480/200 = 2.4 seconds.
The bucket movement speed is also 200 pixels. The game window width is 600 pixels so the bucket moves from one edge of the screen to the oposite in 800/200 = 4 seconds.
droplet.png and bucket.png images are loaded from the file system into the libGDX Texture class instances. drop.wav is loaded using Gdx#audio#new_sound() and rain.mp3 using Gdx#audio#new_music(). The rain.mp3 file is set to play immediately, before the game loop starts.
Next, an instance of the OrthographicCamera class is created. OrthographicCamera is used to display 2d scenes. The SpriteBatch class is used to draw sprites on the screen.
Raindrops are created as instances of the Rectangle class so it is possible to keep track of and change their position (using Rectange.getX(), Rectangle.getY(), Rectangle.setX() and Rectangle.setY()) and stored in the array named @raindrops.
The Drop#render() method
The #render() method is executed each game loop. If possible, libGDX tries to keep the FPS (frames per second) rate at 60 which means that this method needs to execute in 1/60 = ~0.067 seconds. If #render() takes longer to execute the frame rate drops which can affect the player visual experience.
Each game loop the screen is cleared and filled with the color blue and the camera is updated - this is not necessary in this demo since the camera never moves, but the documentation says that it is generally a good practice to update the camera once per frame.
A new drop is created and added to @raindrops every second. Vertical position is updated for every raindrop in @raindrops using Rectangle#y. If a raindrop vertical position becomes negative it is removed from @raindrops. The bucket and all raindrops are drawn. If a raindrop overlaps the bucket it is removed from the @raindrops array and the drop sound is played.
On mouse click the bucket horizontal position is set to the click x coordinate. The mouse click coordinates are translated to camera coordinates using OrthographicCamera#unproject(). The game also handles keyboard events - when the left or right arrow key is pressed the bucket moves in the corresponding direction.
FPSLogger#log() displays the current FPS rate in the console.
The Drop#.dispose() method
The resources (Texture, Sound, Music and SpriteBatch instances) need to be explicitly disposed.
Calling Java methods from JRuby
When calling Java camel case named methods you can use Ruby's snake case convention instead. For instance:
OrthographicCamera.setToOrtho()becomesOrthographicCamera#set_to_ortho()GL20.glClearColor()becomesGL20.#gl_clear_color()
JRuby translates Java methods following the 'beans-convention'. For instance:
Rectangle.getX()becomesRectangle#xRectangle.setX()becomesRectangle#x =Input.isKeyPressed()becomesInput.key_pressed?
You are not required to use these conversions, you can call Java methods using their original names.
Java constants are called using the double colon notation. For instance:
GL20.COLOR_BUFFER_BITis used asGL20::COLOR_BUFFER_BITInput.Keys.RIGHTis used asInput::Keys::RIGHT
For Java static methods you can use either the dot or the double colon notation. For instance:
Gdx.input.isTouched()can be used asGdx::input::touched?orGdx.input.touched?
You can call unreachable Java methods using java_send. For instance the MathUtils class has two methods named random() that accept one argument - the one that accepts an integer and the one that accepts a float. To specify which one to call, use:
MathUtils.java_send(:random, [Java::int], @viewport_width - @sprite_width)
You can find more examples here - Calling Java from JRuby.
The Eclipse project
You can import the enclosed project into an Eclipse workspace using File -> Import... -> General - Existing Projects into Workspace -> Select archive file. You can run the project from Eclipse by right-clicking main.rb in Package Explorer and selecting Run As -> Ruby Script. If not already configred, you need to configure the Ruby interpreter in Eclipse Window -> Preferences:
You can run the project from the command line by navigating to the src directory and using:
jruby main.rb
The Jython implementation
If you prefer Jython there is a tutorial here: Using libGDX with Python.