
How to Create a Dropdown Button Control
4.85/5 (9 votes)
This is to show you how to build a Dropdown button for Windows form
Introduction
As you may know, Windows Form does not have all the controls that you may need, so when you face these issues, you have to start building a new one by yourself, and Dropdown button is one of them...
What is DropdownButton?
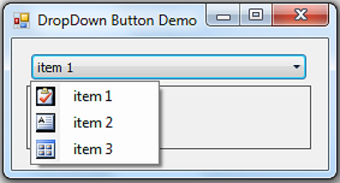
Dropdown button is a new control that I created in order to help in some development issues especially the design issues. From its name, you can understand what it means. Dropdown Button is a combination of button and dropdown control so when you click on the button, a dropdown that contain values will appear, and beside each value in the dropdown, you can add a small icon/image.
Purpose
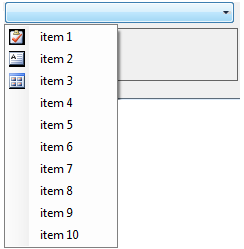
This control can help us by collecting a list of buttons in one button to minimize the space area. If you compare the two figures below, you can find how much this control decreases the space.
(Example: Case of 10 buttons)

Technical Specs
This control has been developed based on C# programming language; it is a user control that you can add by dragging it from the toolbox and drop it into your Windows Form. This will happen after adding the user control into your project (user control name: DDControl).Then inside your form, you just need to implement the Form_Load event and inside it, you must implement your code to add items(string) to your list, when you fill the list in string values, then call FillControlList(List<string>) that is implemented inside the user control that will take your list of string as a parameter (dDControl.FillControlList(lstSting)); And also you have to add the event ItemClickedEvent.
dDControl.ItemClickedEvent += new ItemClickedDelegate(dDControl_ItemClickedEvent);)
When clicking on the button(btnDropDown) the event (btnDropDown_Click) will be fired and the ContextMenueStrip will be bound with the list of the strings that we have, by calling ShowDropDown() method and then show the ContextMenueStrip (knowing that ContextMenueStrip created dynamically at run time) also inside the same method you can see how to add an image for each item in ContextMenueStrip.
private void ShowDropDown() {
            ContextMenuStrip contextMenuStrip = new ContextMenuStrip();
            //get the path of the image
            string imgPath = GetFilePath();
            //adding contextMenuStrip items according to LstOfValues count
            for (int i = 0; i < LstOfValues.Count - 1; i++) {
                //add the item
                contextMenuStrip.Items.Add(LstOfValues[i]);
                //add the image
                if (File.Exists(imgPath + @"icon" + i + ".bmp")) {
                    contextMenuStrip.Items[i].Image = Image.FromFile(imgPath + @"icon" + i + ".bmp");
                }
            }
            //adding ItemClicked event to contextMenuStrip
            contextMenuStrip.ItemClicked += contextMenuStrip_ItemClicked;
            //show menu strip control
            contextMenuStrip.Show(btnDropDown, new Point(0, btnDropDown.Height));
        }
When you choose an item from the drop down, the below event will be fired in order to set the text of the button and the text of the label in your main form (Callback method).
 void contextMenuStrip_ItemClicked(object sender, ToolStripItemClickedEventArgs e) {
            try {
                ToolStripItem item = e.ClickedItem;
                //set the text of the button
                btnDropDown.Text = item.Text;
                if (ItemClickedEvent != null) {
                    ItemClickedEvent(sender, e);
                }
            }
            catch (Exception ex) {
                MessageBox.Show(ex.ToString());
            }
        }
void dDControl_ItemClickedEvent(object sender, ToolStripItemClickedEventArgs e) {
label1.Text = "Congrats!!! \r\nYou clicked [" + e.ClickedItem.Text + "]";
} Conclusion
In this tip, we have learned how to create a dropdown button for Windows Form using C# programming language. Thank you for your patience. Keep reading, keep learning and keep sharing.
That is all I wanted to say in this tip. I hope you liked it. If you did like this tip, could you spare some time to leave a comment and a vote? Many thanks.