Introduction
Suites are a way to package and distribute applications in a common framework to give a common look and feel, or to group functionality under a common container. Extending the suite to add new applications, or to update existing ones, can be problematic. The approach I will demonstrate here is to use dynamic runtime discovery to load applications from DLLs.
Credits
The Outlook Bar used in this project is from Marc Clifton’s article An Outlook Bar Implementation. I made a small modification to support an additional field.
Suite Container
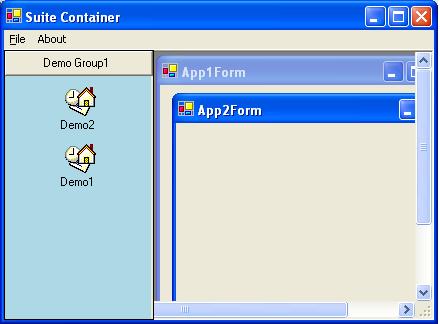
The suite container is the shell that holds everything together. It gives the applications a common look and feel, menu items, and basically a place to hang out. For this project, I’ve created a very simple container with an Outlook Bar to group and show loaded apps and an area to display the apps interface.
Loading Apps
When the suite container starts, it needs to look for any applications to load. One way to do this is to have it search a given path for any DLLs and attempt to load them. The obvious problem with this approach is that the path may contain support DLLs that can’t, or should not, be loaded. A way to get around this is to use custom attributes to indicate that the class, or classes, within the DLL are meant to be part of the application suite.
public static Hashtable FindApps()
{
Hashtable hashAssemblies = new Hashtable();
string strPath = Path.GetDirectoryName(ExecutablePath);
DirectoryInfo di = new DirectoryInfo(strPath);
foreach(FileInfo file in di.GetFiles("*.dll") )
{
Assembly asm = Assembly.LoadFile(file.FullName);
foreach(Module mod in asm.GetModules() )
{
foreach( Type t in mod.GetTypes() )
{
object[] attributes =
t.GetCustomAttributes(typeof(SuiteAppAttrib.SuiteAppAttribute),
true);
if( attributes.Length == 1 )
{
string strName =
((SuiteAppAttrib.SuiteAppAttribute)attributes[0]).Name;
string strGroup =
((SuiteAppAttrib.SuiteAppAttribute)attributes[0]).Group;
SuiteApp app = new SuiteApp(t.Name,
file.FullName, strName, strGroup);
if( hashAssemblies.ContainsKey(t.Name) )
throw new Exception("Name already in use.");
hashAssemblies.Add(t.Name, app);
}
}
}
}
return hashAssemblies;
}
As you can see from this code, we are searching the application path for any DLLs, then loading them and checking for the presence of our custom attribute.
t.GetCustomAttributes(typeof(SuiteAppAttribute), true);
If found, we then create an instance of the SuiteApp helper class and place it in a Hashtable with the apps name as the key. This will come into play later when we need to look up the app for activation. It does place the limit of not allowing duplicate application names, but to avoid confusion on the user end, it is a good thing.
Using Attributes
Attributes are a means to convey information about an assembly, class, method, etc. Much more information about them can be found here, C# Programmer's Reference Attributes Tutorial. In the case of this project, a custom attribute is created and used to give two pieces of information necessary for the suite to load any app it finds. First, just by querying for the mere presence of the attribute, we can tell that the DLL should be loaded. The second part of information we get from the attribute is the name of the Outlook Bar group it should be added to and the name to be shown for the application.
[AttributeUsage(AttributeTargets.Class, AllowMultiple=false)]
public class SuiteAppAttribute : Attribute
{
private string m_strName;
private string m_strGroup;
public SuiteAppAttribute(string strName, string strGroup)
{
m_strName = strName;
m_strGroup = strGroup;
}
public string Name
{
get{ return m_strName; }
}
public string Group
{
get{ return m_strGroup; }
}
}
The first thing to note here is the attribute applied to this custom attribute.
[AttributeUsage(AttributeTargets.Class, AllowMultiple=false)]
This tells the runtime that this particular custom attribute can only be applied to a class and further can only be applied once.
Creating supported apps
To create applications to become part of our suite, we need to start with the Build event. To facilitate debugging, the application(s) must be moved to a location where the suite container can detect and load them. This step can be automated by adding a post-build step.

copy $(TargetDir)$(TargetFileName) $(SolutionDir)SuiteAppContainer\bin\debug
Provided that everything is in the same solution, this will copy the output of the application's compile step to the debug folder of the suite container.
Activating Apps
To activate the application once the icon has been selected, we first make a check that it does indeed exist in the HashTable, if not there are some real problems. We also need to make sure the form has not already been created. Once these checks are verified, the path to the assembly is located and loaded. The InvokeMember function is used to create an instance of the form in question. We set a handler for the form closing event, so it can be handled as we’ll see later.
public void OnSelectApp(object sender, EventArgs e)
{
OutlookBar.PanelIcon panel = ((Control)sender).Tag as
OutlookBar.PanelIcon;
string strItem = panel.AppName;
if( m_hashApps.ContainsKey(strItem) )
{
if( ((SuiteApp)m_hashApps[strItem]).Form == null )
{
SuiteApp app = (SuiteApp)m_hashApps[strItem];
Assembly asm = Assembly.LoadFile(app.Path);
Type[] types = asm.GetTypes();
Form frm = (Form)Activator.CreateInstance(types[0]);
frm.MdiParent = this;
frm.Show();
frm.Closing += new
CancelEventHandler(ChildFormClosing);
((SuiteApp)m_hashApps[strItem]).Form = frm;
return;
}
else
{
((SuiteApp)m_hashApps[strItem]).Form.Activate();
}
}
else
throw new Exception("Application not found");
}
If the form already exists then we just want to activate it, bring it to the front.
((SuiteApp)m_hashApps[strItem]).Form.Activate();
Form Closing
We need to be able to capture when the child forms close so that the resources can be freed and when it is required again the form will be recreated rather than attempting to activate a form that has already been closed.
private void ChildFormClosing(object sender, CancelEventArgs e)
{
string strName = ((Form)sender).Text;
if( m_hashApps.ContainsKey(strName) )
((SuiteApp)m_hashApps[strName]).Form = null;
}
Menus
The next area to address are the menus. The main container app has a basic menu structure and each application it houses will have its own menus, some with the same items.
Combining menus isn’t terribly difficult; it just takes some attention to detail and planning. The menu properties MergeType and MergeOrder are used to sort out how the menus are merged and where the items appear. The default settings are MergeType = Add and MergeOrder = 0. In the case of this example, we want to merge the File menu of the container app with the File menu from the child app. To start with, we need to set the MergeType of the main window file menu to MergeItems. The File menu in the child app must also be set to MergeItems.
This gets a little closer but as can be seen, we have duplicates of some items. I’ve renamed the child’s exit menu to better illustrate the problem. To correct this, we need to change the main window’s exit menu item to MergeType = Replace.
Now, we have the expected results. The next step is to set the MenuOrder. This doesn’t affect the merging of the menus but does affect where the items appear. Reviewing the sample project, we can see that the exit menu items have a MergeOrder of 99. Merging starts at 0 with higher numbered items being merged lower in the menu.
By setting the MergeOrder to 0, we see that the exit menu item is placed higher in the file menu.
Conclusion
This is certainly not an earth shattering killer application. What I hope is, it is a learning tool to explorer capabilities and present the seeds for thought, possibly some of the techniques can be incorporated into other applications.


 General
  News
News  Suggestion
  Question
  Bug
Bug  Answer
  Joke
Joke  Praise
  Rant
Rant  Admin
Admin 


