In this tutorial I want to show you how to integrate dhtmlxGantt into an ASP.NET MVC application. dhtmlxGantt is an open source (GPL) JavaScript library that draws attractive Gantt charts and with its help it becomes easy and convenient for the end users to edit the tasks. Lead this tutorial and you will know how to: 1) place the Ajax-based Gantt chart on a web page, 2) load tasks from the .NET server side, 3) update the tasks in the database when a user makes changes in the browser.
In case if you have already worked with ASP.NET MVC and dhtmlxGantt and you are just interested in jumping right into the code, you can download the final demo app.
NOTE: The sample goes without pre-downloaded NuGet packages. They will be installed automatically when you Build the project in Visual Studio. If it doesn't happen, you can either configure Visual Studio to restore missing packages during the build, or install them manually by this command in Package Manager Console:
>> Update-Package -Reinstall
In case if you are not familiar with using dhtmlxGantt with ASP.NET MVC, follow the instructions in this tutorial.
Getting Started
The first thing you need to do is to create a new MVC project.

For further work you also need dhtmlxGantt and EntityFramework libraries. You can install them using Nuget Package Manager.
When all pre-work actions are done you can proceed to the first step.
Step 1 – Initialization
To begin with, add the links to the dhtmlxGantt files. Open the _Layout.cshtml file and modify it like this:
<!DOCTYPE html>
<html>
<head>
    <meta charset="utf-8" />
    <meta name="viewport" content="width=device-width, initial-scale=1.0">
    <title>@ViewBag.Title</title>
    <script src="~/Scripts/dhtmlxgantt/dhtmlxgantt.js" type="text/javascript" charset="utf-8"></script>
    <link rel="stylesheet" href="~/Content/dhtmlxgantt/dhtmlxgantt.css" type="text/css" />
    <style type="text/css">
html, body
{
    height: 100%;
    padding: 0px;
    margin: 0px;
    overflow: hidden;
}
    </style>
</head>
<body>
    @RenderBody()
    <script src="~/Scripts/main.js" type="text/javascript" charset="utf-8"></script>
</body>
</html>
Then create HomeController with Index action. Add this HTML container for dhtmlxGantt to the Index view:
<div id="ganttContainer" style="width: 100%; height: 100%;"></div>
Create main.js file in the Scripts folder for adding code that initialize the Gantt chart on a page. The following data should be added to the created file:
(function () {
gantt.config.scale_unit = "week";
gantt.config.step = 1;
gantt.templates.date_scale = function (date) {
var dateToStr = gantt.date.date_to_str("%d %M");
var endDate = gantt.date.add(gantt.date.add(date, 1, "week"), -1, "day");
return dateToStr(date) + " - " + dateToStr(endDate);
};
gantt.config.subscales = [
{ unit: "day", step: 1, date: "%D" }
];
gantt.config.scale_height = 50;
gantt.templates.rightside_text = function (start, end, task) {
if (task.type == gantt.config.types.milestone) {
return task.text;
}
return "";
};
gantt.config.lightbox.sections = [
{ name: "description", height: 70, map_to: "text", type: "textarea", focus: true },
{ name: "type", type: "typeselect", map_to: "type" },
{ name: "time", height: 72, type: "duration", map_to: "auto" }
];
gantt.config.xml_date = "%Y-%m-%d %H:%i:%s";
gantt.init("ganttContainer");
})();
In this code we've specified the following:
- scales configuration - two line scale that will display days and weeks;
- labels text for milestones and sections of the task details form;
- the format of dates for data loading (this is needed to parse the server-side data correctly).
Then we’ve initialized our Gantt chart.
Without data you will see the running application like this:
Step 2 – Creating Task and Link Models
This step concerns the creation of models for storing the tasks and links. Note that here we use EF Code First, that releases us from manual creation of the database tables. Now create Task and Link classes in Model folder:
public class GanttTask
    {
        public int GanttTaskId { get; set; }
        [MaxLength(255)]
        public string Text { get; set; }
        public DateTime StartDate { get; set; }
        public int Duration { get; set; }
        public decimal Progress { get; set; }
        public int SortOrder { get; set; }
        public string Type { get; set; }
        public int? ParentId { get; set; }
    }
public class GanttLink
    {
        public int GanttLinkId { get; set; }
        [MaxLength(1)]
        public string Type { get; set; }
        public int SourceTaskId { get; set; }
        public int TargetTaskId { get; set; }
    }
Note that classes for Tasks and Links can have any number of custom columns that can be accessed on the client-side.
After this, create the database context class:
- create a new folder DAL (for Data Access Layer);
- in that folder create a new class file named GanttContext.cs;
- replace the template code with the following code:
public class GanttContext : DbContext
    {
        public GanttContext() : base("GanttContext") { }
        public DbSet<GanttTask> GanttTasks { get; set; }
        public DbSet<GanttLink> GanttLinks { get; set; }
    }
In this class our models are linked with database. The context class will use connection string named "GanttContext", so you'll need to define one in order to fetch the database.
Step 3 – Loading Data
Now let’s deal with loading data. With the client-side dhtmlxGantt component we use simple JSON structure as described here. Basically it is an object with two array properties, one for the links and one for the tasks. Task dates should be serialized in format specified in gantt.config.xml_date, that has been defined in the main.js. What we need to do is to create a JSON object with two arrays for Tasks and Links.
Add Data action to HomeController.cs and GanttContext variable to access the database:
private readonly GanttContext db = new GanttContext();
public JsonResult GetGanttData()
{
var jsonData = new
{
data = (
from t in db.GanttTasks.AsEnumerable()
select new
{
id = t.GanttTaskId,
text = t.Text,
start_date = t.StartDate.ToString("u"),
duration = t.Duration,
order = t.SortOrder,
progress = t.Progress,
open = true,
parent = t.ParentId,
type = (t.Type != null) ? t.Type : String.Empty
}
).ToArray(),
links = (
from l in db.GanttLinks.AsEnumerable()
select new
{
id = l.GanttLinkId,
source = l.SourceTaskId,
target = l.TargetTaskId,
type = l.Type
}
).ToArray()
};
return new JsonResult { Data = jsonData, JsonRequestBehavior = JsonRequestBehavior.AllowGet };
}
We continue with configuring dhtmlxGantt to load data from these actions. This line should be added after the grid initialization in the main.js file:
gantt.load("/Home/Data", "json");
Now dhtmlxGantt is able to load data. In order to fill out our database we will configure entity framework to initialize the database with test data. In the DAL folder, create a new class file named GanttInitializer.cs and replace the template code with the following code, which will lead to the creation of database when needed and loads test data into the new database:
public class GanttInitializer : DropCreateDatabaseIfModelChanges<GanttContext>
 {
     protected override void Seed(GanttContext context)
     {
         List<GanttTask> tasks = new List<GanttTask>()
         {
             new GanttTask() { GanttTaskId = 1, Text = "Project #2", StartDate = DateTime.Now.AddHours(-3),
                 Duration = 18, SortOrder = 10, Progress = 0.4m, ParentId = null },
             new GanttTask() { GanttTaskId = 2, Text = "Task #1", StartDate = DateTime.Now.AddHours(-2),
                 Duration = 8, SortOrder = 10, Progress = 0.6m, ParentId = 1 },
             new GanttTask() { GanttTaskId = 3, Text = "Task #2", StartDate = DateTime.Now.AddHours(-1),
                 Duration = 8, SortOrder = 20, Progress = 0.6m, ParentId = 1 }
         };
         tasks.ForEach(s => context.GanttTasks.Add(s));
         context.SaveChanges();
         List<GanttLink> links = new List<GanttLink>()
         {
             new GanttLink() { GanttLinkId = 1, SourceTaskId = 1, TargetTaskId = 2, Type = "1" },
             new GanttLink() { GanttLinkId = 2, SourceTaskId = 2, TargetTaskId = 3, Type = "0" }
         };
         links.ForEach(s => context.GanttLinks.Add(s));
         context.SaveChanges();
     }
 }
The Seed method takes the database context object as an input parameter, and the code in the method uses that object to add new entities to the database. For each entity type, the code creates a collection of new entities, adds them to the appropriate DbSet property, and then saves the changes to the database.
Now you need the Entity Framework to use your initializer class. For doing this, add an element to the entityFramework element in the application Web.config file, as shown in the following example:
<contexts>
    <context type="Gantt.DAL.GanttContext, Gantt">
        <databaseInitializer type="Gantt.DAL.GanttInitializer, Gantt" />
    </context>
</contexts>
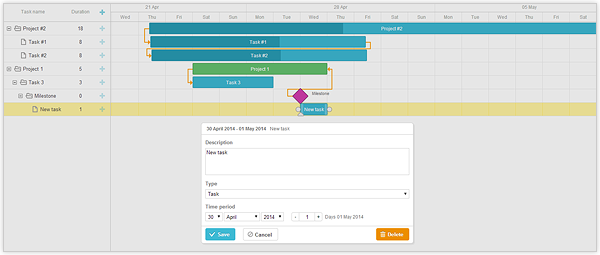
dhtmlxGantt is now ready for loading data. When running the application, it will look like this:
Step 4 – Saving Changes to the Database
Passing through all these steps, we now have a Gantt chart that loads the tasks from the database but this is not the end. In what follows we will save changes made on the client side to the server. Let’s use dataProcessor on the client for this. This library is integrated into dhtmlxGantt and automatically traces the changes made on the client side and sends updates to the server, so we need to configure the server to handle these requests.
We need to add the following code in order to create a class which will parse and represent data action sent from the client. Add it to a new created GanttRequest model in the Model folder:
public enum GanttMode
{
Tasks,
Links
}
public enum GanttAction
{
Inserted,
Updated,
Deleted,
Error
}
public static List<GanttData> Parse(FormCollection form, string ganttMode)
{
var currentCulture = Thread.CurrentThread.CurrentCulture;
Thread.CurrentThread.CurrentCulture = CultureInfo.InvariantCulture;
var ganttDataCollection = new List<GanttData>();
var prefixes = form["ids"].Split(',');
foreach (var prefix in prefixes)
{
var ganttData = new GanttData();
Func<string, string> parse = x => form[String.Format("{0}_{1}", prefix, x)];
ganttData.Mode = (GanttMode)Enum.Parse(typeof(GanttMode), ganttMode, true);
ganttData.Action = (GanttAction)Enum.Parse(typeof(GanttAction), parse("!nativeeditor_status"), true);
ganttData.SourceId = Int64.Parse(parse("id"));
if (ganttData.Action != GanttAction.Deleted && ganttData.Mode == GanttMode.Tasks)
{
ganttData.GanttTask = new GanttTask()
{
GanttTaskId = (ganttData.Action == GanttAction.Updated) ? (int)ganttData.SourceId : 0,
Text = parse("text"),
StartDate = DateTime.Parse(parse("start_date")),
Duration = Int32.Parse(parse("duration")),
Progress = Decimal.Parse(parse("progress")),
ParentId = (parse("parent") != "0") ? Int32.Parse(parse("parent")) : (int?)null,
SortOrder = (parse("order") != null) ? Int32.Parse(parse("order")) : 0,
Type = parse("type")
};
}
else if (ganttData.Action != GanttAction.Deleted && ganttData.Mode == GanttMode.Links)
{
ganttData.GanttLink = new GanttLink()
{
GanttLinkId = (ganttData.Action == GanttAction.Updated) ? (int)ganttData.SourceId : 0,
SourceTaskId = Int32.Parse(parse("source")),
TargetTaskId = Int32.Parse(parse("target")),
Type = parse("type")
};
}
ganttDataCollection.Add(ganttData);
}
Thread.CurrentThread.CurrentCulture = currentCulture;
return ganttDataCollection;
}
GanttRequest class has several properties to store the action info that came from the client side, and one method that creates a collection of data actions from the request values.
The data is sent from the client in the following format:
13_!nativeeditor_status:"inserted",
13_text: "New task"
13_duration: 1
which is common for all DHTMLX components that use dhtmlxDataprocessor.
A single request may specify operations on several data items. Each property has prefix that links to an id of the related data item. All sent ids are stored in "ids" parameter and separated by commas:
ids:13,25
13_!nativeeditor_status:inserted,
25_!nativeeditor_status:updated,
…
By default, requests for insert/update contains only one id, while requests for deleting may have multiple items specified. Although, in general case, the request may contain any number of operations of different kind.
So now we change the current culture to InvariantCulture. This is needed for more predictable parsing of request parameters - the format of dates and numbers that comes from a client-side component does not depend on the server-side culture settings. The next step is to parse request values into collection of individual data actions and store it in request variable (GanttRequest class has been defined in Models/GanttRequest.cs).
The following properties define the type of data action:
- Mode - specifies the data entity, it can be a link or a task
- Actions - specifies the type of an operation, can be delete, update, insert
Depending on action and mode, we populate UpdatedTask or UpdatedLink objects from the request values.
The changes are saved depending on the action and for this we will create in HomeController.cs Save action, two private methods: UpdateTasks and UpdateLinks. Besides, we create GanttRespose method for XML response.
[HttpPost]
public ContentResult UpdateGanttData(FormCollection form)
{
var ganttDataCollection = GanttData.Parse(form, Request.QueryString["gantt_mode"]);
try
{
foreach (var ganttData in ganttDataCollection)
{
switch (ganttData.Mode)
{
case GanttMode.Tasks:
UpdateGanttTasks(ganttData);
break;
case GanttMode.Links:
UpdateGanttLinks(ganttData);
break;
}
}
db.SaveChanges();
}
catch
{
ganttDataCollection.ForEach(g => { g.Action = GanttAction.Error; });
}
return GanttRespose(ganttDataCollection);
}
private void UpdateGanttTasks(GanttData ganttData)
{
switch (ganttData.Action)
{
case GanttAction.Inserted:
db.GanttTasks.Add(ganttData.GanttTask);
break;
case GanttAction.Deleted:
db.GanttTasks.Remove(db.GanttTasks.Find(ganttData.SourceId));
break;
case GanttAction.Updated:
db.Entry(db.GanttTasks.Find(ganttData.GanttTask.GanttTaskId)).CurrentValues.SetValues(ganttData.GanttTask);
break;
default:
ganttData.Action = GanttAction.Error;
break;
}
}
private void UpdateGanttLinks(GanttData ganttData)
{
switch (ganttData.Action)
{
case GanttAction.Inserted:
db.GanttLinks.Add(ganttData.GanttLink);
break;
case GanttAction.Deleted:
db.GanttLinks.Remove(db.GanttLinks.Find(ganttData.SourceId));
break;
case GanttAction.Updated:
db.Entry(db.GanttLinks.Find(ganttData.GanttLink.GanttLinkId)).CurrentValues.SetValues(ganttData.GanttLink);
break;
default:
ganttData.Action = GanttAction.Error;
break;
}
}
private ContentResult GanttRespose(List<GanttData> ganttDataCollection)
{
var actions = new List<XElement>();
foreach (var ganttData in ganttDataCollection)
{
var action = new XElement("action");
action.SetAttributeValue("type", ganttData.Action.ToString().ToLower());
action.SetAttributeValue("sid", ganttData.SourceId);
action.SetAttributeValue("tid", (ganttData.Action != GanttAction.Inserted) ? ganttData.SourceId :
(ganttData.Mode == GanttMode.Tasks) ? ganttData.GanttTask.GanttTaskId : ganttData.GanttLink.GanttLinkId);
actions.Add(action);
}
var data = new XDocument(new XElement("data", actions));
data.Declaration = new XDeclaration("1.0", "utf-8", "true");
return Content(data.ToString(), "text/xml");
}
In the Save action we parse the request values into collection of individual data actions. Then for each data action, depending on it's mode, we perform update on links or tasks table.
When we’ve done with the actions above, we need to return the response for the client side. Method GanttRespose renders the XML response that will notify the client-side about the result of operation (success or error).
UpdateGanttTaks and UpdateLinks methods are fairly simple. They call Entity Framework function to update/insert/delete new tasks or links.
XML response format is also very simple:
insert: <data><action type="inserted" sid="temp id" tid="new id from database" /></data>
update: <data><action type="updated" sid="entity id" tid="entity database" /></data>
delete: <data><action type="deleted" sid="first entity id" tid="first entity id" /><action type="deleted" sid="second entity id" tid="second entity id" /> … </data>
We are close to finish. The last step is to activate the dataProcessor on the client. We add the following lines to the end of the main.js file:
var dp = new dataProcessor("/Home/Save");
dp.init(gantt);
These updates will give you the possibility to create/update/delete tasks and links on your Gantt chart in your application.
As a result of this tutorial, you have built an interactive Gantt chart with ASP.NET MVC backend. For the end users it is now very simple to create and manage tasks using an intuitive drag-and-drop interface. All the changes are saved to the server and updated in the database. Now you see how to extend the functionality of the application and customize it for your needs with the help of dhtmlxGantt API .
Download the final demo app and it shows you the integration of dhtmlxGantt with ASP.NET MVC.
Building web apps since 2001. Rich experience in HTML frontends for different platforms.


 General
  News
News  Suggestion
  Question
  Bug
Bug  Answer
  Joke
Joke  Praise
  Rant
Rant  Admin
Admin 


