Introduction
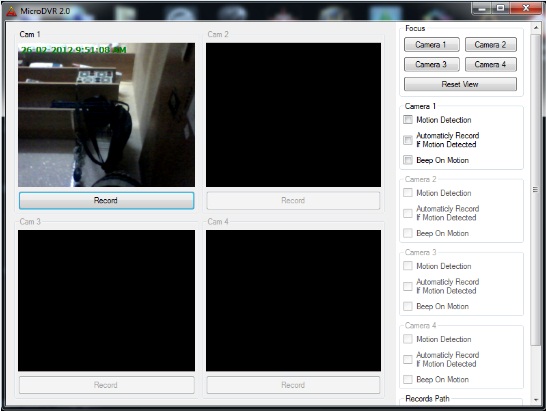
This is a simple application that allows the user to use the available VideoCaptureDevices (Webcams) as security cameras.
The interface allows the user to record the videocapture of a specific camera to a video file (.avi) to local storage (The recording path also can be set via the interface).
The user can at anytime set the focus on any camera.
For each camera, we can enable the Motion Detection, Beep on motion and Automatic recording on motion.
Background
The basic idea of this application is to create a low cost/cost free video security program for a rather small place (a small store in my case)
that covers the basic DVR functionalities (Motion detection, recording).
Code Explanation
a - The CameraMonitor Class
The "CameraMonitor" class is the essencial core of this application, as it provides the interface to control the "VideoCaptureDevice" as well as the other functions like Video Recording and motion detection.
here's the class's public members and properties :

The way we can create "
CameraMonitor" object is through its constructor:
new CameraMonitor(
PictureBox display,
string monikerString,
String cameraName
);
The CameraMonitor first creates the "
VideoCaptureDevice" using the
monikerString passed to it, then sets the event handler for new incoming frames and finally it starts the Video capture.
cam = new VideoCaptureDevice(monikerString);
cam.NewFrame += new NewFrameEventHandler(cam_NewFrame);
cam.Start();
It also creates the
MotionDetector:
md = new MotionDetector(new TwoFramesDifferenceDetector(), new MotionAreaHighlighting());
Now when a
NewFrameEvent is detected the "
cam_NewFrame" method is ready to handle it, first it gets the BitMap from the new frame , then it displays it on the PictureBox for the user.
Bitmap bit = (Bitmap)eventArgs.Frame.Clone();
this.display.Image = (Bitmap)bit.Clone();
The Motion Detection Algorithm
If the motion detection is activated by the user, "
cam_NewFrame" executes the code below:
if (this.MotionDetection && !this.motionDetected)
{
Bitmap bit2 = (Bitmap)bit.Clone();
if (md.ProcessFrame(bit2) > 0.001)
{
if (this.calibrateAndResume > 3)
{
Thread th = new Thread(MotionReaction);
th.Start();
}
else this.calibrateAndResume++;
}
}
Note : The "
calibrateAndResume" counter is added to make sure that there is a real motion going on (withing 3 subsequent frames). Before, the motion detector would trigger even for a small change in the room lighting.
If Motion is detected, a new Thread is launched to do whatever needs to done (display a message and/or beep and/or start recording).
private void MotionReaction()
{
this.motionDetected = true;
if (this.RecordOnMotion)
{
this.StartRecording();
}
if (this.BeepOnMotion)
{
System.Console.Beep(400, 500);
System.Console.Beep(800, 500);
}
Thread.Sleep(10000);
calibrateAndResume = 0;
this.motionDetected = false;
Thread.Sleep(3000);
if (!this.forceRecord && this.motionDetected == false)
{
this.StopRecording();
}
}
Video Recording
To record videos we're using a Bitmap Queue to store the frames coming from the camera, then the recorder thread will dequeue frame by frame and write it to a file using a "VideoFileWriter"
private void DoRecord()
{
VideoFileWriter writer = new VideoFileWriter();
writer.Open(RecordingPath+"\\" + this.cameraName +String.Format("{0:_dd-M-yyyy_hh-mm-ss}",DateTime.Now) +".avi", this.Width, this.Height, 30);
while (IsRecording)
{
if (frames.Count > 0)
{
Bitmap bmp = frames.Dequeue();
writer.WriteVideoFrame(bmp);
}
}
writer.Close();
}
Note: we can always set the recording path via the public property "
RecordingPath". Note: here the FrameRate is not properly set as it must be retrieved from the camera FrameRate, this will be noticed in the output videofile (speed not accurate).
b - The user interface (MainForm Class)
Using the CameraMonitor
When the form loads, it fetches the
FilterInfoCollection array which contain the
monikerString strings required to start the VideoCaptureDevice in the CameraMonitor. At this point the available cameras will be working and displaying video on the PictureBox controls we passed to them.
webcam = new FilterInfoCollection(FilterCategory.VideoInputDevice);
for (int i = 0; i < webcam.Count && i<4; i++)
{
this.CamMonitor[i] = new CameraMonitor(this.DisplayReference[i],webcam[i].MonikerString,"Camera"+(i+1));
this.camPanels[i].Enabled = true;
this.camOptions[i].Enabled = true;
}
Saving and Loading User Options
The last part is making the application remember stuff like the recording path or which cam was detecting motion etc., so when the user runs the application, he would not have to RESET all options manually. To do this, I've created a Config DataSet that stors associations ( KEY => VALUE ) where we'll save user option upon aplication exit, and reload them at application run using the DataSet.WriteXml() and DataSet.ReadXml()
Example: fetching options from the user interface and saving them to an XML file:
try
{
DataRow r = this.config.Options.Select("Key = 'Camera1'")[0];
r[1] = ((!this.MotionDetection1.Checked) ? "0" : "1") +
((!this.AutoRecord1.Checked) ? "0" : "1") +
((!this.BeepOnMotionCheck1.Checked) ? "0" : "1");
}
catch (Exception ex)
{
this.config.Options.AddOptionsRow("Camera1",
((!this.MotionDetection1.Checked) ? "0" : "1") +
((!this.AutoRecord1.Checked) ? "0" : "1") +
((!this.BeepOnMotionCheck1.Checked) ? "0" : "1"));
}
this.config.WriteXml("config.xml");
Example: fetching options from XML File and applying them to the user interface:
this.config.ReadXml("config.xml");
try
{
DataRow r = this.config.Options.Select("Key = 'Camera1'")[0];
string option = r[1].ToString();
this.MotionDetection1.Checked = (option[0] == '0') ? false : true;
this.AutoRecord1.Checked = (option[1] == '0') ? false : true;
this.BeepOnMotionCheck1.Checked = (option[2] == '0') ? false : true;
}
catch (Exception ex) { }
Points of Interest
As a programmer, this application enabled me to scratch the surface to working with Video using AForge, writing video files (FFMpeg),playing with some image processing, so all in all, its good programming experience!
History
First Release : Feb 2012.
This member has not yet provided a Biography. Assume it's interesting and varied, and probably something to do with programming.


