Introduction
Web part chrome is one of the major components in the Web
Part framework of ASP.NET 2.0. It is responsible for rendering the Web parts
and their affiliates, e.g. title, that are contained within a Web part zone.
However, we can customize the way a Web part chrome renders Web parts to a great
extent by changing some property values of the WebPartZone class. We
sometimes still need to modify the way the Web part chrome renders Web parts to
meet some particular requirements. This article is about that modification.
Pre-requisites
To understand this article, you need to be familiar with the ASP.NET Web part
framework. If you are new to this, I recommend you read "ASP.Net 2.0 Web Parts
in Action" written by Darren Neimke, published by Manning Publications. This
book will give you a good understanding about it.
Background
The other day, when I was trying to show my colleague
what the Web part is all about, so I opened the iGoogle page.
My colleague mentioned that he liked the way Google designed the title
bar by putting in only three image buttons, one for closing, one for minimize
or restore and the other one for a drop down menu for the rest. Then he asked
me if I could do the same thing in .NET. Without thinking carefully, I firmly
replied, "Definitely! Who do you think you are talking to?" But after that, I
began feeling I should have thought twice before speaking.
Anyway, having said that, I would feel embarrassed if I
had to eat my words, so I got my hair messy for a couple of days and here's what I
achieved.
CustomisedWebPartZone Class
Now let's begin. A
Web part chrome is created and used by a Web part zone to render a Web part. In
the WebPartZone class, there is an overridable function called CreateWebPartChrome. First of all, we will write a class called CustomisedWebPartZone that
inherits from this class and overrides that function to return the
CustomisedWebPartChrome that we are going to write. The code for the function is
as follows.
Protected Overrides Function CreateWebPartChrome() As
    System.Web.UI.WebControls.WebParts.WebPartChrome
    Return New CustomisedWebPartChrome(Me,
        WebPartManager.GetCurrentWebPartManager(Me.Page))
End Function
There is also a protected property of the WebPartZone class that our CustomisedWebPartChrome class needs to call later, so we have to make a friend (assembly) property
to expose it to other classes.
Protected Friend Shadows ReadOnly Property RenderClientScript() As Boolean
    Get
        Return MyBase.RenderClientScript
    End Get
End Property
CustomisedWebPartChrome Class
Now, we will create CustomisedWebPartChrome class that inherits from the WebPartChrome class. We will cast and shadow the original Zone property that
returns the WebPartZoneBase to return our CustomisedWebPartZone
instead.
Protected Shadows ReadOnly Property Zone() As CustomisedWebPartZone
    Get
        Return MyBase.Zone
    End Get
End Property
The core method of the WebPartChrome class is the RenderWebPart method. It is this method that renders the whole chrome (which is supposed
to have a Web part sitting in it) and if we program it to write "Hello World", it will end up writing "Hello World" into the Web part zone regardless of what
Web part is being rendered. In this case, we will make it render a title bar on
top and the Web part contents afterwards. A Table element will be used as a
frame as shown in the simple HTML code below.
<Table>
    <TR>
        <TD>
            <!—Title Bar Goes Here -->
        </TD>
    </TR>
    <TR>
        <TD>
            <!—Web Part Contents Go Here -->
        </TD>
    </TR>
<Table>
Now, we will override this RenderWebPart method. I will explain some
bits of code here and you can go through the rest in the attached source code.
If Me.Zone.RenderClientScript Then
    writer.AddAttribute(HtmlTextWriterAttribute.Id,
        Me.GetWebPartChromeClientID(webPart))
End If
This part applied the chrome's ID to the chrome's table element, which is
the element that covers the whole chrome. At runtime, there will be some
JavaScript that is automatically written to enable the chrome to be dragged and
dropped into another zone.
RenderTitleBar(writer, webPart)
This line of code calls another method that we are going to write. This
method takes care of rendering the title bar area of the chrome, which is what
we want to customize. We will come back to this method in the next section.
If webPart.ChromeState = PartChromeState.Minimized Then
    writer.AddStyleAttribute(HtmlTextWriterStyle.Display, "none")
End If
This bit of code tells the browser to hide the Web part contents section if
the chrome is minimized.
RenderPartContents(writer, webPart)
This line renders the contents of the Web part.
RenderTitleBar Method
As mentioned, we come back to the RenderTitleBar method. This method
is for rendering the title bar as shown in the HTML code above. I want this
chrome to render the title bar regardless of the chrome style. However, if you
want to render the title bar only when the chrome style is either "TitleOnly" or
"TitleAndBorder", you can put that condition into this method. Again, I will
explain enough code for comprehension in the article and you can look up the
rest of the code in the attached source code.
writer.AddAttribute(HtmlTextWriterAttribute.Id,
    Me.GetWebPartTitleClientID(webPart))
This line of code applies the ID of the title bar into the TD element to
indicate it is the title bar of a Web part chrome. This is important for the
dragability.
RenderButton(writer, clientID, "verbs", webPart)
This method is for rendering a button on the title bar. I'll explain about
it in the next section. There are three buttons that need to be rendered: Verbs,
Minimize/Restore and Close.
Now, the title bar is nearly done. The only thing we still have to add is
the pop-up menu containing other verbs that you may add into the Web part. You
may choose to write some JavaScript code to do this yourself. Yet, ASP.NET does
provide us a convenient JavaScript class just for this case, which is WebPartMenu.
All we need to do is create it and pass the right parameters into its
constructor and that's it, so if you have a look at the last block of code in
the RenderTitleBar method, you'll find a piece of code to register a
client script to do that. The constructor of that class is as follows.
new WebPartMenu(<Button Wrapper Object>, <Button Object>,
    <Pop-up Menu Object>)
If you scroll up a little bit, you'll find a code block to create a pop-up
menu. Notice that I give it the ID of the chrome's client ID plus a suffix
"verbsMenu". This ID is then used in the client script to find the pop-up menu
element. Another method, RenderVerb, is also called to render a verb into
the pop-up menu. I'll cover this in the section after the next one.
RenderButton Method
Let's explore the RenderButton method. Our button will be an HTML
image element wrapped with a span element. The span element has the ID attribute
set to the chrome client ID followed by the button name. This ID is crucial for
the Verbs button since it is used to identify the button in the constructor of
the client side WebPartMenu class. Continue reading the code and you'll
find the following bit.
If buttonName = "verbs" Then
    img.Attributes.Add("id", String.Format("{0}VerbsPopup",
        clientID))
Else
    img.Attributes.Add("onclick",
        String.Format("__wpm.SubmitPage('{0}',
        '{2}:{1}');", Zone.ClientID.Replace("_"c,
        "$"c), webPart.ID, buttonName))
End If
For the Verbs button, we need to add another ID to the image element, which
functions as a button. For the Minimize, Restore and Close buttons, we need to
add a piece of JavaScript code to handle the onclick event. This code
calls the __wpm object, a client side object representing the Web part
manager. This object has a method called SubmitPage which has the following
signature.
SubmitPage(<WebPartZoneRepresentationString>,<Command>)
The first parameter is simply the client ID of the Web part zone with "_"
replaced by "$". The second parameter is the ID of the Web part followed by ":",
then followed by the command name, i.e. close, minimize or restore.
RenderVerb Method
This method is called in the RenderTitleBar method explained earlier.
We add some JavaScript code to handle the onclick event of the anchor
element. The SubmitPage method of the client side __wpm object is
called as before. Notice that this time I simply use the ID of the zone for the
first parameter, not the modified client ID as before. This is the way Microsoft
does for the verbs. I personally think if you do the same in the RenderButton
method, it'll also work, but I haven't tried that though.
The second parameter is the word "partverb" followed by ":" then the ID of
the verb then ":" and then the ID of the Web part. This is enough for ASP.NET to
call the server-side event handler of the verb.
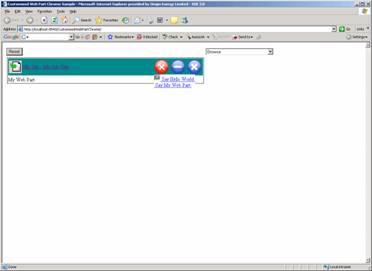
Now It's Time to Test
To test our customized Web part chrome, we will create a Web part by using a
user control called MyWebPart. This user control will implement IWebPart
so that we'll be able to add in the description, title, etc. It will also
implement IWebActionable so that we'll be able to add some custom verbs.
Two custom verbs that we'll add are SayHelloWorld and SayMyWebPart,
which will display the text "Hello World" and "My Web Part" respectively. SayHelloWorld
will also have an image attached to it in order to test the rendering of a
verb's image.
In the default.aspx file, to use our customized Web part zone and chrome, we
have to put in the following directive to register a tag prefix.
<%@ Register Namespace="CustomisedControls" TagPrefix="cc" %>
After that, we'll be able to use CustomisedWebPartZone in the same
way as the normal WebPartZone. Try dragging and dropping an instance of
MyWebPart
between the two zones and see the difference. You may also edit some properties
of the web part by using the editor zone and see how it is rendered.
To Sum Up
This article, together with the source code, shows you a way
to customize the Web part chrome. Taking from this, I believe you'll be able to
do much more fancy stuff with it. Only your imagination is the limit.
History
6 May 2007 – Original article + source code submitted.
Wasu is a .Net enthusiast in Sydney, Australia. He is a believer of the saying "It is possible for a man to achieve anything as long as he has enough time and efforts."


 General
  News
News  Suggestion
  Question
  Bug
Bug  Answer
  Joke
Joke  Praise
  Rant
Rant  Admin
Admin 


