Everyone who has ever created and managed a C++ project in Visual Studio knows that there are hundreds of compiler switches and options to choose from. While setting the desired values for one project may be ok, it’s quite time-consuming and error-prone to do this for multiple projects. I’m currently working with a solution containing about 30 or so projects that share most of their project settings. I always wished there was a way to sync or share these common settings among the projects in the solution. Fortunately, there is: property sheets. They’re a bit hidden though, so I’ll explain how to use them in this article.
Note: This only applies to C++ and C++/CLI projects. .NET projects (C# and Visual Basic) don’t have that many options to be tweaked and (therefore?) can’t have shared settings.
Note 2: This article describes property sheets as they appear in Visual Studio 2010. They may work slightly differently in other versions of Visual Studio.
The Property Manager
While property sheets (file extension: .props) are simply XML files and therefore could be edited with a simple text editor, Visual Studio also provides an editor for property sheets. This editor is available through the so called Property Manager. To display the Property Manager pane, in the menu, go to View –> Other Windows –> Property Manager.
Note: Property sheet files share the same XML syntax as .vcxproj files.

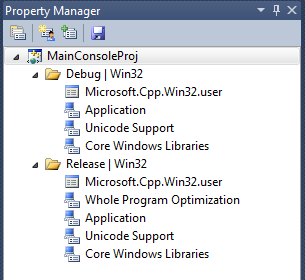
This will open the Property Manager pane. For just one project (here called MainConsoleProj), the contents of the Property Manager will look like this:

Let’s examine what you see here:
- On the top (icon:
 ) you see our project. If there were more projects in the solution, they would be listed here as well.
 - On the next level, there are all configurations of the project on all supported platforms (icon:
 ). There are usually the configurations “Debug” and “Release” on the platform “Win32″. These are the same configurations you have available in the project settings in the
 Configuration drop-down field. To keep things simply, from now on in this article, a configuration-platform combination will be called just “configuration”. -
On the inner-most level, you have the actual property sheets.
Let’s examine the property sheets a bit closer:
Note: The property sheet Microsoft.Cpp.Win32.user is located somewhere in the current user’s application settings. It’s contents therefore will be different for each user. By keeping it the top item in every configuration, you allow the user to override any option, if necessary, without needing to change the project file.
Creating a Shared Property Sheet
The first step is to create a new property sheet file. To do this, right-click on the project and choose Add New Project Property Sheet. This will add a new property sheet to all configurations of the project. In this article, we’ll called the file commons.props and place it in a directory called shared-properties directly in the solution directory.
Note: You can also right-click on a configuration and choose the same menu item. In this case, the new property sheet will only be added to the selected configuration. You can, of course, add this property sheet later to the other configurations as well.
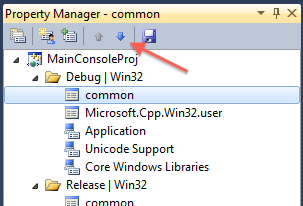
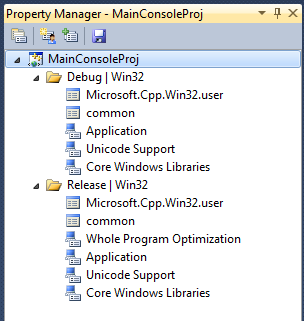
As mentioned before, we want to keep the property sheet Microsoft.Cpp.Win32.user the top item in every configuration. So, select an instance of the new property sheets and click on the down arrow in the Property Manager’s toolbar. Repeat this also for the property sheet(s) in the other configuration(s).

The result then should look like this:

Editing a Property Sheet
To edit a property sheet (file), simply double-click on it in the Property Manager.
Note: The same property sheet file can be listed multiple times in the Property Manager. Editing one “instance” of this file will, of course, update all other “instances” as well (since all “instances” share the same file).
This will pop up a dialog that’s very similar to the “Project Settings” dialog of a C++ project. Note that since the property sheet file itself isn’t bound to any specified project kind or configuration, the dialog may display more options than are actually available to the project the property sheet is currently associated with.

Let’s demonstrate the effect of a property sheet with compiler switch Warning Level. But before we start editing the property sheet, we need to revert this switch to its default value. To do this, open up the project settings for the current project (for example, by selecting the project in the Property Manager and select Properties from the context menu). Then, select All Configurations from the Configuration drop-down box and go to C++ –> General. Then make sure that Warning Level is inheriting the default value (which should be Level1 (/W1)). If it’s not, its value will be printed in bold. In this case, click on the down arrow in the value field and select <inherit from parent or project defaults> (see screenshot).

After clicking on Apply, the result should look like this:

Now, again, open the property sheet editor for the common property sheet we created earlier. There, set the Warning Level to Level3 (/W3). Then click OK.
Note: You may need to save the property sheet manually. For this, use the Save button in the Property Manager’s toolbar.
When you now open the project’s settings again, you should see that the inherited value (not in bold) of Warning Level changed from level 1 to level 3.

That’s the effect of the property sheet. You can define as many settings in a single property sheet file as you want. Then, you can add the same property sheet file to multiple projects thereby sharing this set of common project settings among all projects.
Note: A value of a setting specified in a property sheet is only used in a project, when there isn’t a custom value (printed in bold) assigned to this setting in the project settings. To take the value of the property sheet (instead of defining a value in the project file), select <inherit from parent or project defaults> from the drop-down menu of this setting.
Property Sheet Order
As mentioned earlier, the property sheets are applied in a certain order – from bottom to top as shown in Property Manager. When editing a property sheet, each setting already displays the inherited value – unless the property sheet defines its own value.
So, let's have a look at the property sheet Microsoft.Cpp.Win32.user (in one of the configurations). It still should be the top item in the stack. The value for Warning Level is already Level3 (/W3). It’s inherited from one of the property sheets below – our “common” sheet in this case.

Now, let's swap the common sheet with the Microsoft.Cpp.Win32.user sheet. This will move the common sheet to a position above of Microsoft.Cpp.Win32.user. Again, open the Microsoft.Cpp.Win32.user sheet. The Warning Level is now Level1 (/W1), as it’s no longer inherited from the common sheet. In fact, the common sheet now inherits its values from the Microsoft.Cpp.Win32.user sheet.

Custom Variables (a.k.a. Macros)
It’s possible to define your own custom variables (like the pre-defined $(OutDir) or $(SolutionDir)). These variables are called “Macros” in Visual Studio. To define one, open the property sheet editor and go to User Macros. There, you can add new macros with the Add Macro button. These macros then appear in the Macros section that is available when editing free text properties (such as paths).
Inheriting From Other Property Sheets
Property sheets can inherit their values from other property sheets. You can either specify this inheritance …
- in a project file: This is accomplished by adding the inherited property sheet to the Property Manager and move it below the inheriting property sheet.
-
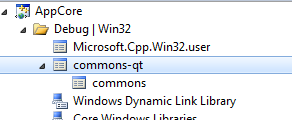
in a property sheet file: To do this, right-click on the inheriting property sheet file in the Property Manager and choose Add ... Property Sheet and select/create the inherited property sheet. The inherited property sheet is now being displayed as child node of the inheriting property sheet (see screenshot).

The XML code for inheritance is:
<ImportGroup Label="PropertySheets">
  <Import Project="commons.props" />
</ImportGroup>
Conditional Properties
Property sheets can also contain conditional property values. This means that the value of a property depends on some other value. Usually, this is used to place values for debug and release builds in the same property sheet file. Unfortunately, you can edit these conditions in Visual Studio’s property editor. You need to use a text editor.
Note: When you’ve modified a property sheet outside of Visual Studio, you need to close the solution(s) it belongs to and reopen them afterwards. Otherwise, Visual Studio won’t detect the changes to the property sheet.
First, you can define conditions on single properties by using the Condition attribute:
<Optimization Condition="'$(Configuration)|$(Platform)'=='Debug|Win32'">Disabled</Optimization>
On the other hand, if you want to group several properties for a certain configuration, you can also add the Condition attribute to container elements (here: <ItemDefinitionGroup>):
<ItemDefinitionGroup Condition="'$(Configuration)|$(Platform)'=='Release|Win32'">
  <ClCompile>
    <PreprocessorDefinitions>QT_NO_DEBUG;QT_NO_DEBUG_OUTPUT;
     NDEBUG;%(PreprocessorDefinitions)</PreprocessorDefinitions>
  </ClCompile>
  <Link>
    <GenerateDebugInformation>false</GenerateDebugInformation>
  </Link>
</ItemDefinitionGroup>
You can find more information about conditions in the article “MSBuild Conditions” on MSDN.
Property Sheet XML Structure
Property sheet files are XML files. The root element is called <Project> and in most cases, you’ll work with the child elements <ItemDefinitionGroup> and <PropertyGroup>. It’s not always clear, in which kind of group to place a certain element. The easiest way to figure this out is to set the desired element in the project settings of a C++ project and then view the project file in a text editor. This is possible because property sheets and C++ project files (.vcxproj) use the same XML schema.
Additionally, you can have a look at the XML tag descriptions on MSDN, although there aren’t that descriptive.
I have studied Software Engineering and am currently working at the University of Stuttgart, Germany.
I have been programming for many years and have a background in C++, C#, Java, Python and web languages (HTML, CSS, JavaScript).
 General
  News
News  Suggestion
  Question
  Bug
Bug  Answer
  Joke
Joke  Praise
  Rant
Rant  Admin
Admin 


