Introduction
This project shows how to create a download animation in WPF using a simple UserControl and code-behind animation.
Background
I needed a download animation in my WPF application and I started looking for a way to use animated GIFs in WPF. I found out that animated GIFs aren't directly supported in WPF, so I decided to make my own WPF user control.
Usage
Many applications download stuff from the Internet, for example when you check for updates to your application. Showing a download animation while your application is contacting the web server and downloading data makes the waiting time more acceptable to the user. This project provides a simple WPF UserControl that contains a download animation.
What You Will Learn
If you are a beginner in WPF, this project gives you a quick introduction to user controls, control styling and control positioning using a Canvas layout. The animation is controlled by a timer in the code-behind.
Design of the Control
I started out by adding a UserControl to my Visual Studio project. Then I added a Canvas control and two Image controls. One image on the left side shows a globe and one on the right side shows a PC. In between the images, I made a dotted line using Ellipse controls.
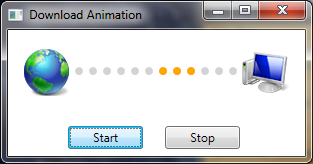
The animated part consists of three orange dots sliding from left to right. The Start and Stop buttons are used for testing and are not part of the UserControl.
XAML
The XAML code for the UserControl is shown below:
<UserControl x:Class="WpfDownloadAnimation.DownloadAnimationControl"
    xmlns="http://schemas.microsoft.com/winfx/2006/xaml/presentation"
    xmlns:x="http://schemas.microsoft.com/winfx/2006/xaml">
    <UserControl.Resources>
        <Style TargetType="Ellipse">
            <Setter Property="Fill" Value="LightGray" />
            <Setter Property="Width" Value="8" />
            <Setter Property="Height" Value="8" />
        </Style>
    </UserControl.Resources>
    <Canvas Height="58" Width="275">
        <Ellipse Canvas.Left="56" Canvas.Top="23" />
        <Ellipse Canvas.Left="70" Canvas.Top="23" />
        <Ellipse Canvas.Left="84" Canvas.Top="23" />
        <Ellipse Canvas.Left="98" Canvas.Top="23" />
        <Ellipse Canvas.Left="112" Canvas.Top="23" />
        <Ellipse Canvas.Left="126" Canvas.Top="23" />
        <Ellipse Canvas.Left="140" Canvas.Top="23" />
        <Ellipse Canvas.Left="154" Canvas.Top="23" />
        <Ellipse Canvas.Left="168" Canvas.Top="23" />
        <Ellipse Canvas.Left="182" Canvas.Top="23" />
        <Ellipse Canvas.Left="196" Canvas.Top="23" />
        <Ellipse Canvas.Left="210" Canvas.Top="23" />
        <Canvas Canvas.Left="10" Canvas.Top="19"
		Name="SlidingCanvas" Height="17" Width="46">
            <Ellipse Canvas.Left="4" Canvas.Top="4" Fill="Orange" />
            <Ellipse Canvas.Left="18" Canvas.Top="4" Fill="Orange" />
            <Ellipse Canvas.Left="32" Canvas.Top="4" Fill="Orange" />
        </Canvas>
        <Image Canvas.Left="4" Canvas.Top="4"
		Source="Globe.png" Stretch="Fill" Height="48" Width="48" />
        <Image Canvas.Left="222" Canvas.Top="4"
		Source="Computer.png" Stretch="Fill" Height="48" Width="48" />
    </Canvas>
</UserControl>
I made a Style targeting Ellipses to set the size and color of all dots.
The three orange dots are made as three Ellipse controls placed on an inner Canvas named SlidingCanvas. The animation is made by changing the Left property of this canvas. The sliding canvas starts hidden behind the globe image and ends behind the PC image.
Code-Behind
The code behind the UserControl is shown below:
public partial class DownloadAnimationControl : UserControl
{
private int i;
private double startPos;
private DispatcherTimer timer;
public DownloadAnimationControl()
{
i = 0;
InitializeComponent();
startPos = Canvas.GetLeft(SlidingCanvas);
timer = new DispatcherTimer();
timer.Interval = TimeSpan.FromMilliseconds(100);
timer.Tick += new EventHandler(timer_Tick);
}
public void StartAnimation()
{
timer.Start();
}
public void StopAnimation()
{
timer.Stop();
}
private void timer_Tick(object sender, EventArgs e)
{
i++;
if (i < 16)
{
Canvas.SetLeft(SlidingCanvas, Canvas.GetLeft(SlidingCanvas) + 14);
}
else
{
i = 0;
Canvas.SetLeft(SlidingCanvas, startPos);
}
}
}
The control has two public methods StartAnimation and StopAnimation for starting and stopping the animation.
A timer is used to create the animation by changing the Left property of the SlidingCanvas at every timer tick.
Limitations
This size of the control is fixed. If you need a different size, you have to add or remove dots between the two images and change the animation counter in the code behind.
License Notes
The globe and PC icons are taken from the Visual Studio 2008 Image Library, so you are free to use them. The code is public domain.
History
- 26th January, 2010: Initial version
This member has not yet provided a Biography. Assume it's interesting and varied, and probably something to do with programming.


 General
  News
News  Suggestion
  Question
  Bug
Bug  Answer
  Joke
Joke  Praise
  Rant
Rant  Admin
Admin 


