Introduction
We are going to be taking a look at the construction of an analog clock using textured backgrounds. I know this "looks" hard and intimidating, but believe me, it's anything but hard :-)
Step 1
Modifying your form's startup
First thing is, we need to change the way your form starts so we can control the loading procedure. This is fairly simple to accomplish. What you need to do is create a Shared Sub Main in your main program and set that as the startup. Don't forget to name your form frmClock.
Shared Sub Main()
    Application.Run(New frmClock())
    Application.Exit()
End Sub
This will start up the form named frmClock. Then, when it's done, exit the application. Now, we need to modify the new procedure for the form and insert a me.show command and an initClock command.
Public Sub New()
    MyBase.New()
    InitializeComponent()
    initclock()
End Sub
All that's left to do now is change the project's startup properties to make it use our Shared sub Main and not the standard startup procedure. Go to Solution Explorer and right click on your project's properties and change the Startup Object.
Step 2
Create the cHands class to hold the hands information
01: Public Class cHands
02: Private Angle As Integer = 0
03: Public Path As New Drawing2D.GraphicsPath()
04: Public filled As Boolean = False
05:
06:
07:
08:
09:
10: Public Sub setAngle(ByVal newAngle As Integer, ByVal imgCenter As PointF)
11: Dim Rotate As Integer = newAngle - Angle
12: Dim trans As New Drawing2D.Matrix()
13: trans.RotateAt(Rotate, imgCenter)
14: Path.Transform(trans)
15: Me.Angle = newAngle
16: End Sub
17:
18:
19:
20:
21: Public Sub draw(ByVal imgDraw As Graphics)
22: If filled Then
23: imgDraw.FillPath(Brushes.DimGray, Path)
24: imgDraw.DrawPath(Pens.Black, Path)
25: Else
26: imgDraw.DrawPath(New Pen(Color.DimGray, 2), Path)
27: End If
28: End Sub
29: End Class
|
Line 1 | Declare the class name. |
|---|
|
Lines 2-4 | Set up some internal variables, one to track the last angle, one to hold the graphics object and another to hold the value if we want to fill the lines. |
|---|
|
| |
|---|
|
Line 10 | Create Sub setAngle that will take the new angle of the hand minus the old angle on the hand and rotate the object the rest of the distance. |
|---|
|
Line 11 | Figure out how much farther the line needs to rotate to get to where it needs to be. |
|---|
|
Line 12 | Create a new Transform Matrix object. |
|---|
|
Lines 13-14 | Rotate the hand the distance it needs to go and set the pivot point (rotation point) at the center of the circle. |
|---|
|
Line 15 | Set the old angle to the new angle. |
|---|
|
Line 16 | End Sub |
|---|
|
| |
|---|
|
Line 21 | Create Sub Draw that will draw your paths. |
|---|
|
Line 22-25 | If you want the hands filled, fill them in and draw a black border around them to look nice. |
|---|
|
Lines 26-27 | Draw the line with a thickness of two, but don't fill it in. |
|---|
|
Line 28 | End Sub. |
|---|
In this step, we have created a class that will be used to store information about the individual hands of the clock.
Step 3
Controls
Go to your form, add a Timer and a PictureBox control. Set the PictureBox to the name clock with a background color of black and set it as docked with the entire form. Leave the Timer control as timer1 and enable it.
Step 4
Tick tock goes the clock
First thing we need to do is create the variables for the clock hands using our cHands class and a point that will denote the center of the screen.
Private handHour As New cHands()
Private handMinute As New cHands()
Private handSecond As New cHands()
Private center = New PointF(150, 150)
Next is the part where it all starts, the initclock Sub.
Private Sub initclock()
    Me.ClientSize = New Size(300, 300)
First things first, make sure the client area for the form is 300 x 300. Now, we initialize the hands, remember the Path object in cHands? Well, it's come time to set it, but first a few notes. We will always set the hand straight up (at the 12:00 position). From here, it will be rotated from the center of the screen, so it will look as if it is turning like a real clock. We draw our lines with points, point a connects to point b, point b connects to point c, and point c connects again with point a. These points are contained within an array of points. This can look quite overwhelming but really makes perfect sense if you step through it slowly.
Dim drawHour As Point() = _
    {New Point(Int(clock.Width / 2), Int(clock.Height / 2)), _
    New Point(Int(clock.Width / 2 - 5), 80), _
    New Point(Int(clock.Width / 2), 50), _
    New Point(Int(clock.Width / 2 + 5), 80), _
    New Point(Int(clock.Width / 2), Int(clock.Height / 2))}

Dim drawMinute As Point() = _
   {New Point(Int(clock.Width / 2), Int(clock.Height / 2)), _
    New Point(Int(clock.Width / 2 - 5), 60), _
    New Point(Int(clock.Width / 2), 30), _
    New Point(Int(clock.Width / 2 + 5), 60), _
    New Point(Int(clock.Width / 2), Int(clock.Height / 2))}
Why didn't we use center instead of New Point(Int(clock.Width / 2), Int(clock.Height / 2))? Well, center is a PointF (Floating point or Single) and this requires a point (integer). Now we have to associate these values with the Path object.
handHour.Path.AddLines(drawHour)
handHour.filled = True

handMinute.Path.AddLines(drawMinute)
handMinute.filled = True
But wait, what about the second hand? Well, the second hand is just a line. It's not a shape that needs to be filled. So, it's really easy to draw.
    handSecond.Path.AddLine(center, New PointF(Int(clock.Width / 2), 25))
End Sub
That's it for this Sub. Now, on to the clock timer (its really complicated :-)).
Private Sub Timer1_Tick(ByVal sender As System.Object, _
             ByVal e As System.EventArgs) Handles Timer1.Tick
    clock.Invalidate()
End Sub
Basically, what this says is every time the timer ticks, repaint the clock. Now we need to create the painting event for clock.
Private Sub clock_Paint(ByVal sender As Object, _
      ByVal e As System.Windows.Forms.PaintEventArgs) Handles clock.Paint
    handHour.setAngle((360 / 60) * Val(Format(Now, "hh")), center)
    handMinute.setAngle((360 / 60) * Val(Format(Now, "mm")), center)
    handSecond.setAngle((360 / 60) * Val(Format(Now, "ss")), center)

    handHour.draw(e.graphics)
    handMinute.draw(e.graphics)
    handSecond.draw(e.graphics)
End Sub
What this Sub does is fairly simple. It calculates the degrees the hands need to be at, then calls the draw Sub for the corresponding object.
Why not run your program now and watch the hands move across the screen?
Step 5
Dressing it up
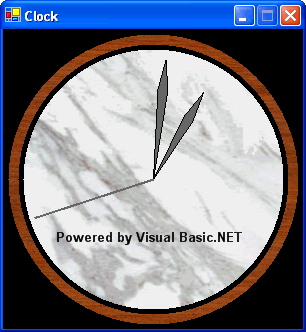
Here, you create a Sub named drawFace. You can add anything you want to it. I opted to fill in the ellipses with textures instead of gradients (look better that way).
Private Sub drawFace(ByVal g As Graphics)
Dim path As String = Mid(Application.ExecutablePath, 1, _
InStrRev(Application.ExecutablePath, "\"))
Dim grdFace As New TextureBrush(New Bitmap(path & "\face.jpg"))
Dim grdWatch As New TextureBrush(New Bitmap(path & "\watch.jpg"))
g.FillEllipse(grdWatch, New Rectangle(5, 5, 290, 290))
g.FillEllipse(Brushes.Black, New Rectangle(15, 15, 270, 270))
g.FillEllipse(grdFace, New Rectangle(20, 20, 260, 260))
Dim f As New Font("Arial", 10, FontStyle.Bold)
Dim Sze = g.MeasureString("Powered by Visual Basic.NET", f)
g.DrawString("Powered by Visual Basic.NET", f, _
Brushes.Black, (300 - Sze.width) / 2, 200)
grdFace.Dispose()
grdWatch.Dispose()
End Sub
The last thing you need to do is add the drawFace command to your paint Sub like this:
Private Sub clock_Paint(ByVal sender As Object, _
     ByVal e As System.Windows.Forms.PaintEventArgs) Handles clock.Paint
   drawFace(e.Graphics)

   ...
   ...
   ...

End Sub
Well, that's it, you should now have a working clock with a cool looking face.


 General
  News
News  Suggestion
  Question
  Bug
Bug  Answer
  Joke
Joke  Praise
  Rant
Rant  Admin
Admin 


 It's from 'VB.NET Hacks & Pranks' by Alexander Klimov, easily the most useful .NET book I ever bought *gasps* and it was only £15! Hehe you even kept the variable names the same


