Introduction
System.Window.Form.Button as is stands does not feature a flashing button. In some cases, it may not be obvious to observe a button being clicked (3D shadow). A Flashing button provides better attention to the user. A flashing button could indicate many useful things such it highlighting that a routine in the background is active or busy or perhaps guide the user to click specific button. It could also indicate operation mode being selected (as alternative to checkbox). FButton is an extension of the system button, “F” prefix stand for flasher
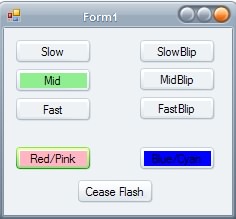
It features six types of flashes (via enum list, which make it easy to select mode), the standard flashes: Slow, Mid, Fast which are based on 50:50 duty cycle and has flash period of 1000mSec, 500mSec and the shortest 200mSec for higher sense of urgency. Among those, you have choice of applying a blip flashes. The blip flashes (SlowBlip, MidBlip, FastBlip) which flashes ‘ON’ at fixed period of 70mSec.
It also features a custom color control as demonstrated within demo code. The default is astandard control color provided by the system.control color and light green color.
The routine include status property, which defines the state of the flashing operation. It is set to true if the flasher behavior is enabled. This is useful for flipping the flashing state of the button when clicked.
Within the Button class, BackColor property is used to change the button color. This is a very simple solution. This can be easily flipped between two predefined colors (set by routine default or operator choice). The flipping occurs when a Timer event is generated (TimerOnTick) and the timer interval is reset to desired interval:- Flash ON and OFF. You may modify the code for enhanced behavior such as glowing effects
Source Code
Below steps briefly guide you how the build a custom control class which inherits the button control as base class and how to add flasher routine via parent class. I discovered a few 'coding mistakes' during the development which has significant effect on implementation when apply to the window form. As an example...you need to ensure to pass the FButton (parent class) behavior into base Button class ie base.OnPaint(pe) not this.OnPaint(pe), otherwise the button will not respond to a behavior change and appear static or unchanged. The exception of this is when base class method or delegate is overridden by the parent class. This is well documented in principle of class inheritance
- Setting up the custom control library and configure to inherit button control.
- Create new project using
WindowsControlLibrary class
- View code of the class "UserControl1.cs" under the solution explorer. You may rename it into FButton.cs
- At FButton code, change from
public partial class FButton : UserControl to public partial class FButton : System.Windows.Forms.Button<BR>
- Add enum variable, which is typically placed outside the FButton class, ensure this is public
public enum FlashIntervalSpeed {Slow = 0, Mid = 1, Fast = 2,
                                BlipSlow = 3, BlipMid = 4, BlipFast = 5}
- Include several routine that handle flashes behavior which incorporates timer event delegate and so on (well document in various textbook)...you may wish to add other feature that perhaps change appearance of the button or have scrolling text across the button, etc
- Within Constructor method, ensure to include "
InitializeComponent();" statement
Within OnPaint routine at parent level, ensure to include "base.OnPaint(pe);", which pass the Invalidated event control into button class inherited by the custom control class. This force repaint on button (affected by BackColour) as the base level
- There is no special need to apply attributes, but in this case this code included some. There is no special configuration procedure prior to build solution procedure. Proceed to build
The end result that it generates FButton.dll file within bin/debug (or bin/release) of your project folder.
Applying custom button to window form
- Create new project with window form1
- Obtain the file "FButton.dll" and drag and drop into toolbox at the LHS of the VS2005 under the tab "General". FButton (looking like gear wheel) should appear.
- At the solution explorer, select and click reference to open a list of System....
- Right click on the reference and select "Add Reference"...the Add Reference window pop up.
- Select Browse Tab and select dll file, the same file where you transfer to toolbox (Step 2) as indicated below

- Returning back to Toolbox (LHS), select FButton control and drag into window form, the button appears.
- Double click the button which create click event routine, insert code as required. Refer to Demo source code.
Conclusion
This procedure turned out to be relatively simple. What has proven here based on very simple custom control, there is no black magic involved to make it work. (with exception of attributes part...which I found it a little bit of a puzzle!).
You can apply similar technique for other form control, such as checkbox.
It easier to add or modify form control (ie FButton) which can be adopted for any window form. This is better than writing separates code that may be dedicated for a specific button behavior.
One possible additional feature is to sync the timing of several flashing button which may help to make it less distracting, how to align the timer event together would indeed represent an interesting challange. I welcome idea how to achieve this, so I may incoperate some routine.
Any suggestion for improvement or additional function (apart of from changing button appearance), please drop a message. My apologies for grammar error, I just missed my hot chocolate before bedtime!
Electronic Engineer for embedded microcontrol projects (C and C++) and linear.
Keen C# programmer for external interface and electronics related application.
Still can't make up mind stick with NET 1.1 or upgrade to NET 2.0(!). Bill Gate will start to fish everyone to Vista, ie Halo-2 need Vista (damn him!)
Hobby:- Ski (racer), Sci-Fi, Game and books.


 General
  News
News  Suggestion
  Question
  Bug
Bug  Answer
  Joke
Joke  Praise
  Rant
Rant  Admin
Admin 


