Introduction
In this article we will learn how to call WebAPI's PUT method from C# which takes complex type as input
Background
In my quest to learn WebAPI, I found a lot of examples which explained how to call Get methods, but no article which had complete information on how to pass complex input to a PUT/POST method and how to receive and process these data on the service side using C#. Explaining this in detail is the intent of this article. I used .Net framework 4.0 for the code demo. This article makes use of JSON.
Using the code
Today I am going to show you how to call PUT method of WebAPI which takes a complex type as input. Let's statrt by creating a empty WebAPI project.
Create WebAPI
I am not going to get into details of how to create a new WebAPI. There are a lot of articles out there on this topic. I named my WebAPI project as TrialWebAPI.
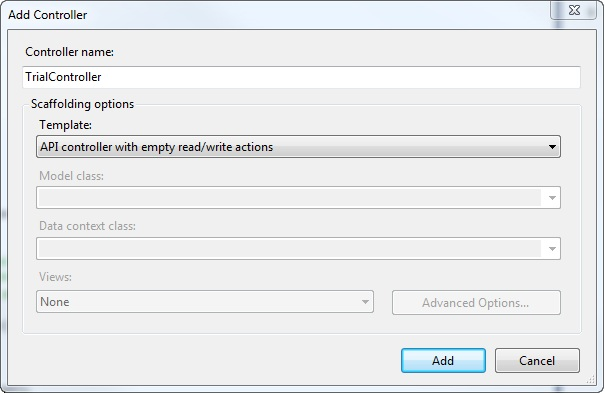
Once the project is created, add a Controller. To do this, right click the Controllers folder and select Add -> Contoller. This will bring the "Add Controller" dialog. I am naming my cotroller as Trial. Select the template as show in the image below and click Add. This will add the controller.
Newly added controller will have default action methods for Get, Put, Post and Delete. I am going to concentrate only on Put method. This is how the autogenerated Put method will look like.
public void Put(int id, [FromBody]string value)
{
}
Its time to create the complex type that will be passed to this action method as input. I am going to create a complex type called Person. Add a class to the Models folder and name it person. Add some properties to the class. This is my version of Person class.
    public class Person
    {
        public string FirstName { get; set; }
        public string LastName { get; set; }
        public string FullName { get; set; }
        public int Age { get; set; }
    }
We can make the PUT method to receive the complex type either by using HttpRequestMessage or by using ModelBinder. In this article I will be showing how to use ModelBinder as it will keep the code clean and relevant to the complex object we are dealing with. Will post an article with <font face="Courier New">HttpRequestMessage</font> soon.
In order to use ModelBinder, it is necessary to implement IModelBinder interface. This is available under System.Web.Http.ModelBinding namespace. IModelBinder defines single method called BindModel. Let's create the modelbinder for our complex type Person.
Let's add a new class to the Models folder and name it PersonModelBinder. Implement IModelBinder interface. Here is my version PersonModelBinder:
 public class PersonModelBinder : IModelBinder
 {
   public bool BindModel(HttpActionContext actionContext, ModelBindingContext bindingContext)
   {
     if (bindingContext.ModelType != typeof(Person))
     {
       return false;
     }
     Person result = JsonConvert.DeserializeObject<Person>
        (actionContext.Request.Content.ReadAsStringAsync().Result);
     bindingContext.Model = result;
     return true;
   }
 }
The code is very simple and self explanatory. Since this is a sample I am not doing much of validataion. You can add your logic for validation here.
Note: HttpActionContext requires System.Web.Http.Controllers namespace and JsonConvert requires Newtonsoft.Json.
Once this is done, we have to let the Person complex type know that PersonModelBinder is going to be its ModelBinder. It is done by using ModelBinder attribute as shown below.
 [ModelBinder(typeof(PersonModelBinder))]
 public class Person
 {
        public string FirstName { get; set; }
        public string LastName { get; set; }
        public string FullName { get; set; }
        public int Age { get; set; }
 }
Now it is time to change the Put method to accept Person complex type as input. The new version of Put method will look like the below. The return type has been changed to HttpResponseMessage from void. This method receives Person complex type as input, updates the FullName and sends Person object back. Just a simple one.
<code>public HttpResponseMessage Put([ModelBinder]Person putPerson)
{
putPerson.FullName = string.Format("{0},{1}", putPerson.FirstName, putPerson.LastName);
var output = JsonConvert.SerializeObject(putPerson);
StringContent content = new StringContent(output,Encoding.UTF8,"application/json");
HttpResponseMessage message = Request.CreateResponse(HttpStatusCode.OK);
message.Content = content;
return message;
}
I removed the Id parameter as I am not going to use it and also change the URI to reflect the same.
Now our WebAPI is ready. I am going to self host the service in a console application for the demo purpose.
Create Console App for self hosting
Create a console application and name it APIHost. Use NuGet and install Microsoft.AspNet.WebApi.SelfHost package to the project. Once the package is installed add the following code to the Main method of Program.cs file.
static void Main(string[] args)
{
  HttpSelfHostConfiguration selfConfiguration =
                        new HttpSelfHostConfiguration("http://localhost:51880/");
  selfConfiguration.Routes.MapHttpRoute("API Default","api/{controller}/{id}",
                        new {id = RouteParameter.Optional});
  HttpSelfHostServer selfHostServer = new HttpSelfHostServer(selfConfiguration);
  selfHostServer.OpenAsync().Wait();
  Console.WriteLine("Press Enter to quit");
  Console.ReadLine();
 }
Now that the service is self hosted, let's create a client application for consuming the services. This is also going to be a console application.
Create client to access WebAPI
Add a new projec to the same solution that has APIHost and name this project as APIClient. Use NuGet and install the package Microsoft.AspNet.WebApi.Client to this client project. Add reference to APIHost in APIClient project. Set APIClient as the Startup project.
Note: For complete details on how to self host please refer Self Hosting.
Since the Put method expects Person complex type as input we have to send a Person from client. Let's add a new class to the APIClient and name it Person. Add the properties just like we did to the Person class in the WebAPI. Person class in APIClient will not have ModelBinder attribute.
 public class Person
 {
        public string FirstName { get; set; }
        public string LastName { get; set; }
        public string FullName { get; set; }
        public int Age { get; set; }
 }
We are still one step away from calling the Put method and displaying the output. Add the following code to the Program.cs of APIClient project.
class Program
{
   static HttpClient client = new HttpClient();
   static void Main(string[] args)
   {
     client.BaseAddress = new Uri("http://localhost:51880");
     PutTrial();
     Console.ReadLine();
   }
   private static void PutTrial()
   {
      Person person = new Person() {FirstName = "Iron", LastName = "Man", Age = 30};
      Console.WriteLine("Before calling the PUT method");
      Console.WriteLine("-----------------------------");
      Console.WriteLine("FirstName of the Person is : {0}", person.FirstName);
      Console.WriteLine("LastName of the Person is  : {0}", person.LastName);
      Console.WriteLine("Fullname of the Person is  : {0}", person.FullName);
      Console.WriteLine("Age of the Person is       : {0}", person.Age);
      Console.WriteLine();
      string serilized = JsonConvert.SerializeObject(person);
      var inputMessage = new HttpRequestMessage
      {
        Content = new StringContent(serilized,Encoding.UTF8,"application/json")
      };
      inputMessage.Headers.Accept.Add(new MediaTypeWithQualityHeaderValue("application/json"));
      HttpResponseMessage message = client.PutAsync("api/trial", inputMessage.Content).Result;
      if (message.IsSuccessStatusCode)
      {
        var inter = message.Content.ReadAsStringAsync();
        Person reslutPerson = JsonConvert.DeserializeObject<Person>(inter.Result);
        Console.WriteLine("Person returned from PUT method:");
        Console.WriteLine("--------------------------------");
        Console.WriteLine("FirstName of the Person is : {0}", reslutPerson.FirstName);
        Console.WriteLine("LastName of the Person is  : {0}", reslutPerson.LastName);
        Console.WriteLine("Fullname of the Person is  : {0}", reslutPerson.FullName);
        Console.WriteLine("Age of the Person is       : {0}", reslutPerson.Age);
      }
   }
}
That's it. We are done :).
Test WebAPI
It is necessary that TrialWebAPI is running for the client to be able to make calls to the service. So first run the TrialWebAPI project. Once it is up and running, launch the client and you can see the results. Here is a screenshot of the output.

Points of Interest
We learnt how to call PUT method of WebAPI from C# and sending a complex type, receiving and processing it at the service side. POST method can be implemented by following the same steps. Please share your questions or comments below.
History
04/28/2015 - First version
This member has not yet provided a Biography. Assume it's interesting and varied, and probably something to do with programming.


