
AngularJS + ASP.NET Web API: Building a simple grid in AngularJS with server-side paging, sorting, searching (Part 1)
5.00/5 (2 votes)
Recently I ran across a situation where I had to present some data in a grid form, something the user could edit/save/delete, the usual CRUD operations. I decided to develop an Angular Grid that talks to a WebAPI
Recently I ran across a situation where I had to present some data in a grid form – something the user could edit/save/delete – the usual CRUD operations.
I could have gone down the route of presenting the data in the conventional form using a ASP.NET MVC grid but somehow this seemed a bit cumbersome; I wanted to give the user the ability to edit the records “in-place” without having to jump through hoops; click on the edit button, then get taken to another screen, then save the edited record and then come back to the original grid, and then for the delete operation do some thing similar i.e. get taken to another page, confirm to delete a record and then get taken back to the grid – again, a simple confirmation in-place when they click on the delete button would do just fine – thank you!
My use case was pretty straightforward – ability to edit records in place, delete in place, server side paging, search & sort on a few key fields and of course the ability to add a new record – I thought about using AngularJS to drive the front end development and turned to what was available and though there are quite a few choices none of these quite fit the bill and I did not have the patience to customize any of these existing plugins and then struggle with understanding the API to accomplish what I had to do.
So, I turned to look at how I could develop such an angular grid natively from scratch using Angular and was pleasantly surprised at how easy it was to build something like this, and wanted to share my experience.
I’ll build a step-by-step tutorial – this tutorial is the first of a multipart series – and along the way we’ll touch upon the basics of organizing code in a modular way, creating modal windows, incorporating a progress bar to let the user know that yes – things are happening, and then sorting, paging & searching and for these we’ll use another third party plugin local storage.
The angular grid will have server side paging, the data will be returned as JSON from a Web Api, and ability the ability to sort and search.
Sounds a bit daunting? – you’ll be surprised at how easy it is to get this done – follow along…
Basic Setup
Create a typical ASP.Net web application project

and make sure to select the MVC template with the Web API checked

Install requisite Nuget packages
Install the Angular Nuget package – make sure to install the one that has the Id of angularjs
You’ll see a slew of JavaScript files installed in the scripts folder – we’ll be using just a couple of these but for now lets leave them all there.
Now, search for angular ui – install the package with id Angular.UI.Bootstrap.
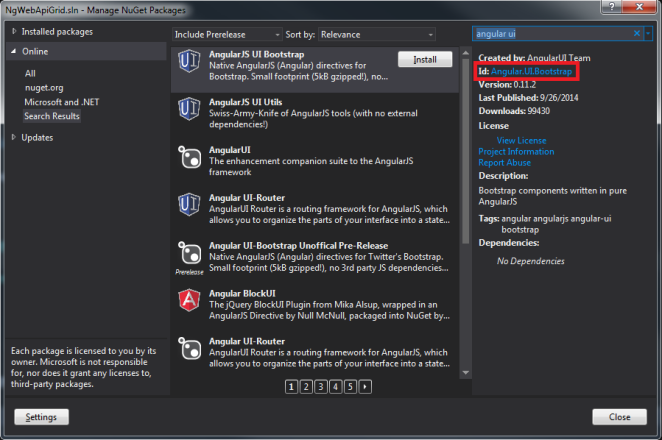
You’ll see JavaScript files installed within the Scripts folder under the angular-ui subfolder
Next, two other dependencies need to be installed – angular-local-storage.js and loading-bar.js. Unfortunately, there’s no nuget package for either of these – I usually install these using bower, and that in turn requires that npm and nodejs be installed. But, for now we’ll just grab the zipped versions of these files from their Github repositories – so, head over to the angular-local-storage Github repository here & download the zip file.

From the down loaded zip file navigate to the src folder and copy the angular-local-storage.js file to the scripts folder of your solution.

For the angular-loading-bar we’ll do exactly the same – go to the following link and click on the download zip button.
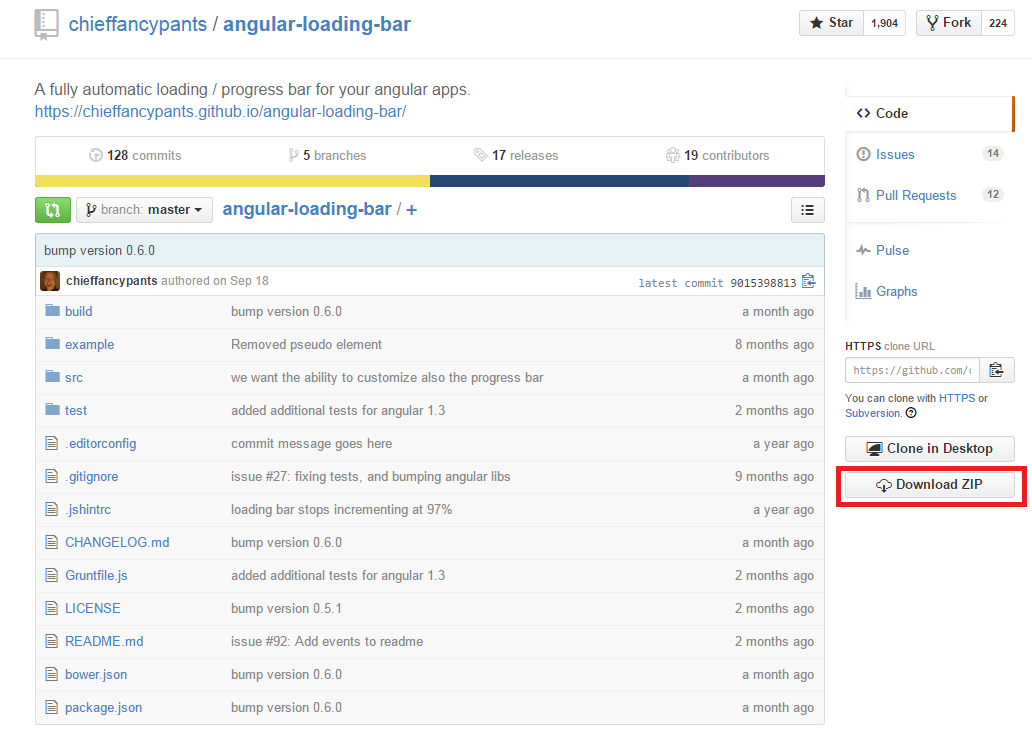
Navigate to the src folder of the downloaded zip file and copy the loading-bar.js to the scripts folder as before. Also, copy the loading-bar.css to the Content folder.
The Scripts folder should now look some thing like this

Add Script bundle
Navigate to the BundleConfig.cs in the App_Start folder and add a new Script bundle as shown below
bundles.Add(new ScriptBundle("~/bundles/app").Include(
"~/Scripts/angular.js",
"~/Scripts/angular-route.js",
"~/Scripts/angular-ui/ui-bootstrap-tpls.js",
"~/Scripts/angular-local-storage.js",
"~/Scripts/angular-animate.js",
"~/Scripts/loading-bar.js"
));
and, update the existing Content/css StyleBundle to include the loading.bar.css – it should now look as follows
bundles.Add(new StyleBundle("~/Content/css").Include(
"~/Content/bootstrap.css",
"~/Content/site.css",
"~/Content/loading-bar.css"));
and, make sure BundleTable.EnableOptimization is set to false – this will make it easier for us to debug and it is always a good practice to switch this off during development. Of course for production you want to enable optimization.
Update _Layout.cshtml
In the _Layout.cshtml add the app bundle after the @Scripts.Render(“~/bundles/bootstrap”)
Create the folders to house the client side scripts
I have attempted to follow the directory structure described in the ng-boilerplate template – click on the following link to get taken to their site and click on the “Read the Docs” link. You should now get taken to their Github repository. Look around, remember to come back here once you are a bit more comfortable developing AngularJS applications, this is a great way to learn a new tool-set.
Take a look at the way folders are created within the ngbp/src folder. You will notice an app.js file and then an about folder and a home folder. Both, about & home are modules and each has a js file and a template tpl.html file. In the app.js file both these modules are injected as dependencies.

We’ll be doing some thing similar – so, go ahead and create an app folder and within that folder add an app.js file and create a sub-folder – let’s call that folder simpleGrid, and within this simpleGrid folder add a simpleGrid.js file. So, your directory should now look like this

The app.js file is the main configuration file & is responsible for kick starting the whole process – two modules are being loaded, one is the ngWebApiGrid.simpleGrid which we will write and the other is the LocalStorageModule – this comes from the angular-local-storage.js file.
angular.module('ngWebApiGrid', ['ngWebApiGrid.simpleGrid', 'LocalStorageModule'])

.config(function ($routeProvider) {
 $routeProvider.otherwise("/");
})

.run(function run() {

});
In the simpleGrid.js file add the following code
angular.module('ngWebApiGrid.simpleGrid',['ngRoute'])

.config(["$routeProvider", function ($routeProvider) {
    $routeProvider.when("/", {
        controller: "entityController",
        templateUrl: "app/simpleGrid/entity.tpl.html"
    });

    $routeProvider.otherwise("/");
}])

.controller("entityController", ["$scope", "$http",
    function ($scope, $http) {
        $scope.controllerName = "entityController";

}])
Add entity.tpl.html within the simpleGrid folder and enter the following code
{{controllerName}}
Head over to the BundleConfig.cs file and make sure that both app.js and simpleGrid.js files are included in the bundles/app ScriptBundle – so now that bundle should look like this –
bundles.Add(new ScriptBundle("~/bundles/app").Include(
                "~/Scripts/angular.js",
                "~/Scripts/angular-route.js",
                "~/Scripts/angular-ui/ui-bootstrap-tpls.js",
                "~/Scripts/angular-local-storage.js",
                "~/Scripts/angular-animate.js",
                "~/Scripts/loading-bar.js",
                "~/app/app.js",
                "~/app/simpleGrid/simpleGrid.js"
                ));
Now, go to the Index.cshtml file views/home and delete all its contents and replace it with the following code
@{
   ViewBag.Title = "Index";
}

@section Scripts{

}

<div data-ng-view=""></div>
lastly, go to the _Layout.cshtml file and add the attribute data-ng-app=”ngWebApiGrid” to the html tag on the second line, so that should now look like this
<!DOCTYPE html>
<html data-ng-app="ngWebApiGrid">
Run the application and you should see entityController being displayed as so

If you see the above then that means AngularJS has been configured correctly and all the scripts and dependencies have been loaded.
Source code is available at https://github.com/SangeetAgarwal/NgWebApiGrid
In my next post we implement the AngularJS grid and create an Web API to return data to the grid.
