Introduction and Pre-requirements
Hello, and welcome to this article series. In this first part of the series, I will introduce you to the world of C++/CLI briefly. For starters, let's have a look on a set of abbreviations that may pop up on our way.
- CLR = Common Language Runtime, the heart of .NET Framework.
- CRT = C/C++ Run-time (Usually, means the libraries).
- MSIL = Microsoft Intermediate Language, or 'What C++/CLI is compiled to'.
Before starting on this article, I recommend reading the following set of articles on the C++/CLI syntax, written by our very own Nishant S. You can find the articles, in the preferred reading order, right here:
Another thing that must be fulfilled before starting is the installation and setup of Visual C++ 2005 Express Beta. If you are an MSDN Subscriber, you can gain access to the Visual Studio 2005 version also, but for the sake of simplicity, we will use the Express version in the context of this article. In this light, the following software/additions need to be installed and present:
The basics of C++/CLI - A simple Hello World application
After the pre-requirements have been filled, we can start on our journey to conquer the world of C++/CLI. Our first task on this path is to create a small sample application that pops up a simple message box from the .NET Framework.
First, boot up your VC++ 2005 and from File -> New -> Project, create a new, empty .NET project. Name this project as 'Hello_CLI'. The wizard will create a project skeleton that uses the CLR and supports C++/CLI extensions on the standard C++ language.
Supporting the Platform SDK
In order to create Windows applications, we need to add support to the Platform SDK. When you install the SDK, the installer automatically configures the Visual Studio to point to the correct directories for the headers and libraries.
If you have multiple installations of Visual Studio on your machine, these directories might or might not be correct. At this point, it is good practice to check whether this is the case. Go to the Tools -> Options menu, and on the left-hand list, expand Projects and Solutions, then click on VC++ Directories. The key directories are for Executable files, Include files and Library files. If the directory entries are not listed, you must add them manually. This is a daunting process, but when done, it comes a long way in simplifying things.
After the directories are set, the next step is to actually include the necessary files. So, go back to the Solution Explorer view, right-click on the project name, and add a new header file. Name this file StdAfx.h, and paste the following as its contents:
#pragma once
#define WINVER 0x0400
#define _WIN32_WINNT 0x0400
#define _WIN32_WINDOWS 0x0410
#define _WIN32_IE 0x0400
#define WIN32_LEAN_AND_MEAN
#include <WINDOWS.H>
Supporting the .NET Framework
Although the wizard that generated our project automatically adds support for the CLR, it is still our task to reference the necessary assemblies that we wish to use. In standard C++ terms, this would mean importing the needed libraries. However, in the world of C++/CLI, all this is made much simpler.
Back in the Solution Explorer, right-click on the solution name and choose Add .NET Reference. This will pop up the project settings and take you to the page of the references. As of now, no references have been added, so we need to add them manually. Click on Add New Reference button. From the list that pops up, choose System.dll and System.Windows.Forms.dll. Add them, and click OK. Now, exit the project properties.
Now, it is our task to add some actual code. For starters, add a new C++ source file named main.cpp. Paste the following code snippet into this file:
#include "stdafx.h"
#undef MessageBox
int __stdcall WinMain(HINSTANCE hInstance, HINSTANCE hPrevInstance,
LPSTR lpStrCmdString, int nCmdShow)
{
System::Windows::Forms::MessageBox::Show( L"Hello C++/CLI", L"TestApp",
System::Windows::Forms::MessageBoxButtons::OK);
return 0;
}
You might wonder some of the code lines, so let's get through them in an orderly fashion. Our first command is to include the Platform SDK headers. As we are using both the Platform SDK and the .NET Framework, there are a few instances on where duplicate names are found.
One of these is the MessageBox function. So, we will promptly undefine MessageBox. This automatically results in the fact that if you wish to create an unmanaged messagebox, you must explicitly call either the ANSI version (MessageBoxA) or the UNICODE version (MessageBoxW).
The next step, as visible, is to define the entry-point of our Win32 application. The calling convention (__stdcall) is necessary, otherwise the Whidbey compiler will issue a warning. However, our main task is to pop up a managed message-box, so that is what we will do. From the System::Windows::Forms namespace, a class called MessageBox is found. This class cannot be instantiated, but it has one static method (Show()) that can be used to display a messagebox. As for the parameters of the call, you should see the class definition in the MSDN or the off-line documentation, if you have it installed.
This program, when built and executed, does nothing much more than pop up a messagebox. Interesting things during the debug execution are that in addition to the normal thread of execution, a secondary .NET thread is executed alongside, on which the managed code runs. These threads are named as Native and .NET in the output window.
Taking a step further - Using Windows Forms
After we have taken our first elusive steps into the depths, it's time to make a bit larger leap. This time, we will take on the Windows Forms usage. At this point, you can either use the old project or create a new one. I will present the steps necessary when you start from ground zero, so if you decide to use the old project as a base, do only the changes that are necessary.
Again, create a blank .NET project by using the wizard, just like in the previous chapter. Following the same steps, add support to the Platform SDK by creating the StdAfx.h file and pasting the code contents there.
Now, it's time to add the references needed to use Windows Forms. Unlike you might think, just using the System.Windows.Forms.dll is not enough. As we will be using the Forms Designer to accomplish the creation, the wizards will include the necessary references for us. So, just right-click on the project, add a new item, and under UI choose Windows Form (.NET). Name the form <iii>MyForm1. The adding of the form into the project may take up to five minutes, so be patient.
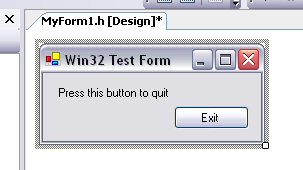
We are automatically presented with a form. First, right-click on the form and select Properties. Under Appearance, change the Text property to Win32 Test Form. This property determines the caption shown on the form. Next, let's add some text and a button on the form. From the Toolbox, select a Label control and move it on the form. Open up its properties and change the Text property to Press this button to quit. Then, add a button from the Toolbox, giving it similarly a caption of Exit. For the button, we also need to change the ID to ID_EXIT. The ID, in .NET Framework, is called Name, and can be found under Design in the properties box.
Place and size the controls and the form so that your form looks just about like this.
When done, click on Save All and close the Form Designer by closing the form window. Then return to the Solution Explorer, now it's time to take our form into use.
Add a new source file, called main.cpp. Again, include the common header file. Then include the form's header file MyForm1.h and write the WinMain() function. Naturally, you can copy these from the previous chapter's files.
As for the contents of the WinMain function, write the following:
int __stdcall WinMain(HINSTANCE hInstance, HINSTANCE hPrevInstance,
LPSTR lpStrCmdString, int nCmdShow)
{
System::Windows::Forms::Application::EnableVisualStyles();
System::Windows::Forms::Application::Run( gcnew Hello_CLI_2::MyForm1() );
return 0;
}
This code fragment would display the form, but as we have not coded any functionality to the button, it won't do much. Now, it's time to add that functionality. So, back in Solution Explorer, right-click on MyForm1.h and select View Designer. This takes us back to the Form Designer.
Now, locate our button, right-click on it, and choose Properties. In the Properties window, look for an image of a small lightning button in the upper part of the window. This button has a tooltip called Events. When you find it, click on it, and a list of possible events to which you can respond is displayed.
To remain simple, we will only respond to the Click event, which occurs whenever a button is clicked over the button. Into the box next to Click, write OnClicked_Exit and press Enter. After a minute or two, a piece of code is auto-generated and you're taken into the code view of the form, into this new function.
Inside this function, we wish to terminate the form, and for this purpose, the System::Windows::Forms::Application offers a method called Exit. To call this method, write the following inside the function:
private: System::Void OnClicked_Exit(System::Object^ sender,
System::EventArgs^ e)
{
System::Windows::Forms::Application::Exit();
}
So, now when the project is built and executed, a small, nifty form is displayed. Clicking on the button will close the application.
The Conclusion
There it was. Now we know how to write applications that run on the Win32 platform and make use of the .NET Framework. Although it is also possible to create a pure-.NET application that doesn't use the unmanaged platform, I decided to use this approach because it's more intuitive to people who have programmed for Windows earlier on.
As for the writing of this article, I would like to thank Nishant S. for his patience in answering some of my daunting questions, and for the pre-work made in writing the articles mentioned at the start of this one.
That is all for now. Look forward for the next part in the series: creating Windows MDI Forms applications and how to take MFC into the play as well.


 General
  News
News  Suggestion
  Question
  Bug
Bug  Answer
  Joke
Joke  Praise
  Rant
Rant  Admin
Admin 


