
Visio Add-On Getting Started
4.75/5 (4 votes)
Getting Started in Visio Add-On creation (VSL project)
Contents
- Introduction
- Definitions
- ShapeSheet Conception
- General Structure of Every Add-on
- Code Overview
- Environment
Introduction
Visio is widely used in our life and from time to time we need to add some extra functionality to it. This article demonstrates how to create a simple Visio Add-on with menu, toolbars and events. The attached sample is far from been perfect. It can raise some exceptions. But its main goal is to demonstrate main principles. So stop twaddle and let's get down to work.
Definitions
First of all, let's settle the general definitions to come on the same page. In the picture, you can find the following terms: "Document", "Page", "Stencil", "Master" and "Shape".
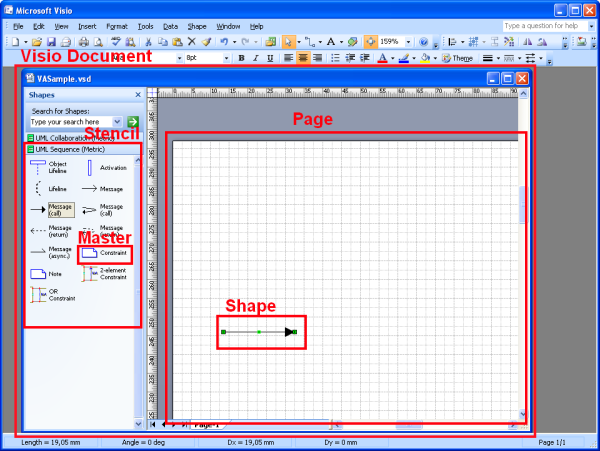
We also have the "Application", which is not shown in the picture. "Application" is the object that represents current up and running Visio instance. It is the main object, from which we will start our work. The "Application" object gives us access to the main configurations of Visio such as "Language", "Path" and so on. But also it gives us access to the collection of opened documents.
"Document" object represents opened file such as *.vsd, *.vsx and so on. It provides the following properties such as "FullName" (full path to the file), "Name" (only the name of the file) and other properties of the document.
"Stencil" is just opened file with extension ".vss" or ".vsx". Every Stencil has a collection of "Master" objects.
Also "Document" object provides the collection of "Pages", but "Application" one provides current selected "Page". The "Page" object gives the collection of "Layers" and "Shapes", that belongs to it.
"Master" is a template that could be placed on the page. The instance of the "Master" on the page is called "Shape".
Every "Page" has a collection of "Shapes", which are placed on the page. Every "Shape" has a lot of properties such as position, dimensions, and so on.
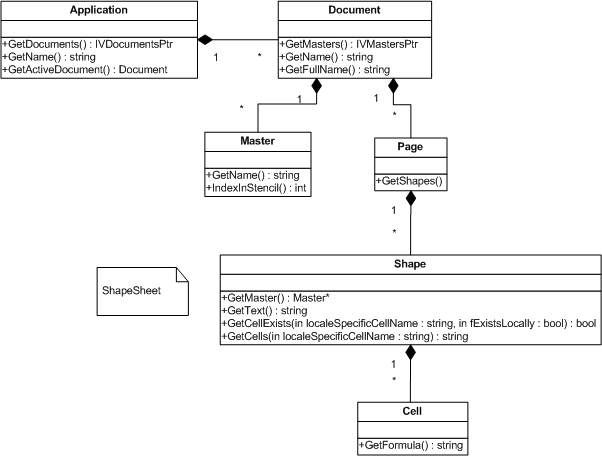
The connections and some properties of these objects are shown in the diagram below:
ShapeSheet Conception
Visio uses ShapeSheet conception to represent the properties of the "Shape". This means that every "Shape" has a sheet with properties. Every sheet consists of the collection of cells with data.

In this picture, we can see that shape (here it is "Message Call" arrow) has such properties as "BeginX", "BeginY", "EndX", and so on.
General Structure of Every Add-on
This section describes the basic structure of Visio Add-on.
Visio Add-on has the following entry points: "Load", "Unload" and "Run".
Visio calls "Load" from Add-on to determine that Add-on must be loaded. "Unload" - Add-on must be unloaded. "Run" is called when some event occurred in Visio on which this Add-on is subscribed.
The attached sample will add to buttons on the toolbar.
The first button will show all information about all shapes on the page. The second one will add event on "SelectionAdded". Event "SelectionAdded" means that Visio will call function “Run” of our Visio Add-on each time, when some "Shape" will be added on the page (you can find more detailed information about this event in Visio SDK documentation).
Code Overview
When the Add-on is launched for the first time, it establishes a connection with Visio via COM interface:
   //Attach to the COM interface of Visio
   if (!SUCCEEDED(m_app.GetActiveObject(Visio::CLSID_Application)))
   {
      m_app.CreateInstance(Visio::CLSID_Application);
   }

   // check if application is reached
   if (!m_app.GetInterfacePtr())
   {
      return VAORC_FAILURE;
   }
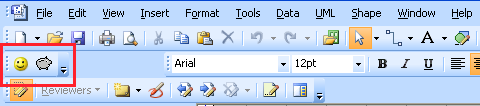
After that, the Add-on adds a toolbar with two buttons “Smiley” and “Pig” ?
   //////////////////////////////////////////////////////////////////////////
   // Get build in ToolBar
   //////////////////////////////////////////////////////////////////////////
   Visio::IVUIObjectPtr uiToolbarPtr;
   HRESULT hr = m_app->get_BuiltInToolbars(0, &uiToolbarPtr);
   Visio::IVToolbarSetPtr toolbarSetPtr;
   hr = uiToolbarPtr->ToolbarSets->get_ItemAtID(2, &toolbarSetPtr);

   //add a new toolbar
   Visio::IVToolbarPtr toolbarPtr;
   toolbarPtr = toolbarSetPtr->Toolbars->Add();
   toolbarPtr->put_Caption(TOOL_BAR_CAPTION);
   toolbarPtr->put_Position(6);

   Visio::IVToolbarItemsPtr toolbarItemsPtr;
   hr = toolbarPtr->get_ToolbarItems(&toolbarItemsPtr);

   //Add toolbar item with "Smiley"
   Visio::IVToolbarItemPtr	toolbarItemPtr;
   toolbarItemPtr = toolbarItemsPtr->Add();
   toolbarItemPtr->put_Caption(ITEM_SMILEY);
   toolbarItemPtr->put_AddOnName(ADDON_NAME);   //Add-on Name
   // we need to specify ComandLine arguments
   // so Add-on can distinguish what button was pressed in ToolBar("Smiley" or "Pig")

   toolbarItemPtr->put_AddOnArgs(ITEM_SMILEY);
   toolbarItemPtr->put_CntrlType(Visio::visCtrlTypeBUTTON);
   toolbarItemPtr->put_FaceID(151);   	// 151 is a type of button(Smiley)

   //Add toolbar item with "Pig"
   toolbarItemPtr = toolbarItemsPtr->Add();
   toolbarItemPtr->put_Caption(ITEM_PIG);
   toolbarItemPtr->put_AddOnName(ADDON_NAME);   //Add-on Name
   // we need to specify ComandLine arguments
   // so Add-on can distinguish what button was pressed in ToolBar("Smiley" or "Pig")
   toolbarItemPtr->put_AddOnArgs(ITEM_PIG);
   toolbarItemPtr->put_CntrlType(Visio::visCtrlTypeBUTTON);
   toolbarItemPtr->put_FaceID(153);    	// 153 is a type of button(Pig)

   m_app->SetCustomToolbars(uiToolbarPtr);   	//Add the Toolbar to the Application
Now let's take a look at the main function "Run". This function only checks what event has came and calls the appropriate handler of the event.
If we have a "Smiley" in the command line, then call function "OnSmileyAction" to process pushing the button with smile.
   if (ITEM_SMILEY == (_bstr_t)pV2L->lpCmdLineArgs)
   {
      // check if in the command line is "Smiley"
      OnSmileyAction();
   }
If we have "Pig" in the command line, then call function "OnPigAction" to process pushing the button with pig.
   else if (ITEM_PIG == (_bstr_t)pV2L->lpCmdLineArgs)
   {
      // check if in the command line is "Pig"
      OnPigAction();
   }
For the Visio events, we have a special format of CmdLineArguments (e.g. "/doc=1 /page=1 /event=902 /eventid=70"). Add-on parse this line and check if "/event" is "visEvtCodeSelAdded".
   else
   {
      // process other events
      CString cmdLine = (LPTSTR)pV2L->lpCmdLineArgs;

      // finding in the cmdLine keyword "/event"
      // "/event" means that  some event fired
      int posComand = cmdLine.Find("/event");
      if (posComand >= 0)
      {
         // excluding the ID of event
         posComand+=strlen("/event=");
         int posComandEnd = cmdLine.Find(" ",posComand);

         CString strId = cmdLine.Mid(posComand,posComandEnd-posComand);
         int eventId = atoi(strId.GetBuffer(0));

         if (visEvtCodeSelAdded == eventId)
         {
            // check that event is that we wait
            OnEventOccurred();
         }
         else
         {
            TRACE((LPTSTR)pV2L->lpCmdLineArgs);
            TRACE("Not supported event");
         }
      }
   }
In the "OnSmileyAction" Add-on, just output some information about shapes that are placed on the Page. In the "OnPigAction" Add-on, subscribe on the event "visEvtCodeSelAdded" (you can read more detailed information about this event in Visio SDK documentation) and output information about all Masters.
   // Add notification for event when shape is placed on the page
   doc->EventList->Add(visEvtCodeSelAdded,visActCodeRunAddon,ADDON_NAME,"");
When event occurs, the Add-on just outputs the information about the Shape, which is currently added to the Page.
Environment
To build the solution, you need: VC6+, Visio SDK 2007 and MS SDK (Platform SDK)