Introduction
Throughout the last months I have written several
articles about different “animals” from the world of movable screen objects. If
I try to position movable objects along some imaginary scale according to their
increasing complexity, then at one end there will be very simple screen
elements like lines and rectangles, while closer to the opposite end I’ll have
to place complex objects with different relations between their parts. Among
those complex objects I shall place the objects which are of special interest to
me – plots which are used in scientific and engineering applications. My work
on the movability of screen objects was ignited by the need of such movable plots
and throughout the years of research any new ideas were tested on such plots. In
my book The World of Movable Objects (http://sourceforge.net/projects/movegraph/files/)
I wrote about the role that such plots played in understanding and formulating
the main rules of user-driven applications.
Before starting to demonstrate any examples explaining
the plot design, I want to remind about the mechanism of movability which is
used in all of them. The basic ideas of turning any screen object into movable
/ resizable are described at the beginning of the book (chapter 1 – Requirements,
ideas, algorithm). The whole process can be described in several words,
but the devil (or the magic?) is in details. To turn any object into movable /
resizable, this object is covered by a set of nodes. Usually these nodes are
invisible, so the implemented movability does not change the view of the screen
objects. For the purpose of better explanation, the visibility of the nodes can
be switched ON; this is demonstrated in the first of the following examples –
in the Form_Rectangles.cs, but the moving / resizing operations work
regardless of the nodes’ visibility.
Only three shapes of nodes are used in the covers of all
objects: circles, rounded strips, and convex polygons. There are no
limitations on the sizes of nodes, their placement, or the number of nodes used
in a cover. Each node in a cover is used for one purpose only; it can be reconfiguring,
resizing, or forward movement of an object, but when the nodes are united into
a cover, then such set of nodes provides all the needed movements of an object.
Nodes can overlap and at such point the upper node determines the reaction on
the mouse press, so the order of nodes in the cover is important.
To turn any graphical object into being movable and
resizable, it must be derived from the abstract class GraphicalObject and
three crucial methods of this class must be overridden.
public abstract class GraphicalObject
{
    public abstract void DefineCover ();
    public abstract void Move (int dx, int dy);
    public abstract bool MoveNode (int i, int dx, int dy, Point ptMouse,
                                   MouseButtons catcher);
For graphical objects, the cover is organized in
the DefineCover() method; this method determines the number, order, and
types of nodes in the cover.
Move (dx, dy) is the method for forward
moving of the whole object for a number of pixels passed as the parameters.MoveNode (i, dx, dy, ptMouse, catcher) is the method for
individual moving of the nodes.
There can be a lot of different objects on the screen;
moving and resizing of all of them are supervised by a mover – an object
belonging to the Mover class. Mover supervises
over the moving and resizing of only those objects which are registered in its
queue and checks the possibility of moving objects according to their order in
this queue. Objects can overlap. While pressing the mouse button at such
point with overlapped objects, any user expects that the upper object is going
to be moved, so the order of drawing must correlate with the order of analysis
(the order of objects for mover’s analysis must be opposite to their order of
drawing). While mover analyses the possibility of moving / resizing for any
particular object, it checks the nodes according to their order in the cover of
this object and do something when the first node at the place of the mouse
cursor is found.
It is neither a law nor fixed anywhere in my algorithm
but it is a standard practice and thus expected by users that forward movement, resizing, and reconfiguring of objects is
done by pressing the left button. To distinguish these movements from
rotation, I always start rotation by the right button. Context menus are also
called by the right button. It is nearly impossible to press and release the
buttons without some even tiny movement of the mouse between two events, so
there is always a question about the user’s intention when the points of mouse
press and release are different. Computers do not scan and read user’s mind
and I hope that they are not going to do it throughout the remainder of my
life, so there must be some algorithm to decide about the reaction on mouse
clicks. In my programs the distance between the points of mouse press and
release is used to make a decision about the needed action. If the right
button is used and the distance is not greater than three pixels, then it is a
menu call; otherwise it is rotation of an object. The same estimation is used
when an object is pressed with the left button: if the distance between the
mouse press and release is small, then usually it is a command to bring the
pressed object on top; otherwise it is a simple move of the pressed object
without any change in the order of the screen elements.
A well known rule of good design declares that
development of any system or complex object must start with its detailed
specification; otherwise the currently changing demands will bury any good idea
and turn the time of development into infinity. The development of movable
plots can be an excellent illustration to this rule, but the whole process of
their improvement step by step demonstrated the iron logic of movability; I
wrote about it in the chapter Applications for science and engineering.
The requirements for movable plots which you will see further on were
formulated not at the beginning of design but post facto. As usual,
when now you read these items, you can’t understand why it was impossible to
formulate them at the beginning and avoid all those intermediate attempts. The
research work never takes the straight way and the small wrong paths maybe the
most interesting in any research. (In the same way the curved trails in the
forest are much more exciting and interesting than the highway going straight
through the green world.)
Plots of different shapes are used for different
purposes. Rectangle is the most often used shape of a plot, but other shapes
are also in use. For example, I wrote in the book about the pie charts and
their design, but this article deals only with the plots of rectangular shape.
The Plot class is
included into the MoveGraphLibrary.dll. Objects of this class are used
in different scientific and engineering applications; some of these programs
are included into the Demo application which accompanies the book. Here are
specifications for the Plot class.
- All parts of plots are movable. This is the
first rule of user-driven applications; I want only to remind it in order
to avoid any misunderstanding further on.
- A plot consists of the main plotting area (a
rectangle) and any number of horizontal and vertical scales. At least one
scale of each orientation exists, but user can decide individually about
showing or hiding each scale. Existence and visibility are different
things, so it is possible to demonstrate a plot without any scales in
view.
- The main area and scales may have an arbitrary
number of comments.
- Plot is a complex object; parts of any plot can
be involved in synchronous, related, and individual movements.
- Rectangular plotting area can be moved by any
inner point and resized by its border. Movement of the main area
initiates the synchronous movement of all the associated parts (scales and
comments). When the main plotting area is resized, all other parts of the
plot retain their relative positions to the main rectangle.
- Length of each scale is always equal to the
certain size of the main plotting area (for example, length of the
horizontal scale is equal to the width of the associated plotting area),
so the length of scale can be changed only as a result of the plotting
area resizing.
- Scale can be moved individually only orthogonally
to the main line of this scale. Such movement is not limited and any
scale can be placed outside the plotting area or over it. Movement of a
scale causes the synchronous movement of its associated comments.
- Any comment can be moved individually and placed
anywhere on the screen; there are no limitations on forward movement or
rotation of comments.
Plot is a complex object with different possible
movements of its parts. User can add / delete / hide / unveil some of these
parts, but in general there are two and three level links between those parts.
Two level links are “main area – scales”, “main area – comments of this area”,
and “scale – comments of the scale”. Three level links are the chains “main
area – scale – comments of the scale”. Some time ago (April 2013) I published
a small article about the construction of complex objects and among the
examples for this article you can find the one with plot analogue. Here I want
to pay more attention to some details and problems of design, so you will see
two different examples with plot analogues. Plot analogues use the light
versions for scales and main plotting areas, but the comments are always the
same and belong to the CommentToRect class.
The main area of our plots is a rectangle which must
be movable by any inner point and resizable by any border point. Moving and
resizing are started with the left button press; any movement is over when the
button is released. There is a limit on minimal size of any plot but there is
no upper limit on the size. Limit on minimal size prevents from accidental
disappearance of any plot throughout its squeezing; if you need to delete a
plot, there is better way to do it via the command of context menu.
If you press on the border of rectangle then only this
side of rectangle is moved; if a corner of rectangle is pressed then two neighbouring
sides can be moved simultaneously. In the first article about the movability
of graphical primitives (March 2013) I have explained the ideas of their
movability and demonstrated several examples. Later I found out, and that was
a surprise for myself, that there were no rectangles among the examples of that
article. Well, there were triangles and polygons which are similar to
rectangles in moving and resizing, so all the needed steps were demonstrated
and explained, but in that article I didn’t write about rectangles. Now I want
to fill the gap and start out road to complex plots with a small example of
fully resizable rectangles.
Movable rectangles
- File: Form_Rectangles.cs
- Menu position: Movement details - Rectangles
Rectangles of this example belong to the Rectangle_Simple
class.
public class Rectangle_Simple : GraphicalObject
{
    Rectangle rc;
    int radius = 6;
    int halfstrip = 3;
    SolidBrush brush;
    int minside = 40;
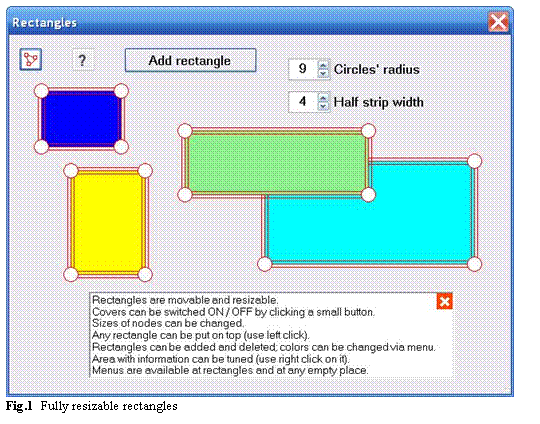
The cover for these rectangles consists of nine
nodes in the following order: four circular nodes on the corners (top left
corner, top right, bottom right, and bottom left), four rectangular nodes along
the sides (left side, right, top, and bottom), and the big rectangular node to
cover the whole area of an object. It’s a general rule that nodes are included
into cover (and are analysed by mover for possible movements) according to
their increasing area; this makes easier the use of the smallest nodes. Covers
of rectangles can be seen at figure 1. Area of each circular node is painted
in white; other nodes are transparent. Borders of all the nodes are shown with
red lines and this makes obvious the overlapping of the nodes. Click the
button in the top left corner once more; covers will disappear and you will see
only normal colored rectangles, but for the purpose of explanation I need the
nodes to be visible.
Let’s begin from the last node of the cover and move
to the nodes at its head. The last one is the biggest node in the cover; the
area of this node is equal to the area of rectangle. Each narrow rectangular
node along the border goes for several pixels on each side of the border, so
half of such node overlaps a narrow strip of the big node. Because narrow node
on the border precedes the big node, then any point of such narrow node can be
used for moving the associated side of rectangle. Well, nearly any point,
because a small part of the narrow node near the corner is covered by the
preceding circular node. Central point of each circular node is placed on the
corner of rectangle; such circular node slightly overlaps the big node and the
narrow nodes on two neighbouring sides of rectangle. As a result, near the
corners there are points with three or four overlapping nodes. Now you can see
why the smallest nodes must be the first in the cover; change the order of
nodes and it would be very difficult to grab circular nodes for moving the
corners. Only tiny parts of circular nodes do not overlap with others and it
would be really difficult to detect those parts.
public override void DefineCover ()
{
    cover = new Cover (rc, Resizing .Any, radius, halfstrip);
}
You don’t need to press exactly on the border point in
order to move this border; each node has some area and the mouse press on any
point inside this area has the same reaction. The Form_Rectangles.cs allows to change the sizes of the nodes in the corners and on the sides of
rectangles to set the best node sizes for each user.
Form_Rectangles.cs is simple. It has some
unique features which are not used in other examples (like visualization of
covers) but there are also things which are general to all examples of this
article and even to all applications using the movability of the screen
objects.
Moving and resizing of the screen elements is supervised
by an object of the Mover class.
Mover mover;
All elements are movable, so all of them are
registered with the mover. Controls are always shown atop all graphical
elements. At the same time when the mouse button is pressed anywhere inside
the form then the possibility of any movement of any object is checked
according to the order of elements in the mover’s queue, so here is the general
order of objects in this queue: first all the controls, then the objects which
combine controls with some graphical additions (like control with comment), and
then pure graphical objects (in this form, there is a rectangular area with
information and all colored rectangles). All objects in the form are
registered with the mover by the RenewMover() method.
Simple objects are registered with the Mover.Add() or Mover.Insert() methods.
private void RenewMover ()
{
    mover .Clear ();
    mover .Add (scCovers);
    mover .Add (scQuestion);
    mover .Add (scAdd);
    mover .Add (ccRadius);
    mover .Add (ccHalfStrip);
    if (info .Visible)
    {
        mover .Add (info);
    }
    for (int i = 0; i < rects .Count; i++)
    {
        mover .Add (rects [i]);
    }
}
In this example the visibility of covers can be
switched ON / OFF; for this purpose the small button is used; at figure 1
this button is shown in the top left corner. All objects are movable, so all
of them have covers. But the purpose of this example is to demonstrate the
covers of rectangles, so only their covers are painted with the DrawCover() method when the visibility of covers is switched ON.
private void OnPaint (object sender, PaintEventArgs e)
{
    Graphics grfx = e .Graphics;
    for (int i = rects .Count - 1; i >= 0; i--)
    {
        rects [i] .Draw (grfx);
        if (bShowCovers)
        {
            rects [i] .DrawCover (grfx, mover);
        }
    }
    info .Draw (grfx);
    ccHalfStrip .Draw (grfx);
    ccRadius .Draw (grfx);
}
Some explanation to the form is shown in the
rectangular area with a small cross in its top right corner. This area is an
object of the ClosableInfo class and this
object is paired with a small button marked with a question sign. If you press
the small cross in the corner of this information area then the area disappears
and the button becomes enabled; if you press this button then it becomes
disabled and the area with information appears again. Only visible elements
must be registered with the mover; on any change of number or order of such
elements the
RenewMover() method must be called.
private void Click_btnHelp (object sender, EventArgs e)
{
    info .Visible = true;
    btnHelp .Enabled = false;
    RenewMover ();
    Invalidate ();
}
Each pair “control with associated comment” used in
this example belongs to the CommentedControlLTP class. In the current case a control (it is a
NumericUpDown control) can be resized only horizontally, while its vertical
size is determined by the used font. The comment always retains the same
relative position to its associated control; the movement of such pair around
the screen can be started by pressing either the border of the control or any
point inside the comment.
The Add rectangle button can be moved around
the screen and resized. Resizing can be started near the corners and middle
points on the sides of the control; all other parts of its border can be used
for moving the button. The sizes of this button do not correlate with the used
font. Forget about dynamic layout in user-driven applications; user can set
any combination of font and sizes.
All movements are organized with three mouse events.
If the mouse is pressed down on any cover, then the
pressed object, the pressed node of the caught object, and some other needed
information are remembered for later use. This is done by the Mover.Catch()
method.
private void OnMouseDown (object sender, MouseEventArgs e)
{
    ptMouse_Down = e .Location;
    mover .Catch (e .Location, e .Button);
    ContextMenuStrip = null;
}
When any object is moved, the form must be repainted. The Update() method is added only to avoid some bad visual effect
when any control is moved; it is possible that on fast enough computers the
Update() method is not needed.
private void OnMouseMove (object sender, MouseEventArgs e)
{
    if (mover .Move (e .Location))
    {
        Update ();
        Invalidate ();
    }
}
Different actions must be taken when the mouse is
released. This depends on whether at this moment some object is released or it
happens at an empty place, it also depends on the class of the released object,
on the number of the node which was previously caught, and on the released
button (left or right). When the left button is released, the pressed
rectangle can be taken on top of all others (PopupRectangle() method) or the rectangle with information can be
closed if it happens at its small part with a cross. When the right button is
released, one of the context menus can be called or the standard tuning form
for rectangle with information can be opened.
private void OnMouseUp (object sender, MouseEventArgs e)
{
    ptMouse_Up = e .Location;
    double fDist = Auxi_Geometry .Distance (ptMouse_Down, e .Location);
    int iWasObject, iWasNode;
    if (mover .Release (out iWasObject, out iWasNode))
    {
        if (fDist <= 3)
        {
            GraphicalObject grobj = mover .WasCaughtSource;
            if (grobj is Rectangle_Simple)
            {
                rectPressed = grobj as Rectangle_Simple;
                if (e .Button == MouseButtons .Left)
                {
                    PopupRectangle ();
                }
                else if (e .Button == MouseButtons .Right)
                {
                    ContextMenuStrip = menuOnRectangle;
                }
            }
             else if (grobj is ClosableInfo)
            {
                if (e .Button == MouseButtons .Left && iWasNode == 0)
                {
                    info .Visible = false;
                    btnHelp .Enabled = true;
                    RenewMover ();
                    Invalidate ();
                }
                else if (e .Button == MouseButtons .Right)
                {
                    TuningInfo (e .Location);
                }
            }
        }
    }
    else
    {
        if (fDist <= 3)
        {
            ContextMenuStrip = menuOnEmpty;
        }
    }
}
Usually in all my programs whatever can be done with
the screen elements is ordered through the commands of context menus.
- If you call menu for some object, then the
commands of this menu can change this pressed object. If you call a menu
on some object – “parent”, then some commands can be applied to all
“children” of this object; you will see it beginning from the next
example.
- If menu for some group is called (not in this
example but further on), then the commands of menu can be applied to all
inner elements of this group.
- If menu is called at some empty place in the form,
then the commands are applied to all objects of the form.
I demonstrate these possibilities in the very first
example – in the Form_Rectangles.cs, but I don’t want to overburden this
example with commands, so there are only few of them in menus. For any
rectangle you can either change its color or delete the pressed rectangle.
Menu at any empty place allows to change the used font or to return the default
view of the form.
This simple example demonstrates the standard cover
for the movable / resizable rectangles. The next step in the direction of real
plots is the more complex case of rectangles associated with comments.
Rectangles with comments
- File: Form_RectanglesWithComments.cs
- Menu position: Movement details – Rectangles with comments
Any object of the RectangleCommented class consists of a colored rectangle associated with
an arbitrary number of comments.
public class RectangleCommented : GraphicalObject
{
    Form m_form;
    RectangleF m_rect;
    SolidBrush m_brush;
    List<CommentToRect> m_comments = new List<CommentToRect> ();
    float cxLimit_L, cxLimit_R, cyLimit_T, cyLimit_B;
    PointF ptInner, ptOuter;
    static int minSide = 20;
When there are no associated comments, the behaviour
of such rectangle is identical to the rectangles from the previous example.
The cover of any RectangleCommented object is
the same as was shown for the Rectangle_Simple class.
There is no regulation of the node sizes in the new example and I use the
shorter version of the standard Cover() method which sets
the default values for some parameters. Thus, radius of the circular nodes in
the corners is six pixels and the full width of rectangular nodes along the
borders is also six pixels.
public override void DefineCover ()
{
    cover = new Cover (m_rect, Resizing .Any);
}
When any number of comments is associated with
rectangle, such combination “rectangle + comments” turns into a complex object
and all possible movements of such objects are the most interesting things in
this example.
At any moment position of comment is defined in two
different ways: its absolute position in the form and relative position to
rectangle with which it is associated. The CommentToRect class is derived from the
TextMR class; this is an ordinary text which can be moved
forward in any direction and rotated around its central point, so the absolute
position of comment is defined by its central point. To define the relative
position of comment, it has to store the value of rectangle with which it is
associated and two coefficients which describe the position of the middle point
of comment in relation to this rectangle.
public class CommentToRect : TextMR
{
    Rectangle rcParent;
    double xCoef;
    double yCoef;
Here are the rules to understand the values of xCoef:
xCoef < 0 : is to the left of rectangle; coefficient shows the number of pixels from the
left border of rectangle to central point of comment;xCoef is inside [0, 1] : central
point of comment is between the left border (xCoef = 0) and the right border
(xCoef = 1) of rectangle;xCoef > 1 : comment
is to the right of rectangle; coefficient shows the number of pixels from the
right border of rectangle to central point of comment.
Similar rules are applied to yCoef and vertical
coordinates of rectangle.
When a rectangle is moved forward or resized, each of its
associated comments is informed about the new value of rectangle via the RectangleCommented.InformRelatedElements()
method. Here is the code for forward
movement of rectangle and the code of this method.
public override void Move (int dx, int dy)
{
    m_rect .X += dx;
    m_rect .Y += dy;
    InformRelatedElements ();
}
private void InformRelatedElements ()
{
    Rectangle rc = Rectangle .Round (m_rect);
    foreach (CommentToRect cmnt in m_comments)
    {
        cmnt .ParentRect = rc;
    }
}
When a rectangle is moved forward or resized, each
comment has to retain its relative position. Comment gets and stores the new
value of rectangle; the unchanged coefficients of relative positioning are used
to calculate the new absolute position of comment. This is done by the CommentToRect.ParentRect
property.
public Rectangle ParentRect
{
get { return (rcParent); }
set
{
rcParent = value;
Location = Auxi_Geometry .LocationByCoefficients (rcParent, xCoef, yCoef);
}
}
Any comment can be moved (and rotated) individually. Rotation
of comment goes around its central point, so throughout the rotation neither
absolute nor relative position of comment is changed. When a comment is
individually moved forward, then the stored value of rectangle is not changed,
but the new absolute position of comment is used to calculate new values of coefficients
which determine the relative position.
public override void Move (int dx, int dy)
{
    base .Move (dx, dy);
    Auxi_Geometry .CoefficientsByLocation (rcParent, Location,
                                           out xCoef, out yCoef);
}
There can be a lot of movable / resizable objects on
the screen; the reliability of all movements supervised by mover is based on
the strict but simple identification system for all the involved elements. At
the moment of initialization each object gets its unique identification number.
When any object is pressed with a mouse, it is easy to identify the caught
object because mover gets this ID number. If an object behaves like a child of
another object then it also keeps the ID of its parent, so both the caught
object and its “parent” are identified. In the case of
RectangleCommented class, any comment
keeps the ID of rectangle with which it is associated and when any comment is
pressed, its related rectangle is also known.

At figure 2 you can see a big group Parameters
consisting of two inner groups Rectangle and Comment. Whenever
any rectangle or comment is involved in moving or resizing, the parameters of
the involved objects are shown in the information fields inside the groups. All
three groups belong to the ElasticGroup class. This class is widely used in development of user-driven applications; I
wrote about this class in details in one of the previous articles (May 2013)
and I’ll write a bit about this class at the end of the current section.
We move from simpler to more complex objects and
examples. The increasing complexity of objects means more variants of their
behaviour and view; this also means the increasing number of parameters. One
rule of user-driven applications states that users have total control over the
behaviour and view of the screen objects; this means that users can change each
and all parameters at any moment. I already mentioned that in all my programs
the parameters of each particular object are changed via the commands of
context menu on this object, so there is no problem in finding the way to
change one or another parameter of any rectangle or comment.
Usually objects of each class have their
personal context menu, so here we have a context menu for comments. Color and
font of each comment can be changed individually; also each comment can be
deleted or hidden (figure 3). In real plots the temporary removal
(hiding) of comments from the screen is a very useful feature so I decided also
to include such possibility into this preliminary example. Any change in the
number of movable objects in the form requires the updating of the mover’s
queue, so both actions of deleting or hiding a comment require the call of the
RenewMover() method.
private void Click_miDeleteCmnt (object sender, EventArgs e)
{
long id = cmntPressed .ID;
for (int i = rectPressed .Comments .Count - 1; i >= 0; i--)
{
if (id == rectPressed .Comments [i] .ID)
{
rectPressed .Comments .RemoveAt (i);
RenewMover ();
Invalidate ();
break;
}
}
}
private void Click_miHideCmnt (object sender, EventArgs e)
{
cmntPressed .Visible = false;
RenewMover ();
Invalidate ();
}
With the increasing complexity of objects, there are
more possibilities to change their parameters. As usual, these things are
organized via the commands of context menus, so there are more commands in menu
on rectangles in the Form_RectanglesWithComments.cs than in menu on rectangles
from the previous example. Menu for simple rectangles from the previous
example Form_Rectangles.cs gives only two options: to change the color
of rectangle or to delete this rectangle. Menu on rectangles in the current
example (figure 4) includes the same two commands but there are also
several new commands and not surprisingly at all that they allow to do
something with the comments associated with the pressed rectangle. There are
two ways to add new comments. A quick way allows to organize the new comment
with the default parameters; later these parameters can be changed through the
commands of another menu. The alternative way is to organize the new comment
with all the needed parameters just from the beginning, but this requires
calling of a simple additional form. There are also commands to
delete, hide, or unveil comments associated with rectangle.
Another context menu can be called at any empty place
of the form; the commands of this menu are obvious and do not need any
explanation. Let us talk a bit about the groups used in this form (figure 2)
and a small menu that can be called at each of them.
As I already mentioned, all groups in the Form_RectanglesWithComments.cs
belong to the ElasticGroup class. Objects
of five different classes can be used as inner elements of such groups; figure
2 demonstrates that groups of this class can be used as elements of bigger
groups. Among other allowed inner elements is the SolitaryControl class; this class is used to turn individual controls
into movable / resizable; the small Panel colored
in cyan at figure 2 is turned into an element of this class. All other
inner elements of the groups in the current example belong to the CommentedControl
class; this class represents a “control +
comment” pair in which a comment can be moved freely in relation to the
associated control; the synchronous move of the pair is done by moving the
control. Positioning of comment in such pair is done in exactly the same way
as positioning of comments in relation to rectangles which is demonstrated in
this example.
The most interesting in the ElasticGroup class is its main idea: such group is looked at as a
collection of inner elements and nothing else. The frame indicates the set of
elements included into this group but does not regulate their behaviour, size,
or position. On the contrary, position of the frame is defined by positions
and sizes of the inner elements so the frame is adjusted to all the changes of
the inner elements. The whole group can be moved around the screen by pressing
at any spot inside not covered by inner elements or by pressing anywhere near
the frame. The title of the group can be moved along the upper line of the
frame and placed anywhere between the left and right borders.
A small context menu consisting of two commands can be
called on any group; one command allows to modify the group through its tuning
form; another restores the default view of the group. By the way, this
restoration does not change the fonts that you, as a user, have already set for
inner elements. Thus, if you will prefer to have my view of the groups but
with your fonts, then you can change the fonts and after it order the default
view.
Let us make one more step in direction of the real
plots and look at their analogue with different elements playing the simplified
roles of plotting areas, scales, and comments.
Plot analogue
- File: Form_PlotAnalogue.cs
- Menu
position: Movement details – Plot analogue
At the beginning of this article I already formulated
the specifications for the Plot class.
The
PlotAnalogue_Sep class is designed
according to the same requirements, but a lot of methods and properties not
essential for this example are omitted. The main purpose of this example is to
demonstrate the synchronous and individual movements of all the plot’s parts so
all the features providing such movements exist in this plot analogue. I have
demonstrated the plot analogues in the application accompanying the book and in
one of the previous articles (April 2013); the plot analogue in the current
example differs from the previous versions, so I decided to add to the name of
the new class the abbreviation of the month in which this example was designed. (The same abbreviation is added to the names of the classes of the scales.)
The main part of the plot is a rectangular area (Rectangle rc) painted in some color (SolidBrush m_brush). A plot may have an arbitrary number of horizontal
and vertical scales; at least one scale of each orientation exists (figure 5).
Plot may have zero or more comments (
List<CommentToRect>
m_comments
). To avoid the accidental
disappearance of plots, there is a minimal allowed size of rectangular area (
int minSide = 60).
public class PlotAnalogue_Sep : GraphicalObject
{
    Form form;
     Rectangle rc;
    SolidBrush m_brush;
    Font fntComments;
    List<HorScaleAnalogue_Sep> m_horScales = new List<HorScaleAnalogue_Sep> ();
    List<VerScaleAnalogue_Sep> m_verScales = new List<VerScaleAnalogue_Sep> ();
    List<CommentToRect> m_comments = new List<CommentToRect> ();
    static int minSide = 60;
Objects of the PlotAnalogue_Sep class have the same type of cover which was used for rectangles
in the previous example, so the plotting area can be resized by the sides and
corners both horizontally and vertically.
public override void DefineCover ()
{
    cover = new Cover (rc, Resizing .Any);
}
When the plotting area is moved or resized, all the
associated elements must be informed about the change of rectangle; for
example, here is the PlotAnalogue_Sep.Move() method for forward moving of the plotting area.
public override void Move (int dx, int dy)
{
    rc .Location += new Size (dx, dy);
    InformRelatedElements ();
}
Those elements to be informed about the change of
rectangle are the comments to rectangle and all the scales associated with this
plotting area.
private void InformRelatedElements
()
{
foreach (CommentToRect comment in
m_comments)
{
comment .ParentRect = rc;
}
foreach (HorScaleAnalogue_Sep scale in
m_horScales)
{
scale .ParentRect = rc;
}
foreach (VerScaleAnalogue_Sep scale in
m_verScales)
{
scale .ParentRect = rc;
}
}
Horizontal and vertical scales are designed in similar
ways; only the directions of the main line and ticks differ, so it is enough to
look at one type of scales, for example, horizontal scales.
Scale analogue consists of the main line and ticks
(short lines) orthogonal to it. The main line is defined by its two end points
(Point pt_LT, pt_RB); for better visualization, the main line is drawn
with wide pen (Pen penLine). Six short ticks (int nTicksLen = 12) are painted on one side of the main line with the
thin pen (Pen penTicks); ticks divide the main line
into five segments of equal length. A scale may have any number of comments (
List<CommentToRect>
m_comments
).
public class HorScaleAnalogue_Sep : GraphicalObject
{
Form form;
Rectangle rcParent;
Point pt_LT, pt_RB;
double posCoef;
Side sideTicks = Side .N;
int nTicksLen = 12;
Pen penLine, penTicks, penDots;
Font fntComments;
List<CommentToRect> m_comments = new List<CommentToRect> ();
The area of any scale is a rectangle which is bordered
by the main line and two ticks at the ends. For better visualization of this area,
its fourth side is drawn with a thin dotted line of the same color (Pen penDots).
Scale is not resizable directly, but the length of any
scale is always equal to one or another size of the associated plotting area
(either width or height), so the length of a scale is changed when the
corresponding size of the plotting area is changed. Any scale is movable individually
only in one direction orthogonally to its main line. The cover of such movable
and non-resizable rectangle is simple; it consists of a single node and can be
constructed by using a standard Cover method. However,
there are some nuances which require additional lines of code in the DefineCover() method. First, at any moment user can switch the ticks
from one side to another, so the scale’s area can be on one or another side of
the main line. Second, user can switch ON / OFF the movability of the scale;
this changes some parameters of the single node.
public override void DefineCover ()
{
    int cyTop = (sideTicks == Side .N) ? (pt_LT .Y - nTicksLen) : pt_LT .Y;
   Rectangle rect = Rectangle .FromLTRB (pt_LT .X, cyTop, pt_RB .X,
                                         cyTop + nTicksLen);
    CoverNode [] nodes;
    if (Movable)
    {
        nodes = new CoverNode [] { new CoverNode (0, rect, Cursors .SizeNS) };
    }
    else
    {
        nodes = new CoverNode [] { new CoverNode (0, rect, Behaviour .Frozen,
                                                  Cursors .Hand) };
    }
    cover = new Cover (nodes);
    cover .SetClearance (false);
}
The scale’s cover consists of a single node which is used for moving the scale, so the
HorScaleAnalogue_Sep.MoveNode() method must only call the HorScaleAnalogue_Sep.Move() method.
public override bool MoveNode (int i, int dx, int dy, Point ptM,
                               MouseButtons catcher)
{
    bool bRet = false;
    if (catcher == MouseButtons .Left)
    {
        Move (dx, dy);
    }
    return (bRet);
}
The HorScaleAnalogue_Sep.Move() method is also simple. The main line must be moved on
the required number of pixels which are passed as parameters; new positioning
coefficient must be calculated, and all the associated comments must be
informed about the new scale’s area.
public override void Move (int dx, int dy)
{
    pt_LT .Y += dy;
    pt_RB .Y += dy;
    posCoef = Auxi_Geometry .CoefficientByCoor (rcParent .Top,
                                                rcParent .Bottom, pt_LT .Y);
    CommentsNotification ();
}
Comments for the scale use the standard mechanism of
positioning the CommentToRect elements in
relation to the rectangular area, so they receive the new value of rectangle
(the scale’s area) and update their positions by using the positioning
coefficients which are stored in each comment.
As usual, all the possibilities of changing the view of the form or any visual parameter of the involved objects are
initialized via the commands of several context menus. Four classes of
elements are used in the Form_PlotAnalogue.cs, so four different context
menus are needed, but horizontal and vertical scales are so much alike that I
use the same menu for both classes of scales. Still there are four context
menus in this example; the fourth menu is used for empty places (figure 6).
The main goal of this example is to demonstrate the
synchronous, related, and individual movements of all the parts of which a plot
is constructed. In some cases the chain of associated elements consists of two
elements like area – scale or scale – comment; such short chain is similar to
the previous example. There is also a longer chain consisting of three
elements: area – scale – scale’s comment. The longer chain of associated
elements does not produce any extra problems in organizing the related
movements as the same simple rules of calculating the new positions are applied
to all the links in the chains. There is one problem into which I bumped while
working on movability of real plots. This problem is caused by the increasing
number of screen elements which, by the logic of their close connections, must
be placed on the screen next to each other. Maybe this problem is better seen
on the real plots, but in the Plot class
this problem is already solved, so I’ll better demonstrate it here in the
example with the PlotAnalogue_Sep class.
Before going into the details of the problem and its
solution, I want to remind that any PlotAnalogue_Sep object is a complex object consisting of different
movable parts. Any complex object cannot use for registering the standard Mover.Add()
or Mover.Insert() methods but have to use the IntoMover() method of its class; this guarantees the correct order
of registering for all parts of such object. The order of parts in the mover’s
queue must be opposite to the order of their drawing on the screen; then user
will always press and catch for moving the upper shown element. The scales can
be moved across the main plotting area and placed anywhere in relation to it
(outside the area or over it). Comments can be placed anywhere in relation to
the rectangular area with which they are associated; this can be the main
plotting area or the area of some scale, but in order to be freely movable
around, any comment is drawn after the element with which it is associated.
Taking into consideration the opposite orders of drawing and registering
elements with the mover, we have such code for the PlotAnalogue_Sep.IntoMover()
method.
new public void IntoMover (Mover mover, int iPos)
{
    if (iPos < 0 || mover .Count < iPos)
    {
        return;
    }
    mover .Insert (iPos, this);
    for (int i = m_comments .Count - 1; i >= 0; i--)
    {
        mover .Insert (iPos, m_comments [i]);
    }
    for (int i = m_horScales .Count - 1; i >= 0; i--)
    {
        m_horScales [i] .IntoMover (mover, iPos);
    }
    for (int i = m_verScales .Count - 1; i >= 0; i--)
    {
        m_verScales [i] .IntoMover (mover, iPos);
    }
}
Scale with comments is also a complex object, so each
scale is registered by its own IntoMover() method.
Small step from PlotAnalogue to Plot class
Now let us take the plot analogue from figure 5
and slightly change its view. There are not too many changes between figures
5 and 7, but this view is closer to real plots which you can see in
a lot of applications.
The scales can be placed anywhere relatively to the
main plotting area, but more often than not in the case of one horizontal and
one vertical scale (this is the most often used case of plots) the main line of
scale is positioned exactly at the border of the main rectangle. There can be
some comments associated with scales, but at the moment much more important for
discussion are the numbers which are nearly always shown along the scales. Numbers
on the borders declare the ranges; intermediate numbers are very helpful in
estimation of special points of the graphs; as a rule, the intermediate numbers
are associated with the grid in the plotting area and the ticks on the scale. Numbers
along the scales may look like comments, but there is big difference between
dealing with comments and numbers. Positioning of each comment is absolutely
individual, so each comment can be individually moved forward and rotated. All
numbers of a scale are positioned identically to special points on the main
line; usually these are the points of ticks. Numbers can be also moved and
rotated, but to guarantee their identical lining, it is done synchronously; this
mechanism is shown and explained further on in the tuning form of the scales. Because
there are no real numbers in the scale analogue, I added several comments to
substitute them. At figure 7, several comments represent the numbers
for the boundary values; these boundary values are of special interest in
explaining the problem of resizing of the real plots and my solution to this
problem.
The area of a scale analogue is a thin rectangle bordered
by the main line and two end ticks. In the real Scale object the scale’s area is much bigger because it
includes also all the numbers. Look at the horizontal scale at figure 7
and imagine a rectangle which includes its main line, ticks, and two comments playing
the role of boundary numbers at the ends of the scale. First, this rectangle
covers the area not on one side of the main line but on both. Relative
positioning of ticks and numbers is defined by each user individually, but it
is a very common situation when they are positioned on opposite sides of the
main line. Second, the comments (numbers!) spread beyond the end points of the
main line. As a result, the scale’s area becomes wider and longer. Such
growth of the scale’s area doesn’t cause any problems for the movability and
resizability of the plot and its parts except one: the corners of the main
plotting area (the corner nodes of this area) become unreachable because now
they are blocked from mover by the increased area of scale. The proposed
example demonstrates a very often used positioning of horizontal and vertical
scales and what do we get in such situation? Horizontal scale blocks two
corners at the bottom of the main area; in the same way vertical scale blocks two
corners on the left side. Together they block three of the four corners and
this is a very common situation! Maybe it is too much, but to worsen the
situation I blocked the remaining corner by another comment (figure 7).
Do you remember the cover of rectangles from figure
1? The cover of the yellow rectangle from figure 7 is the same:
resizing is done by four small circles in the corners and four thin rectangles
along the borders. In the current situation shown at figure 7 nearly
all these nodes are blocked from mover by those parts of the plot which are
positioned above the main plotting area. Three corners and two sides are
blocked by the scales; the remaining corner is blocked by comment.
Now you might begin to understand the problem with the
resizing of the plotting area. When you need to change both sizes of the
plotting area, then the best way to do it is to move its corner. It was easily
done in the Rectangle_Simple class;
there were nearly no problems with RectangleCommented objects, but then we organized the close analogue of
the needed plots and ran into such a problem. Certainly, this problem is not
fatal. User can move aside the scales which block the parts needed for
resizing of the main area, change the sizes of the plotting area, and then
return the scales back into proper positions, but repeating the whole procedure
again and again will be extremely annoying.
This is not an artificial situation to discuss at some
seminar on programming; unfortunately, it is a real problem. While working on
the
Plot class, I didn’t understand the
seriousness of situation until scientists began to work on applications with
such movable plots and bumped into this problem. While I was thinking about
some solution and tried one idea after another, researchers working with the
new applications had to move scales back and forth and were becoming more and
more upset. Users were excited about the new applications with easily movable
and resizable plots and couldn’t understand why they could do everything in a
lot of situations but not always. The most annoying thing was the abruptness
of the situation when somebody tried to resize the area in the standard way by
moving its corner and instead moved another element which he didn’t want to
touch at all. Scientists deal with their own problems while programs for them
are only instruments to solve those problems. Researchers do not need and do
not want to know anything about the invisible nodes and covers, about the order
of drawing of the screen elements, about their possible overlapping, and the
problems caused by such overlapping. Here is an area which can be resized by
its corner, it is the best way of resizing, and it must always work without
problems. Finally I found a good solution; as usual, it turned out to be a
simple one. This technique can be used in other situations, so I want to write
about some details.
Let me describe the situation once more in several
words. We have a complex object consisting of several parts; in the order of
drawing (from bottom to top) there is a rectangular area with its comments and
scales with their comments; scales are above the rectangular area and comments
are always above an element with which they are associated (plotting area or
scale). There are no other elements and the change of their order does not
help at all. Suppose that you put the main area over the scales in view and
ahead of them in the cover. Well, in this case you can always resize the main
area by the corners and sides, but then in the most often used situation with
the scale positioned along the border of the plotting area (and in a lot of other
situations) the scales will be partly or entirely closed by the main area. For
example, you grab the scale which is somewhere outside the main area, move it
across the area, and release the scale somewhere inside. It doesn’t matter
whether you did it purposely or accidentally; from this moment the scale is
gone forever; there is no way to grab it again and to return it back to view
and to life. Changing of order for the plot’s parts is not a good idea at all.
Let me describe the situation in slightly different
way. We have a complex object consisting of several visible parts; each part
has its own invisible cover which is used to organize all the needed moving and
resizing. The change of order of those parts doesn’t solve the problem as some
important parts will be always closed by other parts and thus some needed
movements will be blocked. Is there any good solution?
I purposely added one word into the second
description; this word may give you a tip. Do you see the way to solution? It
is simple but it is unusual.
We have a complex object consisting of several visible
parts. These parts get their covers which provide all the needed synchronous,
related, and individual movements. Unfortunately, some parts are blocked from
mover by others and this causes the problems. Changing the order of those
parts is not a solution because we still have the same problem of some parts
blocked by others. My solution is in adding some invisible part with its own
cover. This invisible part doesn’t change the view of our object; this
invisible part always stays on top of all others, so its cover is always the
first to be checked. As I said, this is a simple, very effective, but very
unusual solution. There are more than 170 examples in the book World of
Movable Objects; I have designed many other programs which are not
mentioned in this book; I can estimate that the number of different classes of
movable objects which I designed throughout the years is somewhere around
several hundreds, but only in the case of the Plot class (and very similar BarChart class) I have used this technique of adding an
invisible part with its own cover.
Certainly, in the situation with individually movable
parts some of them will always block others. Blocking can not be eliminated absolutely
and there is no such aim. There is no problem in positioning a small node
above the big one; you can move the small node anywhere and there is a always a
significant part of the bigger node which is not blocked, so there is no
problem with access to this node also. The problem is in blocking of the small
node by the big one; in such case there is no access to the small node. In the
case of the plots, the smallest are the circular nodes in the corners; they are
easily blocked by other parts, so I need to find the way to give an access to
these circular nodes regardless of positions of scales and comments. It is
impossible to divide the cover of the main area into two parts and include the
covers for scales and comments between these two parts, but it is possible to
organize an additional invisible element with a cover consisting of the same
four circular nodes and always to use this new part as the first part of the
cover in analysis of possible movements of the complex plot. The idea is
announced; now we can look into some details.
The Plot class
consists of several familiar elements and something new.
public class Plot : GraphicalObject
{
    RectCorners m_rectcorners;
    Underlayer m_underlayer;
    List<Scale> scalesHor = new List<Scale> ();
    List<Scale> scalesVer = new List<Scale> ();
    List<CommentToRect> m_comments = new List<CommentToRect> ();
The Underlayer class
unites the Rectangle and several
parameters for painting; from the point of moving / resizing it is a pure
rectangle used in the previous examples. There are lists of scales (horizontal
and vertical) and comments which were already used in the PlotAnalogue_Sep
class. The only new part is the element
of the RectCorners class. It would
be difficult to design anything simpler.
public class RectCorners : GraphicalObject
{
    Rectangle rc;
    Delegate_Rect InformParent = null;
    static int minsize = 16;
Two parameters are needed for initialization of such
object: the rectangle of the main area and the method to inform this associated
rectangle about all possible changes of the RectCorners object.
public RectCorners (Rectangle rect, Delegate_Rect inform)
{
    rc = new Rectangle (rect .Left, rect .Top,
          Math .Max (minsize, rect .Width), Math .Max (minsize, rect .Height));
    InformParent = inform;
}
The cover of the RectCorners class is simple and consists of four circular nodes
over the corners of rectangle; they are identical to four circular nodes that
are shown at figure 1.
public override void DefineCover ()
{
int radius = 6;
cover = new Cover (new CoverNode [4] {
new CoverNode (0, new PointF (rc .Left, rc .Top), radius, Cursors .SizeNWSE),
new CoverNode (1, new PointF (rc .Right, rc .Top), radius, Cursors .SizeNESW),
new CoverNode (2, new PointF (rc.Right, rc.Bottom), radius, Cursors.SizeNWSE),
new CoverNode (3, new PointF (rc.Left, rc .Bottom), radius, Cursors .SizeNESW)
});
if (!Movable)
{
cover .SetBehaviourCursor (Behaviour .Frozen, Cursors .Hand);
}
}
The Plot.IntoMover() method is used for registering any Plot object in the mover’s queue. All familiar parts are
registered in exactly the same order as in the PlotAnalogue_Sep class and then the
RectCorners part is registered ahead of them all. Thus, the RectCorners element is always the first in the plot’s cover to be
analysed by mover.
new public void IntoMover (Mover mover, int iPos)
{
    mover .Insert (iPos, this);
    foreach (CommentToRect comment in Comments)
    {
        if (comment .Visible)
        {
            mover .Insert (iPos, comment);
        }
    }
    foreach (Scale scale in HorScales)
    {
        if (scale .Visible)
        {
            scale .IntoMover (mover, iPos);
        }
    }
    foreach (Scale scale in VerScales)
    {
        if (scale .Visible)
        {
            scale .IntoMover (mover, iPos);
        }
    }
    mover .Insert (iPos, m_rectcorners);
}
A corner of the main area can be blocked from mover by
some scale or comment, but it is not a problem any more as this invisible RectCorners part is the first in the queue, so it is always caught
by mover if the mouse is pressed near the corner. When one of these RectCorners circles is moved, then the Plot object is informed about such movement and the main
rectangular area is changed accordingly. When the plotting area is moved or
resized in the way it was demonstrated in the previous example, it informs all
the related parts so that they can adjust their positions; the RectCorners part is among those informed.
In this way the movements of the Plot objects are organized. This class was designed
throughout the years in order to be used in different scientific and
engineering applications and this is the class which turned upside down the
design and work of many scientific applications. I would prefer to demonstrate
in this article the work of the Plot class in
some real application, but there are some problems with such demonstration.
- Real scientific applications always work with
some input data and more often than not the size of those data files is
very big or even huge.
- Usually a real scientific application has a very
specific purpose which is of no interest to anyone outside its area; even
a short description of such program is of no interest to programmers.
- In any such application, there are always many
significant details which are essential for this application and require a
lot of work throughout the design but are absolutely insignificant for
current discussion of the Plot class
and its use.
Taking into consideration all these things, I decided
to demonstrate in this article not some real scientific application but a very
close one in design and at the same time such one which is easily
understandable by anyone who took at school some classes in math.
My small reminiscence on the item of the next
example. Years ago my father, a professor at the university, took me (at that
time only a small boy) from time to time to his office and there he had a small
problem of keeping me busy for a couple of hours while he had a seminar with
his students. My father had an easy solution to that problem: he switched on
an oscilloscope and showed me two tuning knobs to change the view of the
Lissajous figures at the screen. So don’t be surprised to find a graph of not
so often used functions in the next example; it is from those old happy days of
my childhood.
Function analyser
- File: Form_Functions.cs
- Menu position: Functions
There are many different situations when you want (or
you need) to look at the graph of a function described by some equation. Maybe
you are helping your kids to do some homework, maybe you are teaching students,
maybe you try to imagine the view of some function or the result of its change
by one or another parameter, maybe you need to compare several functions and
this comparison is better done by their simultaneous drawing… There can be different
variants and at the base of them all there is the same simple task: to turn
function’s expression into graph.
Any program implementing such task must allow you to
enter the text of expression and then, if this expression is correct, some
interpreter calculates it for different values of argument and draws the
graph. I don’t want to go into the details of such interpreter which
transforms normal mathematical expression into another form that is more
suitable for calculations. In the 1920s the Polish mathematician Jan Lucasiewicz
invented the notation in which all brackets were omitted and the operator came
before operands; in honour of the author this notation was called Polish
notation. In the late 1950s, the Australian computer scientist Charles Hamblin
changed the order of operands and operators and thus invented the reverse
Polish notation. Any interpreter of math expressions is based now on using
such notation. In some books published 30 and more years ago you can find the
explanation of such interpreters with the pictures demonstrating the turn of
cars at the railroad station. Writing such an interpreter became a standard
exercise for those who take courses in programming and just learnt about queues
and stacks, so I am not going into the details of writing such interpreter but
I am going to use one of them.
Such interpreter is included into the MoveGraphLibrary.dll
as the FunctionInterpreter class
and in the current example I use this class and two of its methods. The FunctionInterpreter.Analyse() method takes a string containing normal
mathematical expression and transforms it into the reverse Polish notation.
bool Analyse (string strIn, ref List<Elem> liem, out int iError, out int kErrPlace)
The FunctionInterpreter.Calculate()
method uses this transformed expression
to calculate its value for any needed argument.
bool Calculate (List<Elem> PolishForm, double fArg, ref double fVal)
To simplify the drawing of the graphs, the Plot class includes a couple of methods which use that
List prepared by the interpreter. The first of these
methods is used to draw ordinary Y(x) functions. The function is calculated
for each pixel of the horizontal axis of the plotting area.
void DrawYofX (Graphics grfx, PlotAuxi auxi, List<Elem> polishY)
Another method is used for drawing the parametric
functions {X(r), Y(r)}; to draw such function, you need to define the range and
step of the parameter r.
public void DrawParamFunc (Graphics grfx, PlotAuxi auxi, List<Elem> PolishX,
                                                             List<Elem> PolishY)
Interpreter calculates a sequence of values; methods
of drawing have to link the consecutive points with some line; in this way we
receive graphs. When two consecutive points are inside the plotting area, they
are connected with a line. There can be situations when one or both of two
consecutive points are outside the plotting area; whether to connect such pair
of points with a line or not is decided by an additional parameter of the PlotAuxi class.
Now we can put aside the details of interpreter (it
has to work and it will work) and look at the development of function
analyser. I am a designer of this program but I can’t predict the way people
are going to use this analyser and I have no right to put any restrictions on
the users’ possible behaviour. There can be any number of the plots on the
screen, each plotting area might contain any number of graphs, those plotting
areas can be arranged in any possible way, there are a lot of visibility parameters,
and all of them must be under the full users’ control. User can add, delete,
or change anything, while I have to provide all these possibilities and in the
most simple and natural way. In other words, I design an instrument – analyser
of functions – and only users decide WHAT, WHEN, and HOW to show. Let us look
at the design of such program.
First, we need to formulate several main requirements
and mark the way of their fulfillment.
- Easy and obvious process to define
new functions.
The text of any function can be defined by typing it
in the TextBox; when the typing is over, the function must be shown for
visual evaluation. There can be mistakes in the text of a function; in this
case we need some information about the possible problem with the text. In my function
analyser, the definition of any function is organized in an auxiliary form and only
the approved (!) function is returned into the main window and included into
the list of functions under some name. Declaration of the Y(x) functions and
parametric functions {X(r), Y(r)} are slightly different, so they are organized
in two separate forms, but these forms are similar in design.
- An arbitrary number of plotting areas can be used in analyser; such areas can be added and deleted at any moment.
In order to add a new plotting area with the graphs of
the needed functions, it is enough to select the names of these functions in
the list and press the button. To
delete any plotting area, call menu on this area and use the Delete area
command. All the created areas can be also deleted by a single command from
menu which can be called at any empty place.
- Any number of functions can be shown in any plotting area.
The number of functions (graphs) to be shown in any
plotting area is unlimited in this program, but all functions in the particular
area are shown inside the same ranges. The Plot class
allows to use areas with multiple horizontal and vertical scales and it is
often done in the real scientific applications, but in this analyser I purposely
set the restriction on the scales’ number. This is more like an application
for teaching and I decided that multiple scales can be too confusing in such
case.
- Easy change of positions and sizes for all the plotting areas.
Movability and resizability of the plotting areas are
provided by the Plot class as was explained
earlier. Positioning of those plots on the screen has no limitations and is
very individual for each user.
In this analyser of functions the screen area works
like a desk surface on which you position the sheets with the graphs. In real
life you can put on your desk several sheets of paper, look at them, then move
them aside, and place on the desk another set of sheets with different
functions. In the proposed program you can simulate the same process but in a
more efficient way. Any set of plotting areas can be declared as a “view” with
its unique name; an arbitrary number of views can be organized; an elementary
list with the names allows to switch between the views.
- Easy change of all visibility parameters for all the plotting areas.
As usual, all the needed commands are in several
context menus; to change some object, user has to call menu on this object.
This rule is slightly changed in case of plotting areas and their related elements
– comments. In the previous examples the visibility parameters of any comment
is changed via the commands of menu on this comment. The comments do not exist
on the screen by themselves but only as auxiliary elements for scales or
plotting areas, so all changes of comments are now done in the tuning forms for
scales and plotting areas; you will see it a bit later.
This example can be used as a teaching program. With
its help you can demonstrate different functions, but you also have to learn
how to do it. To simplify this task, I included into the program several
predefined functions, so you can learn to do everything even before entering
the text of your first function.
There can be an arbitrary number of plotting areas in
the main form of Function Analyser. There is also one group on the
screen; the view of this group can be changed by users. At the first
start of this program, there are no plots but the group is there; this group is
shown at figure 8 (the default view of the group is slightly different).
This group consists of two different halves. On the left, there is a list
of predefined functions; you can’t change the content of this list but you can
change its size or even hide this list if you don’t need it. On the right,
there is a group of controls to deal with the functions defined by you. At the
beginning the right list is empty; later there will be the names of your own
functions. You can select any combination of names in one or both lists and
press the button
to show the selected functions in one plotting area.
Some of the predefined functions are obvious from their names. It’s not so easy to imagine the view of other functions, and
I can’t remember them myself because I prepared these functions two or three
years ago, so I selected them one after another and put each one into separate Plot object (only three simple trigonometric functions
share the same area); figure 9 shows the Function Analyser with
all the predefined functions in view.
I didn’t want to turn figure 9 into demonstration
of wide variety of visibility parameters; there is a lot of such parameters
which can be changed through the tuning forms for plotting areas and scales.
Usually these tuning forms can be called through the context menus or by double
click on the element which needs changes (plotting area or scale); in the Form_Functions.cs
both ways work. Figures 10 show tuning forms for plotting areas and
vertical scales; tuning form for horizontal scales is similar to figure 10b.
My Function Analyser works according to its
declared purpose; at the same time it is a representative of the widely used
scientific and engineering applications and demonstrates all the features of
such applications and the main rules of their design. Programs of such type often
deal with very complicated problems, with a lot of parameters, and with different
ways of analysis, so such programs cannot be simple. At the same time users
have to think about scientific problems and prefer to spend minimal time on
learning the features of such applications. There must be some basic rules
implemented at all the levels; the knowledge of these basic rules will be enough to deal with any program.
For example, the comparison of figures 8 and 9
shows that a group can be transformed by moving and resizing its inner
elements. It is correct not only for this particular group but for any other
group also, so any user can rearrange the groups in the tuning forms from figures
10. Even more: the unneeded parts of these tuning forms can be moved out of
view across the borders, so each user decides WHAT, WHEN, and HOW to show on
the screen. For people who work for many years with the applications of fixed
design (for them the highest achievement is the adaptive interface which can provide
several variants) such flexibility and easiness of change can be a shock at the
beginning but the benefits are found very quickly.
As I mentioned before, changes of visibility parameters are done via the commands of context menus and the main rule of
distributing the commands between the menus was already mentioned at the
beginning of this article: to change an element, you call the menu on this
element; to change several elements associated with some “parent”, you call a
menu for this “parent”. Figures 11 show the menus for plotting areas,
scales, and comments.
You can find here one change in dealing with comments,
but this change is also done according to the above mentioned rule. Comments
do not exist on the screen by themselves but each comment is associated either
with some plotting area or scale, so I didn’t include into the menu on comments
the commands to change font and color, but these changes are done in the tuning
form for a “parent”. Identical groups to change the associated comments are
used in tuning forms for plotting areas and scales, only in case of the
plotting area (figure 10a) there are several comments and all the inner
elements of the group are enabled while there are no comments for vertical
scale (figure 10b) and the majority of inner elements of the group is
disabled.
This Function Analyser was developed to deal
with user designed functions, so let us look at the process of designing new
functions. If you want to organize a new Y(x) function, you have to click the button
and then another form will be opened.
Suppose that you want to discuss with your students
the polynomial functions and among other examples you want to show such
function: y = (x + 4) * (x + 2) * (x + 1) * (x – 1) * (x – 3). You can
prepare a function with this expression in the Form_FuncYx.cs form and
demonstrate its graph but you can also do much more. There is an easy way to
show the change of polynomial function with an addition of each new member.
First, in the Form_FuncYx.cs you organize
the simplest linear function y = x – 3 (figure 12).
Then you organize the next function y = (x – 3)(x – 1)
and continue until you have five different polynomial functions and each of
them is one degree higher than the previous one. To make your explanation more
obvious, you can put five different functions into five small plotting areas
next to each other. Then you select all five functions in the list and show
them all together in a single plotting area (figure 13).
You can see from figure 13 that I have changed
colors for graphs and their comments in such a way that each function is shown
with the same color in its own plotting area and in the area of their combined
view. Comparison of figures 9 and 13 also highlights once more
the flexibility of such applications. As a designer, I only think about the
development of an instrument – the Function Analyser. I am not saying
anything about the use of this program – this is the prerogative of users to
make all the decisions.
Function Analyser is the first real example of scientific applications in this article
and I think that I don’t need to add more examples. I have included several
scientific applications into the big Demo program accompanying my book, but
there is no sense in copying those examples into the article. There is a free
access to all the codes of that Demo program; anyone can download the book
together with the whole project. The same Plot class
is used in all those examples and this makes the work with the applications
much easier for users.
Scientists use different programs as instruments
in their research work and then they have a habit of publishing the results of
their work. For many years I was doing it myself and throughout all those
years the procedure was simple: put the copy of the screen view into the Clipboard, show the image in another program (I prefer to use Paint),
cut the needed part, save it as a file (for example, some JPG file), and insert
this file into the text of your article. The procedure is simple, but there is
one problem: the good view of pictures on the screen often differs from the
good view on the paper, so somewhere on the way (usually in the Paint
program) I had to edit the picture to give it the best “paper variant”. Now,
when scientists work with user-driven applications in which they can easily
change each and all visibility parameters, the process of preparing an
illustration for some article has changed. Easy change of all screen elements
in the working applications allows to make all (or nearly all) needed changes
simpler at the beginning of the process in the working program rather than
later in the Paint, but this is not all that using of the Plot class allows.
From time to time users have some very interesting and
unusual requests, but without such requests the programming will be boring. Though
I am involved in design of scientific and engineering applications for many
years, occasionally I have to think about and implement such features which I
would never think out myself. Here is one of such features.
When you work with movable plotting areas, you often
change locations and sizes of those areas. You do it not even thinking about
the purpose of such moving / resizing but simply to feel comfortable with the
view and location of all the screen elements at any particular moment. When
you decide to include into your article some picture with several plotting
areas, you begin to evaluate the prepared view for the purpose of better
presentation and you often want to line these plotting areas in one way or
another. For some people a tiny shift of several pixels between the sides of
two neighboring plots doesn’t mean anything at all; for others it can be
annoying. Scientists from the Department of Mathematical Modeling asked me to
add on the screen the information about the sizes and position of the plot
which is currently under move; this became the standard feature for all the
applications designed later and you can see this feature in the Form_Functions.cs.
Certainly, the appearance of this additional
information is regulated by user and can be switched ON / OFF via the command of
context menu. Throughout the normal work with a program this additional
information on the screen is not needed at all; it is switched ON only to
prepare some pictures for publications. If this information is required, then it
appears at the moment when the plotting area is pressed and disappears when it
is released. In the previous example I have already explained the trick of
using the RectCorners additional part for
moving / resizing of the Plot objects, so two classes
must be mentioned while the decision about the appearance of this additional
information on the screen is made.
private void OnMouseMove (object sender, MouseEventArgs e)
{
    if (mover .Move (e .Location))
    {
        GraphicalObject grobj = mover .CaughtSource;
        … …
        else if ((grobj is Plot || grobj is RectCorners) &&
                 ShowAreaDimensions && e .Button == MouseButtons .Left)
        {
            infoPlotSize .Text = InfoSizesText ();
            infoPlotSize .Location =
                     new Point (e .Location .X + 16, e .Location .Y + 16);
            CheckInfoLocation (e .Location);
        }
        Invalidate ();
    }
    … …
Conclusion
Plots in applications are not limited only to the rectangular shape, but such
shape of the plots prevails and the rectangles with the graphs of Y(x)
functions are what you see most often in the programs. For this reason I
limited the discussion of plots in this article to this particular case of
rectangular plots; you can find much more in the mentioned book. I tried to
show that there is nothing super magical in turning such rectangular plots into
movable / resizable, that the covers are simple, the moving / resizing is
natural, but with the use of it we receive absolutely different scientific and
engineering programs which users can change in the way they really want.
Function Analyser can be very useful in teaching of some math courses but it is not
needed in real scientific applications. Programs which are used in research
work always work with some experimental data and the interface between this
data and the program itself is a very important part of each program. Each
program can deal with the data in some special format; the explanation of such
format would require time, the code will increase, but this all will have
nothing to do with the use of plots, so I decided not to include any more
examples into this article. (You can find a couple of interesting applications
in the book.)
I tried to demonstrate the main features of the Plot class and standard way of its use in applications.
Depending on the purpose of each application, different features can be added
to the plotting areas. There can be trackbars for more accurate estimation of special
points on the graphs, there can be different ways to organize many plotting
areas which you need to store and between which you have to switch all the
time. But at the base there are the Plot objects
which can be moved and resized at any moment and which allow any user to
transform the screen view in the way he personally prefers. For the highest
efficiency of the work he is just doing.
There is a very funny situation with the spread of
movable plots in the scientific and engineering applications.
- Scientists who work with the new type of
applications are fond of new possibilities and not only look at them as
the mandatory features of all the new programs but require to find some magic
way to implement such plots into old programs which are still in use.
They don’t care how you are going to do it but they really need it.
- Marketing departments of the companies which
develop scientific and engineering programs organize surveys to find out
what their clients need and expect to see, but all these surveys are based
only on the existing versions of their programs which have no movable
plots. Certainly, there is no discussion of movable plots in these
surveys because such plots simply don’t exist in the world of marketing
departments.
- Somewhere in the middle there are some
programmers who might know about movable plots and maybe even ready to
design user-driven applications but those developers are not given time
and money to do it because the orders must be given by marketing
departments which … (return to the previous statement).
I really enjoy this crazy situation!
Related articles
If you want to read about some related details, there
are several articles.
Sergey Andreyev What can be simpler than graphical
primitives? Parts 1, 2, and 3.
Sergey Andreyev Movable Elements: From Primitive
to Complex Objects.
All these articles demonstrate only a tiny part of
information from the book with its accompanying project.
This member has not yet provided a Biography. Assume it's interesting and varied, and probably something to do with programming.


 General
  News
News  Suggestion
  Question
  Bug
Bug  Answer
  Joke
Joke  Praise
  Rant
Rant  Admin
Admin 


![Java | [Coffee]](https://codeproject.global.ssl.fastly.net/script/Forums/Images/coffee.gif)
