Introduction
This is my first article on MVC framework and Dependency Injection (DI) which will explain in a step-by-step manner how to use Unity Application block with an ASP.NET web application which is built on MVC framework.
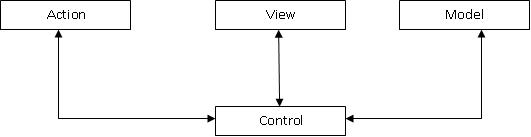
What is ASP.NET MVC Framework?
The MVC (Model View Controller) is a design pattern where the application flow is mediated by a central controller. The controller delegates requests/actions to an appropriate handler. The controller is the means by which the user interacts with the web application/views. The controller is also responsible for sending and receiving the data from the model.
Microsoft ASP.NET MVC 1.0 is a framework built on top of Microsoft .NET 3.5 framework which implements the MVC pattern. We can also implement custom MVC framework using core ASP.NET framework using HttpHandlers which is not in the scope of this article.
What is Unity Application Block?
In recent times, one of the most used architectures is the container based architecture. The main purpose of the container based architecture is to achieve IOC (Inversion of Control). The DI (Dependency Injection) is the method which is used to achieve IOC (Inversion of Control). Unity Application Block (Part of Microsoft Enterprise library 4.1) is Microsoft’s answer for container based architecture. There are different container based frameworks available in the market e.g. Castle Windsor.
What is the Advantage of Using Container Based Architecture in MVC Application?
While implementing MVC framework in ASP.NET application, we need to invoke model class methods from controller class to retrieve the data from database or any other data source. At that time, we need to create the objects of Model class in Controller class using new operator. This will end up in a strong coupling between Controller and Model. By introducing the component architecture, we are moving the responsibility of creating Model objects from Controller to Unity Framework.

Background
Understanding of MVC (Model View Controller), DI (Dependency Injection) and IOC (Inversion of Control) Design patterns are advantageous. The code relays on Microsoft Enterprise library 4.1 and Microsoft ASP.NET MVC 1.0 framework. So an understanding of this framework will be helpful.
Using the Code
You can download the MvcDI.zip file, but you must have Microsoft .NET 3.5 SP1, Microsoft ASP.NET MVC 1.0 and Microsoft Enterprise library 4.1 installed on your machine.
How Did I Create the Project?
In this section, I will describe how I created the project. The steps are listed in sequence and are numbered.
Step 1: Create MVC Enabled ASP.NET Web Application
1.1 Start the Visual Studio 2008 Application and select the New Project from the file menu.
1.2 Select the ASP.NET MVC Web Application template and create the project.
1.3 Delete all the folders which are created (by default) under Views folder.
1.4 Delete all the classes which are created (by default) under Controllers and Models folder.
1.5 Add reference to the following DLLs which are part of Microsoft Enterprise library 4.1.
- Microsoft.Practices.ObjectBuilder2
- Microsoft.Practices.Unity
- Microsoft.Practics.Unity.Configuration
Step 2: Create Model Layer
2.1 Add a new class CustomerEntity.cs under the Models folder.
This class acts as a Data Transfer Object(DTO) which is used to transfer the data across the layers:
using System.Configuration;
using System.Linq;
using System.Web;
using System.Web.Security;
using System.Web.UI;
using System.Web.UI.HtmlControls;
using System.Web.UI.WebControls;
using System.Web.UI.WebControls.WebParts;
using System.Xml.Linq;
namespace MvcDI.Models
{
public class CustomerEntity
{
private string _strCustomerName;
private string _strCustomerID;
private string _strCity;
public CustomerEntity(string strCustomerID,
string strCustomerName, string strCity)
{
CustomerID = strCustomerID;
CustomerName = strCustomerName;
CustomerCity = strCity;
}
public string CustomerName
{
set
{
_strCustomerName = value;
}
get
{
return _strCustomerName;
}
}
public string CustomerID
{
set
{
_strCustomerID = value;
}
get
{
return _strCustomerID;
}
}
public string CustomerCity
{
set
{
_strCity = value;
}
get
{
return _strCity;
}
}
}
}
2.2 Add a new Interface ICustomer.cs under the Models folder.
This Interface defines the methods which need to be implemented by the Customer class:
using System;
using System.Collections.Generic;
using System.Linq;
using System.Text;
namespace MvcDI.Models
{
    public interface ICustomer
    {
        IList<CustomerEntity> LoadCustomers();
    }
}
2.3 Add a new class Customer.cs which implements ICustomer under the Models folder.
This is the model class responsible for generating data.
using System;
using System.Collections.Generic;
using System.Linq;
using System.Web;
using System.Collections;
namespace MvcDI.Models
{
public class Customer:ICustomer
{
public IList<CustomerEntity> LoadCustomers()
{
IList<CustomerEntity> customerList = new List<CustomerEntity> {
new CustomerEntity("ID101", "Anil", "Paris"),
new CustomerEntity("ID101", "Sunil", "Bangalore"),
new CustomerEntity("ID101", "Roy", "London"),
};
return customerList;
}
}
}
Step 3: Create Controller Layer
3.1 Add a new class CustomerController.cs under the Controllers folder.
The CustomerController class supports the constructor based dependency injection which pushes the dependencies into a concrete class through constructor arguments.
The ViewCustomer() method represents the action method. The Controller base class has a "ViewData" dictionary property that can be used to populate data that you want to pass to a View. In this code snippet using the ViewData dictionary, customer data retrieved from the model layer is passed on to the view layer.
using System;
using System.Data;
using System.Configuration;
using System.Linq;
using System.Web;
using System.Web.Security;
using System.Web.UI;
using System.Web.UI.HtmlControls;
using System.Web.UI.WebControls;
using System.Web.UI.WebControls.WebParts;
using System.Xml.Linq;
using System.Web.Mvc;
using System.Web.Mvc.Ajax;
using MvcDI.Models;
using System.Collections;
using System.Collections.Generic;
using Microsoft.Practices.Unity;
namespace MvcDI.Controllers
{
public class CustomerController:Controller
{
ICustomer _customer;
public CustomerController(ICustomer customer)
{
_customer = customer;
}
public ActionResult ViewCustomer(string s)
{
IList<CustomerEntity> customerList =_customer.LoadCustomers();
ViewData["custList"] = customerList;
return View();
}
}
}
Step 4: Create View Layer
4.1 Add a new WebForm with the name ViewCustomer.aspx and put it in a sub folder called Customer under the Views folder.
ViewCustomer.aspx
The BoundColumn in the data DataGrid control specifies the fields' needs to bind from the data source.
<%@ Page Language="C#" AutoEventWireup="true"
	CodeBehind="ViewCustomer.aspx.cs" Inherits="MvcDI.Views.ViewCustomer" %>
<!DOCTYPE html PUBLIC "-//W3C//DTD XHTML 1.0 Transitional//EN"
	"http://www.w3.org/TR/xhtml1/DTD/xhtml1-transitional.dtd">
<html xmlns="http://www.w3.org/1999/xhtml" >
<head runat="server">
    <title>View Customer</title>
</head>
<body>
    <form id="form1" runat="server">
    <div>
    <asp:DataGrid ID="dtgCustomer" runat="server" AutoGenerateColumns="False">
        <Columns>
            <asp:BoundColumn DataField="CustomerID" HeaderText="Customer ID">
             </asp:BoundColumn>
            <asp:BoundColumn DataField="CustomerName" HeaderText="Customer Name">
             </asp:BoundColumn>
            <asp:BoundColumn DataField="CustomerCity" HeaderText="Customer City">
            </asp:BoundColumn>

        </Columns>
    </asp:DataGrid>
    </div>
    </form>
</body>
</html>
ViewCustomer.aspx.cs
One interesting point we need to note here is that ViewCustomer class is derived from ViewPage (which is a subclass of the existing Page class) class instead of Page class.The ViewPage base class provides us with a ViewData dictionary property that we can use within the view page to access the data objects that were added by the controller.
using System;
using System.Collections.Generic;
using System.Linq;
using System.Web;
using System.Web.Mvc;
using MvcDI.Models;
namespace MvcDI.Views
{
public partial class ViewCustomer :ViewPage
{
protected void Page_Load(object sender, EventArgs e)
{
dtgCustomer.DataSource = (IList<CustomerEntity>)ViewData["custList"];
dtgCustomer.DataBind();
}
}
}
Step 5: Create a UnitFactory Class which Inherits from DefaultControllerFactory
The Unity factory class is responsible for creating controller instances.
using System;
using System.Data;
using System.Configuration;
using System.Linq;
using System.Web;
using System.Web.Security;
using System.Web.UI;
using System.Web.UI.HtmlControls;
using System.Web.UI.WebControls;
using System.Web.UI.WebControls.WebParts;
using System.Xml.Linq;
using Microsoft.Practices.Unity;
using System.Web.Mvc;
namespace MvcDI
{
public class UnityFactory : DefaultControllerFactory
{
IUnityContainer _container;
public UnityFactory(IUnityContainer container)
{
_container = container;
}
protected override IController GetControllerInstance(Type controllerType)
{
if (controllerType!= null)
return _container.Resolve(controllerType) as IController;
else
throw new ArgumentNullException("Control Type is not available");
}
}
}
Step 6: Add the Following Contents to the Global.asax.cs File
In the RegisterRoutes method, user can specify the Action and Controller names. The controller name is the name of the controller class by just eliminating the word "Controller".
The Application_Start method is responsible for initializing the unity container, sets the controller factory and registers a type with the container. The RegisterRoutes() method creates the route table.
using System;
using System.Collections.Generic;
using System.Linq;
using System.Web;
using System.Web.Mvc;
using System.Web.Routing;
using Microsoft.Practices.Unity;
using MvcDI.Models;
namespace MvcDI
{
public class MvcApplication : System.Web.HttpApplication
{
public static void RegisterRoutes(RouteCollection routes)
{
routes.IgnoreRoute("{resource}.axd/{*pathInfo}");
routes.MapRoute(
"Default",
"{controller}/{action}/{id}",
new { controller = "Customer",
action = "ViewCustomer", id = "" }
);
}
protected void Application_Start()
{
IUnityContainer container = new UnityContainer();
IControllerFactory factory = new UnityFactory(container);
ControllerBuilder.Current.SetControllerFactory(factory);
container.RegisterType<ICustomer, Customer>();
RegisterRoutes(RouteTable.Routes);
}
}
}
Step 7: Build and Run the Application
History
- 21st January, 2010: First version
He has been programming for 11+ years in Microsoft Technologies.Now he works for Collabera Solutions, Bangalore. He is an MCP professional and he loves Playing Keyboard and Guitar on his free time.


 General
  News
News  Suggestion
  Question
  Bug
Bug  Answer
  Joke
Joke  Praise
  Rant
Rant  Admin
Admin 


