
CodeProject.AI Module creation: A full walkthrough in Python
5.00/5 (3 votes)
The full walkthrough of a bare bones module for CodeProject.AI using Python
Introduction
CodeProject.AI Server provides the glue, the infrastructure and the front-end to bundle together whatever AI project you wish to expose to your applications. By creating a simple wrapper for your AI project's code you get a module that has full life cycle management, deployment, updates, and exposure to any application, any language. Your fun console project is now available everywhere.
Our Example CodeProject.AI Server Module
For our example we'll take a simple Python program that uses PyTorch and the YOLOv8 models to perform object detection. This program we'll use is a single python file that runs on the console using
python3 detect.py --input test.jpg --assets assets --model yolov8m --threshold 0.6
It will produce output similar to
Label        confidence    bounding box
====================================================
chair           91%        (102, 272)   - (242, 421)
potted plant    88%        (9, 226)     - (71, 337)
chair           72%        (235, 203)   - (336, 358)
laptop          69%        (231, 221)   - (300, 259)
chair           66%        (0, 361)     - (91, 439)

We will turn this into a CodeProject.AI module that is called via the API call
http://localhost:32168/v1/vision/detect
and which will return
{
   "success":true,
   "message":"Found chair, potted plant, chair...",
   "count":5,
   "predictions":[
      {
         "confidence":0.9158754944801331,
         "label":"chair",
         "x_min":102,
         "y_min":272,
         "x_max":242,
         "y_max":421
      },
      ...
      {
         "confidence":0.665546715259552,
         "label":"chair",
         "x_min":0,
         "y_min":361,
         "x_max":91,
         "y_max":439
      }
   ],
   "processMs":398,
   "inferenceMs":386
}
The image you wish to process is passed to this API by a simple HTTP POST call. This means any application capable of making a HTTP call can now use your python code.
No more worrying about setting up Python, and virtual environments, and wondering how you use your python code in, say, a .NET app. CodeProject.AI Server exposes your python page to everyone.
Steps to Building a Module
- Define the module's settings. This allows the CodeProject.AI installer to setup the environment for us, and also provide information to the server on how to start the module and the API route the module will be servicing.
- Create a setup script. Allows us to download assets or install any support libraries needed
- Write an adapter to wrap our existing code. The provides the communication between our code and the CodeProject.AI server.
- Write a test page. This allows us to easily test the module
- Write a packager script. Not required, but it allows you to redistribute your module in zip form for the module registry
Let's Begin: The modulesettings.json file
The modulesettings.json file is the the real workhorse of it all.
Module settings are stored in a modulesettings.json file. If you have different settings for different platforms, such as a different version of a runtime, you can use a modulesettings.<target>.json file. See the docs for an explanation of the filename targeting options.
For this exercise we'll run Python 3.9 in Windows and Python 3.8 in Linux. Old versions, yes, but often AI projects use old versions of Python due to requirements of the packages they use. Feel free to use whatever version your code works with.
The modulesettings.json file has the basic format of
{
  "Modules": {

    "DemoModulePython": {
      "Name": "My module name",
      "Version": "2.0.0",

      "PublishingInfo" : {
         ...
      },

      "LaunchSettings": {
         ...
      },

      "EnvironmentVariables": {
         ...
      },

      "GpuOptions" : {
         ...
      },

      "InstallOptions" : {
         ...
      },

      "UIElements" : {
         ...
      },

      "RouteMaps": [
      {
         ...
      }]
    }
  }
}
Let's walk through this and fill in the values
Name and version should be self explanatory, and the module ID is any ID you wish to provide that doesn't conflict with another module. We're labelling our module as DemoModulePython.
Our PublishingInfo section will contain:
"PublishingInfo" : {
  "Description" : "Provides Object Detection YOLOv8",
  "Category"    : "Computer Vision",
  "Stack"       : "Python, PyTorch, YOLO",
  "License"     : "AGPL-3.0",
  "LicenseUrl"  : "https://www.gnu.org/licenses/agpl-3.0.en.html",
  "Author"      : "Chris Maunder",
  "Homepage"    : "https://codeproject.com/ai",
  "BasedOn"     : "ultralytics",                         // What project is this based on?
  "BasedOnUrl"  : "https://github.com/ultralytics/ultralytics" // The URL for that project
}
The LaunchSettings will contain
"LaunchSettings": {
  "AutoStart"          : true,                // Start this when the server starts
  "FilePath"           : "detect_adapter.py", // Name of file that gets launched
  "Runtime"            : "python3.8",         // file is launched by Python
  "RuntimeLocation"    : "Local",             // We want our own virt. env., not a shared one
  "PostStartPauseSecs" : 1,                   // Generally 1 if using GPU, 0 for CPU
  "Queue"              : "objdetect_queue",   // Can be left as null if you wish
  "Parallelism"        : 0                    // 0 = Default (number of CPUs - 1)
}
- FilePath and Runtime are the most important fields here. Everything else can be omitted if you wish.
- Queue specifies where the server will place requests from clients, and the name of the queue that the module will be looking in for requests to process. You can leave this blank, or you can provide a name in case you wish to have multiple modules service the same queue.
- Parallelism denotes the number of parallel tasks that will be running to service this queue.
- RuntimeLocation is currently only used for Python, and can be "shared", meaning this module will use a shared virtual environment to save space, or "local" meaning the venv will be local to this module (to avoid package conflicts)
The EnvironmentVariables section contains any environment variables we wish to have set before launch
"EnvironmentVariables": {
  "CPAI_MODEL_YOLODEMO_MODEL_SIZE" : "Medium",   // tiny, small, medium, large
  "CPAI_MODEL_YOLODEMO_MODELS_DIR" : "%CURRENT_MODULE_PATH%/assets"
}
Note the use of the CURRENT_MODULE_PATH macro. See Macros for more information on this.
GpuOptions is solely for GPU setup
"GpuOptions": {
  "InstallGPU"            : true,    // Should we install GPU enabled code?
  "EnableGPU"             : true,    // Should we enable GPU support (if installed)
  "AcceleratorDeviceName" : null,    // eg "cuda:0" or just leave blank for default
  "HalfPrecision"         : "enable" // For code that supports half-precision. Use 'Force', 'Enable', 'Disable'
}
- HalfPrecision allows you to disable half precision operations on older CUDA cards that don't support it. It's generally safe to omit this because CodeProject.AI server can make some educated guesses on your behalf
InstallOptions describe how and where and if the module should or could be installed
"InstallOptions": {
  "Platforms":      [ "windows", "linux" ],
  "ModuleReleases": [
      { "ModuleVersion": "1.0.0", "ServerVersionRange": [ "1.0.0", "2.4.9" ],
        "ReleaseDate": "2023-01-01", "ReleaseNotes": "Initial Release",
        "Importance": "Major" },
     { "ModuleVersion": "2.0.0", "ServerVersionRange": [ "2.5.0", "" ],
       "ReleaseDate": "2023-02-14", "ReleaseNotes": "Updated for Server 2.5.0",
       "Importance": "Major" }
  ]
}
- Platforms is a list of platforms. Supported options are: windows, macos, linux, raspberrypi, orangepi, jetson, plus the arm64 variants: windows-arm64, macos-arm64, linux-arm64. Or, use "all" to signify it can run anywhere.
- ModuleReleases is an array of versions and the server versions it's compatible with. In this case version 1 was compatible with CodeProject.AI Server version 1 to 2.4.9, and version 2 of the module is compatible with CodeProject.AI version 2.5 and above
UIElements provides the server with information on UI options. We'll only discuss the context menu that appears on a module's row in the dashboard. We'll provide a single menu that offers model size. Adding a second menu option is as is simple as adding another menu object ({ "Label": .... "Options": ...})
"UIElements" : {
  "Menus": [{
     "Label": "Half Precision",
     "Options": [
       { "Label": "Force on",    "Setting": "CPAI_HALF_PRECISION", "Value": "force"   },
       { "Label": "Use Default", "Setting": "CPAI_HALF_PRECISION", "Value": "enable"  },
       { "Label": "Disable",     "Setting": "CPAI_HALF_PRECISION", "Value": "disable" }
     ]
  }]
},
RouteMaps are what define the API route for your module.
"RouteMaps": [{
  "Name": "Python YOLOv8 Object Detector",
  "Route": "vision/detection",
  "Method": "POST",
  "Command": "detect",
  "Description": "Detects objects",

  "Inputs": [
    {
      "Name": "image",
      "Type": "File",
      "Description": "The HTTP file object (image) to be analyzed."
    },
    {
      "Name": "min_confidence",
      "Type": "Float",
      "Description": "The minimum confidence level (0.0 - 1.0) for an object will be detected.",
      "DefaultValue": 0.4,
      "MinValue": 0.0,
      "MaxValue": 1.0
    }],

  "Outputs": [{
    "Name": "success",
    "Type": "Boolean",
    "Description": "True if successful."
    },
    ...
  ]
 }
]
- Route is route a caller will use to call this module. The route vision/detection will correspond to the API call http://localhost:32168/v1/vision/detection
- Command is the command that will be sent to this route. You can setup routes that go to the same path but send different commands. It's up to your module to handle the command appropriately
- Inputs and Outputs define the input parameters and output results and are used for automatically documenting your module
Adding a variant modulesettings file for Windows
The the sake of this demo we'll add a modulesettings file specifically for Windows, and we'll change the Python version from 3.8 to 3.9 for Windows. We will name the file modulesettings.windows.json and it will contain only the overridden values:
{
  "Modules": {
    "DemoModulePython": {
      "LaunchSettings": {
        "Runtime": "python3.9"
      }
    }
  }
}
The setup system
Most of the setup for our module will be handled automatically based on the contents of the module settings file, so in some cases your setup scripts will be empty. In our case we're going to download the YOLOv8 models so our setup script is very basic
@if "%1" NEQ "install" (
    echo This script is only called from ..\..\setup.bat
    @pause
    @goto:eof
)

REM Download the YOLO models from the CodeProject models/ folder and store in /assets
call "%sdkScriptsDirPath%\utils.bat" GetFromServer "models/" "models-yolo8-pt.zip" "assets" "Downloading Standard YOLO models..."
if [ "$1" != "install" ]; then
    read -t 3 -p "This script is only called from: bash ../../setup.sh"
    echo
    exit 1
fi

# Download the YOLO models from the CodeProject models/ folder and store in /assets
getFromServer "models/" "models-yolo8-pt.zip"  "assets" "Downloading Standard YOLO models..."
Here we're using the getFromServer method from the CodeProject.AI SDK. See Install script docs for more information on these. Note that unless you have your assets hosted on the CodeProject servers you will need to download your assets manually from whatever location you have them stored.
The core of the setup is handled by the CodeProject.AI server setup scripts. They will sniff out the runtime (Python) and ensure the version we selected is installed, a virtual environment is setup, and the python packages required (as specified in the appropriate requirements.txt file) are installed.
Post Install
In some cases you may need to execute some post-install commands for scenarios such as patching libraries. This is done by including post-install.bat / post-install.sh files which the installer will execute if they are present. In our demo we've included post-install scripts that patch the ultralytics library.
Requirements.txt
If you have different requirements.txt files for different platforms then review the requirements.txt documentation.
.NET
For .NET modules, .NET is already installed as part of the server setup.
Writing the module itself: the Adapter
The code we're going to wrap is in the zip download associated with this article. In the detect.py file you will find the nut of the code we want to make available in the do_detection method:
def do_detection(img: any, threshold: float = 0.4, models_dir: str = "assets",
                 model_name: str = "yolov8m", resolution: int = 640,
                 use_Cuda: bool = False, accel_device_name: int = 0,
                 use_MPS: bool = False, use_DirectML: bool = False,
                 half_precision: str = "enable"):
This method will output an object with the form
{
  "message"     : "Detected car, bike and person",
  "count"       : 3,
  "predictions" : [ ... ],
  "success"     : True,
  "processMs"   : 50,
  "inferenceMs" : 20
}
where predictions is an array of objects with the form
{
  "confidence": 0.87,
  "label": "car",
  "x_min": 20,
  "y_min": 10,
  "x_max": 100,
  "y_max": 50,
}
The parameters passed to the do_detection method aren't that important here. As long as you understand what your code needs you'll be able to follow along.
To wrap this method we create an adapter that is derived from the ModuleRunner class in the CodeProject.AI Server SDK
The basic skeleton of the adapter is
# Import or general libraries
import os
import sys

# Import the CodeProject.AI SDK. This will add to the PATH var for future imports
sys.path.append("../../SDK/Python")
from common import JSON
from request_data import RequestData      # RequestData is passed to 'process'
from module_options import ModuleOptions  # Handle options passed to the module
from module_runner import ModuleRunner    # The ModuleRumne core
from module_logging import LogMethod      # For logging

# Import the method of the module we're wrapping
from detect import do_detection

# Our adapter
class YOLOv8_adapter(ModuleRunner):

    def initialize(self):
        # (optional) initialise the module.

    def process(self, data: RequestData) -> JSON:
        # process the request and return the results as JSON

    def status(self) -> JSON:
        # (optional) return the module status as JSON

    def update_statistics(self, response):
        # (optional) Update statistics if required

    def selftest(self) -> JSON:
        # (optional but encouraged) Perform a self-test

    def cleanup(self) -> None:
        # (optional) Perform any cleanup required

if __name__ == "__main__":
    YOLOv8_adapter().start_loop()
Each of these methods overrides the corresponding method in the parent ModuleRunner class. You only really need to override process, but for our example we'll show a typical initialize and selftest, and also show how the status and update_statistics work.
initialize. Or initialise
You can pick one or the other. This method sets things up for us. Here, we're going to sniff whether we have GPU code enabled, set some values, and initialise some statistics.
    def initialise(self):
        # Can we use the GPU (via PyTorch / CUDA)?
        if self.system_info.hasTorchCuda:
            self.can_use_GPU       = True
            self.inference_device  = "GPU"
            self.inference_library = "CUDA"

        self.models_dir        = ModuleOptions.getEnvVariable("CPAI_MODULE_YOLODEMO_MODEL_DIR",  "assets")
        self.std_model_name    = ModuleOptions.getEnvVariable("CPAI_MODULE_YOLODEMO_MODEL_NAME", "yolov8m")
        self.resolution_pixels = ModuleOptions.getEnvVariable("CPAI_MODULE_YOLODEMO_RESOLUTION", 640)
        self.accel_device_name = "cuda" if self.can_use_GPU else "cpu"

        # Let's store some stats
        self._num_items_found = 0
        self._histogram       = {}
ModuleRunner has a property system_info which provides a wealth of information on the current environment and performs some basic functionality checks for common libraries such as PyTorch. Here we check if we have CUDA enabled. If so we set can_use_GPU = True to signal that our module can use the GPU, and also set the inference device and library so it can be reported in the dashboard.
We use the ModuleOptions class to help sniff values set in environment variables, while also providing defaults.
The _num_items_found and _histogram properties will store information on what we found. These will compliment the statistics collected by default in the ModuleRunner class.
process
In this demo our process method will do one thing (detect objects) in two different ways (default and custom model) in order to demonstrate routes and commands. We have two routes: /v1/vision/detect, and /v1/vision/custom/<model>, where <model> is the name of a custom model to use for object detection.
We use the data (RequestData) object to get parameters and files passed to the method. You'll see how to pass parameters and files to the server API in the selftest and explorer discussions below.
The data.command property has the command passed to the route, and data.segments contains the segments of the route after the route proper. For example, the route /v1/vision/custom is called using "/v1/vision/custom/model-name", so segments will contain the single entry "model -name"
We also use the ModuleRunner.log method to send a log entry back to the server.
The process method is very simple: it gathers parameters and sends them to our do_detection method, then return the results. It's a JSON response so we don't need to do any post processing.
    def process(self, data: RequestData) -> JSON:

        response = None

        if data.command == "detect": # Detection using standard models (API: /v1/vision/detection)

            threshold: float = float(data.get_value("min_confidence", "0.4"))
            img: Image       = data.get_image(0)
            model_name: str  = "yolov8m"

            response = do_detection(img, threshold, self.models_dir, model_name,
                                    self.resolution_pixels, self.can_use_GPU, self.accel_device_name,
                                    False, False, self.half_precision)

        elif data.command == "custom": # Detection using custom model (API: /v1/vision/custom/<model>)

            threshold: float  = float(data.get_value("min_confidence", "0.4"))
            img: Image        = data.get_image(0)
            model_name: str   = None

            if data.segments and data.segments[0]:
                model_name = data.segments[0]

            if not model_name:
                return { "success": False, "error": "No custom model specified" }

            if not os.path.exists(os.path.join(self.models_dir, model_name + ".pt")):
                return { "success": False, "error": f"Could not find custom model {model_name}" }

            self.log(LogMethod.Info | LogMethod.Server,
            {
                "filename": __file__,
                "loglevel": "information",
                "method": sys._getframe().f_code.co_name,
                "message": f"Detecting using {model_name}"
            })

            response = do_detection(img, threshold, self.models_dir, model_name,
                                    self.resolution_pixels, self.can_use_GPU, self.accel_device_name,
                                    False, False, self.half_precision)

        else:
            response = { "success" : False }
            self.report_error(None, __file__, f"Unknown command {data.command}")

        return response
update_statistics
This method is called after each process call. We'll override this method so we can sniff out what was detected and produce some statistics
    def update_statistics(self, response):
        super().update_statistics(response)
        if "success" in response and response["success"] and "predictions" in response:
            predictions = response["predictions"]
            self._num_items_found += len(predictions)
            for prediction in predictions:
                label = prediction["label"]
                if label not in self._histogram:
                    self._histogram[label] = 1
                else:
                    self._histogram[label] += 1
status
This method returns the status of a module. The default implementation returns statistics such as number of calls and average inference time, so we'll add some of our stats to the mix.
    def status(self) -> JSON:
        statusData = super().status()
        statusData["numItemsFound"] = self._num_items_found
        statusData["histogram"]     = self._histogram
        return statusData
selftest
The final method we'll discuss. The selftest method is called at the end of the setup process to let the user know whether the module was install successfully.
The process method requires a RequestData object, so we'll create a new RequestData object, set the command, add a property/value pair, and add a file. We'll then call our process method and return the result.
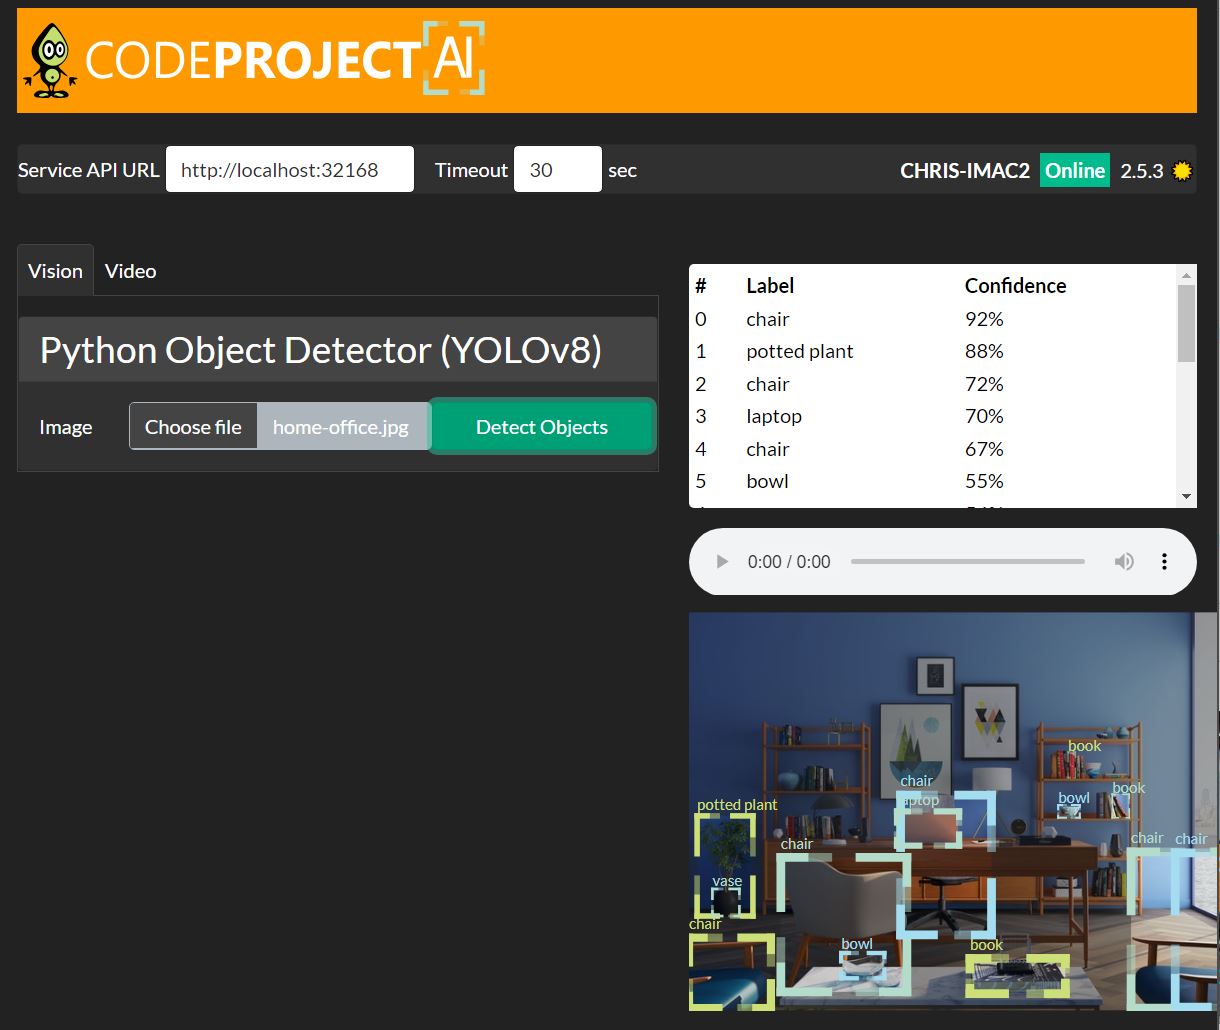
For this example we will include a home-office.jpg image in our project under the test folder.
    def selftest(self) -> JSON:

        file_name = os.path.join("test", "home-office.jpg")

        request_data = RequestData()
        request_data.command = "detect"
        request_data.add_file(file_name)
        request_data.add_value("min_confidence", 0.4)

        result = self.process(request_data)
        print(f"Info: Self-test for {self.module_id}. Success: {result['success']}")

        return { "success": result['success'], "message": "Object detection test successful"}
A Test page and Explorer UI for your module
CodeProject.AI Server provides an HTTP API so the simplest way to test is via tools like Postman, Swagger, or a simple HTML page you write yourself. We'll do the latter.
We'll write a simple webpage that will call the module via its API and display the results. We do this using a special file `explore.html` that will be written in a way that allows the CodeProject.AI Server's Explorer to extract the UI from this explore.html file and incorporate it into the server's main explorer.html file
The entire HTML file is shown below. Note the 3 sections marked by
- START/END EXPLORER STYLE
- START/END EXPLORER MARKUP
- START/END EXPLORER SCRIPT
These three sections will be pulled out from this file and inserted into the main server's explorer.html file. For this to work seamlessly it's best if your explore.html test file for this module uses the same scripts and follows the same naming conventions as the main server's Explorer file, explorer.html
Specifically
- We include the explorer.js class to get access to the methods used to call the server API.
- We include
imgPreviewandimgMaskelements for displaying image results - We include a
resultselement for displaying text results. - We prefix any IDs that may have naming conflicts with the
_MID_macro. This marker will be replaced by the module's ID in the main explorer.html file to avoid name collisions.
Our page is:
<!DOCTYPE html>
<html>
<head>
    <meta charset="utf-8" />
    <title>Object Detection (YOLOv8) Module Test</title>

    <!-- CSS and script helpers from the server -->
    <link id="bootstrapCss" rel="stylesheet" type="text/css" href="http://localhost:32168/assets/bootstrap-dark.min.css">
    <link rel="stylesheet" type="text/css" href="http://localhost:32168/assets/server.css?v=2.5.0.0">
    <script type="text/javascript" src="http://localhost:32168/assets/server.js"></script>
    <script type="text/javascript" src="http://localhost:32168/assets/explorer.js"></script>

    <style>
/* START EXPLORER STYLE */
/* styles for this module if needed */
/* END EXPLORER STYLE */
    </style>

</head>
<body class="dark-mode">

<!-- START EXPLORER MARKUP -->
    <div class="form-group row">
        <label class="col-form-label col-2">Image</label>
        <input id="_MID_image" class="col form-control btn-light" type="file" style="width:17rem"
               onchange="return previewImage(this)" />
        <input id="_MID_things" class="form-control btn-success" type="button" value="Detect Objects"
               style="width:11rem" onclick="_MID_onDetectThings(_MID_image)"/>
    </div>
<!-- END EXPLORER MARKUP -->

    <div class="w-100 position-relative form-control my-4 p-0">
        <div id="imgMask" class="position-absolute"
             style="left:0;top:0;pointer-events:none;z-index:10"></div>
        <img src="" id="imgPreview" class="w-100" style="height:250px;visibility:hidden">
    </div>
    <div>
        <h2>Results</h2>
        <div id="results" name="results" class="bg-light p-3" style="min-height: 100px;"></div>
    </div>

    <script type="text/javascript">
// START EXPLORER SCRIPT

        async function _MID_onDetectThings(fileChooser) {

            clearImagePreview();

            if (fileChooser.files.length == 0) {
                alert("No file was selected for vision detection");
                return;
            }

            showPreviewImage(fileChooser.files[0]);
            let images = [fileChooser.files[0]];

            setResultsHtml("Detecting objects...");
            let data = await submitRequest('vision', 'detection', images, null);
            if (data) {
                showResultsBoundingBoxes(data.predictions);
                showPredictionSummary(data)
            };
        }

// END EXPLORER SCRIPT
    </script>
</body>
</html>
Create a packager
The final (optional) step is to create a packager. The CodeProject.AI Server code contains a script create_packages.bat (for Windows) and create_packages.sh (for macOS/Linux) that will iterate through the modules and create a package using the package.bat / package.sh scripts you create. This package is a simple zip file that the installer can install using the install.bat / install.sh files you created above.
@Echo off
REM Module Packaging script. To be called from create_packages.bat

set moduleId=%~1
set version=%~2

tar -caf %moduleId%-%version%.zip --exclude=__pycache__  --exclude=*.development.* --exclude=*.log ^
    rembg\* *.py modulesettings.* requirements.* install.sh install.bat explore.html test\*
#!/bin/bash
# Module Packaging script. To be called from create_packages.sh

moduleId=$1
version=$2

tar -caf ${moduleId}-${version}.zip --exclude=__pycache__  --exclude=*.development.* --exclude=*.log \
    rembg/* *.py modulesettings.* requirements.* install.sh install.bat explore.html test/*
Bringing it all together: Installing and testing
At this point we have a module, an install script and a test client. Let's give it a run
-
Ensure you have the latest CodeProject.AI repo downloaded. That has all the code we've talked about already in place
-
Copy your module folder into the CodeProject.AI Server code under the src/modules folder. Open a terminal and head to that folder, then run the main CodeProject.AI Server install script
This will see something similar to..\..\setup.bat
bash ../../setup.sh
Installing CodeProject.AI Analysis Module

======================================================================

                   CodeProject.AI Installer

======================================================================

47.6Gb of 380Gb available on BOOTCAMP

General CodeProject.AI setup

Creating Directories...Done

GPU support

CUDA Present...No
ROCm Present...No

Reading DemoModulePython settings.......Done
Installing module Python Object Detector (YOLOv8) 1.0.0

Installing Python 3.9
Python 3.9 is already installed
Creating Virtual Environment (Shared)...Virtual Environment already present
Confirming we have Python 3.9 in our virtual environment...present
Downloading Standard YOLO models...already exists...Expanding...Done.
Copying contents of models-yolo8-pt.zip to assets...done
Downloading Custom YOLO models...already exists...Expanding...Done.
Copying contents of custom-models-yolo8-pt.zip to custom-models...done
Installing Python packages for Python Object Detector (YOLOv8)
Installing GPU-enabled libraries: If available
Ensuring Python package manager (pip) is installed...Done
Ensuring Python package manager (pip) is up to date...Done
Python packages specified by requirements.txt
  - Installing PyTorch, for Tensor computation and Deep neural networks...checked...done
  - Installing TorchVision, for Computer Vision based AI...checked...done
  - Installing Ultralytics package for object detection in images...checked...done
Installing Python packages for the CodeProject.AI Server SDK
Ensuring Python package manager (pip) is installed...Done
Ensuring Python package manager (pip) is up to date...Done
Python packages specified by requirements.txt
  - Installing Pillow, a Python Image Library...checked...done
  - Installing Charset normalizer...checked...done
  - Installing aiohttp, the Async IO HTTP library...checked...done
  - Installing aiofiles, the Async IO Files library...checked...done
  - Installing py-cpuinfo to allow us to query CPU info...checked...done
  - Installing Requests, the HTTP library...checked...done
Executing post-install script for Python Object Detector (YOLOv8)
Applying Ultralytics patch
        1 file(s) copied.
Self test: Self-test passed
Module setup time 00:00:28.37

Setup complete

Total setup time 00:00:29.28
Python is installed, a virtual environment setup, the requirement.txt file used to install the python packages, models are downloaded and the post-install script run. Your module is also tested and is now ready to launch.
Notice that if you run this setup on Linux or macOS, Python 3.8 will be used. On windows, because of our modulesettings.windows.json file, we'll be installing Python 3.9.
- Launch the server by starting a new debug session in Visual Studio or VS Code.
- In Debug, the CodeProject.AI Dashboard is automatically launched when run. After the server starts all the backend Modules, including your new module, will be launched and the Dashboard will display something similar to

- Launch the
explore.htmlfile in a browser, choose a file and click "Submit" button. The results should be shown. Also test in the server's explorer.html.
Conclusion
Writing a module for CodeProject.AI is not difficult, though there are a number of things you do need to keep in mind. The modulesettings.json file defines the settings and launch parameters, and the ability to override the module settings files with different variants provides very fine scale control over your environment. A similar system for Python requirements files provides support for the massive complexity typically involved with getting a python app to install on various hardware and software combos.
Choosing the code you wish to wrap and expose to the world does require you to consider how practical it is to have that code be installed on a remote user's machine, but the install and post install scripts provide a lot of flexibility in working around subtleties (or outright roadblocks) that may pop up.
The only thing left for a typical developer is to host downloads and send us your modules. We're always happy to include modules in the main CodeProject.AI module registry.
Show us your creativity and let's work to get all those awesome AI projects off your desktop and out of Jupyter notebooks and into modules that hundreds of thousands of CodeProject.AI server users can enjoy.