
Creating a Service Virtualization Capability from Scratch (Part 2)
5.00/5 (1 vote)
A case study in building a cloud tool to perform service virtualization using LocalStack (AWS), minimal APIs, and Terraform
Introduction
This is the second article in a bit of an unusual series for me. This service is the result of three years of work, inspired by watching teams struggle with unhappy path testing. It's easy to integrate into your application space..
Having spent years developing with APIs, I have been frustrated by teams that only really test the 2xx series of results from calls. Imagine if your application relied on the Google Maps API, for instance. Would your application behave gracefully if the Maps API was offline? What about if the user you were authenticating with no longer has access? Can you cope?
To answer questions like this, I have used Service Virtualization applications that allow me to mock up results and return them based on the data I input.
The series here goes through the various stages of creating this capability. There are certain assumptions and practices that I will be following and I'll be detailing the core concepts shortly. As the series progresses, and we refine the application further, I will add to these practices.
In the first article, we built the basics of our API structure. We built a minimal API service in C#, backed up by Docker, LocalStack (representing AWS), and DynamoDB to build a versioned set of APIs. In this article, we are going to move on to the next step and add the ability for a user to manage the details of an organization in a Blazor application. Along the way, we are going to learn how we can add Keycloak capabilities to support authentication and authorization.
Previous Articles in this Series
Source Code
- The source for this article is available on GitHub.
Minimal API: Server
Blazor: Client
Very High-Level Architecture
When we create and deploy our service, I am assuming the following features:
- Our service will make use of AWS (Amazon Web Services) features. We could use Azure but I have chosen AWS.
- We will deploy one service to manage the service virtualization (we'll refer to this as SV from now on).
- We will only virtualize HTTP/HTTPS.
- We will control our SV capability via APIs.
- We will host multiple users/organizations in our SV.
- We will control the storage of the request/response items using DynamoDB.
- To lower the cost of development, all development will be done with LocalStack (the free tier is fully functional).
- We will define our cloud infrastructure using a technique known as Infrastructure as Code (IaC). We will script as many areas of our AWS deployment as possible.
- We will use Blazor for our front end application. We could use any client-side technology but, for this development, we are going to use a Web Assembly (WASM) framework.
- We will install LocalStack using Docker.
- We will incrementally build up our SV capability so we will throw code away. That's okay and is a perfectly normal thing to do.
- We will not be blanketing the code in unit tests. I want to go through the process of building and deploying SV into a cloud environment and not get people lost in the details of the various tests.
- We will not worry about performance initially. If we need to speed things up, we'll profile it and do it later on.
- We won't spend too much time worrying how AWS does things. Over this series, we will build up our knowledge.
- All API calls to our services will follow a convention of being created under /api.
- I will create the lowest possible number of interfaces that I can. I will register concrete types. To make types testable, we can mark methods as
virtualif we want. - Our code is heavily "happy path". As we build up our application, we will start to layer in error handling and error prevention but, at the start, we assume the code always works.
Pre-requisites
In order to build the code for this article, we are going to need to install the following capability.
MudBlazor
MudBlazor is a great components framework for Blazor. It's completely open source and, I have to admit, it's one of my favourite OSS projects. To install support for it, we only need to run the following command.
dotnet new install MudBlazor.Templates
Creating our (Mud)Blazor Application
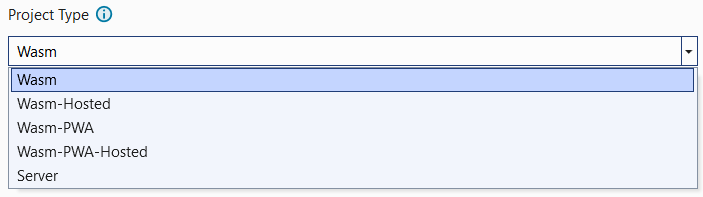
To make life simple when running our application, we will create our MudBlazor application in a new Visual Studio instance. This makes it easy for us to start up the different parts of our code when we need to. Select Create a new project and choose the MudBlazor Templates template. Obviously, the next stage is to choose the project name (I chose Goldlight.Blazor.VirtualServer). The last step of the wizard is interesting as it lets us choose how we want to deploy our Blazor app. We are going to use the Wasm-PWA option and have the best of both worlds, a site that can be deployed as both a website and that users can run locally on their desktop.
Note: At the time of writing, the template creates a .NET 6 project. I updated my project to .NET 7 (the minimum .NET SDK needed to run this code is 7.0.400).
We aren't going to go through the template that's there right now. Rather than doing that, we'll start to add features and remove some of the boilerplate code as we go on.
Adding Organization Settings
At the moment, I'm assuming the user created an organization called codeproject using our backend services. If we assume this, this lets us ignore the fact that our users have not logged in yet.
We are going to add a Settings section to the navigation links down the left hand side of our screen. In this section, we will add a navigation link called Organization that will allow us to maintain details about our organization.
We need to open the Shared folder and open up NavMenu.razor. This file contains the links that we will display down the side. Right now, the code in this file looks like this:
<MudNavMenu>
  <MudNavLink Href="" Match="NavLinkMatch.All" Icon="@Icons.Material.Filled.Home">
   Home</MudNavLink>
  <MudNavLink Href="counter" Match="NavLinkMatch.Prefix"
   Icon="@Icons.Material.Filled.Add">Counter</MudNavLink>
  <MudNavLink Href="fetchdata" Match="NavLinkMatch.Prefix"
   Icon="@Icons.Material.Filled.List">Fetch data</MudNavLink>
</MudNavMenu>
What we need to do is add something called a navigation group. This groups together navigation items under a common place. Add the following code just before the </MudNavMenu> line.
<MudNavGroup Title="Settings" Icon="@Icons.Material.Filled.Settings">
</MudNavGroup>
This creates the navigation group and gives it the Settings title. To add some visual appeal, we also add a Settings icon that will appear next to the text. Throughout this series, we will make use of MudBlazor features wherever possible; we can tell that they are MudBlazor when the control starts with Mud.
Now we want to add the actual navigation link that we will click to see the details. Inside the MudNavGroup section, add the following line.
<MudNavLink Href="settings/organization" Match="NavLinkMatch.All">Organization</MudNavLink>
What we are doing here is adding a MudNavLink that will navigate to the Organization page when the href explicitly matches settings/organization.
Our navigation file should now look like this.
<MudNavMenu>
  <MudNavLink Href="" Match="NavLinkMatch.All" Icon="@Icons.Material.Filled.Home">
   Home</MudNavLink>
  <MudNavLink Href="counter" Match="NavLinkMatch.Prefix"
   Icon="@Icons.Material.Filled.Add">Counter</MudNavLink>
  <MudNavLink Href="fetchdata" Match="NavLinkMatch.Prefix"
   Icon="@Icons.Material.Filled.List">Fetch data</MudNavLink>
  <MudNavGroup Title="Settings" Icon="@Icons.Material.Filled.Settings">
    <MudNavLink Href="settings/organization" Match="NavLinkMatch.All">
     Organization</MudNavLink>
  </MudNavGroup>
</MudNavMenu>
With the navigation set up, we are ready to add a page that we will navigate to. Inside the Pages folder, we add a new folder called Settings. This is where we will add the Organization component.
Add this line at the top of the razor file to set this component as the target of the navigation..
@page "/settings/organization"
When we run the application now, we can navigate to the organization page. Let's think about what we need to do in this page. This is a settings page, that's going to show the details for the organization so we are going to need to retrieve that data from the server. To do that, we are going to have to do three things.
- Enable CORS support in our service so that requests will be served
- Make an API call to the back-end service
- Display the results from the API call.
Enable CORS Support
This requires changes to the back end to provide support for our front end to interact with the APIs. This is a simple change to make, as long as we assume that we are not going to be restrictive on the origins, methods, and headers that we will allow through to our application. Start by adding the following named CORS policy.
builder.Services.AddCors(options =>
{
  options.AddPolicy("AllAllowed",
    policy =>
    {
      policy
        .AllowAnyOrigin()
        .AllowAnyMethod()
        .AllowAnyHeader();
    });
});
With that in place, we just have to tell our service that we want to use our CORS policy.
app.UseCors("AllAllowed");
Call the Back-End Service
Rather than call the server directly from our page, we are going to create a class that encapsulates the logic for the call, and which will return the appropriately "shaped" model. We are going to create a simple model for the GET call.
[DataContract]
public class ExtendedOrganization
{
  [DataMember(Name = "id")]
  public string? Id { get; set; }

  [DataMember(Name = "name")]
  public string? Name { get; set; }

  [DataMember(Name = "version")]
  public long? Version { get; set; }

  [DataMember(Name = "apiKey")]
  public string? ApiKey { get; set; }
}
The beauty about using Blazor, is that we can write our API code in the same way we would handle it calling from one service to another. This gives us a very familiar looking structure, and leverages the ability to work with HttpClient.
I'm going to make a confession here. When I set up the versioning in the server code, I didn't really consider the difficulties I would encounter extending the content-type in the client. To make my life a lot simpler, I have extended the versioning in the server to support an attribute called x-api-version. In the server, change the version registration to the following.
builder.Services.AddApiVersioning(options =>
{
  options.ReportApiVersions = true;
  options.DefaultApiVersion = version1;
  options.ApiVersionReader = ApiVersionReader.Combine(
    new MediaTypeApiVersionReader(),
    new HeaderApiVersionReader("x-api-version"));
});
By adding the ApiVersionReader.Combine method, we can provide multiple methods to support versioning. The user of HeaderApiVersionReader allows us to add the attribute into our headers.
Getting back to the Blazor application, we will add an OrganizationApi implementation. As we are injecting HttpClient into this, we know that we are going to be registering this to be injected into the pages. The API client.
public class OrganizationApi
{
  private readonly HttpClient httpClient;

  public OrganizationApi(HttpClient httpClient)
  {
    this.httpClient = httpClient;
    this.httpClient.BaseAddress = new Uri("http://localhost:5106/");
    this.httpClient.DefaultRequestHeaders.TryAddWithoutValidation("x-api-version", "1.0");
  }

  public async Task<ExtendedOrganization?> GetOrganization(string? id)
  {
    var response = await httpClient.GetAsync($"api/organization/{id}");
    response.EnsureSuccessStatusCode();
    return await response.Content.ReadFromJsonAsync<ExtendedOrganization>();
  }
}
We register this class for injection like this.
builder.Services.AddScoped<OrganizationApi>();
Display the Results on the Screen.
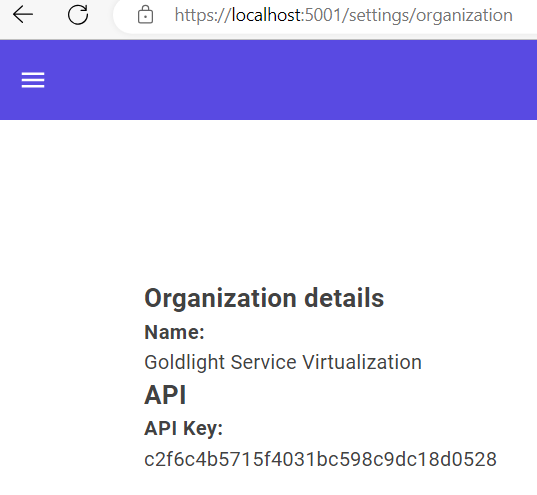
Before we break down how the code works, let's take a look at what the finished code actually looks like:
@inject OrganizationApi OrganizationApi

<PageTitle>Organization</PageTitle>

<DataContainer HasData="@(organization is not null)">
  <NoData>
    <MudText>No organization details present</MudText>
  </NoData>
  <DataTemplate>
    <h2>Organization details</h2>
    <h3>Name:</h3>
    <MudText>@organization!.Name</MudText>
    <h2>API</h2>
    <h3>API Key:</h3>
    <MudText>@organization!.ApiKey</MudText>
  </DataTemplate>
</DataContainer>

@code {
  private ExtendedOrganization? organization;
  protected override async Task OnInitializedAsync()
  {
    organization = await OrganizationApi.GetOrganization("goldlight");
  }
}
Note: I explain how the DataContainer works in this article. In the Github project, this class is in the Components folder.
The code starts by injecting our OrganizationApi into the service. With that available, we call the GetOrganization method inside the page initialization code to retrieve the information we need for the display.
The DataTemplate section contains the "meat" of the display. When we get the results from our API call back, the organization field is populated. We display the values from these fields in our display.
It's very impressive, how little code we need to write in Blazor, to retrieve and display information like this.
Later on, we will come back to this page when we look at what we would need to do, to change the organization name. For the moment, we are just going to leave this as read only because we want to get to the point where we upload a single rest and response, which is going to be the very first "real" virtualized service. That's going to see us working with both the front and back ends to add this extra capability.
Our application looks like this:
I know that it's ugly, at the moment, and there is a lot of whitespace around the details. Tidying up the whitespace is simple, and is something we only need to do in one location.
In the MainLayout file, we have the following element.
Razor
<MudMainContent>
    <MudContainer MaxWidth="MaxWidth.Large" Class="my-16 pt-16">
        @Body
    </MudContainer>
</MudMainContent>
The container has margins and padding set on it. The use of my-16 sets the margin that appears at the top and bottom of the page, and the pt-16 sets the padding at the top. You can replace the numbers in those settings with a value of 0 through to 16, where each number represents a 4 pixel increment. So, my-16 sets a 64 pixel margin (16*4). No margin would be my-0 and 4 pixels would be my-1. If I want to adjust the left or right margin, I can use ml and mr. We are going to remove all of the margins, and leave a 4 pixel padding at the top like this.
Razor
<MudMainContent>
    <MudContainer MaxWidth="MaxWidth.Large" Class="my-0 ml-0 mr-0 pt-1">
        @Body
    </MudContainer>
</MudMainContent>
Later on, we will come back to the settings when we look at what we would need to do, to change the organization name. For the moment, we are just going to leave this as read only because we want to get to the point where we upload a single rest and response, which is going to be the very first "real" virtualized service. That's going to see us working with both the front and back ends to add this extra capability.
Adding Request and Response Pairs
Adding Projects to the Organization
To make things nice and organized, each request/response will belong inside a virtual grouping that brings together related operations. Initially, I was toying with the idea of calling these services, but that just didn't feel right to me as it does tend to lead to a mental model where the RR pairs are related to a single service somehow, and that feels like I am constraining how users would actually use the service. I have decided, instead, to call each of these groupings, projects.
What I have in mind, from the users point of view, is that the home page would list all of the projects for the organization. The user would have the ability to edit the details of a project, remove it, or add new ones, all driven from the home screen. Most importantly, they will have the ability to open up a project and see all the request response pairs that have been added to it, allowing them to manipulate those.
We are going to work the other way round this time. Normally, I tend to prefer to work from the API contract, but let's try to build the screen in such a way that we can rapidly iterate through changes before we decide what our APIs would have to do. This is a fun and interactive way to prototype changes and create wireframes in near real-time.
Let's decide on what we need to need for a project. I think we should use the project as part of the URL, so we are going to need a name, and a URL friendly version of the name. A description would be useful as well.
We'll create a quick couple of classes to mock some data out for this.
private class Projects : List<Project>
{
  public Projects()
  {
    Add(new Project { Name = "Code Project", FriendlyName = "codeproject",
                      Description = "Code Project APIs" });
    Add(new Project { Name = "Goldlight Samples", FriendlyName = "goldlight",
                      Description = "Goldlight APIs" });
  }
}

private class Project
{
  public string Name { get; set; }
  public string FriendlyName { get; set; }
  public string Description { get; set; }
}
Quick hint: We are going to set the home page to the projects view, we are going to be adding functionality into Index.razor. So, go ahead and remove everything below the PageTitle. We're not going to need that.
Initially, I've been going backwards and forwards between using either the table or datagrid component from MudBlazor. After reading the documentation, I've decided to go with the datagrid because it reminded me of something that our users might find useful; if they have lots of projects, being able to search for one would be a useful thing to be able to do.
Add a code section to the razor file and instantiate a new instance of the Projects class. We are going to bind to this in our datagrid.
@code {
  private Projects projects = new();
}
The datagrid we are going to use is called MudDataGrid. It's straightforward to set up, simply needing the Items property being set to the item we want to bind to. As the grid is generic, we use the T property to specify the type of object we are going to display. To add the columns to the display, we add a Columns entry, with PropertyColumn entries binding to a particular property on the column.
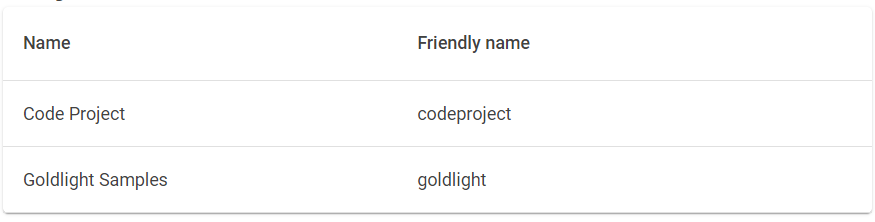
<MudDataGrid T="Project" Items="projects">
  <Columns>
    <PropertyColumn Property="x => x.Name" Title="Name" />
    <PropertyColumn Property="x => x.FriendlyName" Title="Friendly name" />
  </Columns>
</MudDataGrid>
Running the application gives us this:
It would be nice to display the base url beside each entry, and we have sufficient ability to do this. As in the settings page, we will inject an instance of the OrganizationApi and use this to get the organisation id which will act as part of the API.
By the way, I noticed that I had given my GetOrganization method a name I didn't like. As this is an asynchronous method, I want consumers to know that it can be called with async/await so I renamed the method GetOrganizationAsync.
private ExtendedOrganization? organization;
protected override async Task OnInitializedAsync()
{
  organization = await OrganizationApi.GetOrganizationAsync("goldlight");
}
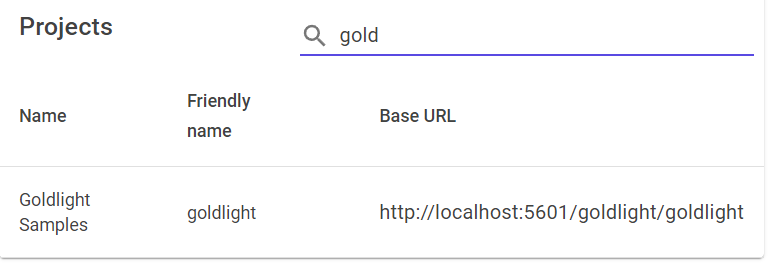
All we need to do now is update our datagrid with a new column. This column doesn't really map to a property so we are going to use a different column type, a TemplateColumn, which allows us to add arbitrary information to a row. In this case, we'll add in a text string containing the different parts of the URL.
<MudDataGrid T="Project" Items="projects" Hover="true">
  <Columns>
    <PropertyColumn Property="x => x.Name" Title="Name"/>
    <PropertyColumn Property="x => x.FriendlyName" Title="Friendly name"/>
    <TemplateColumn Title="Base URL">
      <CellTemplate>
        <DataContainer HasData="organization != null">
          <DataTemplate>
            <MudText>http://localhost:5601/@organization!.Id/@context.Item.FriendlyName
            </MudText>
          </DataTemplate>
        </DataContainer>
      </CellTemplate>
    </TemplateColumn>
  </Columns>
</MudDataGrid>
In order to grab the item from the current row, we use @context.Item which gives us access to the relevant bound entry.
I mentioned that we would probably want the ability for our users to be able to search for matching entries in our grid. Adding this capability is a trivial exercise. The first part is to add a search string and filter function to our code. We will be binding to these very soon.
private string? searchString;

private Func<Project, bool> QuickFilterFunc => row =>
                            string.IsNullOrWhiteSpace(searchString)
  || row.Name.Contains(searchString, StringComparison.OrdinalIgnoreCase)
  || row.FriendlyName.Contains(searchString, StringComparison.OrdinalIgnoreCase);
The QuickFilter function will return true if the searchString has no value, or if the row passed in contains the search string in either the Name or FriendlyName properties.
We're going to add a toolbar to our datagrid. This toolbar contains a text field that binds to the search string. The QuickFilterFunc is bound to our datagrid giving us the search capability.
<MudDataGrid T="Project" Items="projects" Hover="true" QuickFilter="QuickFilterFunc">
  <ToolBarContent>
    <MudText Typo="Typo.h6">Projects</MudText>
    <MudSpacer/>
    <MudTextField @bind-Value="searchString" Placeholder="Search"
                  Adornment="Adornment.Start" Immediate="true"
                  AdornmentIcon="@Icons.Material.Filled.Search"
                  IconSize="Size.Medium" Class="mt-0" />

  </ToolBarContent>
  <Columns>
    <PropertyColumn Property="x => x.Name" Title="Name"/>
    <PropertyColumn Property="x => x.FriendlyName" Title="Friendly name"/>
    <TemplateColumn Title="Base URL">
      <CellTemplate>
        <DataContainer HasData="organization != null">
          <DataTemplate>
            <MudText>http://localhost:5601/@organization!.Id/@context.Item.FriendlyName
            </MudText>
          </DataTemplate>
        </DataContainer>
      </CellTemplate>
    </TemplateColumn>
  </Columns>
</MudDataGrid>
Note: The ToolBarContent was taken directly from the MudBlazor datagrid samples.
We should take a moment to pat ourselves on the back. In a matter of minutes, we have created a grid that binds to model properties, adds derived columns, and provides the ability to easily search our data.
Adding New Projects
As well as displaying projects, we should give ourselves the ability to add new projects. Just below the data grid, we just add a button that navigates to a new page. Obviously, this will also require us to create another Razor page in our application.
<MudButton Href="/projects/addproject" Variant="Variant.Filled"
  StartIcon="@Icons.Material.Filled.Add" Color="Color.Primary"
  Class="mt-2">Add project</MudButton>
The page that is reached at /projects/addproject is going to use the forms capability of MudBlazor. We are going to create an edit form that supports adding the information we are interested in, and automatically validating the entries to ensure they have been set.
To start the process off, we are going to update the model to include some simple data annotations.
public class Project
{
  [Required]
  public string? Name { get; set; }
  [Required]
  public string? FriendlyName { get; set; }
  [Required]
  public string? Description { get; set; }
}
With these annotations, we can create the edit form, and tell it to validate using the DataAnnotations. This is a great way to make life really simple for ourselves. In the form, we are going to create a text field for the name, a text field for the friendly name, and a multi-line text field for the description. As we want the validation to apply automatically, we will tell the edit form that we are validating using the data annotations, and in each field, we will tell it what to validate against using the For attribute.
Our entire code simply looks like this:
@page "/projects/addproject"

<PageTitle>Add project</PageTitle>

<EditForm Model="@project" OnValidSubmit="OnValidSubmit">
  <DataAnnotationsValidator/>
  <MudCard>
    <MudCardContent>
      <MudTextField Label="Project name" @bind-Value="project.Name"
       For="@(() => project.Name)"/>
      <MudTextField Label="Friendly name" @bind-Value="project.FriendlyName"
       For="@(() => project.FriendlyName)"/>
      <MudTextField Label="Project description" Lines="10"
       @bind-Value="project.Description" For="@(() => project.Description)"/>
      <MudButton StartIcon="@Icons.Material.Filled.Save" Variant="Variant.Filled"
       Color="Color.Primary" ButtonType="ButtonType.Submit" Class="mt-2">
       Add project</MudButton>
    </MudCardContent>
  </MudCard>
</EditForm>

@code {

  readonly Project project = new();
  private void OnValidSubmit(EditContext context)
  {
    StateHasChanged();
  }
}
There are a couple of things to note with this. The first is that we don't actually do anything on the submission, which is in line with what we said earlier, that we were just prioritising designing the screens for the moment. The second point is a more subtle one and, potentially one that could cause our users problems later. This is around the initial state of the screen.
When we show this form, we have no validation failures. We don't see a validation failure until we have touched and moved out of a field. That means that the model annotation says that a field is required, but our code hasn't set it. In other words, this version of the code allows us to potentially add empty data to our database. To avoid any issues, all we need to do is disable the Submit button until the user has entered all of the required data. To give ourselves this ability, we are going to set the Disabled state so that it is dependent on the edit form having been modified, and the validation having completed. In our button tag, we just need to add the following attribute.
Disabled="@(!context.IsModified() || !context.Validate())"
Now, the friendly name is the one we are going to use in the URL so it would be useful to show what this is going to look like. Again, I'm refactoring and changing things as I go so there are going to be areas where I'm going to be touching code again. If you remember, from the first article, I removed spaces from strings to make a "unique" friendly name. It was while working in this code that I realised that this was a stupid decision for me to make. Imagine the scenario; the name of the organisation is App Le, and they register with us. Following our guidelines, this would give us a friendly name of apple. When Apple joins up, they try to register APIs and find that apple has already been taken. Obviously, they aren't going to be happy.
So, what is the friendly name going to be? The answer to that one is really straightforward. What we should have done before, and what we are going to do now, is UrlEncode the friendly name; so, the organisation friendly name would for App Le would be app+le. We will apply similar rules to our name here. This means that we have the following changes to make.
- Correct our back end service to remove the friendlyname API. We have a simpler way to achieve a meaningful URL. As the organization is created through a
POSToperation, all we need to do is URL encode the ID field in our backend. - Display a URL encoded version of the friendly name to show the user what this will look like.
We're going to start with a simple derived property that will be displayed in the URL. Update the Project class with the following code.
public string UrlName => FriendlyName is not null ? WebUtility.UrlEncode(FriendlyName) : "";
We now have something to display on the UI. As the code for displaying the this URL name in both the project and add project page, we are going to make life a bit easier for ourselves. We will create a component that does this for us. Let's make a component called UrlFriendlyProject. Most of the code inside the component will be familiar already so we aren't going to dig too deeply into it.
@inject OrganizationApi OrganizationApi

<DataContainer HasData="organization is not null">
  <DataTemplate>
    <MudText>http://localhost:5601/@organization!.Id/@Project.UrlName</MudText>
  </DataTemplate>
</DataContainer>

@code {
  [Parameter]
  public Project Project { get; set; } = new();

  private ExtendedOrganization? organization;
  protected override async Task OnInitializedAsync()
  {
    organization = await OrganizationApi.GetOrganizationAsync("goldlight");
  }
}
The Parameter attribute means that we can pass the project into our component directly. With this present, our view page can easily be refactored to remove the duplicated area.
@page "/"

<PageTitle>Projects</PageTitle>

<MudDataGrid T="Project" Items="projects" Hover="true"
 QuickFilter="QuickFilterFunc" Style="align-items: center;">
  <ToolBarContent>
    <MudText Typo="Typo.h6">Projects</MudText>
    <MudSpacer/>
    <MudTextField @bind-Value="searchString" Placeholder="Search"
     Adornment="Adornment.Start" Immediate="true"
                  AdornmentIcon="@Icons.Material.Filled.Search"
                  IconSize="Size.Medium" Class="mt-0" />

  </ToolBarContent>
  <Columns>
    <PropertyColumn Property="x => x.Name" Title="Name"/>
    <PropertyColumn Property="x => x.FriendlyName" Title="Friendly name"/>
    <TemplateColumn Title="Base URL">
      <CellTemplate>
        <UrlFriendlyProject Project="context.Item"></UrlFriendlyProject>
      </CellTemplate>
    </TemplateColumn>
  </Columns>
</MudDataGrid>
<MudButton Href="/projects/addproject" Variant="Variant.Filled"
 StartIcon="@Icons.Material.Filled.Add" Color="Color.Primary"
 Class="mt-2">Add project</MudButton>

@code {

  private readonly Projects projects = new();
  private string? searchString;

  private Func<Project, bool> QuickFilterFunc => row =>
          string.IsNullOrWhiteSpace(searchString) ||
          row.Name.Contains(searchString, StringComparison.OrdinalIgnoreCase) ||
          row.FriendlyName.Contains(searchString, StringComparison.OrdinalIgnoreCase);
}
Our add page gets a similar makeover and should now look like this:
@page "/projects/addproject"
<PageTitle>Add project</PageTitle>

<EditForm Model="@project" OnValidSubmit="OnValidSubmit">
  <DataAnnotationsValidator/>
  <MudCard>
    <MudCardContent>
      <MudTextField Label="Project name" @bind-Value="project.Name"
       For="@(() => project.Name)"/>
      <MudTextField Label="Friendly name" @bind-Value="project.FriendlyName"
       For="@(() => project.FriendlyName)"/>
      <UrlFriendlyProject Project="@project"></UrlFriendlyProject>
      <MudTextField Label="Project description" Lines="10"
       @bind-Value="project.Description" For="@(() => project.Description)"/>
      <MudButton StartIcon="@Icons.Material.Filled.Save" Variant="Variant.Filled"
       Color="Color.Primary" ButtonType="ButtonType.Submit"
       Disabled="@(!context.IsModified() || !context.Validate())" Class="mt-2">
       Add project</MudButton>
    </MudCardContent>
  </MudCard>
</EditForm>

@code {

  readonly Project project = new();

  private void OnValidSubmit(EditContext context)
  {
    StateHasChanged();
  }
}
The last thing we need to do in this page (other than hook things up to APIs) is navigate back to the main page when we have added an entry. Let's add that navigation into our form submission.
The navigation starts with injecting an instance of NavigationManager into the add page.
@inject NavigationManager NavigationManager
Then, we simply replace the StateHasChanged line with the following:
NavigationManager.NavigateTo("/");
Working With Real Projects
At this point, I am happy with where we have got to in working out what the projects view, and add project screen are going to look like. It's time for us to put a back-end into place for this functionality. This is where we need to start making some decisions about whether or not the project belongs to the organization table. To make this decision, we need to think about the hierarchy of our offering. What I mean by this is, each organization can have a number of projects, and each project can have a number of request/response pairs. Theoretically, we could think of this as looking something like this:
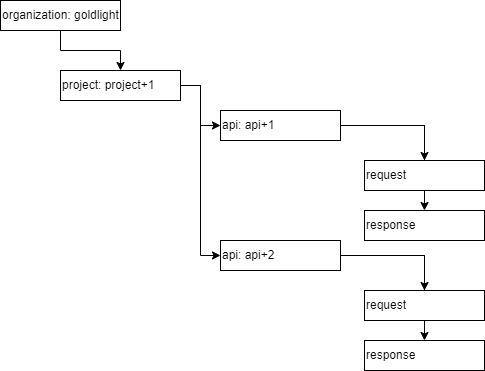
Ultimately, each organization could have many projects, each of which have any number of apis represented by request/response pairs. If we want to embed this full hierarchy into our organization table, we will soon run into a fundamental problem of DynamoDB; namely that it can only store 400 Kb of data per row. This will limit the amount of APIs each organization can store.
Bearing that limitation in mind, we have to choose whether or not we think we need another table here. For the moment, let's make an assumption that we are going to create a new table that will model the project. Inside each project, we will store a number of APIs. This implies that we are going to modify our Terraform development as a starting point.
The Terraform code we are going to write will need to create something that, on first glance, looks like a foreign key. We are going to add an organization_id attribute that we will populate with the reference to the organization name. The reason we do this is because we want a method to search for projects that belong to the parent organization, which requires us to create something known as a global secondary index in DynamoDB. The code looks like this:
resource "aws_dynamodb_table" "projects" {
  name           = "projects"
  read_capacity  = 20
  write_capacity = 20
  hash_key       = "id"

  attribute {
    name = "id"
    type = "S"
  }

  attribute {
    name = "organization_id"
    type = "S"
  }

  global_secondary_index {
    name            = "project-organization_id-index"
    hash_key        = "organization_id"
    write_capacity  = 20
    read_capacity   = 20
    projection_type = "ALL"
  }
}
What our Terraform script is doing is creating a table with two defined properties; the id and the organization_id. These represent the key field (the id), which will be a GUID when we add data to it, and something that looks like a foreign key (the organization_id). The global secondary index is created in the global_secondary_index snippet. What we have done with this is create an index with the name project-organization_id-index that maps to the organization_id entry so when we query against our project, we use the organization as the hash to search through. By doing this, we are removing the need to scan through all the data in our table, looking for ones of interest.
One thing you might be wondering about; why did we add a projection_type of ALL? There are a few different values we could have applied here; KEYS_ONLY, ALL, or INCLUDE. What these values do is identify what gets added into the index. If we specify KEYS_ONLY, then only the key fields are added in. If we use INCLUDE, we can include other fields in the index, but they must be specified explicitly. We are going to use one extra attribute which we will call Details, and it will store the other attributes as a JSON payload. As we are using one extra attribute, we are going to project that into the index as well using ALL. What this should give as a hint is, when we query, we are going to be querying the index, and not the table. We will see that when we get to the query code.
Go ahead, and apply the terraform for this new table.
The Project Server
One of the things I like about the code that we have just written is that we have the beginnings of an API already laid out for us. We can make use of the Project class, and drop it directly into the server implementation. The only thing we will need to add is the ToTable method to convert this into a DynamoDB table when we have created it. Let's start with the DynamoDB table.
[DynamoDBTable("projects")]
public class ProjectTable
{
  [DynamoDBHashKey("id")]
  public string Id { get; set; } = "";
  [DynamoDBProperty("organization_id")]
  public string OrganizationId { get; set; } = "";
  [DynamoDBProperty]
  public int ModelVersion { get; set; } = 1;
  [DynamoDBVersion]
  public long? Version { get; set; }
  [DynamoDBProperty("details")]
  public Details? Details { get; set; }
}

public class Details
{
  [DynamoDBProperty]
  public string Name { get; set; }
  [DynamoDBProperty]
  public string Description { get; set; }
  [DynamoDBProperty]
  public string FriendlyName { get; set; }
}
Most of the concepts in the ProjectTable should be familiar by now, but you have probably noticed that we don't have entries in here for the friendly name, the name, or the description directly in there. The reason we don't have these properties present is because we have the Details property which maps to the Details class. By doing this, we can store sub-objects against our project, allowing us to create as complex a set of classes as we need. This ability is the prime reason we are using a NoSQL database rather than a SQL database, so that we can extend our model as and when we need. It does come with some limitations, such as not being able to search on objects nested inside these sub objects, but there are other capabilities for searching if we need them.
It will come as no surprise that we also want to create a data access class for the project. Initially, we are only going to implement two methods, one to save the project details and the other to get all the projects belonging to a particular organization. Before I explain how the get all method works, let's see what the class looks like.
public class ProjectDataAccess
{
  private readonly IDynamoDBContext dynamoDbContext;
  public ProjectDataAccess(IDynamoDBContext dbContext)
  {
    dynamoDbContext = dbContext;
  }

  public virtual async Task SaveProjectAsync(ProjectTable project)
  {
    await dynamoDbContext.SaveAsync(project);
  }

  public virtual async Task<IEnumerable<ProjectTable>>
                 GetProjectsAsync(string organization)
  {
    DynamoDBOperationConfig queryOperationConfig = new DynamoDBOperationConfig
    {
      IndexName = "project-organization_id-index"
    };

    List<ProjectTable> projects = new();
    AsyncSearch<ProjectTable>? search =
      dynamoDbContext.QueryAsync<ProjectTable>(organization, queryOperationConfig);
    while (!search.IsDone)
    {
      projects.AddRange(await search.GetNextSetAsync());
    }
    return projects;
  }
}
The SaveProjectAsync looks familiar, and should come as no surprise after seeing the code for the OrganizationDataAccess class. What is different here, is in the GetProjectsAsync method. What we do with this method is create a DynamoDBOperationConfig instance that says we are going to look for items using the same IndexName that we just created in our Terraform script. We pass this into the QueryAsync method along with the organization we want to search for.
In the get all code for the organizations, we directly returned data using GetRemainingAsync. We did this to get an implementation that we could play around with, but it only really works with a small dataset. The GetRemainingAsync method deals with a paginated dataset. What we really need to do is build up the complete set of data which is why we use the IsDone property and, if we haven't finished reading data in, we get the next set and add it into a list of projects. While I'm adding this code, I have corrected the organization code to use the same approach. (Don't forget to register the ProjectDataAccess class in the IoC container).
What we have left to do now, is add the API classes we are going to use, and then create the actual endpoints in our server. Once we have done that, we can get back to our front-end code. We won't go into a great deal of detail about the model classes because we should be comfortable with this approach by now. The only thing we are going to really look at is that we aren't going to pass the id in, so we will be creating that at the server side, and passing the details back.
public class Project
{
  [Required]
  public string? Name { get; set; }
  [Required]
  public string? FriendlyName { get; set; }
  [Required]
  public string? Description { get; set; }
  [Required]
  public string Organization { get; set; }

  [DataMember(Name = "version")] public long? Version { get; set; }
}

public class ExtendedProject : Project
{
  public ExtendedProject() {}
  public ExtendedProject(Project project)
  {
    Organization = project.Organization;
    Name = project.Name;
    Description = project.Description;
    FriendlyName = project.FriendlyName;
  }

  [DataMember]
  public Guid Id { get; set; }

  public virtual ProjectTable ToTable(int modelVersion = 1) =>
    new()
    {
      Id = Id.ToString(),
      OrganizationId = Organization,
      Details = new ()
      {
        Description = Description, FriendlyName = FriendlyName, Name = Name
      },
      ModelVersion = modelVersion,
      Version = Version
    };

  public static ExtendedProject FromTable(ProjectTable table)
  {
    ExtendedProject project = new ExtendedProject
    {
      Id = Guid.Parse(table.Id),
      Organization = table.OrganizationId,
      Name = table.Details.Name,
      Description = table.Details.Description,
      FriendlyName = table.Details.FriendlyName,
      Version = table.Version
    };
    return project;
  }
}
Now that we have our classes in place, we are ready to create our minimal APIs. We can start with creating a new version set for them.
ApiVersionSet projects = app.NewApiVersionSet("Projects").Build();
Both the POST and GET methods should be something we are comfortable with, by now. For the POST, we get the Project in, and convert it into an ExtendedProject which we then save into the database.
The GET method accepts the organization as part of the path, and uses this when querying the database.
app.MapPost("/api/project", async (ProjectDataAccess dataAccess, Project project) =>
{
  ExtendedProject extendedProject = new(project)
  {
    Id = Guid.NewGuid()
  };
  await dataAccess.SaveProjectAsync(extendedProject.ToTable());
  extendedProject.Version = 0;
  return TypedResults.Created($"/api/organization/{extendedProject.Id}", extendedProject);
}).WithApiVersionSet(projects).HasApiVersion(version1);

app.MapGet("/api/{organization}/projects/",
  async Task<Results<Ok<IEnumerable<ExtendedProject>>, NotFound>>
    (ProjectDataAccess dataAccess, string organization) =>
{
  IEnumerable<ProjectTable> allProjects = await dataAccess.GetProjectsAsync(organization);
  if (!allProjects.Any()) return TypedResults.NotFound();
  return TypedResults.Ok(allProjects.Select(ExtendedProject.FromTable));
}).WithApiVersionSet(projects).HasApiVersion(version1);
We now have everything we need to add projects to our front end, so we will return to that code, and start to remove the hardcoded example data.
Integrating the Project APIs with our Project Screens
My initial thought processes about the changes that we need to provide at the front end.
- We need to make sure we have a model that is suitable for transmission to the server, and that it caters for the additional information we are providing from our back end.
- We need to add an API class to call the back end from the front end.
- We want to call these APIs from our projects screens.
These are simple enough requirements to deal with, so we will start with updating our Project class. When we initially created it, we did so with [Required] properties. While these were useful for our validation, they won't aid us in transmitting our data over to the server. To that end, we need to add DataMember attributes to each property. While we are in this class, we are going to extend it so that it has all the properties in it that are present in the ExtendedProject class from the server. You might wonder why we have two separate models at the server, but we are going to use one at the front end. The reasoning behind this lies in understanding that, any property that is sent to the server, that does not exist on the API model that it expects, is simply ignored. So, if we were to add an id to our POST call at the front end, the back end code won't use it because it's not a recognised property there.
public class Project
{
  [DataMember]
  public Guid Id { get; set; }
  [Required]
  [DataMember]
  public string? Organization { get; set; }
  [Required]
  [DataMember]
  public string? Name { get; set; }
  [Required]
  [DataMember]
  public string? FriendlyName { get; set; }
  [Required]
  [DataMember]
  public string? Description { get; set; }
  [DataMember(Name = "version")]
  public long? Version { get; set; }

  public string UrlName => FriendlyName is not null ?
         WebUtility.UrlEncode(FriendlyName.ToLowerInvariant()) : "";
}
Something that concerned me about the code we wrote for OrganizationApi was the fact that we were using the DefaultRequestHeaders to add our API version. Another concern I have is the fact that we should not have to override the BaseAddress in every call. In the program class, we create a scoped HttpClient which means that every screen could end up making multiple HTTP calls to different endpoints. The current implementation fails us on both counts. The first thing we are going to do is to override the BaseAddress. To support this, we are going to create an appsettings file. This needs to be created in wwwroot, in order to be picked up by our app when it is started up.
{
  "Logging": {
    "LogLevel": {
      "Default": "Information",
      "Microsoft.AspNetCore": "Warning"
    }
  },
  "AllowedHosts": "*",
  "Server": {
    "BaseAddress": "http://localhost:5106/",
  }
}
Note that the BaseAddress is the url of the server which means we can change our scoped URL creation to read from the configuration.
builder.Services.AddScoped(sp =>
  new HttpClient { BaseAddress = new Uri(builder.Configuration["Server:BaseAddress"]!) }
);
I'm a big fan of not writing the same code over and over again. I'm not talking about SOLID principles here, rather I'm talking about just saving myself from a lot of repetition or cut and paste coding. We are going to make use of the fact that all of the calls that go to the server from HttpClient actually use the SendAsync method internally. Armed with this knowledge, we are going to create an HttpClientExtensions class that provides us with extension methods for our calls. I went through a few iterations of this code before I settled on the following.
public static class HttpClientExtensions
{
  public static async Task<T?> Get<T>(this HttpClient client, string uri) =>
    await GetResponseFromServer<T>(client, GetRequestMessage(HttpMethod.Get, uri));

  public static async Task<T?> Post<T>
         (this HttpClient client, string uri, T requestBody) =>
    await GetResponseFromServer<T>(client, GetRequestMessage
                                  (HttpMethod.Post, uri, requestBody));

  public static async Task<T?> Put<T>
        (this HttpClient client, string uri, T requestBody) =>
    await GetResponseFromServer<T>(client, GetRequestMessage
                                  (HttpMethod.Put, uri, requestBody));

  public static async Task Delete<T>(this HttpClient client, string uri) =>
    await GetResponseFromServer<T>(client, GetRequestMessage(HttpMethod.Delete, uri));

  private static async Task<T?> GetResponseFromServer<T>
       (HttpClient client, HttpRequestMessage requestMessage)
  {
    HttpResponseMessage response = await client.SendAsync(requestMessage);
    response.EnsureSuccessStatusCode();
    return await response.Content.ReadFromJsonAsync<T>();
  }

  private static HttpRequestMessage GetRequestMessage(HttpMethod method, string uri)
  {
    HttpRequestMessage requestMessage = new HttpRequestMessage(method, uri);
    requestMessage.Headers.Add("x-api-version", "1.0");
    return requestMessage;
  }

  private static HttpRequestMessage GetRequestMessage<T>
         (HttpMethod method, string uri, T requestBody)
  {
    HttpRequestMessage requestMessage = GetRequestMessage(method, uri);
    requestMessage.Content =
      new StringContent(JsonSerializer.Serialize(requestBody), Encoding.UTF8,
      "application/json");
    return requestMessage;
  }
}
Armed with this set of extensions, we can create a streamlined ProjectApi class which we will inject into our razor pages. First, our API class.
public class ProjectApi
{
  private readonly HttpClient httpClient;

  public ProjectApi(HttpClient httpClient)
  {
    this.httpClient = httpClient;
  }

  public async Task<ObservableCollection<Project>?> GetProjects(string organization) =>
    await httpClient.Get<ObservableCollection<Project>>($"api/{organization}/projects");

  public async Task<Project?> GetProject(string id) =>
    await httpClient.Get<Project>($"api/project/{id}");

  public async Task<Project?> SaveProject(Project project) =>
    await httpClient.Post("api/project", project);

  public async Task<Project?> UpdateProject(Project project) =>
    await httpClient.Put("/api/project", project);

  public async Task DeleteProject(string id) =>
    await httpClient.Delete<string>($"api/project/{id}");
}
(I have also streamlined the organization API using similar techniques.)
Now all we need to do is inject the API into our Index and AddProject pages, and we can actually retrieve data from the server. In the Index page (assuming we have already injected the ProjectApi page), replace the code section with the following.
@code {

  private string? searchString;
  private Func<Project, bool> QuickFilterFunc => row =>
          string.IsNullOrWhiteSpace(searchString) ||
          row.Name.Contains(searchString, StringComparison.OrdinalIgnoreCase) ||
          row.FriendlyName.Contains(searchString, StringComparison.OrdinalIgnoreCase);

  private List<Project>? projects;
  protected override async Task OnInitializedAsync()
  {
    projects = await ProjectApi.GetProjects("goldlight");
  }

}
The change is even more straightforward in the AddProject page (again, this assumes we have injected the ProjectApi page. Change the OnValidSubmit method to the following:
readonly Project project = new() { Organization = "goldlight" };
private async Task OnValidSubmit(EditContext context)
{
  await ProjectApi.SaveProject(project);
  NavigationManager.NavigateTo("/");
}
While we are at it, let's remove the Disabled check from the MudButton. I have worked my way through this screen quite a few times, and it's just annoying me. Initially, I thought this would give us a good user experience but, the fact that I have to have filled in all the fields and then left them before the button was enabled, this felt wrong. The only valid reason I could think of for disabling the button is to prevent the user pressing the button more than once so let's fix that by adding a submitted flag and binding the Disabled to that.
bool submitted;
private async Task OnValidSubmit(EditContext context)
{
  submitted = true;
  await ProjectApi.SaveProject(project);
  NavigationManager.NavigateTo("/");
}
Don't forget to change the binding on the MudButton Disabled attribute. With that change, as soon as the user presses the save project button, the button is disabled and the project is saved. When we navigate back to the main page, the data is reloaded so the newly added data will be displayed.
Adding Request/Response Pairs
Congratulations on sticking with me to this point. We are now ready to add the ability to save Request and Responses to a particular API. For the moment, we are going to stick with a nice and simple method of storing these paired objects. In a later article, we will see how we can avoid the 400KB limit for a DynamoDB table.
What is a Request/Response Pair
I have worked with Service Virtualization for so long that it's easy to foget that not everyone is familiar with how they work. Fundamentally, what they do is match up a request to a response so we have a throughput process of "if my service receives a request for X, it will send response Y". My introduction to RR Pairs was through the use of files, so that seems like a useful starting point. The format of the files tends to contain the following information.
- The HTTP method (e.g.,
GET,POST,PUT,DELETE) - The headers of the request message (optional)
- The body of the request message (optional)
We may choose to augment these, if necessary, but these are the basics. The matching response tends to contain the following.
- The HTTP status code of the response message
- The headers of the response message (optional)
- The body of the response message (optional)
An example GET call might look like the following:
GET /Articles/5367867/Power-Your-NET-REST-API-with-Data-Queries-and-Repo
Host: codeproject.com
And the corresponding response.
HTTP/1.1 200 OK
Content-Type: application/json

{
  ..... content removed for brevity
}
Let's establish some rules for our request files.
- Our
RRPairsare going to be for JSON entities only. - The first non-blank line contains the API type, and the address of the operation. Optionally, it may contain the transport type (e.g., HTTP/1.1)
- If the following lines are not blank, these are the headers.
- The content after the next blank line represents the JSON entry for the response (if present).
An example request file might look like this:
GET /v1/Articles?tags=webapi,asp.net,c%23&minRating=4.5&page=3 HTTP/1.1
Accept: application/json
Authorization: Bearer VSo3gOu-X7nimE0xcav8ftN_Cb0aAOKeNIdR88K ...
Host: testapi.codeproject.com
Pragma: no-cache
The corresponding response file:
HTTP/1.1 200 OK
Content-Type: application/json

{
  "pagination": {
    "page": 1,
    "pageSize": 25,
    "totalPages": 1,
    "totalItems": 2
  },
  "items": [
    {
      "id": "2_781740",
      "title": "Sample Article about source code control systems.",
      "authors": [
        {
          "name": "Bob the Alien",
          "id": 1
        },
        {
          "name": "Martian Manhunter",
          "id": 2
        }
      ],
      "summary": "This is the first sample item.",
      "contentType": "The content type such as 'article', 'forum message', ...",
      "docType": {
        "name": "Article",
        "id": 1
      },
... Content removed for brevity

    }
  ]
}
Any project that we add will be able to host a number of these entries. Rather than go through the DynamoDB and API for the server, as well as the API for the client, we will just look at the classes that make up the client API. Have a look in the server source code to see what things look like over there.
Each request and response pair is joined together in a top level model called RequestResponsePair.
[DataContract]
public class RequestResponsePair
{
  [DataMember(Name = "name")] public string? Name { get; set; }
  [DataMember(Name = "description")] public string? Description { get; set; }
  [Required, DataMember(Name="request")] public Request Request { get; set; } = new();
  [Required, DataMember(Name="response")] public Response Response { get; set; } = new();
}
As well as the actual request and response, we have provided some space to allow the user to enter the name of the API, and a description.
The Request and Response classes both provide places to hold the summary information, as well as the headers and any content.
[DataContract]
public class Request
{
  [Required, DataMember(Name = "summary")]
  public HttpRequestSummary Summary { get; set; } = new();
  [DataMember(Name = "headers")]
   public ObservableCollection<HttpHeader> Headers { get; set; } = new();
  [DataMember(Name = "content")] public string? Content { get; set; }
}
[DataContract]
public class Response
{
  [Required, DataMember(Name = "summary")]
   public HttpResponseSummary Summary { get; set; } = new();
  [DataMember(Name = "headers")]
  public ObservableCollection<HttpHeader> Headers { get; set; } = new();

  [DataMember(Name = "content")]
  public string? Content { get; set; }
}
[DataContract]
public class HttpHeader
{
  [Required, DataMember(Name = "name")] public string? Name { get; set; } = "Unset";
  [Required, DataMember(Name = "value")] public string? Value { get; set; } = "Unset";
}
[DataContract]
public class HttpRequestSummary
{
  [Required, DataMember(Name = "method")]
  public string Method { get; set; } = "ANY";
  [Required, DataMember(Name = "path")] public string? Path { get; set; }
  [DataMember(Name = "protocol")] public string? Protocol { get; set; }
}
[DataContract]
public class HttpResponseSummary
{
  [DataMember(Name="protocol"), Required] public string? Protocol { get; set; }
  [DataMember(Name = "status"), Required] public int? Status { get; set; }
}
The last change to be made, to support the request/response pairs is to add an appropriate list in the Project class.
[DataMember(Name="requestResponses")]
 public List<RequestResponsePair>? RequestResponses { get; set; }
Before we go any further, I want to show you what we are building towards with our application.
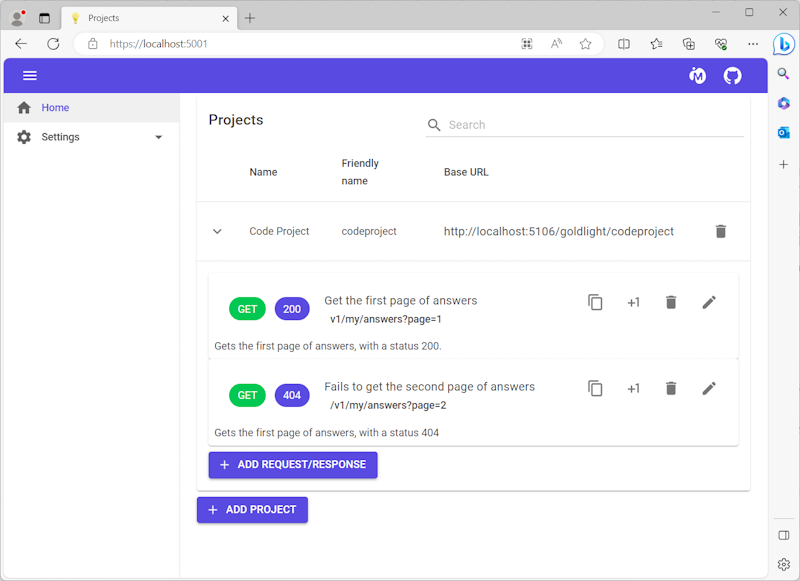
The page we can see here is the extended version of the project overview page. Once we have the ability to add a request/response pair, we will be displaying it underneath the project, and allow the user to perform various operations such as clone, copy the url, edit and delete the entry.
As the most basic element of this operation is adding the pair, we will start with that. The code for this sits inside the pages/RequestResponsePairs folder. We aren't going to start with the code that sits inside the page first; instead, we are going to look at the validation that we are going to apply in our page. Rather than relying on MudBlazor using default validation with the model annotations, we are going to use more complex validation here. We are doing this to demonstrate that we can validate data in other ways; in this case using an external library called FluentValidation.
FluentValidation starts with creating a class that inherits from the generic AbstractValidator class. This class uses the generic type to create several rules that must be followed for a valid RequestResponsePair object, including minimum lengths for Name and Description properties, non-empty values for summary items including the Protocol, Status, Method and Path properties. We will also add validation of Request and Response headers using the HeaderValidator class.
As a convenience, we are going to add a property called ValidateValue, which creates a validation context based on the provided model using a specified property to validate. It then validates the context and returns a collection of error messages if the validation fails.
public class RequestResponsePairValidator : AbstractValidator<RequestResponsePair>
{
  public RequestResponsePairValidator()
  {
    RuleFor(rr => rr.Name).NotEmpty()
      .WithMessage("The name needs a minimum of 10 characters.")
      .MinimumLength(10)
      .WithMessage("The name needs a minimum of 10 characters.");
    RuleFor(rr => rr.Description).NotEmpty()
      .WithMessage("The description needs a minimum of 10 characters.")
      .MinimumLength(10)
      .WithMessage("The description needs a minimum of 10 characters.");
    RuleFor(rr => rr.Response.Summary.Status).NotEmpty();
    RuleFor(rr => rr.Response.Summary.Protocol).NotEmpty();
    RuleFor(rr => rr.Request.Summary.Method).NotEmpty();
    RuleFor(rr => rr.Request.Summary.Path).NotEmpty();
    RuleForEach(rr => rr.Response.Headers).SetValidator(new HeaderValidator());
    RuleForEach(rr => rr.Request.Headers).SetValidator(new HeaderValidator());
  }

  public Func<object, string, Task<IEnumerable<string>>> ValidateValue =>
    async (model, propertyName) =>
  {
    ValidationResult? result =
      await ValidateAsync(ValidationContext<RequestResponsePair>
        .CreateWithOptions((RequestResponsePair)model,
        context => context.IncludeProperties(propertyName)));
    return result.IsValid ? Array.Empty<string>()
      : result.Errors.Select(e => e.ErrorMessage);
  };
}
We can see that the rules can be chained together for a single property; we could have different validation messages if we wanted but I find it best to tell people up-front what they need to do to satisfy the rules.
All that's missing for our rule set is to ensure the headers do not contain empty keys or values. The RuleForEach call applies a rule to each instance of a header.
public class HeaderValidator : AbstractValidator<HttpHeader>
{
  public HeaderValidator()
  {
    RuleFor(hdr => hdr.Name).NotEmpty();
    RuleFor(hdr => hdr.Value).NotEmpty();
  }
}
Getting back to the page itself, we are faced with a question. How do we know what project we want to add our pair to? As the project is a complex object, it's not something that we can readily transfer using the NavigationManager so we need to think of a means to get the project into the page. We could pass in the project identifier to the page and use it to read the project information using our project API, or we could inject the project information into the page as state. Rather than reloading the project with every request, we are going to take a bit of a shortcut and create a project properties service that we will inject when we navigate to the page. This page will also capture the active RequestResponsePair, which means we can use the same property mechanism to manage both adding and editing requests.
public class ProjectProps
{
  public Project? SelectedProject { get; private set; }
  public RequestResponsePair? SelectedRequestResponse { get; private set; }

  public void Set(Project project, RequestResponsePair? requestResponsePair)
  {
    SelectedProject = project;
    SelectedRequestResponse = requestResponsePair;
  }

  public void Clear()
  {
    SelectedProject = null;
    SelectedRequestResponse = null;
  }
}
Note: The ProjectProps class is registered in the IoC as a scoped instance.
The markup in the razor page is rather long so let's start by looking at the code that sits behind it. When we get to the markup, knowing what the code is doing will make the markup a lot easier to understand. We'll start with the declarations.
[Parameter]
[SupplyParameterFromQuery]
public bool Edit { get; set; }

private RequestResponsePair requestResponsePair = new();
private bool requestHeaderExpanded = true;
private bool responseHeaderExpanded = true;
private bool submitted;
private MudForm form = null!;
private readonly RequestResponsePairValidator validator = new();

private readonly string[] httpMethods =
{
  "POST",
  "GET",
  "PUT",
  "PATCH",
  "DELETE",
  "OPTIONS",
  "ANY"
};
The Edit property is a querystring parameter, passed in to the page. So, if the path is /rrpair/upload?Edit=false, this tells us that we are going to add a new entry.
The requestResponsePair field is a new instance of the RequestResponsePair model. This will be bound to by the blazor form. The form has further binding to properties, namely the requestHeaderExpanded, responseHeaderExpanded, and validator fields. In the markup, we have two collapsible sections, one for request headers and the other for response headers. These are bound to the expanded fields to allow the user to collapse the relevant header section independently of the other. The validator field is bound to the validation capabilities of the form, something that we interact with through the form field..
When we submit the data to the backend, we want to prevent the user from being able to send the data again. The submitted field is bound to in the submit button markup to disable the button click.
The final piece of the puzzle at this point is to add an array of methods that the service virtualization will respond to. The httpMethods string array is iterated over in the markup to create the choices for the user.
With these declarations in place, we are ready to tackle the functionality behind this screen. The first area to consider is what we want to do when the screen is initialized. This largely breaks down into three things.
- If we have come directly to this page without selecting a project first, we have to navigate back to the home page. We shouldn't attempt to add a pair if we don't have a project to add it to.
- If there are no request responses, add a new list to the selected project.
- If we are adding a new pair, we add the
requestResponsePairto our array. If not, we update therequestResponsePairvariable with the selected pair from theProjectPropsinstance.
protected override void OnInitialized()
{
  if (ProjectProps.SelectedProject is null)
  {
    NavigationManager.NavigateTo("/");
  }
  ProjectProps.SelectedProject!.RequestResponses ??= new List<RequestResponsePair>();
  if (!Edit)
  {
    ProjectProps.SelectedProject.RequestResponses.Add(requestResponsePair);
  }
  else
  {
    requestResponsePair = ProjectProps.SelectedRequestResponse!;
  }
}
Adding and removing headers to our requests or responses is accomplished with two simple methods.
private void DeleteHeader(ObservableCollection<HttpHeader> headers, HttpHeader header)
{
  headers.Remove(header);
}

private void AddHeader(ObservableCollection<HttpHeader> headers)
{
  headers.Add(new HttpHeader());
}
Saving the data is straightforward enough. The submitted flag is set to true to prevent the user from resubmitting the same data; we only reset it if, after validation using form.Validate, we find the form is not valid. If the validation passes, we call the UpdateProject method to Put the data back to the server. On successful completion of updating the backend, we clear the ProjectProps to make sure that we don't accidentally allow a route back into editing a record without following the navigation process. We make sure we navigate back to the home page when we're done using the NavigationManager.
private async Task OnSubmitAsync()
{
  submitted = true;
  await form.Validate();
  if (form.IsValid)
  {
    await ProjectApi.UpdateProject(ProjectProps.SelectedProject!);
    ProjectProps.Clear();
    NavigationManager.NavigateTo("/");
  }
  submitted = false;
}
Finally, we have two methods that look pretty much identical. They are responsible for updating the request and response objects with the results of the upload request.
private async Task OnResponseUploadedAsync(Response response)
{
  requestResponsePair.Response = response;
  StateHasChanged();
  await form.Validate();
}

private async Task OnRequestUploadedAsync(Request request)
{
  requestResponsePair.Request = request;
  StateHasChanged();
  await form.Validate();
}
The ability to perform the uploads is managed in a separate component, and these methods are event handlers triggered from the file upload. This component provides both the ability to trigger a file upload, and the orchestration needed to translate the uploaded file into either a request or response, depending on the type of file.
The parameters for the upload component are general purpose so they cater for the ability to handle both request and response uploads. The interesting attributes are the EventCallback ones. These take the output of any file processing and return them to the hosting page.
public enum UploadType
{
  Request,
  Response
}

[Parameter] public UploadType Upload { get; set; }
[Parameter] public string FileTypes { get; set; } = null!;
[Parameter] public string ButtonText { get; set; } = "Upload Request";
[Parameter] public EventCallback<Request> OnRequestUploaded { get; set; }
[Parameter] public EventCallback<Response> OnResponseUploaded { get; set; }

private readonly RequestParser requestParser = new();
private readonly ResponseParser responseParser = new();
The actual functionality in this component is straightforward. When the user chooses to upload a file, the UploadFileAsync method chooses an individual parser to parse the request or response. Once a file has been parsed, the appropriate event callback is invoked.
private async Task UploadFileAsync(IBrowserFile file)
{
  switch (Upload)
  {
    case UploadType.Request:
      var request = requestParser.Parse(await ReadFileAsync(file));
      await OnRequestUploaded.InvokeAsync(request);
      break;
    case UploadType.Response:
      var response = responseParser.Parse(await ReadFileAsync(file));
      await OnResponseUploaded.InvokeAsync(response);
      break;
    default:
      throw new ArgumentOutOfRangeException();
  }
}

private static async Task<string> ReadFileAsync(IBrowserFile file)
{
  await using Stream stream = file.OpenReadStream();
  using StreamReader reader = new StreamReader(stream);
  string fileContents = await reader.ReadToEndAsync();
  return fileContents;
}
The markup for this component is straightforward, and uses MudBlazor's file upload component to handle uploading the appropriate file.
<MudCard Class="d-flex align-center justify-center mud-width-full" Elevation="0">
  <MudFileUpload T="IBrowserFile" FilesChanged="UploadFileAsync" Accept="@FileTypes">
    <ButtonTemplate>
      <MudButton HtmlTag="label"
                 Variant="Variant.Filled"
                 Color="Color.Primary"
                 StartIcon="@Icons.Material.Filled.CloudUpload"
                 for="@context">
        @ButtonText
      </MudButton>
    </ButtonTemplate>
  </MudFileUpload>
</MudCard>
The actual heart of the component sits in the call out to the parser classes to manage parsing the input file. Both the RequestParser and ResponseParser have similar implementations so we will look at the RequestParser, and I'll leave it up to you to look at the difference in the response parser.
The main parser class derives from an abstract generic base class. This class accepts two type parameters, T is the type we want to return from our Parse call, and TK which is intended to handle parsing a particular line. Before we look at the LineContent implementation, we're going to walk through the Parse method.
The first part of the method splits the input file into new lines so we can parse each line individually. What we are going to do is loop over the lines and, depending on certain conditions, we will fill out the different parts of the return type.
The first part of the loop gets the current line from the lines array, and updates the array to remove the first line. The reason we are doing this is because we are always going to start off by looking at the current line in the array; this may not be the most performant loop we could create, but it is good enough for us at the start.
We check to see if the summary is missing or not. If we have no summary, we add it and continue the loop so we skip to the next line. We do this because we know that we will only ever have one line for our summary information. The actual implementation of the SummaryIsMissing and FillSummary methods is handled in the LineContent implementation so we will come back to that soon.
The next thing we need to do is check to see if we have already parsed the header. If we have not, we will check to see if the current line is empty or not. If it's empty, we are finished with the header section, and we can continue on to parsing the actual request/response content. If there is content in the line, we will let the LineContent code add the header to the returned instance.
Once we have finished with the header, we look for the first non-empty line. As soon as we find this, we set the content part of our returned instance. The while loop might look like it's doing a lot but, effectively, it's just handling three discrete portions of the file. This is an extremely simple implementation and it's enough for our purposes right now.
public abstract class RequestResponseParser<T, TK> where T : class, new()
  where TK : LineContent<T>, new()
{
  public T Parse(string file)
  {
    T response = new();
    string[] lines = file.Split(Environment.NewLine);
    TK lineContent = new();
    while (lines.Length > 0)
    {
      string line = lines[0];
      lines = lines.Skip(1).ToArray();
      if (lineContent.SummaryIsMissing(response, line))
      {
        lineContent.FillSummary(response, line);
        continue;
      }
      if (!lineContent.HeaderParseCompleted)
      {
        lineContent.AddHeader(response, headerParser, line);
        continue;
      }

      if (string.IsNullOrWhiteSpace(line))
      {
        continue;
      }
      lineContent.SetContent(response, line + string.Concat(lines));
      break;
    }
    return response;
  }
}
We kept talking about the LineContent when describing the parser, but what does it contain? This is another abstract base class, and the derived implementation is what we passed into the parser as our TK parameter. The base class looks like this:
public abstract class LineContent<T>
{
  public abstract bool SummaryIsMissing(T content, string line);

  public void FillSummary(T content, string line)
  {
    Parse(content, line);
  }

  public bool HeaderParseCompleted;

  public void AddHeader(T content, string line)
  {
    HeaderParseCompleted = string.IsNullOrWhiteSpace(line);
    if (HeaderParseCompleted)
    {
      return;
    }

    AddHeader(content, ParseHeader(line));
  }

  public abstract void SetContent(T content, string lines);
  protected abstract void AddHeader(T content, HttpHeader headerLine);

  protected abstract void Parse(T content, string requestLine);

  private HttpHeader ParseHeader(string requestLine)
  {
    HttpHeader header = new();
    var match = Regex.Match(requestLine.Trim(), @"(?<name>[\w\-]+):\s+(?<value>.*)");
    {
      header.Name = match.Groups["name"].Value;
      header.Value = match.Groups["value"].Value;
    }
    return header;
  }
}
In order to populate the header, we use a regular expression to retrieve the header name and value.
So, what does our request LineContent implementation look like? As we can see, the code we have to write for this is really straightforward. Let's start with the SummaryIsMissing method. We determine that we have not specified the summary if that Path has not been set, and the current line is not empty. This gives us the ability to cope with the user adding blank lines to the top of the request or response file, meaning that we will only attempt to add the set the summary when we encounter our first non-blank line.
The Parse method looks a lot more complicated than it really is. It looks scary because we are using a regular expression to break the summary down using the rules we already established where the HTTP method forms the first part of the line, followed by the path and, optionally, a protocol at the end. Once we get past our fear of regular expressions, the parser is pretty straightforward.
public class RequestLineContent : LineContent<Request>
{
  public override bool SummaryIsMissing(Request request, string line) =>
    string.IsNullOrWhiteSpace(request.Summary.Path) && !string.IsNullOrWhiteSpace(line);

  public override void SetContent(Request request, string lines) =>
                                  request.Content = lines;

  protected override void AddHeader(Request request, HttpHeader headerLine)
  {
    request.Headers.Add(headerLine);
  }

  protected override void Parse(Request content, string requestLine)
  {
    HttpRequestSummary requestSummary = new();
    Match match = Regex.Match(requestLine.Trim(),
      @"(?<method>[\w]+)\s+(?<path>[\w\/%$-_.+!*'(),]+)
        (\s+)?(?<protocol>HTTP/\d+\.\d+)?");
    if (match.Success)
    {
      requestSummary.Method = match.Groups["method"].Value;
      requestSummary.Path = match.Groups["path"].Value;
      if (!requestSummary.Path.StartsWith("/"))
      {
        requestSummary.Path = "/" + requestSummary.Path;
      }

      requestSummary.Protocol = match.Groups["protocol"].Value;
    }

    content.Summary = requestSummary;
  }
}
With all of these pieces in place, we can new create a class that inherits from our RequestResponseParser base class. This slots the relevant return type, and line content capability into place, and we have the ability to read the contents of one of our request/response files.
public class RequestParser : RequestResponseParser<Request, RequestLineContent>
{
}
The response parser follows a similar approach so I will leave it to you to read the actual implementation code in the relevant project.
At this point, we have the file upload component, and the file parsing capability in place. We can continue back with our pairs upload page. The last part we have to add to our implementation is the actual markup part. While it looks complex, the markup is straightforward when we realise a couple of things.
- We are going to be implementing a form. In order to hook up to the fluent validation we created, we set the
@refto theformso we can check whether the formIsValid, and we set theValidationto use theValidateValuefunction we have already created. TheModelwe will use is therequestResponsePairproperty we defined above. - We are going to use a grid layout using
MudGridto control how we display items. This means that the name and the description will be added to our containingMudGridas a full-widthMudItem. As a grid can accept 12 columns, setting the size to 12 using xs means we are full width. - The request will be added to the left of the grid, and the response will be added to the right. Again, we use
MudItemto manage this layout for us, this time setting the size to 6. - We are going to use the
UploadRequestResponsecomponent if we are adding a new entry. If we are editing the entry, the upload buttons will be hidden. This is wrapped in theDataContainerto make our code that bit cleaner. - The
MudSelectentry in the request, loops through thehttpMethodsarray we defined earlier and binds the selectedMethodfrom our request. By default, we have anANYentry that we select as our method so, we will always have an entry on the form. - If a field needs to be validated, the markup contains a
For=part, which says what needs to be validated. If a field is astring, we useMudTextField, if it's a number, we useMudNumericField.
<MudForm @ref="form" Model="requestResponsePair"
 Validation="@(validator.ValidateValue)" ValidationDelay="0">
  <MudGrid>
    <MudItem xs="12">
      <MudTextField Label="Name" Immediate @bind-Value="requestResponsePair.Name"
       For="@(() => requestResponsePair.Name)"/>
      <MudTextField Label="Description" Immediate Lines="3"
       @bind-Value="requestResponsePair.Description"
       For="@(() => requestResponsePair.Description)"/>
    </MudItem>
    <MudItem xs="6">
      <DataContainer HasData="!Edit">
        <DataTemplate>
          <UploadRequestResponse FileTypes=".request"
           OnRequestUploaded="OnRequestUploadedAsync"
           Upload="UploadRequestResponse.UploadType.Request"/>
        </DataTemplate>
      </DataContainer>
      <MudSelect Dense Immediate
       @bind-Value="requestResponsePair.Request.Summary.Method"
       For="() => requestResponsePair.Request.Summary.Method">
        @foreach (string method in httpMethods)
        {
          <MudSelectItem T="string" Value="@method">@method</MudSelectItem>
        }
      </MudSelect>
      <MudTextField Label="Protocol"
       @bind-Value="requestResponsePair.Request.Summary.Protocol"
       For="@(() => requestResponsePair.Request.Summary.Protocol)"/>
      <MudTextField Label="Path"
       @bind-Value="requestResponsePair.Request.Summary.Path"
       For="@(() => requestResponsePair.Request.Summary.Path)"/>
      <MudExpansionPanels Dense Class="mt-0" Elevation="0">
        <MudExpansionPanel Dense Class="mt-0 pl=0"
         Text="Headers" @bind-IsExpanded="requestHeaderExpanded">
          <MudButton OnClick="@(() => AddHeader(requestResponsePair.Request.Headers))"
           Variant="Variant.Filled" Color="Color.Success">Add Header</MudButton>
          <MudDataGrid Dense EditMode="DataGridEditMode.Cell" ReadOnly="false"
           T="HttpHeader" Items="requestResponsePair.Request.Headers"
           Style="align-items: center;">
            <Columns>
              <PropertyColumn Property="hdr => hdr.Name"/>
              <PropertyColumn Property="hdr => hdr.Value"/>
              <TemplateColumn CellClass="d-flex justify-end">
                <EditTemplate>
                  <MudTooltip Text="Delete this header">
                    <MudIconButton Icon="@Icons.Material.Filled.Delete"
                     OnClick="@(() => DeleteHeader(requestResponsePair.Request.Headers,
                     context.Item))"/>
                  </MudTooltip>
                </EditTemplate>
              </TemplateColumn>
            </Columns>
          </MudDataGrid>
        </MudExpansionPanel>
      </MudExpansionPanels>
      <MudTextField Label="Content"
       Immediate @bind-Value="requestResponsePair.Request.Content"
       For="@(() => requestResponsePair.Request.Content)" Lines="20"/>
    </MudItem>
    <MudItem xs="6">
      <DataContainer HasData="!Edit">
        <DataTemplate>
          <UploadRequestResponse FileTypes=".response"
           ButtonText="Upload Response" OnResponseUploaded="OnResponseUploadedAsync"
           Upload="UploadRequestResponse.UploadType.Response"/>
        </DataTemplate>
      </DataContainer>
      <MudTextField Label="Protocol"
       Immediate @bind-Value="requestResponsePair.Response.Summary.Protocol"
       For="@(() => requestResponsePair.Response.Summary.Protocol)"/>
      <MudNumericField Label="Status"
       Immediate @bind-Value="requestResponsePair.Response.Summary.Status"
       For="@(() => requestResponsePair.Response.Summary.Status)"/>
      <MudExpansionPanels Dense Class="mt-0" Elevation="0">
        <MudExpansionPanel Dense Class="mt-0 pl=0" DisableGutters Text="Headers"
         @bind-IsExpanded="responseHeaderExpanded">
          <MudButton OnClick="@(() => AddHeader(requestResponsePair.Response.Headers))"
           Variant="Variant.Filled" Color="Color.Success">Add Header</MudButton>
          <MudDataGrid Dense EditMode="DataGridEditMode.Cell" ReadOnly="false"
           T="HttpHeader" Items="requestResponsePair.Response.Headers"
           Style="align-items: center;">
            <Columns>
              <PropertyColumn Property="hdr => hdr.Name"/>
              <PropertyColumn Property="hdr => hdr.Value"/>
              <TemplateColumn CellClass="d-flex justify-end">
                <EditTemplate>
                  <MudTooltip Text="Delete this header">
                    <MudIconButton Icon="@Icons.Material.Filled.Delete"
                     OnClick="@(() => DeleteHeader(requestResponsePair.Response.Headers,
                     context.Item))"/>
                  </MudTooltip>
                </EditTemplate>
              </TemplateColumn>
            </Columns>
          </MudDataGrid>
        </MudExpansionPanel>
      </MudExpansionPanels>
      <MudTextField Label="Content"
       Immediate @bind-Value="requestResponsePair.Response.Content"
       For="@(() => requestResponsePair.Response.Content)" Lines="20"/>
    </MudItem>
  </MudGrid>
  <MudButton Disabled="submitted" OnClick="async () => await OnSubmitAsync()"
   StartIcon="@Icons.Material.Filled.Save" Variant="Variant.Filled"
   Color="Color.Primary" Class="mt-2">Save</MudButton>
</MudForm>
At this point, we have everything in place to actually add an RR Pair from the client side. At the server side, it is simply a matter of creating a copy of our API data models, and then mapping them to appropriate DynamoDB models. We also need to add the missing delete and put handlers and we are good to go. This is where the DynamoDB side really comes into play; we are building a complex object, so we can store that complexity as children inside the project. We have chosen to store the request response pairs as children of the Details class we created earlier. Again, I'll leave this part up to you, to look at the code in the server implementation to see what we have added there. (In the course of writing this article, I have been refactoring the code as I go along, so the ToTable implementations have moved out to extension methods in the server implementation.)
Finally, we want code to display the pairs, along with operations to maintain them. This part is going to be quite long so if you want to read the code "in place", look in pages/projects/Index.razor.
We have already seen some of the functionality in this page, so let's start by expanding the fields that we need.
private string baseUrl = null!;
private string? searchString;
private Func<Project, bool> QuickFilterFunc => row =>
  string.IsNullOrWhiteSpace(searchString) ||
  row.Name!.Contains(searchString, StringComparison.OrdinalIgnoreCase) ||
  row.FriendlyName!.Contains(searchString, StringComparison.OrdinalIgnoreCase);
private ObservableCollection<Project>? projects;
private bool submitting;
private string infoMessage = "";
static Color GetColor(string methodName) =>
    methodName switch
    {
      "GET" => Color.Success,
      "POST" => Color.Primary,
      "PUT" => Color.Info,
      "PATCH" => Color.Dark,
      "DELETE" => Color.Error,
      "OPTIONS" => Color.Warning,
      _ => Color.Dark
    };
We use the baseUrl method to display information about endpoints on the screen, as well as when the user clicks the Copy URL icon in the display. The searchString and QuickFilterFunc parameters have not changed since we first encountered them earlier in the article.
We have created projects as an ObservableCollection because the datagrid responds to INotifyCollectionChanged events. This allows us to delete projects "in-place". The submitting field serves a similar function to the pairs screen; preventing the user from sending the same operation over to the server again.
When the user clicks the Copy URL icon, the infoMessage is filled in with details about what was copied. This is displayed as an alert at the top of the screen.
Finally, we want to display each HTTP method using its own color. The GetColor method returns the appropriate color, depending on the method.
Now we get to the most interesting parts of the code. The OnInitializedAsync method reads the baseUrl from the appsettings.json file (which is located in wwwroot - it's easy to be caught out with where to place the settings if we aren't careful). We clear the ProjectProps here so that, next time we refresh this page, we ensure we are starting with clean project properties.
protected override async Task OnInitializedAsync()
{
  baseUrl = Configuration.GetValue<string>("Server:BaseAddress")!;
  if (!baseUrl.EndsWith("/"))
  {
    baseUrl += "/";
  }
  ProjectProps.Clear();
  projects = await ProjectApi.GetProjects("goldlight");
}
Depending on whether we are adding or editing a request/response pair, we will use the NavigateToUpload method. This method sets the ProjectProps to have the appropriate RequestResponsePair object (null if adding, or the one selected from the markup if editing).
private void NavigateToUpload(Project project, bool edit,
                              RequestResponsePair? requestResponsePair = null)
{
  ProjectProps.Set(project, requestResponsePair);
  NavigationManager.NavigateTo($"/rrpair/upload?Edit={edit}");
}
When we want to copy the URL to the clipboard, our markup will call the following method. The Clipboard service is one we have added to the project as this isn't something that Blazor adds as standard at the moment.
private async Task CopyUrlToClipboard(Project project, RequestResponsePair rrpair)
{
  string endpoint = $"{project.ServiceBaseUrl(baseUrl)}{rrpair.UrlFriendlyPath()}";
  await Clipboard.CopyToClipboard(endpoint);
  infoMessage = $"{endpoint} copied to clipboard";
}
The Clipboard service makes use of the JavaScript runtime like so.
public class Clipboard
{
  private readonly IJSRuntime jsInterop;

  public Clipboard(IJSRuntime jsInterop)
  {
    this.jsInterop = jsInterop;
  }

  public async Task CopyToClipboard(string text)
  {
    await jsInterop.InvokeVoidAsync("navigator.clipboard.writeText", text);
  }
}
The Clone method makes use of an extension method that takes the original instance, and returns a new instance with [CLONE] added to the start of the name. This is saved by our API, and then we navigate to edit the cloned object.
private async Task Clone(Project project, RequestResponsePair rrpair)
{
  submitting = true;
  RequestResponsePair rrpairClone = rrpair.Clone();
  project.RequestResponses!.Add(rrpairClone);
  Project? updatedProject = await ProjectApi.UpdateProject(project);
  project.Version = updatedProject!.Version;
  NavigateToUpload(project, true, rrpairClone);
}
The Clone extension method.
public static RequestResponsePair Clone(this RequestResponsePair pair)
{
  ObservableCollection<HttpHeader> requestHeaders = new();
  foreach (HttpHeader hdr in pair.Request.Headers)
  {
    HttpHeader header = new() { Name = hdr.Name, Value = hdr.Value };
    requestHeaders.Add(header);
  }

  ObservableCollection<HttpHeader> responseHeaders = new();
  foreach (HttpHeader hdr in pair.Response.Headers)
  {
    HttpHeader header = new() { Name = hdr.Name, Value = hdr.Value };
    responseHeaders.Add(header);
  }

  return new RequestResponsePair
  {
    Name = $"[CLONE] {pair.Name}",
    Description = pair.Description,
    Request = new Request
    {
      Content = pair.Request.Content,
      Headers = requestHeaders,
      Summary = new HttpRequestSummary
      {
        Method = pair.Request.Summary.Method,
        Path = pair.Request.Summary.Path,
        Protocol = pair.Request.Summary.Protocol
      }
    },
    Response = new Response()
    {
      Content = pair.Response.Content,
      Headers = responseHeaders,
      Summary = new HttpResponseSummary
      {
        Status = pair.Response.Summary.Status,
        Protocol = pair.Response.Summary.Protocol
      }
    }
  };
}
Finally, we get to our delete methods. These are used to delete the project and all associated pairs, or just to delete an individual pair.
private async Task Delete(Project project)
{
  submitting = true;
  bool? result = await DialogService.ShowMessageBox("Warning",
    "Deleting a project cannot be undone. Any endpoints will no longer be available.",
     yesText: "Delete", cancelText: "Cancel");
  if (result.HasValue && result.Value)
  {
    projects!.Remove(project);
    await ProjectApi.DeleteProject(project.Id.ToString());
  }
  submitting = false;
}

private async Task Delete(Project project, RequestResponsePair rrpair)
{
  submitting = true;
  bool? result = await DialogService.ShowMessageBox("Warning",
    "Deleting cannot be undone. The endpoint will no longer be available",
     yesText: "Delete", cancelText: "Cancel");
  if (result.HasValue && result.Value)
  {
    project.RequestResponses!.Remove(rrpair);
    var updatedProject = await ProjectApi.UpdateProject(project);
    project.Version = updatedProject!.Version;
  }
  submitting = false;
}
All that leaves us to add, is the markup that we use. As we added the ability to create an alert, we are going to add the alert as the first bit of markup. As long as we have something in infoMessage, we will show the alert. When the user clicks the close button, the alert is dismissed by blanking out the string.
<DataContainer HasData="!string.IsNullOrWhiteSpace(infoMessage)">
  <DataTemplate>
    <MudAlert Severity="Severity.Success"
     ContentAlignment="HorizontalAlignment.Center" Variant="Variant.Filled"
     ShowCloseIcon="true" CloseIconClicked="()=>infoMessage = string.Empty">
     @infoMessage</MudAlert>
  </DataTemplate>
</DataContainer>
Rather than show the full DataContainer implementation, we are going to concentrate on the changes to the MudDataGrid. This component is now more fully featured, and is worth going through. The initial ToolBarContent should already be familiar, but we have added some extra capability to our Columns. We want each project line to add a form of hierarchy, with the project displayed on one line, and then the pairs will display as child content below. To do this, we add a HierarchyColumn with the type set to Project. The child content is added inside the ChildRowContent section.
Before we get to our child rows, we want to add two columns that are not bound to a particular value. These are added as TemplateColumn entries and the first entry displays the baseUrl the client will need to call for this particular project. The second template column provides us with the ability to call the Delete method to remove the project and associated pairs.
Looking at our ChildRowContent, we are going to loop over the RequestResponses inside our Project. For each item, we are going to add a MudCard. I have to admit, I like this capability because we add two avatars, to the card header. The first avatar is the request Method, and the second is the response Status. This simple approach makes for quite a visually appealing representation of important information.
The actual content of our card is the Name and the Description entries. These appear below the card header, and stretch the full width of the card.
Finally, we add a number of actions to our card, which appear at the right of the card header. These actions call back to the methods we created earlier and are, from left to right, copy the URL to the clipboard, clone the pair item, delete the pair item, and edit the pair item. With a minimum of effort in our markup, we have added a lot of information and operations.
My original thought process here was to add the actions as a menu to the card but, for the moment, I have opted to add them as a horizontal set of operations. If we start to add more, I would probably rearrange this back into the menu but this isn't needed right now.
<MudDataGrid T="Project" Items="projects" Hover="true"
 QuickFilter="QuickFilterFunc" Style="align-items: center;">
  <ToolBarContent>
    <MudText Typo="Typo.h6">Projects</MudText>
    <MudSpacer/>
    <MudTextField @bind-Value="searchString" Placeholder="Search"
     Adornment="Adornment.Start" Immediate="true"
     AdornmentIcon="@Icons.Material.Filled.Search" IconSize="Size.Medium" Class="mt-0"/>
  </ToolBarContent>
  <Columns>
    <HierarchyColumn T="Project"/>
    <PropertyColumn Property="x => x.Name" Title="Name"/>
    <PropertyColumn Property="x => x.FriendlyName" Title="Friendly name"/>
    <TemplateColumn Title="Base URL">
      <CellTemplate>
        <MudText>@context.Item.ServiceBaseUrl(baseUrl)</MudText>
      </CellTemplate>
    </TemplateColumn>
    <TemplateColumn CellClass="d-flex justify-end">
      <CellTemplate>
        <MudTooltip Text="Delete this project">
          <MudIconButton Disabled="submitting" Icon="@Icons.Material.Filled.Delete"
           Color="Color.Default" OnClick="@(() => Delete(context.Item))"/>
        </MudTooltip>
      </CellTemplate>
    </TemplateColumn>
  </Columns>
  <ChildRowContent>
    <DataContainer HasData="context.Item.RequestResponses is not null &&
                            context.Item.RequestResponses.Any()">
      <DataTemplate>
        @foreach (RequestResponsePair rrpair in context.Item.RequestResponses!)
        {
          <MudCard Class="px-2 py-2 pl-2 pr-2">
            <MudCardHeader>
              <CardHeaderAvatar>
                <MudChip Color="@GetColor(rrpair.Request.Summary.Method)">
                                @rrpair.Request.Summary.Method</MudChip>
                <MudChip Color="Color.Primary">
                 @rrpair.Response.Summary.Status.ToString()</MudChip>
              </CardHeaderAvatar>
              <CardHeaderContent>
                <MudText Typo="Typo.subtitle1">@rrpair.Name</MudText>
                <MudText Typo="Typo.subtitle2" Class="ml-2 pr-2">
                 @rrpair.Request.Summary.Path</MudText>
              </CardHeaderContent>
              <CardHeaderActions>
                <MudTooltip Text="Copy the URL to the clipboard.">
                  <MudIconButton Disabled="submitting"
                   Icon="@Icons.Material.Filled.ContentCopy" Color="Color.Default"
                   OnClick="@(() => CopyUrlToClipboard(context.Item, rrpair))"/>
                </MudTooltip>
                <MudTooltip Text="Clone this request/response">
                  <MudIconButton Disabled="submitting"
                   Icon="@Icons.Material.Filled.PlusOne" Color="Color.Default"
                   OnClick="@(() => Clone(context.Item, rrpair))"/>
                </MudTooltip>
                <MudTooltip Text="Delete this request/response">
                  <MudIconButton Disabled="submitting"
                   Icon="@Icons.Material.Filled.Delete" Color="Color.Default"
                   OnClick="@(() => Delete(context.Item, rrpair))"/>
                </MudTooltip>
                <MudTooltip Text="Edit this request/response">
                  <MudIconButton Disabled="submitting"
                   Icon="@Icons.Material.Filled.Edit" Color="Color.Default"
                   OnClick="@(() => NavigateToUpload(context.Item, true, rrpair))"/>
                </MudTooltip>
              </CardHeaderActions>
            </MudCardHeader>
            <MudText Typo="Typo.body2">@rrpair.Description</MudText>
          </MudCard>
        }
      </DataTemplate>
    </DataContainer>
    <MudButton Disabled="submitting"
     OnClick="@(() => NavigateToUpload(context.Item, false))"
     Variant="Variant.Filled" StartIcon="@Icons.Material.Filled.Add"
     Color="Color.Primary" Class="mt-2">Add Request/Response</MudButton>
  </ChildRowContent>
</MudDataGrid>
And that's it, we have now added enough capability to add request/response pairs to our projects, as well as creating new projects. There's a lot we still have to do, but our little Blazor/AWS project is starting to take shape.
Conclusion
In this article, we have created a client-side Blazor application that interacts with the server we created in the last article. The application allows us to add JSON request/response pairs, which describe the responses we will make to particular server operations.
In the next article, we will cover how we can add authentication and authorization to our application so that only authorized users can maintain and use particular projects. We will also look at addressing the first major technical issue and work around the 400KB size limit for our request/responses. We will also look at a first-pass attempt at returning the virtualized data, based on the request from the client.
History
- 24th October, 2023: Initial version