
JSON Web Token Authentication in RESTful API .NET Core 7.0
5.00/5 (4 votes)
Web app creation using .NET 7.0 and ASP.NET Core
In this article, we will delve into the creation of a compelling web application utilizing .NET 7.0 and ASP.NET Core, all while orchestrating the implementation of the powerful JWT Authentication. I have meticulously addressed even the minutest details in this article. I am fully aware of your familiarity with most of these topics, but I aimed to highlight elements that drew my attention throughout the project. JWT (JSON Web Token) authentication stands as a paramount authentication mechanism dominating contemporary web applications and APIs. It reigns as a succinct, self-contained conduit for exchanging information within parties through a JSON object. Within the realm of .NET Core, the tenets of JWT authentication gain prominence as a shield for APIs, empowering users and clients to seamlessly authenticate and attain authorized entry to safeguarded resources. Here's an overview of JWT authentication in .NET Core:
- Token Generation
- Token Structure
- Token Usage
- Token Validation
- Middleware and Libraries
- Benefits of JWT
- Security Considerations
Overviews
-
Token Generation: JWT tokens are created and signed by the server. The token includes claims (key-value pairs) that provide information about the user, their roles, permissions, and more. The token is typically signed with a secret key or a private key if using asymmetric cryptography.
-
Token Structure: A JWT token consists of three parts:
- header
- payload (claims), and
- signature
These parts are base64 encoded and concatenated with periods. The header typically contains the token type ("
typ": "JWT") and the signing algorithm used ("alg": "HS256" for HMAC SHA-256). The payload contains the claims that define user attributes and access rights. -
Token Usage: The token is sent to the client after successful authentication. The client includes the token in the Authorization header of subsequent requests as a Bearer token ("
Authorization: Bearer"). The server validates the token's signature and checks its claims to authorize the user's access to specific resources. -
Token Validation: The server validates the token using the same secret key or public key used for signing. The server checks the token's signature, expiration (exp claim), and issuer (iss claim) among other claims. Clock skew may be used to account for differences between server and token creation times.
-
Middleware and Libraries: ASP.NET Core provides middleware (
Microsoft.AspNetCore.Authentication.JwtBearer) to handle JWT authentication. You configure the middleware with the necessary settings and validations. -
Benefits of JWT: Stateless: No need to store tokens on the server side, making it scalable. Self-contained: All the necessary information is included in the token itself. Widely supported: JWT is a standardized format used across different platforms.
-
Security Considerations: Store secrets securely and protect against token leakage. Use HTTPS to encrypt communication. Limit the amount of sensitive information stored in the token. Here's a high-level example of how JWT authentication is configured in ASP.NET Core:
Within the realm of the API, I am poised to infuse my Authorization Model, injecting a robust layer of control. Notably, for this project, I have introduced a straightforward User Entity. It's worth acknowledging that in a genuine project, the AspNetUser Authentication entities would naturally come to the fore.
Following the orchestration of a seamlessly flowing RESTful API, my trajectory leads me to introduce a ClassLibrary project, dedicated to crafting the Data Layer project. Within this domain, the canvas becomes adorned with Entities and Repositories, gracefully complemented by the UnitOfWorkFilter class, a component whose significance I shall demystify in an upcoming article. The final touch is the Context, weaving together the fabric of this data-driven symphony. In the JWTAuth API Project, as vividly demonstrated in the image below, I have strategically incorporated the AuthorizationContext. This addition serves the purpose of enabling user creation from the API into the database, employing the potent code-first technique.
-
Token Generation: JWT tokens are created and signed by the server. The token includes claims (key-value pairs) that provide information about the user, their roles, permissions, and more. The token is typically signed with a secret key or a private key if using asymmetric cryptography.
-
Token Structure: A JWT token consists of three parts:
- header,
- payload (claims), and
- signature
These parts are
base64encoded and concatenated with periods. The header typically contains the token type ("typ": "JWT") and the signing algorithm used ("alg": "HS256" for HMAC SHA-256). The payload contains the claims that define user attributes and access rights. -
Token Usage: The token is sent to the client after successful authentication. The client includes the token in the
Authorizationheader of subsequent requests as aBearertoken ("Authorization: Bearer"). The server validates the token's signature and checks its claims to authorize the user's access to specific resources. -
Token Validation: The server validates the token using the same secret key or public key used for signing. The server checks the token's signature, expiration (
exp claim), and issuer (iss claim) among other claims. Clock skew may be used to account for differences between server and token creation times. -
Middleware and Libraries: ASP.NET Core provides middleware (
Microsoft.AspNetCore.Authentication.JwtBearer) to handle JWT authentication. You configure the middleware with the necessary settings and validations. -
Benefits of JWT: Stateless: No need to store tokens on the server side, making it scalable. Self-contained: All the necessary information is included in the token itself. Widely supported: JWT is a standardized format used across different platforms.
-
Security Considerations: Store secrets securely and protect against token leakage. Use HTTPS to encrypt communication. Limit the amount of sensitive information stored in the token.
Here's a high-level example of how JWT authentication is configured in ASP.NET Core


Within the realm of the API, I am poised to infuse my Authorization Model, injecting a robust layer of control. Notably, for this project, I have introduced a straightforward User Entity. It's worth acknowledging that in a genuine project, the AspNetUser Authentication entities would naturally come to the fore.
Following the orchestration of a seamlessly flowing RESTful API, my trajectory leads me to introduce a ClassLibrary project, dedicated to crafting the Data Layer project. Within this domain, the canvas becomes adorned with Entities and Repositories, gracefully complemented by the UnitOfWorkFilter class. The final touch is the Context, weaving together the fabric of this data-driven symphony. In the JWTAuth API Project, as vividly demonstrated in the image below, I have strategically incorporated the AuthorizationContext. This addition serves the purpose of enabling user creation from the API into the database, employing the potent code-first technique.
Migration Authentication Entities
In our determined pursuit of this objective, the installation of the subsequent NuGet Packages becomes imperative. It's noteworthy that I am utilizing PostgreSQL in this context.
Microsoft.EntityFrameworkCoreMicrosoft.EntityFrameworkCore.DesignNpgsql.EntityFrameworkCore.PostgreSQLMicrosoft.IdentityModel.TokensMicrosoft.AspNetCore.Authentication.JwtBearer
For making first migration for authentication entities, we must put our PostgreSQL connection string inside appsettings.json as below:
"ConnectionStrings": {
    "SurveyConnectionString": "Host=localhost;Port=5432;
     Database=SurveyAuth;Username=postgres;Password=*****;"
  },
"AppSettings": {
    "SomeSetting": "SomeValue",
    "AnotherSetting": "AnotherValue",
    "ConnectionString": "Host=localhost;Port=5432;
     Database=SurveyAuth;Username=postgres;Password=*****;"
  },
In the subsequent steps, as we proceed with the installation of the required NuGet packages and input the necessary requirements into the appsettings.json file, we will also incorporate Dependency Injection for our DataContext. To enhance the readability of the program code, I've organized the content into separate classes and integrated them into Program.cs. The structure of my project is as follows:

Helpers Folder
Contains various helper classes. ConfigHelper.cs is a provider class designed to facilitate the addition of DbContext and other services through Dependency Injection (DI).
using JWTAuth.Extensions;
using JWTAuth.Services;
using Microsoft.EntityFrameworkCore;
using Microsoft.Extensions.Options;

namespace JWTAuth.Helpers
{
    public class ConfigHelper
    {
        public static void ConfigureService(WebApplicationBuilder builder)
        {
            var serviceProvider = builder.Services.AddOptions().Configure<AppSettings>
            (builder.Configuration.GetSection("AppSettings")).BuildServiceProvider();

            // Set the value in AppSettings
            var appSettings = serviceProvider.GetRequiredService
                                <IOptions<AppSettings>>().Value;

            // Add your DbContext and other services here
            builder.Services.AddDbContext<AuthorizeContexts>(options =>
                            options.UseNpgsql(appSettings.ConnectionString));

            builder.Services.AddScoped
                    <IConnectionStringProvider, ConnectionStringProvider>();

            serviceProvider.Dispose();
            PostgreSqlBootstrap.Initialize();

            // After the creation of SurveyRepo in the DataLayer project,
            // it is essential to add this line
            builder.Services.AddScoped<ISurveyRepo, SurveyRepo>();
            builder.Services.UseOneTransactionPerHttpCall(appSettings);
        }
    }
}
Services Folder
Houses all the custom services required for Dependency Injection (DI) within the solution.
IConnectionStringProvider.cs
namespace JWTAuth.Services
{
    public interface IConnectionStringProvider
    {
        string GetConnectionString();
    }
}
ConnectionStringProvider.cs
namespace JWTAuth.Services
{
    public class ConnectionStringProvider : IConnectionStringProvider
    {
        private readonly IConfiguration _configuration;

        public ConnectionStringProvider(IConfiguration configuration)
        {
            _configuration = configuration;
        }

        public string GetConnectionString()
        {
            var connectionString = _configuration.GetConnectionString
                                   ("SurveyConnectionString");
            return connectionString;
        }
    }
}
Extensions Folder
Includes extension classes. ServiceCollectionExtensions.cs. This extension for the service collection manages the state of connections and transactions per HttpCall for PostgreSQL.
using JWTAuth.Helpers;
using JWTAuth.Services;
using Npgsql;
using System.Data;

namespace JWTAuth.Extensions
{
    public static class ServiceCollectionExtensions
    {
        public static void UseOneTransactionPerHttpCall
        (this IServiceCollection serviceCollection, AppSettings _appSettings,
         IsolationLevel level = IsolationLevel.ReadUncommitted)
        {
            serviceCollection.AddScoped<IDbTransaction>(serviceProvider =>
            {
                var connectionStringProvider =
                serviceProvider.GetService<IConnectionStringProvider>();
                var connection = new NpgsqlConnection(_appSettings.ConnectionString);

                if (connection.State != ConnectionState.Open)
                    connection.Open();

                return connection.BeginTransaction(level);
            });

            serviceCollection.AddScoped(typeof(UnitOfWorkFilter),
                                        typeof(UnitOfWorkFilter));

            serviceCollection.AddMvc(setup =>
            {
                setup.Filters.AddService<UnitOfWorkFilter>(1);
            });
        }
    }
}
Invoking ConfigHelper.ConfigureService(builder) within Program.cs:
var builder = WebApplication.CreateBuilder(args);
ConfigHelper.ConfigureService(builder);
JWTAuth.Common Project
Furthermore, we require an AppSettings.cs file, which we will place within a new class library project named JWTAuth.Common. This project serves as a repository for all common classes.
Helpers Folder
Contains various helper classes. AppSettings.cs. This entity serves as a container for carrying configuration information throughout the solution.
namespace JWTAuth.Common.Helper
{
    public class AppSettings
    {
        // Define your application settings properties here
        public string ConnectionString { get; set; }
        // ... other settings
    }
}
The moment has come to migrate the authentication entities to PostgreSQL and generate corresponding tables. You can choose between utilizing the Package Manager Console or Developer PowerShell. To proceed, right-click on the intended project and select the Open Terminal option.
Migration can be initiated by executing the following command
dotnet ef migrations add 'AuthFirstMigration'

Upon executing this command, the system will generate a Migrations folder within the JWTAuth project, containing the necessary migration classes.

By utilizing the command below, our database containing authentication tables will be created within PostgreSQL.
dotnet ef database update -c AuthorizeContexts
As previously mentioned, I intend to create a class library project for my DataLayer, housing main entities, the Context, and repositories. Accordingly, I will generate the 'Survey Entity' and other pertinent elements within this project. Subsequently, I will employ a similar technique to the one utilized for migrating authentication entities to our PostgreSQL database.
Demystifying JWT Configuration and Utilization
For implementing JWT, the initial step involves adding JWTSecurityToken to the appsettings.json file, as depicted below:
"JwtSecurityToken": {
    "Key": "K17T6p+mYlBuIll6EOQDUmAdM6xmzeHOpE+O35zsAvw=",
    "Issuer": "JWTAuthServer",
    "Audience": "JWTAuthClient",
    "Subject": "JWTAuthToken"
  },
The key used in the JwtSecurityToken configuration's Key property should be a secret key that is used to sign the JWT tokens. This secret key should be kept confidential and not shared with others. The type of key you use depends on the algorithm you choose for signing the tokens. JWT supports different algorithms for token signing, including symmetric and asymmetric algorithms:
- Symmetric Key (We are going to use Symmetric Key in this article)
- Asymmetric Key Pair
Generating a Symmetric key
To generate a symmetric key, there are several methods available. You can either use the existing value of the Key property or replace it with a new key value of your own. If you decide to generate a custom key, there are various techniques that you can employ. Let's explore a few of these methods. A symmetric key is a single secret key that is used both for signing and verifying the token. It's a shared secret between the token issuer (server) and the token consumer (client). Common symmetric algorithms include HMAC SHA-256 (HmacSha256) and HMAC SHA-512 (HmacSha512). Symmetric keys are typically shorter than asymmetric keys, making the token size smaller.
- Simple way to generate a random symmetric key:
Convert.ToBase64String(Guid.NewGuid().ToByteArray()) - To generate a symmetric key for use with HMAC SHA-256, you can create a random byte array and then encode it as a
Base64 string. Here's a simple example in C#:
using System;
using System.Security.Cryptography;
public static class JWTGenerator
{
    public static string Generate()
    {
        byte[] keyBytes = GenerateRandomKey();
        string base64Key = Convert.ToBase64String(keyBytes);

        return base64Key;
    }

    static byte[] GenerateRandomKey()
    {
        using (var hmac = new HMACSHA256())
        {
            return hmac.Key;
        }
    }
}
- Generate a New Key using OpenSSL If you're on Windows and don't have OpenSSL installed, you have a few options:
- Install OpenSSL: You can install OpenSSL on Windows and then use it in the command line. You can download the Windows installer for OpenSSL from the official website: https://slproweb.com/products/Win32OpenSSL.html
- Use Online Tools: If you only need to generate a random key once and don't want to install OpenSSL, you can use online tools to generate a random key in Base64 format.
- Use PowerShell to Generate a Key: If you prefer to use PowerShell, you can generate a random key like this:
I have successfully installed OpenSSL on my computer and incorporated its installation path into the Path of the operating system's System Variables as a new pathway.
With this configuration in place, you can effortlessly generate new encryption keys at any time by utilizing commands like the following within the Windows Power Shell or Command Prompt.
Windows Power Shell
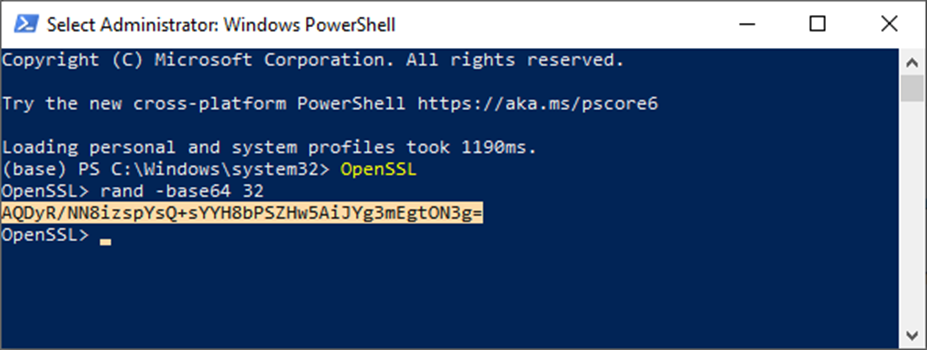
Command Prompt

Through the utilization of OpenSSL, you have the capability to generate various types of encryption keys. You have the flexibility to generate your new encryption key using any preferred method. All you need to do is replace your code with the value of the JwtSecurityToken's Key property in the appsettings.json file.
Setup JWT
To set up and effectively utilize JWT, it is imperative to install the following NuGet Packages within the RESTful API project:
Microsoft.AspNetCore.Authentication.JwtBearerMicrosoft.IdentityModel.TokensSystem.IdentityModel.Tokens.Jwt
Now, to achieve my objective of configuring the Authentication and JwtBearer properties, I have created a distinct static class that contains the necessary code block. This block of code is then called within the Program.cs file to execute the required setup.
using Microsoft.AspNetCore.Authentication.JwtBearer;
using Microsoft.IdentityModel.Tokens;
using System.Text;

namespace JWTAuth.Helpers
{
    public class AuthenticationHelper
    {
        public static void ConfigureService(WebApplicationBuilder builder)
        {
            builder.Services.AddAuthentication(optiones =>
            {
                optiones.DefaultAuthenticateScheme =
                         JwtBearerDefaults.AuthenticationScheme;
                optiones.DefaultChallengeScheme = JwtBearerDefaults.AuthenticationScheme;
                optiones.DefaultScheme = JwtBearerDefaults.AuthenticationScheme;
            })
            .AddJwtBearer(o =>
            {
                o.TokenValidationParameters = new TokenValidationParameters
                {
                    ValidAudience = builder.Configuration["JwtSecurityToken:Audience"],
                    ValidIssuer = builder.Configuration["JwtSecurityToken:Issuer"],
                    IssuerSigningKey = new SymmetricSecurityKey
                    (Encoding.UTF8.GetBytes(builder.Configuration["JwtSecurityToken:Key"])),
                    ValidateIssuer = true,
                    ValidateAudience = true,
                    ValidateIssuerSigningKey = true,
                    ValidateLifetime = true,
                    ClockSkew = TimeSpan.Zero,
                };
            });
        }
    }
}
In the Program.cs file, I have incorporated the following line of code:
AuthenticationHelper.ConfigureService(builder);
This line of code is vital in invoking the configuration setup for authentication services, ensuring that the necessary authentication and authorization configurations are appropriately implemented.
Additionally, I have included my custom class for configuring Swagger. This ensures the seamless integration of Swagger documentation and functionalities within the project, while also adding security requirements to enhance its accessibility and usability.
using Microsoft.OpenApi.Models;

namespace JWTAuth.Helpers
{
    public class SwaggerHelper
    {
        public static void ConfigureService(IServiceCollection service)
        {
            service.AddSwaggerGen(c =>
            {
                c.SwaggerDoc("v1", new OpenApiInfo
                            { Title = "WebAPIv7", Version = "v1" });
                c.AddSecurityDefinition("Bearer", new OpenApiSecurityScheme
                {
                    Description =
                        "JWT Authorization header using the Bearer scheme.
                         \r\n\r\n Enter 'Bearer' [space] and then your token in the
                         text input below.\r\n\r\nExample: \"Bearer 12345abcdef\"",
                    Name = "Authorization",
                    In = ParameterLocation.Header,
                    Type = SecuritySchemeType.ApiKey,
                    Scheme = "Bearer"
                });

                c.AddSecurityRequirement(new OpenApiSecurityRequirement()
                {
                    {
                        new OpenApiSecurityScheme
                        {
                            Reference = new OpenApiReference
                            {
                                Type = ReferenceType.SecurityScheme,
                                Id = "Bearer"
                            },
                            Scheme = "oauth2",
                            Name = "Bearer",
                            In = ParameterLocation.Header,

                        },
                        new List<string>()
                    }
                });
            });
        }
    }
}
In the Program.cs file, I have incorporated the following lines of codes:
AuthenticationHelper.ConfigureService(builder);
SwaggerHelper.ConfigureService(builder.Services);
builder.Services.Configure<JwtSecurityTokenSettings>
        (builder.Configuration.GetSection("JwtSecurityToken"));
Controllers
After completing the setup and configuration requirements, my next step involves the creation of a JWTokenController. This controller will be responsible for generating tokens based on the information provided in the appsetting.json file and login credentials. The code implementation for this class could resemble the example below, or it may be implemented using alternative approaches based on specific requirements:
using JWTAuth.Authorization.Model.Entities;
using Microsoft.AspNetCore.Mvc;
using Microsoft.EntityFrameworkCore;
using Microsoft.IdentityModel.Tokens;
using System.IdentityModel.Tokens.Jwt;
using System.Security.Claims;
using System.Text;

namespace JWTAuth.Controllers
{
    [Route("api/token")]
    [ApiController]
    public class JWTokenController : Controller
    {
        public IConfiguration _configuration;
        private readonly AuthorizeContexts _context;

        public JWTokenController(IConfiguration config, AuthorizeContexts context)
        {
            _configuration = config;
            _context = context;
        }

        [HttpPost]
        public async Task<IActionResult> Post(User _userData)
        {
            if (_userData != null && _userData.Username != null &&
                _userData.Password != null)
            {
                var user = await GetUser(_userData.Username, _userData.Password);

                if (user != null)
                {

                    var nowUtc = DateTime.UtcNow;
                    var expirationDuration =
                        TimeSpan.FromMinutes(10); // Adjust as needed
                    var expirationUtc = nowUtc.Add(expirationDuration);

                    var claims = new List<Claim>
                    {
                        new Claim(JwtRegisteredClaimNames.Sub,
                                  _configuration["JwtSecurityToken:Subject"]),
                        new Claim(JwtRegisteredClaimNames.Jti,
                                  Guid.NewGuid().ToString()),
                        new Claim(JwtRegisteredClaimNames.Iat,
                                  EpochTime.GetIntDate(nowUtc).ToString(),
                                  ClaimValueTypes.Integer64),
                        new Claim(JwtRegisteredClaimNames.Exp,
                                  EpochTime.GetIntDate(expirationUtc).ToString(),
                                  ClaimValueTypes.Integer64),
                        new Claim(JwtRegisteredClaimNames.Iss,
                                  _configuration["JwtSecurityToken:Issuer"]),
                        new Claim(JwtRegisteredClaimNames.Aud,
                                  _configuration["JwtSecurityToken:Audience"]),
                        new Claim("UserId", user.UserId.ToString()),
                        new Claim("Username", user.Username)
                    };

                    var key = new SymmetricSecurityKey
                    (Encoding.UTF8.GetBytes(_configuration["JwtSecurityToken:Key"]));
                    var signIn = new SigningCredentials
                                 (key, SecurityAlgorithms.HmacSha256);

                    var token = new JwtSecurityToken(
                        issuer: _configuration["JwtSecurityToken:Issuer"],
                        audience: _configuration["JwtSecurityToken:Audience"],
                        claims: claims,
                        expires: expirationUtc,
                        signingCredentials: signIn);

                    var tokenHandler = new JwtSecurityTokenHandler();
                    var tokenString = tokenHandler.WriteToken(token);

                    return Ok(tokenString);
                }
                else
                {
                    return BadRequest("Invalid credentials");
                }
            }
            else
            {
                return BadRequest();
            }
        }

        private async Task<User> GetUser(string userName, string password)
        {
            return await _context.Users.FirstOrDefaultAsync
                   (u => u.Username == userName && u.Password == password);
        }
    }
}
Furthermore, I am in the process of crafting a SurveyController. This controller is intended to facilitate the testing of our established objectives. To ensure controlled access to its members, it is imperative to place the [Authorize] attribute above the controller. This step validates the token's validity before granting access.
using JWTAuth.Data.Repositories.GeneralRepositories;
using JWTAuth.Data.Repositories;
using Microsoft.AspNetCore.Mvc;
using Microsoft.AspNetCore.Authorization;
using JWTAuth.Data.Entities;

namespace JWTAuth.Controllers
{
    [Authorize]
    [Route("api/[controller]")]
    [ApiController]
    public class SurveyController : Controller
    {
        private readonly ISurveyRepo _surveyRepo;
        private readonly ILogger<SurveyController> _logger;
        private readonly UnitOfWorkFilter _uow;


        public SurveyController(ILogger<SurveyController> logger,
                                UnitOfWorkFilter unitOfWork,
                                ISurveyRepo surveyRepo)
        {
            _logger = logger;
            _uow = unitOfWork;
            _surveyRepo = surveyRepo;
        }

        // GET ALL: api/<SurveyController>
        [HttpGet]
        public async Task<IEnumerable<Survey>?> GetAll()
        {
            var surveys = await _surveyRepo.GetAllAsync();
            return surveys;
        }

        // GET api/<SurveyController>/5
        [HttpGet("{id}")]
        public async Task<Survey?> Get(int id)
        {
            var survey = await _surveyRepo.GetAsync(1);
            return survey;
        }
   }
}
Build your solution and run JWTAuth RESTful API project. As it shown in the picture, Swagger appears like this:

Should you attempt to access the methods within this page without generating a valid token, an unauthorized error will be encountered. This security measure guarantees that only authorized users can interact with the Survey's methods.

I copied the generated token and entered it into the designated input area within the popup page, accessed by clicking on the Authorize button.

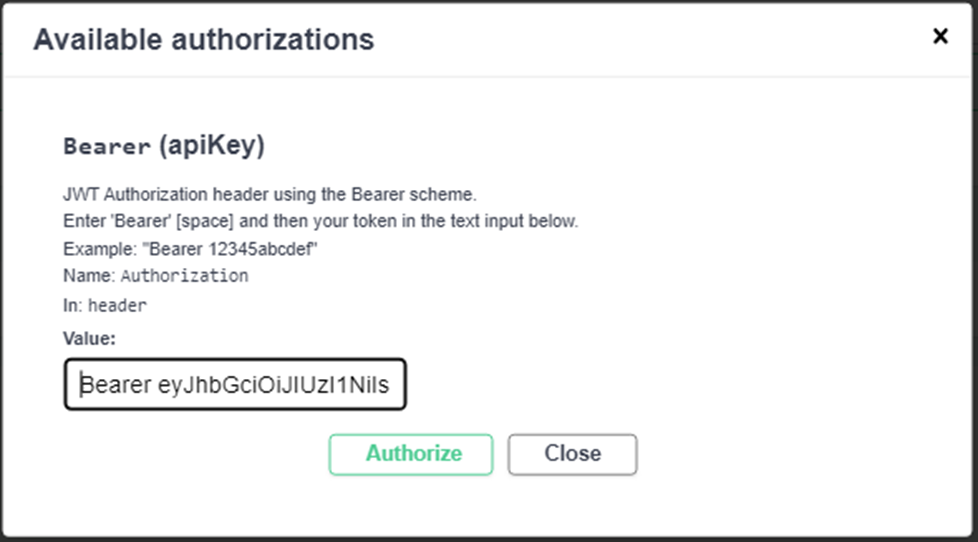
Click on Authorize button and then close the popup.
Now, you can attempt to execute the methods within the SurveyController. By clicking on the respective SurveyController method, if your token is valid, the method will return the expected result values. Conversely, if the token is invalid, an Unauthorized error will be encountered.

In certain scenarios, even after meticulously completing all the requisite steps within the Swagger page, including the generation of tokens in the authorization segment, an unexpected hurdle may arise during the execution of Get/Post programs. At this juncture, the program endeavors to validate the token, only to be met with an exception, which is visually depicted in the subsequent image.

In certain instances, a crucial element was absent: the System.IdentityModel.Tokens.Jwt NuGet package. Astonishingly, despite a seamless compilation and execution process, the API testing phase revealed a significant hiccup in the form of an 'invalid token' error. Remarkably, the simple installation of the System.IdentityModel.Tokens.Jwt package breath life into the solution, seamlessly rectifying the issue without necessitating a single alteration to the codebase. You can also refer to following link to get more information.
In culmination, I extend my sincerest gratitude to each esteemed reader who has devoted their valuable time to delve into the intricacies of JWT implementation in RESTful API using ASP.NET Core. May the challenges you face be met with courage, the hurdles with determination, and the successes with a sense of accomplishment. In your endeavors, may you find the path to your goals illuminated, and may you continue to strive for excellence. Thank you for being a part of this discourse, and I send you my best wishes for every success that lies ahead.