
Aspect Oriented Programming on .NET Framework with AspectDN
5.00/5 (4 votes)
How to weave aspects with AspectDN directly into .NET binary files
![]()
Introduction
AspectDN is a library used to weave advices into binary .NET assemblies. Aspects, advices and pointcuts are described in a language close to C#5.
AspectDN can be used to weave:
- Pieces of code
- New classes, structures, interfaces, enumerations and delegates
- New members like fields, properties, events, constructors
Depending on the advice type, pointcuts can be:
- Assemblies
- Types
- Fields
- Properties
- Methods
- Exceptions
- Events
The following example is taken from the following article, Aspect-Oriented Programming - Aspect-Oriented Programming with the RealProxy Class | Microsoft, which illustrates how to add new functionalities such as a log or authentication method using dynamic proxies.
We're going to do the same example, but this time using AspectDN and working directly on the binary files (and without recompiling the initial application source code).
Prerequisites
Please download the zip and unzip it. It contains:
- A VS Application directory containing the Visual Studio application that we will use to create our initial application binary.
- An AspectRepository 01 directory containing the weaving project for the first modification.
- An AspectRepository 02 directory containing the weaving project for the second modification.
The AspectDN can be download here.
As we are working with binary files, you will need sometimes to look at the changes they undergo. I suggest ILSPY, a powerful tool.
Target Application
Description
Imagine you have developed an application for managing a repository of customers. This application is widely used and installed lots of times. This application is broken into several classes:
- A
customerclass:public class Customer { public int Id { get; set; } public string Name { get; set; } public string Address { get; set; } } - An
interface:public interface IRepository<T> { void Add(T entity); void Delete(T entity); void Update(T entity); IEnumerable<T> GetAll(); T GetById(int id); } - A
repositoryclass realizing the aboveinterface.public class Repository<T> : IRepository<T> { public void Add(T entity) { Console.WriteLine("Adding {0}", entity); } public void Delete(T entity) { Console.WriteLine("Deleting {0}", entity); } public void Update(T entity) { Console.WriteLine("Updating {0}", entity); } public IEnumerable<T> GetAll() { Console.WriteLine("Getting entities"); return null; } public T GetById(int id) { Console.WriteLine("Getting entity {0}", id); return default(T); } } - And finally a
staticmainmethod feeding this directory:static void Main(string[] args) { Console.WriteLine("***\r\n Begin program \r\n"); IRepository<Customer> customerRepository = new Repository<Customer>(); var customer = new Customer { Id = 1, Name = "Customer 1", Address = "Address 1" }; customerRepository.Add(customer); customerRepository.Update(customer); customerRepository.Delete(customer); Console.WriteLine("\r\nEnd program \r\n***"); Console.ReadLine(); }
As AspectDN works with binary files and before we start deeper in aspects, you need to generate the repository.exe application by using the Visual Studio Project placed in the VSSourceApplication. Then open the command prompt and run the Repository.exe like:
...\VS SourceApplication\bin\Debug\repository.exe
You will have the following results:

What To Do
Initially, you will be asked to add new functionalities only for a new deployment:
- The application must have an authentication system, used before any query or update.
- The application must have auditing and logging for sensible operations.
Possible Solutions
You have several options:
- Duplicate the code sources and do the code changes in this copy.
- Change the original application code source and add new settings in a config file for instance to check if the use of the logs is required, for example, depending on the installation.
- Add the changes directly into the deployment binary files without changing the original application source code.
The first solution will be time-consuming because there will be several applications to maintain.
The second solution will make the code more complex and will require all the clients to be reinstalled, with the risk of inducing bugs.
The third solution remains the simplest and does not have the disadvantages of the two previous solutions. This solution can be implemented with AspectDN.
First Change (AspectDN Project 01)
In this first part, we are going to add only the log requirement.
Weave Your First Aspects
Before going into details about the declaration of the aspects to be woven, we will first run the AspectDN project and carry out the weaving.
Execute the following command in command prompt under the AspectDN directory you had previously downloaded.
xxx\AspectDN\ApsectDb.exe -window
A window appears, allowing you to load the project. An AspectDN project is an XML file containing several tags and attributes that will allow us to load the weaving context.
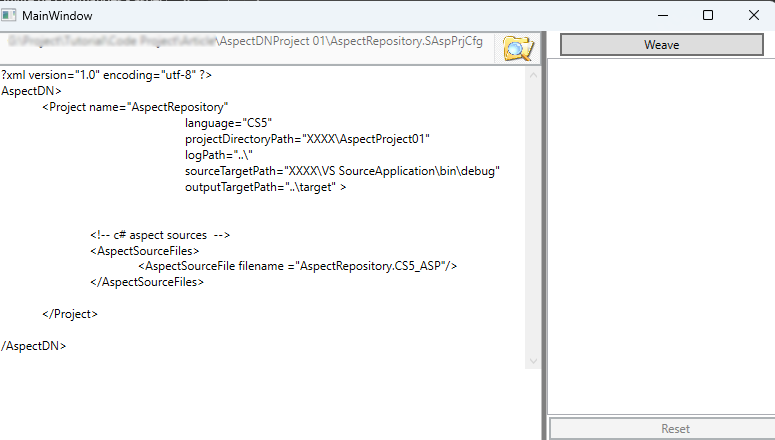
The aspectdn project file is made up with:
	<?xml version="1.0" encoding="utf-8" ?>
	<AspectDN>
		<Project	name="AspectRepository"
					language="CS5"
					projectDirectoryPath="XXXX\AspectProject01"
					logPath="..\"
					sourceTargetPath="XXXX\VS SourceApplication\bin\debug"
					outputTargetPath="..\target" >

			<!-- c# aspect sources  -->
			<AspectSourceFiles>
				<AspectSourceFile filename ="AspectRepository.CS5_ASP"/>
			</AspectSourceFiles>

		</Project>

	</AspectDN>
- Attribute
namedefines the project name (AspectRepository) - Attribute
languagedefines the language used in the project (only C#5 valid for the moment) - Attribute
projectDirectoryPathdefines the root of the directory containing the file sources (aspects, advices, pointcuts) - Attribute
logPathdefines the path of the directory containing the log in which weaving errors are saved. - Attribute
sourceTargetPathdefines the path of the directory containing the original executable application (binary file not sources) - Attribute
outputTargetPathdefines the path of the directory containing the application after the aspects have been weaved. AspectSourceFilesdefines all sources containing the aspects, pointcuts and advices to be woven. All source files must be contained in the root directory.
Note that when a path stats with ../, this means that the path is a subdirectory of the root directory.
Load the project configuration file after you have changed the directories with yours and then click on the weave button.
The sequence of weaving operations is displayed on the right area of the window. If all goes well, you will see the following events:

Go to the target sub-directory of the 'AspectDNProject 01' directory and run repository.exe. The result is as follows:

If we look at the new file by using by ILSPY or ILDASM, we can see the following differences:

Let's look at the aspects we've coded to achieve this result.
Aspect Declaration
Open the source file AspectRepository.CS5_Asp in the project directory.
First, we'll describe the aspect used to weave a new member into the repository class.
In AspectDN, all advices, pointcuts and aspects are encapsulated in one or more packages (equivalent to a namespace in C#) and declared as such.
	using System;
	using System.Threading;

	package RepositoryAspects
	{
		// place aspects, pointcuts and advices
	}
An aspect is always made up of:
- a pointcut and possibly a join point
- an advice
- a mapping of prototype members
The following type member aspect is used to weave our new method Log:
	/* add a new member */
	addLogMethod => // (1) name of the aspect
		extend classes : classes.Name=="Repository`1" // (2) pointcut
		with type members // aspect kind
		{
			// (3) method Log
			private void Log(string msg, object arg = null)
			{
				Console.ForegroundColor = ConsoleColor.Red;
				Console.WriteLine(msg, arg);
				Console.ResetColor();
			}
		}
addLogMethodis the name of the aspect.- The pointcut indicates that we are extending a class contained in the target application, which is a generic class (one parameter) called
Repository. - The advice describes a
Logmethod which is defined as if it were declared in a C# class.
We then declare the code aspect that will enable to trace the CRUD methods in the Repository class. We'll only describe the Add method here, as the others are declared in the same manner except for a few details.
	// add log in add method
	codeAspectAdd => // (1) name of the aspect
		extend around body methods : methods.Name == "Add" &&
               methods.DeclaringType.Name == "Repository`1" // (2) pointcut
		with
		{
			// (3) members of the target we need
			prototype members
			{
				<#T>; // type parameter
				#T #Entity; // field
				void #Log(string msg, object arg); // method
			}

			// (4) chunk of code
			#Log("Before Adding {0}", #Entity);
			[around anchor];
			#Log("After Adding {0}", #Entity);
		} where #Log = Log, <#T> : T, #Entity= entity; // (5) prototype member mappings
- The name of the aspect
codeAspectAdd. - The pointcut indicates that we want to weave the chunk of code in the method body
Addof the classRepository~1. - The declaration of prototype members is used to describe the internal context of the target method that are used in the current advice. It is recommended to have a weak coupling with the target as much as possible in order to ensure reuse of aspects. These members are always beginning with
#to distinguish them with the aspect declaration variable.<#T>is a generic parameter prototype which must have its counterpart in the target (class or method)#Entityis a field, property, variable or method argument prototype that exists in the targetvoid #Log(string msg, object msg)is a prototype of an existing method in the target. In our case, it is woven by the previous aspect.
- The chunk code to be woven is made up of C#5 statements. The [around anchor] instruction indicates the point where instructions will be broken into with two parts :before and after the joinpoint.

- The name of the prototype members are mapped with name of the real members of the target.
It would have been possible to create only one code aspect for all CRUD method by using StackFame of System.Diagnostic to get the name of the method (add, update, delete)
Second Part of the Change (Aspectdn Project 02)
We now add a basic authentication check for adding, modifying and deleting customer. These rights will be only granted to users with the ADMIN role.
Perform Weaving
Before we explain aspects we use in this second part, we are going to do the same thing we have done in the first part, i.e., weave aspects and look at the results. We are now working with the project defined in the 'AspectDNProject 02' directory. After having changed the configuration project file with your directories, run the aspectdn -window command, load the project and weave it.
Run the woven application in the target directory. Use the command below with no arguments.

To check with a user that has the rights, run the EXE with any argument of your choice as follows:

Which Changes Have We Applied?
If you use ILSpy, for instance, you will see in the woven application changes according the original application.
Rather than defining the LOG method in the repository~1 class, a new Logger class has been created.

Another new class is performing authentication. It uses the identity of the user or service account running the process. The logger will be used to trace the authentication.

In the CRUD methods of Repository~1, new code has been woven in order to check authentication. The logger will be used to trace the authentication.

Finally, in the main method, to be able to simulate authentication with or without rights, a change of identity is done if we pass an argument.

Aspect Declarations
Open the source file AspectRepository.CS5_Asp in the project directory.
We declare an aspect type for weaving the two new classes into the Repository.Exe assembly.
	/* add Lgger and Authentification class */
	typeAspect =>
		extend assemblies : assemblies.Name == "Repository.exe" // (1) pointcut
		with types
		{
			// (2) Logger class declaration
			public static class Logger
			{
				public static void Log(string msg, object arg)
				{
					Console.ForegroundColor = ConsoleColor.Green;
					Console.WriteLine(msg, arg);
					Console.ResetColor();
				}
			}
			// (2) Authentification class declaration
			public static class Authentication
			{
				public static bool Check(string msg)
				{
					if (Thread.CurrentPrincipal.IsInRole("ADMIN"))
					{
						Logger.Log("User authenticated - You can execute '{0}' ", msg);
						return true;
					}

					Logger.Log("User not authenticated - You can't execute '{0}' ", msg);
					return false;
				}
			}
		} namespace target Repository; // (3) target namespace
- The pointcut is set this time on the Repository.exe assembly.
- We declare two classes in this type aspect as if we were declaring classes in a C# project. Note that the
Authenticationclass usesLogger. - For type aspect, it is necessary to indicate the namespace in which the class will be woven on the target.
For CRUD methods, we declare the following code aspect which uses the two previous classes.
	// add the authentifcation for the add method
	codeAspectAdd =>
		extend around body methods : methods.Name == "Add" &&
               methods.DeclaringType.Name == "Repository`1" // pointcut
		with
		{
			// target members
			prototype members
			{
				<#T>;
				#T #Entity;
			}

			if (!typeAspect.Authentication.Check("Add"))
                return;

			typeAspect.Logger.Log("Before Adding {0}", #Entity);
			[around anchor];
			typeAspect.Logger.Log("After Adding {0}", #Entity);

		} where typeAspect.Authentication from Repository,
          typeAspect.Logger from Repository, <#T> : T, #Entity= entity;
To use a type from an type aspect, the name of the type must be preceded by the type advice (in our case the same as the aspect) and you need to specify which namespace they belongs to the target.
Let's look at the last code aspect use to change of identity of the user in the main method.
	codeAspectTest =>
	extend before body methods : methods.Name == "Main"
	with
	{
		prototype members
		{
			string[] #args;
		}
		if (#args!=null && #args.Length>0)
		{
			Thread.CurrentPrincipal =
				new GenericPrincipal(new GenericIdentity("Administrator"),
				new[] { "ADMIN" });
		}

	} where #args = args;
As you see, we have declared an array of strings as prototype member which is mapped with the method argument. All instructions used the CS#5 language.
Conclusion
Unlike RealProxy class, which requires code change to work, AspectDN weaves aspects directly into executable files with great simplicity and very little effort.
The language used is closed to C#5 and so it is easy for a developer to code quickly aspects.
There are a lot of tutorials that you can explore and discover for instance how to customize , with AspectDN, layered application including persistence by adding new functional requirements.
History
- 15th July, 2023: Initial version