Interfacing TEA5767 FM Receiver with PIC using I2C
5.00/5 (2 votes)
How to interface TEA5767 FM Receiver with PIC using I2C
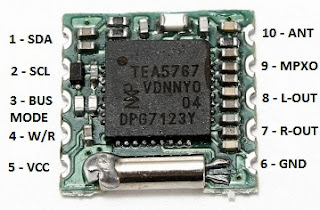
I got myself a few pieces of cheap TEA5767 FM receiver modules from eBay and decided to try them out. The modules arrived safe and sound and looked very tiny. Notice the bottom right of the board, close to the two pins of the 32.768 kHz crystal, where the TEA5767’s GND pin is connected:
BUS MODE pin should be connected to GND whereas W/R and MPXO pin should be left unconnected. I make a simple breakout board out of a small piece of veroboard from my junk box to be able to plug it into a breadboard for development work.
Simple Interface via I2C
It is only then that the fun began. The module is using I2C interface, which requires just 2 control lines, SDA for data and SCL for clock. Since most of the sample code I found on the Internet for this TEA5767 module is targeting the Arduino (the PIC seems to be dying among the world of hobbyists, thanks to tremendous marketing efforts to promote the Arduino), I will need to adapt it my PIC24FJ64GA002 using my software I2C library. The simplest code to tune the TEA5767 to a particular FM station is as follows:
#define TEA5767_W 0xC0
#define TEA5767_R 0xC1

void tea5767_setFrequency(double frequency)
{
  unsigned char frequencyH=0;
  unsigned char frequencyL=0;
  unsigned int frequencyB;

  frequencyB=4*(frequency*1000000+225000)/32768;
  frequencyH=frequencyB>>8;
  frequencyL=frequencyB&0XFF;

  i2c_start();
  i2c_write(TEA5767_W);
  i2c_write(frequencyH);
  i2c_write(frequencyL);
  i2c_write(0xB0);
  i2c_write(0x10);
  i2c_write(0x00);

  i2c_stop();
}
Here comes a word of caution for those converting I2C code from the Arduino to the PIC. The Arduino is using 7-bit I2C addresses, which is 0x60, as specified in the TEA5767 datasheet, with read/write address determined accordingly. However, the PIC24FJ64GA002 that I am using and most other PICs use 8-bit I2C addresses, which consist of the original 7-bit address and another bit to indicate read/write operation. Therefore, the correct I2C address for the TEA5767 on a PIC is 0xC1 for reading and 0xC0 for writing. I wasted three days debugging this issue.
With the above code, the TEA5767 is able to tune into my favourite FM station. The output, although very low, sounds good and clear when fed into a suitable amplifier (such as PC audio system) or a crystal earpiece.
Retrieving Data from the TEA5767
Next comes the challenge of reading data from the TEA5767 to check for signal strength and other relevant information. I used the following code:
void tea5767_readData(unsigned char* byte1, unsigned char* byte2,
     unsigned char* byte3, unsigned char* byte4, unsigned char* byte5)
{
    i2c_start();
    i2c_write(TEA5767_R);
    *byte1 = i2c_rx(1);
    *byte2 = i2c_rx(1);
    *byte3 = i2c_rx(1);
    *byte4 = i2c_rx(1);
    *byte5 = i2c_rx(0);
    i2c_stop();
}
However, despite various debugging efforts, the above code simply returned 0xFF for all the bytes. I even checked on an oscilloscope and indeed the SDA line remained high during the read operation. My software I2C library has always been working well with other stuff, including a DS621 temperature sensor, DS1307 RTC and several EEPROMs.
It was so tempting at this stage to conclude that the TEA5767 module that I received was partially faulty. Who knows, perhaps that is the case for my module which was purchased from Chinese eBay sellers. However, I decided to make one last attempt at it by using the PIC24 hardware I2C modules, instead of bit-banging it via software.
Using the sample code from here, I was quickly able to write codes to read and write a 24C64 EEPROM using the hardware I2C module. The completed I2C helper code can be downloaded here. Surprisingly, when using hardware I2C, the TEA5767 responds properly with the proper status bytes. The signal strength (in percentage) and other information of the currently active FM station can be derived from the data bytes using the following code:
tea5767_readData(&byte1, &byte2, &byte3, &byte4, &byte5);
stereo = (byte3&0x80);
freq = ((((byte1&0x3F)<<8)+byte2)*32768/4-225000)/100000;
signal_level = (byte4 >> 4) * 100 / 16;
If the hardware I2C code does not work with your PIC, first try to use the second I2C module instead of the first I2C module. Some PIC24 devices have a silicon bug rendering the first I2C module inoperative. Secondly, if the code is working intermittently, try to add a 82pF capacitor connecting the SDA line to ground for each I2C device on the bus. It was not working for me initially until I realized that it seemed to work with the oscilloscope probe pin connected, and figured that the capacitor is necessary. The reason is apparently due to the parasitic capacitance on a breadboard affecting the rise time/fall time of the I2C clock line, although I have not had time to verify this in details. Finally, don’t forget the pullup resistors on both SDA and SCL lines of the I2C bus, which need to be at least 4.7k.
Amplifying the Audio Output
One final note is that the TEA5767 output is too low even to be fed into a common 8-ohm speaker configuration of the LM386 audio amplifier. This is why most online tutorials suggest using TDA7052 as the amplifier instead. In my case, as I am using the LM386, a stereo to mono converter and a single transistor pre-amplifier stage is necessary before I could hear the audio in the speaker:
I hope this will be useful for other hobbyists who are also trying TEA5767 on a PIC.


