Introduction
This article (Part 2) serves as sequel (a continuation) for Part 1, where I was discussing on comparing the methods of building table with GridView and dynamic HTML table. You may want to read the Part 1 before this, as there is some reused code expanded from there.
Here, I wish to share one of idea of adding table rows dynamically with JavaScript and AJAX.
The Code
To load data dynamically from server to client's web browser, we can use AJAX.
The C# class object of Member can be serialized into JSON object and send it to client side to further handle by JavaScript.
JSON objects parsing is a very common approach in the universe of web development world for sharing data between two different locations.
Locations here refers to:
- First location: The ASP.NET Web Server
- Second location: The client side (the web browser) - the JavaScript (AJAX)
Preparing JSON Object at Server Side
We are going to add a nuget class library. Right click your project > Manage NuGet Packages

Search for "JSON"...
There are two popular JSON Serializer packages, namely:
- Newtonsoft.Json
- System.Text.Json
Choose your favorite library.
In this article, I'll be using "System.Text.Json", provided by Microsoft.
Right click your project and add a blank page to serve as the API page. Name it "apiGetMemberList.aspx" (of course, you can name it anything).
Open the file "apiGetMemberList.aspx". This is what you'll see for the initial front page code:
<%@ Page Language="C#" AutoEventWireup="true" CodeBehind="apiGetMemberList.aspx.cs"
Inherits="GridView_HtmlTable.apiGetMemberList" %>

<!DOCTYPE html>

<html xmlns="http://www.w3.org/1999/xhtml">
<head runat="server">
    <title></title>
</head>
<body>
    <form id="form1" runat="server">
        <div>
        </div>
    </form>
</body>
</html>
Delete everything and only leave the first line:
<%@ Page Language="C#" AutoEventWireup="true" CodeBehind="apiGetMemberList.aspx.cs"
Inherits="GridView_HtmlTable.apiGetMemberList" %>
Go to code behind, serialize the member list as JSON string and transmit it for download.
public partial class apiGetMemberList : System.Web.UI.Page
{
    protected void Page_Load(object sender, EventArgs e)
    {
        string json = JsonSerializer.Serialize(helper.lst);
        Response.Write(json);
    }
}
In above example, this object "helper.lst" is being serialized into JSON string.
Here's the content of "helper.lst" used in this example:
public class helper
{
    static List<Member> _lst = null;

    public static List<Member> lst
    {
        get
        {
            return _lst;
        }
        set
        {
            _lst = value;
        }
    }
}
But I initialized the list before returning the _lst:
public class helper
{
    static List<Member> _lst = null;

    public static List<Member> lst
    {
        get
        {
            if (_lst == null)
            {
                _lst = new List<Member>();
                _lst.Add(new Member(1, "James", new DateTime(2022, 11, 11), 1));
                _lst.Add(new Member(2, "Amy", new DateTime(2022, 11, 10), 2));
                _lst.Add(new Member(3, "Smith", new DateTime(2022, 10, 8), 1));
                _lst.Add(new Member(4, "Cait", new DateTime(2022, 9, 7), 2));
            }

            return _lst;
        }
        set
        {
            _lst = value;
        }
    }
}
Here's the class object of member:
public class Member
{
    public int Id { get; set; }
    public string Name { get; set; }
    public DateTime DateRegister { get; set; }
    public int Gender { get; set; }
    public int Status { get; set; }

    public Member(int id)
    {
        Id = id;
        Status = 1;
    }

    public Member(int id, string name, DateTime dateRegister, int gender)
    {
        Id = id;
        Name = name;
        DateRegister = dateRegister;
        Gender = gender;
        Status = 1;
    }

    public Member(int id, int status)
    {
        Id = id;
        Status = status;
    }

    public string GenderStr
    {
        get
        {
            switch (Gender)
            {
                case 1:
                    return "Male";
                case 2:
                    return "Female";
                default:
                    return "Other";
            }
        }
    }

    public string DateRegisterStr
    {
        get
        {
            if (DateRegister == DateTime.MinValue)
                return "---";
            return DateRegister.ToString("dd MMM yyyy");
        }
    }

    public string DateRegisterData
    {
        get
        {
            if (DateRegister == DateTime.MinValue)
                return "";
            return DateRegister.ToString("yyyy-MM-dd");
        }
    }

    public string SelectGender(int g)
    {
        if (g == Gender)
            return "selected";
        return "";
    }
}
Here is the sample of serialized JSON string:
[
    {
        "Id": 1,
        "Name": "James",
        "DateRegister": "2022-11-11T00:00:00",
        "Gender": 1,
        "Status": 1,
        "GenderStr": "Male",
        "DateRegisterStr": "11 Nov 2022",
        "DateRegisterData": "2022-11-11"
    },
    {
        "Id": 2,
        "Name": "Amy",
        "DateRegister": "2022-11-10T00:00:00",
        "Gender": 2,
        "Status": 1,
        "GenderStr": "Female",
        "DateRegisterStr": "10 Nov 2022",
        "DateRegisterData": "2022-11-10"
    }
]
Convert JSON string into javascript object, it can be used like this:
let ojb = JSON.parse(json_string);
let m1 = ojb[0];
m1.Id
m1.Name
m1.Gender
m1.DateRegisterData
let m2 = ojb[1];
m2.Id
m2.Name
m2.Gender
m2.DateRegisterData
Next, continue...
Coding the Page for Building the Dynamic HTML Table
Add a new blank page, let's call it "LoadJavascriptTable.aspx":
Add a few buttons to the main body form:
<div class="divbuttons">
    <asp:Button ID="btSave" runat="server" Text="Save" OnClick="btSave_Click" />
    <a href="LoadJavascriptTable.aspx">Refresh Data</a>
    <a href="#">Add Row</a>
</div>
Let's style the buttons with CSS:
.divbuttons {
margin-bottom: 10px;
}

.divbuttons input[type=submit], .divbuttons a {
border-radius: 15px;
border: 1px solid #234db1;
padding: 8px 12px;
display: inline-block;
text-decoration: none;
background: #4266bd;
color: white;
font-size: 10pt;
cursor: pointer;
}

.divbuttons input[type=submit]:hover, .divbuttons a:hover {
text-decoration: none;
background: #234db1;
}
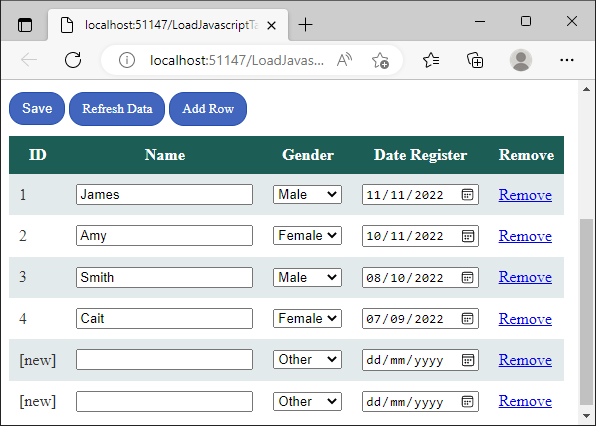
Now, the buttons will look like this.
Add the main table with fixed header below the buttons:
<div class="div1">
    <table id="tb1">
        <tr>
            <th>ID</th>
            <th>Name</th>
            <th>Gender</th>
            <th>Date Register</th>
            <th>Remove</th>
        </tr>
    </table>
</div>
add the style for the table:
.div1 table {
    border-collapse: collapse;
}

.div1 th {
    border: 1px solid black;
    background: #1C5E55;
    color: white;
    padding: 10px;
    border: none;
}

.div1 td {
    border: 1px solid black;
    color: #333333;
    padding: 10px;
    border: none;
}

.div1 tr:nth-child(even) {
    background: #E3EAEB;
}
The output of the color/design of the table will look something like this:
Insert the following JavaScript into the header. This JavaScript block will download the JSON member objects from server:
function loadDoc() {
const xhttp = new XMLHttpRequest();
xhttp.onload = function () {
let text = this.responseText;
}
xhttp.open("GET", "apiGetMemberList.aspx", true);
xhttp.send();
}
Convert the JSON string into JavaScript object list:
function loadDoc() {
const xhttp = new XMLHttpRequest();
xhttp.onload = function () {
let text = this.responseText;
let lst = JSON.parse(text);
}
xhttp.open("GET", "apiGetMemberList.aspx", true);
xhttp.send();
}
Next, load the member list into the table in another separate function:
function loadDoc() {
const xhttp = new XMLHttpRequest();
xhttp.onload = function () {
let text = this.responseText;
let lst = JSON.parse(text);
loadMember(lst);
}
xhttp.open("GET", "apiGetMemberList.aspx", true);
xhttp.send();
}
Preparing new function for loading the member objects:
function loadMember(lst) {

}
Obtain the main table object:
function loadMember(lst) {
    let tb1 = document.getElementById("tb1");
}
Lood through each member object and insert new rows and cells:
function loadMember(lst) {
let tb1 = document.getElementById("tb1");
for (let i = 0; i < lst.length; i++) {
let m = lst[i];
let rowid = `tr_${m.Id}`;
let row = tb1.insertRow(-1);
row.id = rowid;
let td1 = row.insertCell(-1);
let td2 = row.insertCell(-1);
let td3 = row.insertCell(-1);
let td4 = row.insertCell(-1);
let td5 = row.insertCell(-1);
}
}
Insert data into each table cells:
function loadMember(lst) {
let tb1 = document.getElementById("tb1");
for (let i = 0; i < lst.length; i++) {
let m = lst[i];
let rowid = `tr_${m.Id}`;
let row = tb1.insertRow(-1);
row.id = rowid;
let td1 = row.insertCell(-1);
let td2 = row.insertCell(-1);
let td3 = row.insertCell(-1);
let td4 = row.insertCell(-1);
let td5 = row.insertCell(-1);
let selectMale = "";
let selectFemale = "";
let selectOther = "";
if (m.Gender == 1)
selectMale = "selected";
else if (m.Gender == 2)
selectFemale = "selected";
else
selectOther = "selected";
if (m.Id < 0)
td1.innerHTML = "[new]";
else
td1.innerHTML = m.Id;
td2.innerHTML = `<input name='input_${m.Id}_name'
type='text' value='${m.Name}' />`;
td3.innerHTML = `
<select name='input_${m.Id}_gender'>
<option value='1' ${selectMale}>Male</option>
<option value='2' ${selectFemale}>Female</option>
<option value='0' ${selectOther}>Other</option>
</select>`;
td4.innerHTML = `<input name='input_${m.Id}_date'
type='date' value='${m.DateRegisterData}' />`;
td5.innerHTML = `<a href='#' onclick='removeRow(${m.Id});
return false;'>Remove</a>`;
}
}
You'll notice that, all inputs' field names start with "input_". This is for easy identification during data collection at code behind.
At the 5th table cell, a "Remove" button is added:
td5.innerHTML = `<a href='#' onclick='removeRow(${m.Id}); return false;'>Remove</a>`;
Add a HTML hidden input field "hiddenRemoveId" to store the IDs of the removed members:
<input type="hidden" name="hiddenRemoveId" id="hiddenRemoveId" />

<div class="divbuttons">
    <asp:Button ID="btSave" runat="server" Text="Save" OnClick="btSave_Click" />
    <a href="LoadJavascriptTable.aspx">Refresh Data</a>
    <a href="#">Add Row</a>
</div>
Here's the JavaScript for removing the row of member:
function removeRow(rid) {
    if (rid > 0) {
        let hiddenRemoveId = document.getElementById("hiddenRemoveId");
        hiddenRemoveId.value = hiddenRemoveId.value + rid + ",";
    }
    document.getElementById(`tr_${rid}`).remove();
}
At the buttons bar:
<div class="divbuttons">
    <asp:Button ID="btSave" runat="server" Text="Save" OnClick="btSave_Click" />
    <a href="LoadJavascriptTable.aspx">Refresh Data</a>
    <a href="#">Add Row</a>
</div>
Insert JavaScript for the "Add Row" button, this:
<a href="#">Add Row</a>
will become this:
<a href="#" onclick="addRow(); return false;">Add Row</a>
The "return false;" statement stops the default behaviour of "mouse click" event which it will attempt to find the anchor link of "#".
Here's the JavaScript for adding/inserting new row:
var newid = 0;

function addRow() {
    let newid = getNewId();
    let j = `[{"Id":${newid},"Name":"","DateRegister":"",
               "Gender":0,"DateRegisterData":""}]`;
    let lst = JSON.parse(j);
    loadMember(lst);
}

function getNewId() {
    newid--;
    return newid;
}
which basically means, insert new row with an empty member object into the table.
Add an additional placeholder for displaying message after "Save".
<input type="hidden" name="hiddenRemoveId" id="hiddenRemoveId" />

<asp:PlaceHolder ID="phMsg" runat="server"></asp:PlaceHolder>

<div class="divbuttons">
    <asp:Button ID="btSave" runat="server" Text="Save" OnClick="btSave_Click" />
    <a href="LoadJavascriptTable.aspx">Refresh Data</a>
    <a href="#" onclick="addRow(); return false;">Add Row</a>
</div>
Add another line to tell the page to automatically load the member list upon page load:
<script type="text/javascript">
    window.onload = loadDoc();
</script>
So far, we have done for the front page.
Now, let's move to code behind for saving the data.
protected void btSave_Click(object sender, EventArgs e)
{
string removeIDs = Request.Form["hiddenRemoveId"] + "";
}
Display the names of removed members to front page:
string removeIDs = Request.Form["hiddenRemoveId"] + "";
if (removeIDs.Length > 0)
{
StringBuilder sb = new StringBuilder();
string[] removeIdArray = removeIDs.Split(',');
foreach (var idstr in removeIdArray)
{
int rid = 0;
if (int.TryParse(idstr, out rid))
{
foreach (var m in helper.lst)
{
if (m.Id == rid)
{
if (sb.Length > 0)
sb.Append(", ");
sb.Append($"(ID: {m.Id}) {m.Name}");
}
}
}
}
phMsg.Controls.Add(new LiteralControl
($"<div class='divmsg'>Some member(s) were removed: {sb}</div>"));
}
Let's style the output div message box with CSS (done at front page):
.divmsg {
    border: 1px solid #218529;
    color: #218529;
    padding: 10px;
    margin-bottom: 10px;
}
Let's continue...
Obtain the largest ID:
int newid = 0;

foreach (var m in helper.lst)
{
    if (m.Id > newid)
        newid = m.Id;
}
Declare a dictionary to store the data:
Dictionary<int, Member> dicMember = new Dictionary<int, Member>();
Loop through all the form input elements for data collection:
Dictionary<int, Member> dicMember = new Dictionary<int, Member>();

foreach (var key in Request.Form.AllKeys)
{
    if (key.StartsWith("input_"))
    {
        string[] ka = key.Split('_');

        int id = Convert.ToInt32(ka[1]);

        if (dicMember.ContainsKey(id))
            continue;

        string name = Request[$"input_{id}_name"];
        int gender = Convert.ToInt32(Request[$"input_{id}_gender"]);
        string dateinput = Request[$"input_{id}_date"];
        DateTime date = helper.ConvertToDate(dateinput);

        dicMember[id] = new Member(id, name, date, gender);
    }
}
Reconstruct the List of member and store it back to "database".
List<Member> lst = new List<Member>();
foreach (var kv in dicMember)
{
if (kv.Value.Id < 0)
{
newid++;
kv.Value.Id = newid;
}
lst.Add(kv.Value);
}
helper.lst = lst;
In this article, I did not demonstrate the use of real database, as this will be on another topic.
Happy coding!
History
- 12th November, 2022 - Initial release
Programming is an art.


 General
  News
News  Suggestion
  Question
  Bug
Bug  Answer
  Joke
Joke  Praise
  Rant
Rant  Admin
Admin 


 the table structure is shown in the article.