This is Part 2 of a 3-part series that explores how to create an end-to-end streaming solution starting by streaming data into Azure Event Hubs, processing it with Azure Functions in Java, and piping the results into a Cosmos DB database. This article shows how to connect our Event Hub to Azure Functions that will process our messages and store them in Cosmos DB.
In the first article of this series, we successfully subscribed to a real-time Bitcoin-to-USD price WebSocket, then forwarded the messages to an Azure Event Hub. In this article, we'll consume these messages from the Event Hub using an Azure Function before writing the information to Cosmos DB.
Functions provide serverless compute for Azure. We write the code and publish it as an Azure Function, then Azure handles the infrastructure and scaling in the background. Azure Functions provide only the required resources to meet our application’s workload. This approach offers on-demand compute that eases scaling and saves money during low demand.
Cosmos DB is a fully-managed NoSQL database. This fully-managed solution enables us to focus on building the application instead of database administration, as it handles updates and patches automatically. Serverless and automatic scaling options also help our database scale to meet demand.
Cosmos DB supports many popular NoSQL APIs, including MongoDB, Cassandra, and Gremlin. So, we can still use our favorite APIs to work with the database, and Cosmos DB takes care of the storage.
Let’s get started setting up Cosmos DB and our Azure Function. The full code is available on GitHub.
Creating a Cosmos DB Instance
First, create a database using the Cosmos DB console in Azure. To do this, search for “Cosmos DB” in Azure and find it under Services. Once you are in the Cosmos DB console, click Create.
We want to create a Core (SQL) instance for this demonstration. However, as the screenshot below shows, there are other API options.
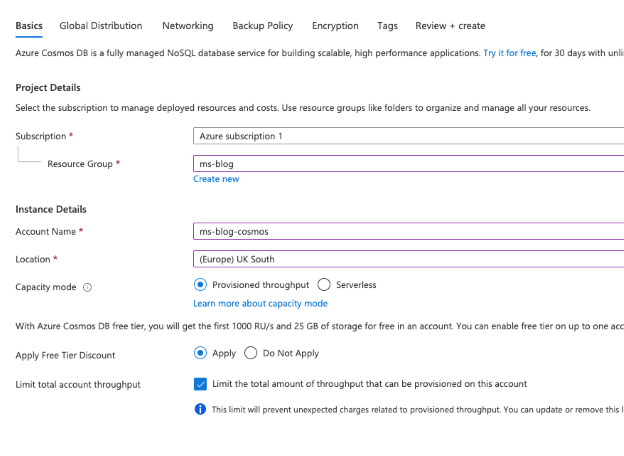
Fill in the form, name your instance, and select a suitable location. We should reuse the resource group that we created in the first article. Since all these resources will work together, it makes sense that they live in the same resource group.
We apply the free tier discount and limit the total account throughput for demonstration purposes. This approach is beneficial when testing your application. It ensures you don’t encounter unexpected charges when Cosmos DB auto-scales if, for example, you accidentally send lots of data for a sustained period to the database.

The next step is to choose how to distribute your instance. Managed services can vastly improve your application’s architecture and failover capability. These options provide redundancies across regions and availability zones, so if there’s ever a service issue in a specific location, your service can continue running as usual from a different place.
For this demonstration, we leave these settings disabled. However, you should enable some of these options in production applications if the cost is worth avoiding disruption and downtime.
We’ll leave the rest of the options as defaults. Note the Networking and Backup Policy tabs for production systems, though. These settings lock down your instance to non-public access and ensure its backup cycle matches your needs.
Now that the database is up and running, we’ll explore how we can use Azure Functions to pass our message from the Event Hub into the database.
Processing Event Hub Messages with Azure Functions
In this section, we’ll create an Azure Function. New messages going to the Event Hub will trigger this Function. We’ll simply read the information and write it to our database after parsing some properties to be more helpful to downstream applications, like Power BI.
Go to the Azure console and search for “Function App” to create the function. The Function App will encapsulate our functions. Click Create and fill in the form, ensuring you use the same resource group as before.
Once created, click the Function App. Within the menu, on the left side, click the Functions option.
A message will tell you that the Azure portal doesn’t support editing Java Function Apps. Click Create anyway to get instructions on setting up your local development environment to start building and testing your function. We use Visual Studio Code (VS Code).
Integrating with VS Code makes local development much more straightforward. You get all the necessary files and configurations to automatically link the Function to the first article’s Event Hub.
Before doing this, we need to create a storage account. Go to the Storage accounts section in the Azure console and press Create. Again, ensure you use the same resource group and pick a suitable redundancy option. For this tutorial, we choose locally-redundant storage.
Once complete, go back to the Function App. Click Create in the Functions sub-menu and follow the instructions to install the Azure dependencies. First, open VS Code and install the Azure Functions extension. Within VS Code, click the Azure menu button on the left-hand side, then click Create New Project.
Follow the instructions by providing a folder, selecting Java as the language, and providing a group ID and artifact ID (these IDs can be anything).
Once the project is ready, again from within VS Code's Azure menu, click the create function button under Functions.
VS Code will ask you to select a template. We click Change Template Filter and change it to “all.” Then we choose EventHubTrigger.
In the following steps, choose the Event Hub and policy you created in the first article and the storage account you just made.
Once complete, you have a Java project ready to develop an Azure Function locally. It contains boilerplate code to run the function and output any messages to the Event Hub.
Open and run the first article’s Event Hub project to test your application. This action will send batches of 100 messages at a time to our Event Hub. While this is running, go back into the Function project and run it. If everything is connected correctly, you should start to observe the messages sent to the Event Hub output in the console, like in the screenshot below.
Now we trigger a Function when new data arrives in the Event Hub. We can process the data before storing it in Cosmos DB. The Function will parse the JSON into a Java object and split the price array values into individual properties.
JSONObject json = new JSONObject(singleMessage);
JSONArray priceArr = json.getJSONArray("price");
json.put("timestamp",priceArr.get(0));
json.put("openPrice",priceArr.get(1));
json.put("highPrice",priceArr.get(2));
json.put("lowPrice",priceArr.get(3));
json.put("closePrice",priceArr.get(4));
json.put("volume",priceArr.get(5));
json.remove("price");
First, we parse the message into a JSON Object, so it's easier to manipulate. We can then access the price array within the object. We’ll put each of the six values into the JSON object as individual properties. Finally, we'll remove the price array from the object.
This approach provides a clean JSON object containing each field plus those extracted from the array. So, it's easier to query this data in Cosmos DB.
Next, we’ll convert this JSON object back into a Java object before integrating it with Cosmos DB. First, we create a Java class to represent our object. It also helps Cosmo DB understand our properties’ data types.
public class BlockchainPrice {
   private int sequenceNumber;
   private String event;
   private String channel;
   private String symbol;
   private String timestamp;
   private double openPrice;
   private double highPrice;
   private double lowPrice;
   private double closePrice;
   private double volume;
}
We then use Gson to convert a JSON string to a Java object automatically. This approach works as long as we name the JSON object properties the same as the Java class.
Gson g = new Gson();
BlockchainPrice price = g.fromJson(json.toString(), BlockchainPrice.class);
Next, we’ll adapt the default function that processes our Event Hub messages to interact with our Cosmos DB instance and store the data.
Storing Data in Cosmos DB
We need to create a container to host our database and make the database for storing our data. First, go into the Azure console and click the already-created Cosmos DB instance. Then, click Create a Container.
Select Create a New Database and give it an ID. Then, select suitable scaling and throughput settings. We've kept ours low for this demonstration.
Next, give the container an ID and select a partition key for the data. The key should be the property's name for the database to store, ideally on every record.
Now that the database is ready, we get its connection string and bring it into our Function App. Find the Primary Connection String in the Keys menu along the left-hand side. We need to store the connection string in our Function App project’s local.settings.json file, which was automatically created when we created the project in VS Code.
The property name should be CosmosDBConnectionString, and the value should be the primary connection string we just copied from the Azure portal.
We must modify our run function to provide a Cosmos DB output annotation and a document to store our data.
Add the CosmosDBOutput annotation after the EventHubTrigger annotation and give it some parameters. The connectionStringSetting parameter should use the property we added to the local settings file.
@FunctionName("EventHubTriggerProcessMessage")
public void run(
    @EventHubTrigger(name = "message", eventHubName = "blockchain-usd-btc-price",
    connection = "msblog_javaapp_EVENTHUB", consumerGroup = "$Default",
    cardinality = Cardinality.MANY) List<String> message,
    @CosmosDBOutput(
        name = "msblogcosmos",
        databaseName = "blockchain-price",
        collectionName = "blockchainPrices",
        connectionStringSetting = "CosmosDBConnectionString")
        OutputBinding<BlockchainPrice> document,
    final ExecutionContext context
)
Once this finishes, we only need to add a single line of code to the end of our function to store our Java object in Cosmos DB:
Gson g = new Gson();
BlockchainPrice price = g.fromJson(json.toString(), BlockchainPrice.class);
document.setValue(price);
We can now run our Event Hub application to send some messages, then confirm that we can see data in Cosmos DB.
From the Cosmos DB console, select the instance. Then, choose Data Explorer in the left menu. You should see your container, and, if you expand it, your database too.
Select items to automatically run a default SQL query.
You should see your data returned on the screen like the screenshot above. Selecting an item provides more detail. As the screenshot shows, our document is stored correctly. It has the items correctly parsed out of the array and stored in individual properties.
Next Steps
In this article, we’ve successfully created a Cosmos DB instance. We’ve also developed an Azure Function locally using Visual Studio Code. The function processes data from an Event Hub and stores it in Cosmos DB.
In the final article of our three-part series, we'll explore using Power BI for ad-hoc analysis and creating powerful dashboards.
To learn how to use Azure Cosmos DB change feed to understand user patterns, perform real-time data analysis and visualization, check out Use Azure Cosmos DB change feed to visualize real-time data analytics.
This member has not yet provided a Biography. Assume it's interesting and varied, and probably something to do with programming.


