In this article, we’ll add PlayFab’s user authentication features with UI elements inside Unity. We’ll build on our Unity game project, adding the ability for users to create a new player account or log in with an existing account using PlayFab.
Although building a multiplayer game may seem daunting to indie developers, and studios know how much work it usually takes to manage multiplayer capabilities, PlayFab makes it easy to add helpful features to your Unity game. In the first article of this series, we created a new Unity game based on a template and linked it to our PlayFab account.
In this article, we’ll add PlayFab’s user authentication features with user interface (UI) elements inside Unity. We’ll build on our Unity game project, adding the ability for users to create a new player account or log in with an existing account using PlayFab.
Requirements
To follow this guide, you will need a free PlayFab account. You’ll also need the following software installed on your computer:
You’ll need the Unity game project we created in the previous article, too. You should follow that guide before continuing with this article. Remember you can review the full project code to see the game in action.
Updating the Intro Scene with Login UI Elements
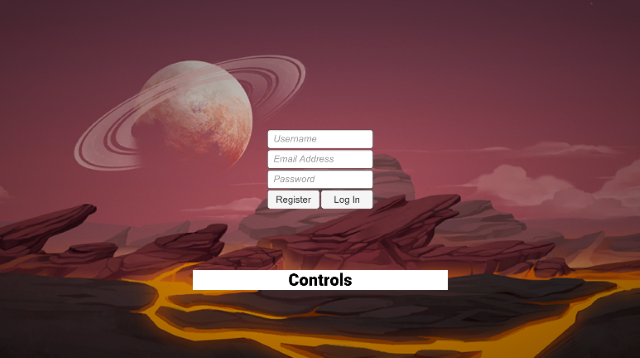
We’ll start by placing the necessary UI elements into the intro menu scene for the player to log in or create an account.
Expand the project files to FPS > Scenes and double-click the IntroMenu scene file to load it into the editor if you’re following along via the FPS Microgame.

Then, click the Game tab and put the menu scene properly into focus.
We’ll add three Input Fields to the Canvas for the player to enter their username, email address, and password. PlayFab doesn’t require both an email address and username, but a second field allows us to add an option for our players to reset their passwords in the future.
Right-click on Canvas and select UI > Input Field to place an input element in the center of the menu screen. Name or rename the element something like “UsernameField” so it’s easy to find.
Repeat the steps until you have all three fields in the hierarchy.
Next, we adjust the field positions to avoid overlapping and hiding each other. Click the Username input field and set the Pos Y value to 60, then select the Email input field and set its Pos Y value to 30 to stack all three input fields on top of each other.
Then, expand each input field and select Placeholder to edit each field’s placeholder text to match its function (Username, Email Address, and Password).
Next, select each input field and change the Content Type to match the input type it needs. Specifically, set the Username field to Alphanumeric, the Email field to Email Address, and the Password field to Password. These settings ensure that the input fields have correct validation and the password text is hidden on the screen when the player types.
One quick reminder: Don’t forget to save your progress!
Let’s add two buttons next.
Right-click on the canvas and choose UI > Button to create a new button on the canvas. Give each button a descriptive name, such as “RegisterButton” and “LoginButton.”
We’ll want to resize and reposition the buttons to appear below the input fields.
We use these values:
RegisterButton
- Pos X: -40
- Pos Y: -30
- Width: 80
LoginButton
- Pos X: 40
- Pos Y: -30
- Width: 80
Expand the button elements and update their text so the user will know which button to press.
We also need a text element to show any error messages resulting from the account creation or login process. So, add a text element to the canvas by right-clicking and selecting UI > Text. Name the element “ErrorMessage.”
Position the text element below the buttons with Pos Y at –60. Also, update the text to “Error Message” for clarity.
Let’s center the text alignment using the Paragraph > Alignment buttons and change the text color to red for better visibility.
Also, we set the Vertical Overflow property to Overflow so long error messages will also display before the buttons.
Lastly, let’s hide the big Play button at the bottom of the scene from this menu. That way, players must register or log in to play the game.
So, select the StartButton element and uncheck the box to the left of the element name to deactivate it.
Adding Code to the UI
We can now attach some code to those UI elements to make them take action.
First, create a new folder called “Scripts” inside the Assets folder. Note that this is a different folder from the one already inside the FPS folder.
Right-click on the new Scripts folder. Then, click Create > C# Script to add a new script file. Let’s call it “PlayFabCode.”
Double-click the Script file to open it in Visual Studio so we can edit the C# code.
This file will contain placeholder methods for Start() and Update().
At the top of the Script file, add the following using statements:
using UnityEngine.UI;
using UnityEngine.SceneManagement;
using PlayFab;
using PlayFab.ClientModels;
And inside the PlayFabCode class, define these variables that will map to the UI elements:
public InputField Username, Email, Password;
public Text ErrorMessage;
public string SceneName = "";
Clear the ErrorMessage text at the beginning of the game by modifying the Start() method:
void Start()
{
    ErrorText.text = "";
}
Now, we can add some methods to call PlayFab’s account registration API with this code:
public void RegisterClick()
{
var register = new RegisterPlayFabUserRequest
{ Username = Username.text, Email = Email.text, Password = Password.text };
PlayFabClientAPI.RegisterPlayFabUser(register, OnRegisterSuccess, OnRegisterFailure);
}
private void OnRegisterSuccess(RegisterPlayFabUserResult result)
{
ErrorMessage.text = "";
SceneManager.LoadScene(SceneName);
}
private void OnRegisterFailure(PlayFabError error)
{
if (error.ErrorDetails != null && error.ErrorDetails.Count > 0)
{
using (var iter = error.ErrorDetails.Keys.GetEnumerator())
{
iter.MoveNext();
string key = iter.Current;
ErrorMessage.text = error.ErrorDetails[key][0];
}
}
else
{
ErrorMessage.text = error.ErrorMessage;
}
}
We then duplicate and modify these methods into the following code to handle logging in with PlayFab.
public void LoginClick()
{
var login = new LoginWithPlayFabRequest
{ Username = Username.text, Password = Password.text };
PlayFabClientAPI.LoginWithPlayFab(login, OnLoginSuccess, OnLoginFailure);
}
private void OnLoginSuccess(LoginResult result)
{
ErrorMessage.text = "";
SceneManager.LoadScene(SceneName);
}
private void OnLoginFailure(PlayFabError error)
{
if (error.ErrorDetails != null && error.ErrorDetails.Count > 0)
{
using (var iter = error.ErrorDetails.Keys.GetEnumerator())
{
iter.MoveNext();
string key = iter.Current;
ErrorMessage.text = error.ErrorDetails[key][0];
}
}
else
{
ErrorMessage.text = error.ErrorMessage;
}
}
A note on password encryption: If you’re concerned about password security when using these APIs with PlayFab, you can rest assured that PlayFab encrypts and hashes the password we send.
The full script should look like this:
using System.Collections;
using System.Collections.Generic;
using UnityEngine;
using UnityEngine.UI;
using UnityEngine.SceneManagement;
using PlayFab;
using PlayFab.ClientModels;
public class PlayFabCode : MonoBehaviour
{
public InputField Username, Email, Password;
public Text ErrorMessage;
public string SceneName = "";
public void RegisterClick()
{
var register = new RegisterPlayFabUserRequest
{ Username = Username.text, Email = Email.text, Password = Password.text };
PlayFabClientAPI.RegisterPlayFabUser
(register, OnRegisterSuccess, OnRegisterFailure);
}
private void OnRegisterSuccess(RegisterPlayFabUserResult result)
{
ErrorMessage.text = "";
SceneManager.LoadScene(SceneName);
}
private void OnRegisterFailure(PlayFabError error)
{
if (error.ErrorDetails != null && error.ErrorDetails.Count > 0)
{
using (var iter = error.ErrorDetails.Keys.GetEnumerator())
{
iter.MoveNext();
string key = iter.Current;
ErrorMessage.text = error.ErrorDetails[key][0];
}
}
else
{
ErrorMessage.text = error.ErrorMessage;
}
}
public void LoginClick()
{
var login = new LoginWithPlayFabRequest
{ Username = Username.text, Password = Password.text };
PlayFabClientAPI.LoginWithPlayFab(login, OnLoginSuccess, OnLoginFailure);
}
private void OnLoginSuccess(LoginResult result)
{
ErrorMessage.text = "";
SceneManager.LoadScene(SceneName);
}
private void OnLoginFailure(PlayFabError error)
{
if (error.ErrorDetails != null && error.ErrorDetails.Count > 0)
{
using (var iter = error.ErrorDetails.Keys.GetEnumerator())
{
iter.MoveNext();
string key = iter.Current;
ErrorMessage.text = error.ErrorDetails[key][0];
}
}
else
{
ErrorMessage.text = error.ErrorMessage;
}
}
void Start()
{
ErrorMessage.text = "";
}
void Update()
{
}
}
We’re finished editing this script. You can close out of Visual Studio and return to the Unity Editor.
Linking Script Events to the UI
The third and final step to making these UI elements functional is to link them to the script we created.
In the Unity Editor hierarchy, create an Empty object for the scene. We can consolidate our PlayFab UI controls there by right-clicking on the root IntroMenu scene and selecting GameObject > Create Empty. Name the object “PlayFabControls.”
We then drag and drop the PlayFabCode script file onto the PlayFabControls game object to assign the script.
We can now drag and drop each UI element, such as UsernameField, to the script’s corresponding property on the right.
Also, we set the Scene Name to “MainScene” so that the scene switch upon successful registration or login navigates to the gameplay Unity scene.
Finally, we need to add onClick event handlers to the two buttons. First, select the RegisterButton element and click the + button to add a click event handler.
Now, drag and drop the PlayFabControls element onto the event handler box (where it says None). Then, set the Function to PlayFabCode > RegisterClick().
Repeat the steps for LoginButton and choose LoginClick() for the function, so it activates the login script path.
And that’s it! Your login screen is now complete. Save the project.
Run and Test
Now, you can click the Play button to run your game. If you set up everything correctly, you’ll be able to register an account the first time and log in each time afterward using the same credentials.
Next Steps
We added fully-functional user authentication to our Unity game project using Azure PlayFab, with some UI and hardly any code. Players can now create accounts with unique usernames then log in, paving the way for other PlayFab features such as score reporting on leaderboards.
Join us in the following article to begin creating the backend code. Our game will connect to this backend to enable multiplayer gameplay.
To learn more about the new PlayFab Matchmaking feature, check out Matchmaking - PlayFab.
Raphael Mun is a tech entrepreneur and educator who has been developing software professionally for over 20 years. He currently runs Lemmino, Inc and teaches and entertains through his Instafluff livestreams on Twitch building open source projects with his community.


 General
  News
News  Suggestion
  Question
  Bug
Bug  Answer
  Joke
Joke  Praise
  Rant
Rant  Admin
Admin 


