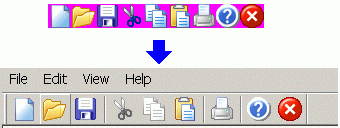
Introduction
Everybody who used full-color images for toolbars have been faced with the problem of creating disabled/inactive images. Whether you order images from a professional artist, or get them from shell32.dll from WinXP, in most cases you only have normal images. The common way is preparing copies of bitmaps for disabled/inactive glyphs using a simple image editor. For example, I have used editing features of IrfanView. But this approach has several drawbacks - you have to store multiple images which makes your app bigger; and, most importantly, you will have to do a lot of tedious work if you decided to add/modify toolbar images later.
The alternative approach is automatically generate sub images from the original picture. To my surprise, I have not found on CodeProject any ready-to-use solutions, so I have combined several existing techniques from other authors.
Background
The code for this article is based on following articles from CodeProject:
- CColor - RGB and HLS combined in one class by Christian Rodemeyer, for RGB-HLS conversion (color.cpp, color.h).
- Add fast user-extensible image processing support to CBitmap by Daniel Godson, for bitmap's pixel-by-pixel processing (enbitmap.cpp, enbitmap.h).
I have to admit that my own additions to these authors is no more than 10 lines of code, but I still hope you will find the result useful. I have also removed all unused stuff from both source codes to minimize the size of the resulting stand-alone component.
Using the Code
At the top of all other authors' source code sits CToolBar24 - a drop-in replacement of CToolBar class in your code. For an MDI/SDI application, simply replace the type of your CMainFrame::m_wndToolBar member to CToolBar24 (declared in enbitmap.h), and make a single additional call:
if (!m_wndToolBar.CreateEx(this,TBSTYLE_FLAT,WS_CHILD | WS_VISIBLE | CBRS_TOP
| CBRS_GRIPPER | CBRS_TOOLTIPS | CBRS_FLYBY | CBRS_SIZE_DYNAMIC) ||
!m_wndToolBar.LoadToolBar(IDR_MAINFRAME))
{
TRACE0("Failed to create toolbar\n");
return -1; }
m_wndToolBar.SetFullColorImage(IDR_MAINFRAME_24, RGB(255, 0, 255));
Just one function is added: void CToolBar24::SetFullColorImage(UINT ID, COLORREF rgbBack), where ID is the resource ID of the full color bitmap, and rgbBack is the background color of your bitmap (in my sample this is RGB(255, 0, 255)).
As result, you will have a full-color toolbar, with inactive buttons looking a bit lighter, and disabled buttons grayed out.
Of course, you don't have to like this look and feel of special state images. Due to the modular structure, you can easily modify inactive/disabled image generation. Just read next section.
Behind the Scenes
Image processing itself is done by the CEnBitmap class, which can modify pixels by using special ImageProcessor classes. Two processors are provided with this project: CImageGrayer, which grays the picture out; and CImageHigh, which can make image look lighter or darker. Look for the CEnBitmap::MakeDisabled and CEnBitmap::MakeNotActive functions to modify the appropriate button appearance. For example, here is how the current MakeDisabled works:
BOOL CEnBitmap::MakeDisabled(COLORREF bk)
{
    int R = GetRValue(bk);
    int G = GetGValue(bk);
    int B = GetBValue(bk);

    CImageHigh high(0.08f);
    high.SetBkColor(R, G, B);
    CImageGrayer gray;
    gray.SetBkColor(R, G, B);

    C32BIPArray aProcessors;
    aProcessors.Add(&gray);
    for (int i=0; i<3; i++)
        aProcessors.Add(&high);

    return ProcessImage(aProcessors);
}
As you can see, an array of processors is prepared and handled. For details of processors implementation I suggest you check the original article. But in most cases you will find reasonable picture results by playing with the given 2 processors just like I did.
Do not miss the constructor parameter for CImageHigh(float fLum=0.1). fLum is the offset for Luminance, which is applied every time CImageHigh processor is used. fLum should be between -1 and 1, negative values will make image look dark. For detailed description of the HLS model see this article.
This member has not yet provided a Biography. Assume it's interesting and varied, and probably something to do with programming.
 General
  News
News  Suggestion
  Question
  Bug
Bug  Answer
  Joke
Joke  Praise
  Rant
Rant  Admin
Admin 


