Introduction
Visual Studio projects contain all the necessary information to build a .NET assembly. A project may contain source code, resources, user settings, configuration files. The structure of a Visual Studio project is stored in an XML file that adheres to the MSBuild XML schema. The schema is defined here. IT systems often consist of hundreds of Visual Studio projects. There is sometimes a need to make the same modifications across all these projects. With this solution, projects may be checked-out and checked-in through Team Foundation, the OutputPath, and the strong key file may be set using absolute or relative paths, the AssemblyFileVersion may be set, a search and replace may be performed across all project files, and a hierarchical view of the projects may be displayed based on their references. Through this solution, several .NET functionalities are demonstrated such as parallel processing with the Parallel.For statement, calling Team Foundation through the Workspace class, reading and writing XML files with XmlDocument, making Regular Expression replacements with the Regex class, displaying a grid with the DataGridView (Windows Forms) class and with the DataGrid (WPF) class, displaying data in XmlDocument with a TreeView (Windows Forms and WPF) control and signing a project with a strong key.
Background
Visual Studio project files have the extension vbproj for Visual Basic projects, and csproj for C# projects. These files have two entries for each of the debug and release configuration for the OutputPath:
<Project ToolsVersion="4.0" DefaultTargets="Build"
        xmlns="http://schemas.microsoft.com/developer/msbuild/2003">
  <PropertyGroup Condition=" '$(Configuration)|$(Platform)' == 'Debug|x86' ">
    <OutputPath>bin\Debug\</OutputPath>
  </PropertyGroup>
  <PropertyGroup Condition=" '$(Configuration)|$(Platform)' == 'Release|x86' ">
    <OutputPath>bin\Debug\</OutputPath>
  </PropertyGroup>
</Project>
In an IT system with hundreds of project files, there is a need to set the output path to the same folder in all projects. This output path may be absolute (for example, C:\ITSystem1\Runtime) or relative (for example, ..\..\Runtime).
Project files contain references to other assemblies:
<Project ToolsVersion="4.0" DefaultTargets="Build"
              xmlns="http://schemas.microsoft.com/developer/msbuild/2003">
  <ItemGroup>
    <Reference Include="Assembly1">
      <Name>Assembly1</Name>
      <HintPath>C:\ITSystem1\Runtime\Assembly1.dll</HintPath>
      <Private>False</Private>
    </Reference>
    <Reference Include="Assembly2">
      <Name>Assembly2</Name>
      <HintPath>C:\ITSystem1\Runtime\Assembly2.dll</HintPath>
      <Private>False</Private>
    </Reference>
  </ItemGroup>
</Project>
The paths in the element "HintPath" may also be absolute, or relative. Assemblies that are entered into the Global Assembly Cache (GAC) must be strong signed. In older projects, the key file was defined in the AssemblyInfo.vb and AssemblyInfo.cs, respectively:
Visual Basic: <Assembly: AssemblyKeyFile("C:\ITSystem1\Runtime\Key1.snk")>
C#: [assembly: AssemblyKeyFile("C:\ITSystem1\Runtime\Key1.snk")]
The path had to be an absolute path. In Visual Studio 2010, there is a possibility to define a relative path to the key file. The key file is no longer referenced in the AssemblyInfo but in the project file. In Visual Studio, you may right-click on the project, choose the menu item Add/Existing Item, select the strong key file and on the Add button, choose Add As Link. This will add in the project a link to the strong key file. In project properties, under tag Signing, you may add the strong key file as the following figure shows:
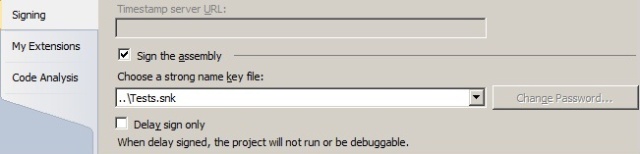
The following entries are created in the project file:
<Project ToolsVersion="4.0"
 xmlns="http://schemas.microsoft.com/developer/msbuild/2003" DefaultTargets="Build">
  <PropertyGroup>
    <AssemblyOriginatorKeyFile>..\Runtime\Key1.snk</AssemblyOriginatorKeyFile>
    <SignAssembly>true</SignAssembly>
  </PropertyGroup>
  <ItemGroup>
    <None Include="..\Runtime\Key1.snk">
      <Link>FTS.snk</Link>
    </None>
  </ItemGroup>
</Project>
Generally, relative paths should be used, so that the entire IT system may be relocated to another folder, and because different branches may exist for development, integration test, UAT test, and production.
AssemblyInfo files have an entry for the file version:
Visual Basic: <Assembly: AssemblyFileVersion("6.0.0.0")>
C#: [Assembly: AssemblyFileVersion("6.0.0.0")]
It is often desired to change this version number to the same value across all projects.
The Solution
There are three Visual Basic projects included in the zip file:
Tests.BL.ProjManip: Contains the logic for several project manipulations. Is signed with a strong key.Tests.UI.ProjManipWNF: User interface in Windows Forms, references Tests.BL.ProjManip.Tests.UI.ProjManipWPF: User interface in WPF, references Tests.BL.ProjManip.
All projects are provided with OutputPath, references, and key-file-path as relative paths. With this solution, these paths can be changed to absolute paths, and then they may be changed back to relative paths. You may unzip the source into any folder, for example, D:\ProjManip.
- Open ProjManip.sln with Visual Studio 2010, build the solution and close it.
- Depending on which client you want to run, double-click the corresponding EXE file:
- Windows Forms: Runtime\Tests.UI.ProjManipWNF.exe
- WPF: Runtime\Tests.UI.ProjManipWPF.exe
The following form appears:
- Windows Forms:

- WPF:
- In the combobox "Source folder", set the folder under which all the projects are situated, for example, D:\ProjManip. The combobox provides the last 10 entries. If you use the button to choose the folder, all files under that folder with the extension defined in "File filter", for example, *.vbproj are loaded and displayed on the grid. If you just type in the combobox, choose the menu File/Reload to load the files to the grid. In the "File filter", you may also define *.csproj for C# projects or any files adhering to the MSBuild standard. The WPF version does not have a button to choose the folder, because strange as it is, there is no
FolderBrowserDialog in WPF. - Actions operate on the selected items in the grid. In the textbox "
Threads", the number of parallel threads may be defined. Each action spawns the number of defined threads, and each thread processes a portion of the selected items. You may choose one of the following actions: - If you use source control of Team Foundation Server:
- If you want to manipulate project files, choose the menu Tools/Projects/Check out. This will check out all selected projects.
- If you want to manipulate AssemblyInfo files, choose the menu Tools/AssemblyInfo/Check out. This will check out all AssemblyInfo files of the selected projects.
- If you want to set the
AssemblyFileVersion value in the AssemblyInfo files, choose the menu Tools/AssemblyInfo/Set file version. A prompt appears, displaying the AssemblyFileVersion of the first selected AssemblyInfo, which may be changed.
Upon accepting the value, the AssemblyFileVersion value is set in all AssemblyInfo files of the selected projects. For example:
<Assembly: AssemblyFileVersion("1.0.0.1")>
- If you want to set the
OutputPath in the project files, set the output path in the text box "Output folder", for example, D:\ProjManip\Runtime, and then choose the menu item Tools/Projects/Set output path.
- If the checkbox "Use relative paths" is not checked, the
OutputPath is set as is in the selected projects. For example, in Tests.ClassLibrary1.vbproj and Tests.WindowsApplication1.vbproj, the OutputPath and the references are set as absolute paths. The output for Tests.ClassLibrary1.vbproj:
<OutputPath>D:\ProjManip\Runtime\</OutputPath>
    <Reference Include="Tests.ClassLibrary1">
      <HintPath>D:\ProjManip\Runtime\Tests.ClassLibrary1.dll\</HintPath>
    </Reference>
- If the checkbox "Use relative paths" is checked, the
OutputPath and all references to other assemblies are changed to relative paths. Note that for the relative paths to become correct, the existing paths must be absolute. The output for Tests.ClassLibrary1.vbproj:
<OutputPath>..\Runtime\</OutputPath>
    <Reference Include="Tests.ClassLibrary1">
      <HintPath>..\Runtime\Tests.ClassLibrary1.dll\</HintPath>
    </Reference>
- If you want to search and replace with Regular Expressions in all projects, choose the menu item Tools/Projects/Search and Replace. This will open a form with two text boxes for the search pattern and the replace string.
- Windows Forms:
- WPF:
The search and replace values may contain Regular Expressions as defined in Regex.Replace. Upon pressing the button OK, the search and replace is performed across all selected projects. In the example above, the OutputPath will be changed from:
<OutputPath>..\Runtime\</OutputPath>
to:
<OutputPath>..\..\Runtime\</OutputPath>
- If you want to set the strong key file in the project files, choose the menu item Tools/Add strong key to projects. This will search for a *.snk file in the folder defined by the textbox "Output folder". This file is then added as a link to the project, and the project is set to be signed by this key file. The key file entry in
AssemblyInfo is deleted. Tests.ClassLibrarary1.vbproj will be as follows:
- Use relative paths checked:
<PropertyGroup>
    <AssemblyOriginatorKeyFile>..\Runtime\Tests.snk</AssemblyOriginatorKeyFile>
    <SignAssembly>true</SignAssembly>
</PropertyGroup>
<ItemGroup>
    <None Include="..\Runtime\Tests.snk">
      <Link>Tests.snk</Link>
    </None>
</ItemGroup>
- Use relative paths not checked:
<PropertyGroup>
    <AssemblyOriginatorKeyFile>
     D:\ProjManip\Runtime\Tests.snk</AssemblyOriginatorKeyFile>
    <SignAssembly>true</SignAssembly>
</PropertyGroup>
<ItemGroup>
    <None Include="D:\ProjManip\Runtime\Tests.snk">
      <Link>Tests.snk</Link>
    </None>
</ItemGroup>
The AssemblyInfo file will have no entry for the strong key file.
- If you want to set the strong key file in the AssemblyInfo files, choose the menu item, Tools/Add strong key to AssemblyInfo. This will search for a *.snk file in the folder defined by the textbox "Output folder". A line for the key file is added to the
AssemblyInfo, and the information about the key file is deleted from the project file. The Tests.BL.ProjManip\My Project\AssemblyInfo.vb file will have the following entry:
<Assembly: AssemblyKeyFile("D:\ProjManip\Runtime\Tests.snk")>
Tests.BL.ProjManip.vbproj will have no information about the strong key file. The projects Tests.UI.ProjManipWNF and Tests.UI.ProjManipWPF will not be changed, because no entry about a strong key file exists either in the project or in the AssemblyInfo.
- When you have finished, you may check-in the projects and
AssemblyInfos through Tools/Projects/Check and Tools/AssemblyInfo/Check in, respectively. - If you want to cancel your changes, choose Tools/Projects/Undo check out and Tools/AssemblyInfo/Undo check out, respectively.
- You may double click on a grid row to open a project. The development environment defined in the textbox "DevEnv" is used.
- To load the references of the projects to memory, choose Tools/Load references. This will read the references of the selected projects and put them into an
XmlDocument. - To view the references of the projects in a hierarchical order, right-click on the grid and choose "References". To change back to grid view, right-click on the tree and choose "List view". The hierarchical view looks like in the following figure:
- Windows Forms:
- WPF:
- To view the projects that reference the selected projects in a hierarchical order, right-click on the grid and choose "Referenced by". To change back to grid view, right-click on the tree and choose "List view". The hierarchical view looks like in the following figure:
- Windows Forms:
- WPF:
History
Revisions:
- Path changes absolute and relative, check-out, check-in, strong key, assembly file version, search and replace
- Added References hierarchical view
- Corrected download size
- Added history
- Added Referenced by hiererachical view
- Added WPF version
This member has not yet provided a Biography. Assume it's interesting and varied, and probably something to do with programming.


 General
  News
News  Suggestion
  Question
  Bug
Bug  Answer
  Joke
Joke  Praise
  Rant
Rant  Admin
Admin 


