
Build a .NET web app with Azure Cosmos DB using the SQL API and the Azure portal
This quick start demonstrates how to create an Azure Cosmos DB SQL API account, document database, and collection using the Azure portal. You'll then build and deploy a todo list web app built on the SQL .NET API, as shown in the following screenshot.
Azure Cosmos DB is Microsoft’s globally distributed multi-model database service. You can quickly create and query document, key/value, and graph databases, all of which benefit from the global distribution and horizontal scale capabilities at the core of Azure Cosmos DB.
This quick start demonstrates how to create an Azure Cosmos DB SQL API account, document database, and collection using the Azure portal. You'll then build and deploy a todo list web app built on the SQL .NET API, as shown in the following screenshot.

Prerequisites
If you don’t already have Visual Studio 2017 installed, you can download and use the free Visual Studio 2017 Community Edition. Make sure that you enable Azure development during the Visual Studio setup.
If you don't have an Azure subscription, create a free account before you begin.
You can Try Azure Cosmos DB for free without an Azure subscription, free of charge and commitments. Or, you can use the Azure Cosmos DB Emulator with a URI of https://localhost:8081. The Primary Key is provided in Authenticating requests.
Create a database account
- In a new browser window, sign in to the Azure portal.
-
Select Create a resource > Databases > Azure Cosmos DB.

-
On the Create Azure Cosmos DB Account page, enter the basic settings for the new Azure Cosmos DB account.
Setting Value Description Subscription Your subscription Select the Azure subscription that you want to use for this Azure Cosmos DB account. Resource Group Create new
Then enter the same unique name as provided in IDSelect Create new. Then enter a new resource-group name for your account. For simplicity, use the same name as your ID. Account Name Enter a unique name Enter a unique name to identify your Azure Cosmos DB account. Because documents.azure.com is appended to the ID that you provide to create your URI, use a unique ID.
The ID can only contain lowercase letters, numbers, and the hyphen (-) character. It must be between 3 and 31 characters in length.API Core(SQL) The API determines the type of account to create. Azure Cosmos DB provides five APIs: Core(SQL) for document databases, Gremlin for graph databases, MongoDB for document databases, Azure Table, and Cassandra. Currently, you must create a separate account for each API.
Select Core(SQL) because in this article you create a document database and query by using SQL syntax.
Learn more about the SQL API.Location Select the region closest to your users Select a geographic location to host your Azure Cosmos DB account. Use the location that's closest to your users to give them the fastest access to the data. Select Review+Create. You can skip the Network and Tags section.

-
The account creation takes a few minutes. Wait for the portal to display the Congratulations! Your Azure Cosmos DB account was created page.

Add a collection
You can now use the Data Explorer tool in the Azure portal to create a database and collection.
-
Click Data Explorer > New Collection.
The Add Collection area is displayed on the far right, you may need to scroll right to see it.

-
In the Add collection page, enter the settings for the new collection.
Setting Suggested value Description Database id Tasks Enter Tasks as the name for the new database. Database names must contain from 1 through 255 characters, and they cannot contain /, \\, #, ?, or a trailing space.Collection id Items Enter Items as the name for your new collection. Collection ids have the same character requirements as database names. Partition key <your key="" partition=""> Enter a partition key such as /userid. Throughput 400 RU Change the throughput to 400 request units per second (RU/s). If you want to reduce latency, you can scale up the throughput later. In addition to the preceding settings, you can optionally add Unique keys for the collection. Let's leave the field empty in this example. Unique keys provide developers with the ability to add a layer of data integrity to the database. By creating a unique key policy while creating a collection, you ensure the uniqueness of one or more values per partition key. To learn more, refer to the Unique keys in Azure Cosmos DB article.
Click OK.
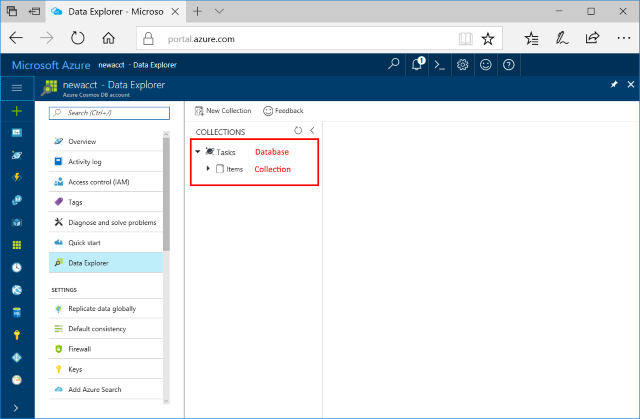
Data Explorer displays the new database and collection.
Add sample data
You can now add data to your new collection using Data Explorer.
-
In Data Explorer, the new database appears in the Collections pane. Expand the Tasks database, expand the Items collection, click Documents, and then click New Documents.

-
Now add a document to the collection with the following structure.
{ "id": "1", "category": "personal", "name": "groceries", "description": "Pick up apples and strawberries.", "isComplete": false } -
Once you've added the json to the Documents tab, click Save.

-
Create and save one more document where you insert a unique value for the
idproperty, and change the other properties as you see fit. Your new documents can have any structure you want as Azure Cosmos DB doesn't impose any schema on your data.
Query your data
You can now use queries in Data Explorer to retrieve and filter your data.
-
See that by default, the query is set to
SELECT * FROM c. This default query retrieves and displays all documents in the collection.
-
Stay on the Documents tab, and change the query by clicking the Edit Filter button, adding
ORDER BY c._ts DESCto the query predicate box, and then clicking Apply Filter.
This modified query lists the documents in descending order based on their time stamp, so now your second document is listed first. If you're familiar with SQL syntax, you can enter any of the supported SQL queries in this box.
That completes our work in Data Explorer. Before we move on to working with code, note that you can also use Data Explorer to create stored procedures, UDFs, and triggers to perform server-side business logic as well as scale throughput. Data Explorer exposes all of the built-in programmatic data access available in the APIs, but provides easy access to your data in the Azure portal.
Clone the sample application
Now let's switch to working with code. Let's clone a SQL API app from GitHub, set the connection string, and run it. You'll see how easy it is to work with data programmatically.
-
Open a command prompt, create a new folder named git-samples, then close the command prompt.
md "C:\git-samples"
-
Open a git terminal window, such as git bash, and use the
cdcommand to change to the new folder to install the sample app.cd "C:\git-samples"
-
Run the following command to clone the sample repository. This command creates a copy of the sample app on your computer.
git clone https://github.com/Azure-Samples/documentdb-dotnet-todo-app.git
-
Then open the todo solution file in Visual Studio.
Review the code
This step is optional. If you're interested in learning how the database resources are created in the code, you can review the following snippets. Otherwise, you can skip ahead to Update your connection string.
The following snippets are all taken from the DocumentDBRepository.cs file.
-
The
DocumentClientis initialized on line 76.client = new DocumentClient(new Uri(ConfigurationManager.AppSettings["endpoint"]), ConfigurationManager.AppSettings["authKey"]);
-
A new database is created on line 91.
await client.CreateDatabaseAsync(new Database { Id = DatabaseId }); -
A new collection is created on line 110.
await client.CreateDocumentCollectionAsync(
    UriFactory.CreateDatabaseUri(DatabaseId),
    new DocumentCollection
        {
           Id = CollectionId
        },
    new RequestOptions { OfferThroughput = 400 });
Update your connection string
Now go back to the Azure portal to get your connection string information and copy it into the app.
-
In the Azure portal, in your Azure Cosmos DB account, in the left navigation select Keys, and then select Read-write Keys. You'll use the copy buttons on the right side of the screen to copy the URI and Primary Key into the web.config file in the next step.

-
In Visual Studio 2017, open the web.config file.
-
Copy your URI value from the portal (using the copy button) and make it the value of the endpoint key in web.config.
<add key="endpoint" value="FILLME" /> -
Then copy your PRIMARY KEY value from the portal and make it the value of the authKey in web.config.
<add key="authKey" value="FILLME" /> -
Then update the database value to match the name of the database you have created earlier. You've now updated your app with all the info it needs to communicate with Azure Cosmos DB.
<add key="database" value="Tasks" />
Run the web app
-
In Visual Studio, right-click on the project in Solution Explorer and then select Manage NuGet Packages.
-
In the NuGet Browse box, type DocumentDB.
-
From the results, install the Microsoft.Azure.DocumentDB library. This installs the Microsoft.Azure.DocumentDB package as well as all dependencies.
-
Select CTRL + F5 to run the application. Your app displays in your browser.
-
Select Create New in the browser and create a few new tasks in your to-do app.
You can now go back to Data Explorer and see query, modify, and work with this new data.
Review SLAs in the Azure portal
The throughput, storage, availability, latency, and consistency of the resources in your account are monitored in the Azure portal. Let's take a quick look at these metrics.
-
Click Metrics in the navigation menu.

-
Click through each of the tabs so you're aware of the metrics Azure Cosmos DB provides.
Each chart that's associated with the Azure Cosmos DB Service Level Agreements (SLAs) provides a line that shows if any of the SLAs have been violated. Azure Cosmos DB makes monitoring your SLAs transparent with this suite of metrics.

Clean up resources
If you're not going to continue to use this app, delete all resources created by this quickstart with the following steps so you don't incur any charges:
-
In the Azure portal, select Resource groups on the far left, and then select the resource group you created.
If the left menu is collapsed, click
 to expand it.
-
In the new window select the resource group, and then click Delete resource group.

-
In the new window, type the name of the resource group to delete, and then click Delete.