
Sending Push Notifications to Android with C#
3.33/5 (6 votes)
How to send push notifications to Android with C#
Introduction
This tutorial shows you how to use C# to send push notifications to an Android application. You'll create a Android app with some customization that receives push notifications by using Firebase Cloud Messaging (FCM).
What is Push Notification
Push notifications let your application notify a user of new messages or events even when the user is not actively using your application.
How It Works
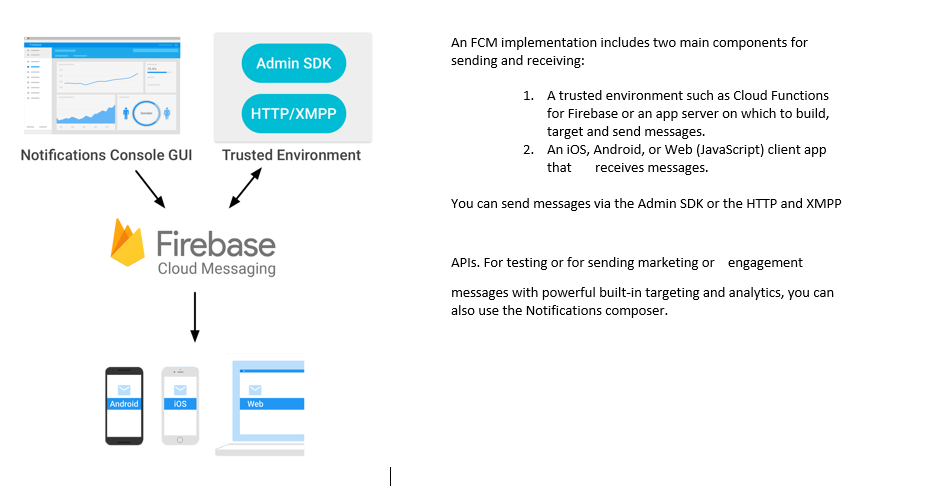
Prerequisites
Below are some prerequisites required:
- Latest version of Android Studio
- Account in FCM
Completing this tutorial is a prerequisite for all other Notification Hubs tutorials for Android apps.
Creating a Project FCM
- Navigate to the Firebase Console, sign in with your Google account crendentials.
- Click Add project.

- Type in your new Project name and click Create project.

- Select newly created project, click on gear at top left and select project settings.

- In the project settings, go to cloud messaging tab and make note of the server key.

Create and Connect Your App to the Notification Hub
Create a New Android Project
- In Android Studio, start a new Android Studio project.

- Choose the Phone and Tablet form factor and the Minimum SDK that you want to support. Then click Next.

- Choose Empty Activity for the main activity, click Next, and then click Finish.
Connect App to the Notification Hub
- Click Tools -> Firebase on the menu. It will open Firebase Assistant as shown below. Open Set up Firebase Cloud Messaging.

- Connect your app to firebase by providing firebase credential and then select your project which was earlier created on Firebase in this demo.
- Ideally this is enough to get push notification……further we can discuss how to send customize notification and use it.

Customizing Android App
- In the Project View, expand app > src > main > java. Right-click your package folder under Java, click New, and then click Java Class. Add a new class named
FirebaseMessagingService.
- Copy and paste the below code:
package notification.com.test.testnewnotification; import android.app.NotificationManager; import android.app.PendingIntent; import android.content.Context; import android.content.Intent; import android.graphics.BitmapFactory; import android.media.RingtoneManager; import android.net.Uri; import android.support.v4.app.NotificationCompat; import android.util.Log; import com.google.firebase.messaging.RemoteMessage; /** * Created by Ashish.kapoor on 04.09.2017. */ public class FirebaseMessagingService extends com.google.firebase.messaging.FirebaseMessagingService { private static final String TAG="FirebaseMessagingServic"; public FirebaseMessagingService() { } @Override public void onMessageReceived(RemoteMessage remoteMessage) { String strTitle=remoteMessage.getNotification().getTitle(); String message=remoteMessage.getNotification().getBody(); Log.d(TAG,"onMessageReceived: Message Received: \n" + "Title: " + strTitle + "\n" + "Message: "+ message); sendNotification(strTitle,message); } @Override public void onDeletedMessages() { } private void sendNotification(String title,String messageBody) { Intent[] intents= new Intent[1]; Intent intent= new Intent(this,MainActivity.class); intent.addFlags(Intent.FLAG_ACTIVITY_CLEAR_TOP); intent.putExtra("IncidentNo", title); intent.putExtra("ShortDesc", messageBody); intent.putExtra("Description",messageBody); intents[0]=intent; PendingIntent pendingIntent=PendingIntent.getActivities(this,0, intents,PendingIntent.FLAG_ONE_SHOT); Uri defaultSoundUri= RingtoneManager.getDefaultUri (RingtoneManager.TYPE_NOTIFICATION); NotificationCompat.Builder notificationbuilder= new NotificationCompat.Builder(this) .setSmallIcon(R.drawable.ic_stat_name) .setContentTitle("Service Now") .setContentText(messageBody) .setAutoCancel(true) .setSound(defaultSoundUri) .setContentIntent(pendingIntent) .setLargeIcon(BitmapFactory.decodeResource (getResources(), R.mipmap.ic_launcher));; NotificationManager notificationManager=(NotificationManager) getSystemService(Context.NOTIFICATION_SERVICE); notificationManager.notify(0, notificationbuilder.build()); } } - Open
MainActivityclass and replace code as below:package notification.com.test.testnewnotification; import android.content.Intent; import android.net.Uri; import android.support.v7.app.AppCompatActivity; import android.os.Bundle; import android.view.View; import android.widget.TextView; import com.google.firebase.messaging.FirebaseMessaging; public class MainActivity extends AppCompatActivity { static String strSDesc = "ShortDesc"; static String strIncidentNo = "IncidentNo"; static String strDesc="IncidentNo"; @Override protected void onCreate(Bundle savedInstanceState) { super.onCreate(savedInstanceState); onNewIntent(getIntent()); FirebaseMessaging.getInstance(). subscribeToTopic("ServiceNow"); } @Override public void onNewIntent(Intent intent) { Bundle extras = intent.getExtras(); if (extras != null) { setContentView(R.layout.activity_main); final TextView IncidentTextView = (TextView) findViewById(R.id.txtIncidentNo); final TextView SDescTextView = (TextView) findViewById(R.id.txtShortDesc); final TextView DescTextView = (TextView) findViewById(R.id.txtDesc); strSDesc = extras.getString("ShortDesc", "ShortDesc"); strIncidentNo = extras.getString("IncidentNo", "IncidentNo"); strDesc=extras.getString("Description", "IncidentNo"); IncidentTextView.setText(strIncidentNo); SDescTextView.setText(strSDesc); DescTextView.setText(strDesc); } } public void browser1(View view){ Intent browserIntent =new Intent (Intent.ACTION_VIEW, Uri.parse ("https://somebrowser?uri=incident.do?sysparm_query=number=" +strIncidentNo)); startActivity(browserIntent); } } - Open Activity_main.xml and add 3
textViewand one command button as below:
Type ID Default Text TextViewtxtIncidentNoIncident No TextViewtxtShortDescShort Description TextViewtxtDescDescription ButtonbtnGetDataGet Data OnClick browser1 - Build your app and run it.
(Optional) Sending Push Notifications from Firebase Portal
Normally, you would send notifications using a backend server. This is just to test your Notification App.
- Open FCM console, select your project and then open Notifications from left toolbar.

- Enter Message text, set Target as user segment and select your app. Click on advance option update Title and add Custom data as below and click on send message.


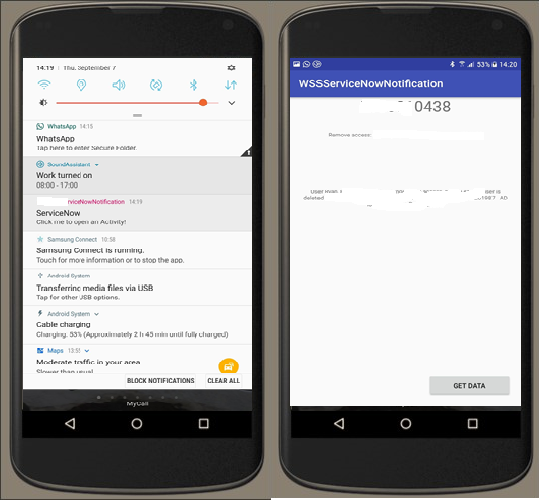
- Wow, you received notification message on your mobile, please find the below screenshots for the same.
Creating C# App
Nothing big!
Create your C# application and use the below code:
     public static String SendNotificationFromFirebaseCloud()
        {
            var result = "-1";
            var webAddr = "https://fcm.googleapis.com/fcm/send";
            var httpWebRequest = (HttpWebRequest)WebRequest.Create(webAddr);
            httpWebRequest.ContentType = "application/json";
            httpWebRequest.Headers.Add(HttpRequestHeader.Authorization,"key=your FCM senderkey");
            httpWebRequest.Method = "POST";
            using (var streamWriter = new StreamWriter(httpWebRequest.GetRequestStream()))
            {
                string strNJson = @"{
                    ""to"": ""/topics/ServiceNow"",
                    ""data"": {
                        ""ShortDesc"": ""Some short desc"",
                        ""IncidentNo"": ""any number"",
                        ""Description"": ""detail desc""
  },
  ""notification"": {
                ""title"": ""ServiceNow: Incident No. number"",
    ""text"": ""This is Notification"",
""sound"":""default""
  }
        }";
                streamWriter.Write(strNJson);
                streamWriter.Flush();
            }

            var httpResponse = (HttpWebResponse)httpWebRequest.GetResponse();
            using (var streamReader = new StreamReader(httpResponse.GetResponseStream()))
            {
                result = streamReader.ReadToEnd();
            }
            return result;
        }