Introduction
Windows 7 comes with a system image backup utility that can be launched by the Control Panel (Backup and Restore/Create a system image) or via command line (sdclt.exe /BLBBACKUPWIZARD). This tool, which is also available in Windows 8 and 10, allows you to create backups of your complete hard disks. These backups can later be used to restore a crashed system.
Each drive is stored in a file with extension ".vhd" (Virtual Hard Disk), and the good news is that you can mount these files with the Disk Management tool and access all files individually with the Windows Explorer. The bad news is that mounting and unmounting VHD files with the Windows tool is very cumbersome.
Background
When creating a system image backup on an external hard disk, the VHD files are stored in a folder like this: 'WindowsImageBackup\ComputerName\Backup yyyy-MM-dd hhmmss'. This folder also contains a file called 'BackupSpecs.xml', which contains information about the saved drives, e.g., the original drive letter and the name of the VHD file for that drive.
For years I have been using the Windows Disk Management tool (Control Panel\Administrative Tools\Computer Management\Disk Management) to attach VHD files to the system (Disk Management\Action\Attach VHD) but:
- it takes a lot of mouse clicks until you can select a VHD file
- once you are there, you have no clue which original drive is stored in a file
The other day I learned that 'DiskPart.exe' (comes with Windows) can do the job as well. There is a nice article about how to attach/detach VHD files from the Windows Explorer directly here. Although this helps to save a lot of mouse clicks, you still have to guess which drive is stored in a particular file. And once you have attached a file, you need to remember its path when it comes to detach.
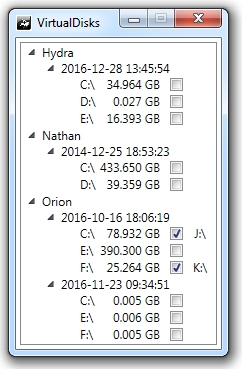
So I started writing this small utility to help me with this. Upon startup, it looks for the 'WindowsImageBackup' folder at the root of each available hard drive. Every VHD file which is mapped to something like 'C:\' or 'D:\' is added to a list which is presented on the UI. You can see the name of the computer, the original drive letter and the date and size of the backup as well.
To mount a drive, just click on the checkbox next to it. A new drive letter will appear to the right, if mounting was successful. To unmount the drive, just click the checkbox again.
Some Code Details
There is nothing highly sophisticated in this WPF application, a little bit of data binding here, a little bit of LINQ there, so let's just have a look at the heart of the code, which is the method MountVHD:
bool MountVHD(string fileName, bool mode)
{
    if (!File.Exists(fileName))
        return false;

    Remember(fileName);
    var script = Path.GetTempPath() + "diskpart.txt";
    File.WriteAllText(script, string.Format
        ("select vdisk file=\"{0}\"\r\n{1} vdisk",
        fileName, mode ? "attach" : "detach"));

    var process = new Process();
    process.StartInfo.FileName = "diskpart.exe";
    process.StartInfo.Arguments = string.Format("/s \"{0}\"", script);
    process.StartInfo.WindowStyle = ProcessWindowStyle.Hidden;
    process.Start();

    var result = false;
    while (true)
    {
        process.WaitForExit(7000);
        if (process.HasExited)
        {
            if (process.ExitCode == 0)
                result = true;
            else
                MessageBox.Show(string.Format("Exit code = {0}",
                          (uint)process.ExitCode), "MountVHD Error");
            break;
        }

        var answer = MessageBox.Show("Mounting the VHD takes long! Wait another 7 seconds?",
                     "MountVHD", MessageBoxButton.YesNo, MessageBoxImage.Question);
        if (answer == MessageBoxResult.No)
            break;
    }

    File.Delete(script);
    return result;
}
Parameter 'fileName' is the name of the VHD file and parameter 'mode' is used to attach or detach the file.
After checking the file existence and saving some settings (to know which file has been attached), a temporary script file is created. This file contains commands for the DiskPart executable, which is started next by using the Process class.
The following while loop just waits for the process to be finished. If that does not happen within 7 seconds, the user can choose to wait another 7 seconds or cancel the loop. At the end, the script file is deleted.
That's It!
Hope you enjoyed it and find the tool useful. If you would like to see more code, check out my repositories on github.
History
- 04-Jan-2017: Added manifest file and some try-catch blocks
- 03-Jan-2017: Using a TreeView now
- 02-Jan-2017: Initial upload
I started programming in Basic, Pascal, Fortran and C in the late 1980s during my last semesters at the University of Bonn, Germany, where I studied Physics. As a professional software engineer I moved on to C++ and C# in the field of scientific data acquisition, data analysis and - my favourite - data visualization.
From the very start of my life as developer I have been a fan of graphics, especially 3D graphics. I have been working with OpenGL, XNA and WPF 3D. Planning to start with SharpDX in the near future.
Besides programming I love making music (guitar and violin), doing sports (rock climbing and volleyball) and spending time with my beloved family.


 General
  News
News  Suggestion
  Question
  Bug
Bug  Answer
  Joke
Joke  Praise
  Rant
Rant  Admin
Admin 


