Introduction
In this installment, we will learn how to add some usability to our application, through the use of docking panels, much like the ones found in Visual Studio. For this example we will change the document area from a free floating window area to a docked window area, so that for each open document we will have a tab at the top of the document. Additionally, we will create a docked panel to the side which we will use to add some usability to our application. We will use this panel to both show item information for items selected on the active document, and also allow for adding items to the active document. First, we need to add the reference for the Docking Suite library we will be using, WeifenLuo.WinFormsUI.Docking, which can be found here
DockPanel Suite
The library has been included in the source package for this article, or you can retrieve it from the site above. Once you acquire it, add a reference to your project.
DockPanel
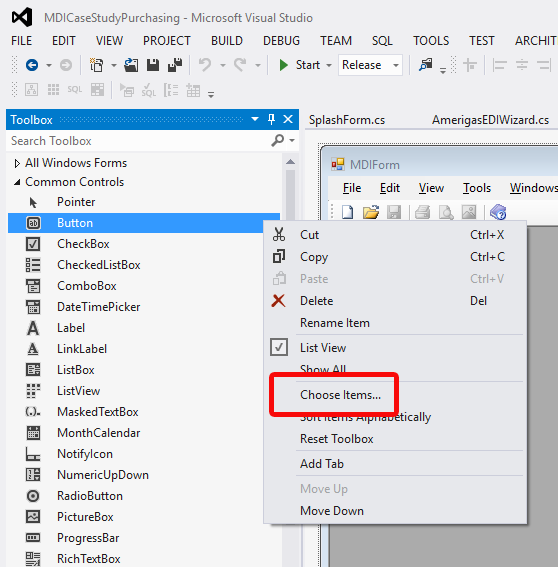
Now let's add the backbone of our docking system, the DockPanel. Open MDIForm in Design View. First, we need to add DockPanel to our Toolbox so we can add it to our form. To do this, right click on the Toolbox, and select "Choose Items...". Scroll down until you find DockPanel and check it. If you don't see it, you may need to click Browse and select the WeifenLuo.WinFormsUI.Docking library

Now, if you expand the "All Windows Forms" controls group, at the bottom you'll see DockPanel. Let's drag one onto MDIForm. Name it dockPanel, set its Dock property to Fill, and set it's BackColor to AppWorkspace. That it all we need to do for DockPanel.
DockContent
DockPanel is a container for our different DockContent objects, which are Forms that can occupy different zones within the DockPanel, which include Float, Left, Right, Top, Bottom, and Document zones. For this example, we will use 2 of these zones, Document, and Right. For our documents, we will place them in the Document zone. We will also create a special form for showing details about our currently selected product, which we will place in the Right zone.
Creating DockContent is simple, for any Form that you want to make dockable, simply change it's implementation from Form to DockContent. Let's do this for PurchaseOrderForm
using WeifenLuo.WinFormsUI.Docking;
public class PurchaseOrderForm : DockContent
This will give you a few more properties for the Form in Design View, but for our purposes we don't need to touch any of them. Now we need to tell our Forms to dock into our DockPanel. Go back to MDIForm, and in the OpenFile and ShowNewForm methods, change the Form.Show() calls to Form.Show(dockPanel). There is an overloaded Show method that also accepts a specific zone to place the content in, but by default content is placed in the Document zone, which is what we want for our PurchaseOrderForm instances
private void ShowNewForm(object sender, EventArgs e)
{
   .....
   childForm.Show(dockPanel);
}

private void OpenFile(object sender, EventArgs e)
{
   .....
   purchaseOrderForm.Show(dockPanel);
   .....
}
That's really all it takes to get the tabbed document look
Auto Hide Tool Panels
Now, let's create a new Form for our Item information display panel, which we will dock to the right, and allow it to auto hide. Create a new Form and name it ItemInformationPanel. Go to Source view, and add a using statement for WeifenLuo.WinFormsUI.Docking library, and change the implementation from Form to DockContent.
using WeifenLuo.WinFormsUI.Docking;
public class ItemInformationPanel : DockContent
Now we want this panel to be available at start, so we need to add it to our DockPanel. In MDIForm, let's add a private instance of ItemInformationPanel and name it itemInfoPanel, and in our constructor, let's initialize itemInfoPanel, and add it to DockPanel, this time we will specify which area we want to content to occupy
private ItemInformationPanel itemInfoPanel;

public MDIForm()
{
   .....
   itemInfoPanel = new ItemInformationPanel();
   itemInfoPanel.Show(dockPanel, WeifenLuo.WinFormsUI.Docking.DockState.DockRight);
   .....
}
Now do a test run, and you'll see we have our panel, and its shown in the right dock zone. Now let's go back to those additional properties we get with DockContent. The first is AutoHidePortion, which controls how large the form is when in AutoHide mode. Values below 1 will be a %, values greater than 1 will be actual pixel size. You can play around with this to your liking. Next is DockAreas. This constrains the content to certain zones only. The dock panels can be grabbed by the user and moved around, and dropped to differnt zones. This will let you either allow or disallow certain zones. You also configure this to your liking, based on the desired function of your application. The last one is pretty important, HideOnClose. This will protect our form from getting disposed when the user closes it. We can provide a menu option to redisplay the panel, and if we try to do this with the form disposed, we'd have problems, so go ahead and set HideOnClose to True. Now, change the Text property to something shorter, like "Item Info". This will reduce the size of the AutoHide header. Not as big a deal until you start adding multiple AutoHide panels in the same dock zone. Lastly, we want this panel to start out in AutoHide mode, so let's fix that. Change the itemInfoPanel.Show DockState to DockRightAutoHide
itemInfoPanel.Show(dockPanel, WeifenLuo.WinFormsUI.Docking.DockState.DockRightAutoHide);
Lastly for this installment, let's give the user a way to recover this panel should they close it. We've set HideOnClose to True, so our panel will never get disposed, but now we need to give the user a means to redisplay the panel. Let's go to the View menu, and add a MenuItem called "Item Info Panel". Also, set the Checked property to True, and the CheckOnClick property to True. Double click the menu item to create a click handler. For this handler, we simply call the Show method again if the menu item is checked, or call the Hide method if the menu item is not checked, except this time, let's show it in regular DockRight state rather than DockRightAutoHide, since the user most likely needs the panel, it will be more readily available
private void itemInfoPanelToolStripMenuItem_Click(object sender, EventArgs e)
{
   itemInfoPanel.Show(dockPanel, WeifenLuo.WinFormsUI.Docking.DockState.DockRight);
}
The last piece of the puzzle is to figure out when the user closes the panel, and set the menu item Checked to False, so re display will work when the menu item is clicked again. For this we need to handle the FormClosing event for itemInfoPanel. Since we are handling this event, the form will now try to close, so we need to set the FormClosingEventArgs.Cancel to true, and call itemInfoPanel.Hide to hide the panel
itemInfoPanel.FormClosing += itemInfoPanel_FormClosing;
.....
private void itemInfoPanel_FormClosing(object sender, FormClosingEventArgs e)
{
   itemInfoPanelToolStripMenuItem.Checked = false;
   e.Cancel = true;
   itemInfoPanel.Hide();
}
And that's it! We'll leave it here, you can see how easy it is to get some nice Docking effects with this library. Next we will finish our Item Info Panel.
Points of Interest
History
Keep a running update of any changes or improvements you've made here.
This member has not yet provided a Biography. Assume it's interesting and varied, and probably something to do with programming.


