
Custom Roles Based Access Control (RBAC) in ASP.NET MVC Applications - Part 3 (Extending ASP.NET Identity 2.0)
4.98/5 (65 votes)
Refactor RBAC framework to authenticate users
- Download Extending ASP.NET Identity with RBAC (PDF) - 1,228 KB
- Download source - 727 KB
- Download source with packages - 19.6 MB
![]()
Contents
- Introduction
- Background
- Authentication Types
- Customizing ASP.NET Identity Database Tables
- Putting It All Together
- Sample Project
- RBAC Authentication/Authorization Overview
- Conclusion
- History
Introduction
In this last and final post in the series, I shall modify our original Roles Based Access Control (RBAC) design from Windows based Authentication to Forms based Authentication designed around ASP.NET Identity. ASP.NET Identity is currently the main framework used to add authentication and authorization capabilities to an ASP.NET site and is designed to replace the previous ASP.NET Membership and Simple Membership systems. ASP.NET Identity contains much of the functionality required to ‘Register’ and ‘Sign In’ to your site including profile support, OAuth integration, works with OWIN, and is included with the ASP.NET templates shipped with Visual Studio 2013 delivering a fully-formed authentication and authorization platform. What we get out of the box is a way to create users, create some roles and assign users to roles. Microsoft's implementation doesn't provide a way to obtain permission levels from a database but is designed to use whatever role-based mechanism is available to it.
However, we can extend Microsoft's system so that our custom security does everything we require. What is missing is a way to assign application permissions to roles instead of individual users. Most developers and projects at this point follow the pattern that’s become conventional; we check if a user belongs to a certain role and if so, we allow that particular operation to proceed. In ASP.NET, this is done using the Authorize attribute (allow the operation to proceed if the current user belongs to a certain role). Yet the default approach to using the Authorize attribute has all sorts of problems as emphasized in Part 1. We’re basically asking the question “Is the user in this role” and based on the answer hardcoding behavior into our application code. The question we need to be asking is “Does the current user have the resource permission required to access this function“? We need to customize the framework’s behavior and this is probably the main reason why most projects will just stick to the default behavior since it’s so much simpler.
Essentially, we need the best of both worlds. Roles are created for various job functions and it’s not uncommon for new roles to be introduced into a role-based system long after the application has been deployed. The application’s system administrator must be able to create new roles and bind them dynamically to controller methods via application permissions without the need of having the application recompiled and redeployed each time, otherwise it becomes a time consuming and costly affair when an application developer inherently becomes the users/roles administrator for that application. Permissions to perform certain operations are assigned to specific roles. Users are assigned particular roles, and through those role assignments acquire application permissions to perform particular computer-system functions. Since users are not assigned permissions directly, but only acquire them through their role (or roles), management of individual user permissions becomes a matter of simply assigning appropriate roles to the user's account. Each user in the system can be assigned zero, one or many roles depending on their responsibility within the business processes.
This article will refactor the RBAC framework to authenticate users using a username/password combination via ASP.NET Identity’s framework features whilst preserving role based permissions introduced in Part 1.
Background
The ASP.NET Identity framework was originally introduced in 2013 as the follow-on to the ASP.NET Membership system, a fundamental part of MVC applications for several years, but which was beginning to show its age. Originally, ASP.NET Identity presented a useful, if somewhat minimal API for managing security and authorization in the context of a public-facing web application built using ASP.NET. The Identity framework introduced modern features such as social network sign-in integration and easily extensible user model definitions which we shall be making use of. Since then, ASP.NET Identity 2.0 Framework has been released which contains significant additions to the functionality found in the original version 1.0 release.
In our previous example, we implemented an intranet application and had assumed that the logged-in user accessing our application must have had to successfully log into Windows and that the user is a trusted user on the corporate network. As such, we didn’t need to concern ourselves with user authentication since this was taken care of by Windows; simply logging into the organization’s domain was enough to determine the user is trusted. Developing internet applications based on Username/Password Authentication presents a number of problems and ASP.NET Identity contains a number of features to try and overcome some of these problems. This article will cover some of these features in the context of extending ASP.NET Identity’s data model to include role based permissions enabling us to refactor our original framework to expose new extended methods to Register and Login to an account based on logic driven by the application’s configuration file.
Authentication Types
When you authenticate a user, you are verifying the identity of that user. The identity of that user becomes essential when we are building an application where only specific users can access our site. The first step is to identify the user to make sure you know who they are. There are three ways you can authentication users in ASP.NET; Forms, OAuth and Windows.
Forms Authentication
Forms based authentication is where users will have to explicitly provide their user credentials before being allowed to continue. When the user clicks the Login button, our application is responsible for making sure they entered the correct password. Microsoft ASP.NET MVC already contains much of the functionality for Forms Authentication. In an internet scenario, we should always use “Forms based authentication”.
We change the authentication model via the Web.config as detailed below:
<system.web>
    <authentication mode="Forms">
      <forms loginurl="~/Account/Login" timeout="50">
    </forms>
</authentication>
The loginUrl specifies the URL to which the request is redirected for logon, if no valid authentication cookie is found.
By default, Forms based authentication uses a timeout value of 20 mins if no timeout attribute is specified. The timeout can be set to a maximum of 360 mins. However, there are other timeout values that will affect your application’s session timeout. The worker process in IIS has a default timeout of 20 mins; if there is no activity on your site for 20 mins, the worker process will end causing your session to end if you are using session InProc mode. If you increase the application's timeout above 20 mins via the Web.config file, you also need to increase the worker process timeout value via IIS, otherwise your application will timeout after 20 mins regardless. It's important to understand how session timeouts work as an incorrectly configured environment will look as if RBAC is not operating correctly and you maybe prompted to login continuously if the session timeout is set too low and/or the slidingExpiration attribute is set to false.
Windows Authentication
Windows Authentication is best applied to intranet applications where all your users are registered with an Active Directory server and work within the boundaries of the company firewall. Services provided by Windows provide information to your application about the currently logged-in user. This enables users to have a single sign-on experience because once they have logged into their desktop, they will use that identity for our application as well as other intranet applications and network shares. As such, we don’t need to concern ourselves with user authentication since this is taken care of by Windows. Please refer to the original RBAC solution presented in Part 1 for an example of an intranet application based on Windows Authentication. The downside of intranet applications is that they can’t be easily accessed from outside the organization’s firewall unless you create a Virtual Private Network (VPN) tunnel.
OpenId/OAuth
These are open standards for authentication and authorization respectively. Adopting these standards means our users don’t need to create or share a password with our site and we don’t need to store or validate a user’s password. Instead, we reply on a third-party like Google or Microsoft to authenticate the user and tell us who they are by issuing an authentication token.
Customizing ASP.NET Identity Database Tables
Microsoft ASP.NET Identity needs to make use of several database tables behind the scenes. These tables are needed to store information about users, account lockouts, login attempts, etc. The default database tables created by ASP.NET Identity are as follows:

The table names and the Entity Framework relationship configurations between these tables are configured in the OnModelCreating method of the IdentityDbContext. If we want to use different table names or map things differently in our database, we need to provide our own DbContext. We can either create a completely new DbContext class with the five required DbSets (one for each of the model classes) or we can simply inherit from the IdentityDbContext and override the OnModelCreating method where we can configure the EF mappings as we wish as illustrated in a later section.
However, our RBAC framework already contains several tables which coincide with ASP.NET Identity. Rather than have separate tables which essentially do the same thing, we shall extend the default ASP.NET Identity base tables to include additional fields as required by the RBAC framework thus enabling ASP.NET Identity and the RBAC framework to utilize the same tables. To keep our RBAC framework consistent, we shall rename the extended ASP.NET Identity tables to their corresponding RBAC entities using our original table naming convention (ie USERS, ROLES and LNK_USER_ROLE).

As a result, the following database schema will be created during the initialization of the RBAC database which resembles our original database schema.

By default, the Primary Key type for the AspNetUser table is defined as a string by the ASP.NET Identity framework using GUIDs as table index keys. This may not be to everyone’s liking including myself, but the framework has been designed with an ‘extensible primary key’ in mind which allows for the Primary Key type to be changed.
GUIDs may seem to be a natural choice for a primary key and if you really must, you could probably argue to use it for the primary key of the table. SQL Server by default (unless you specifically tell it not to) will use the GUID column as the clustering key which isn't optimal, and due to its randomness, it will lead to massive page and index fragmentation and to generally bad performance.
Choosing the right clustering key in advance is very important and can avoid problems amassing in the long run. As such, the Primary Key type for the AspNetUser table has been defined as an integer for this article and the sample project available for download.
Customizing IdentityUser Table
To customize the default ASP.NET Identity IdentityUser table, we need to define a new class which inherits from IdentityUser. The inherited class will define properties as required by the RBAC framework. When EF creates the IdentityUser database table for the first time, the properties defined in our inherited class will be represented as new fields in the extended table. As such, the newly created database table will contain all the table fields found in the default IdentityUser table as required by ASP.NET Identity in addition to new table fields representing our custom class properties.
public class ApplicationUser : IdentityUser<int, ApplicationUserLogin,
                               ApplicationUserRole, ApplicationUserClaim>
{
    public string Firstname { get; set; }
    public string Lastname { get; set; }
    public bool? Inactive { get; set; }
    public string Address1 { get; set; }
    public string Address2 { get; set; }
    ...

    public bool IsPermissionInUserRoles(string _permission)
    {
        bool _retVal = false;
        try
        {
            foreach (ApplicationUserRole _role in this.Roles)
            {
                if (_role.IsPermissionInRole(_permission))
                {
                    _retVal = true;
                    break;
                }
            }
        }
        catch (Exception)
        {
        }
        return _retVal;
    }

    public bool IsSysAdmin()
    {
        bool _retVal = false;
        try
        {
            foreach (ApplicationUserRole _role in this.Roles)
            {
                if (_role.IsSysAdmin)
                {
                    _retVal = true;
                    break;
                }
            }
        }
        catch (Exception)
        {
        }
        return _retVal;
    }
}
However, adding new properties to the class requires that the default ‘User Registration’ feature be extended to capture the additional table fields; default ASP.NET Identity out of the box enables a user to ‘Register’ using just an ‘Email’ and ‘Password’ combination which are considered the minimum properties. Clearly, an ‘Email’ and ‘Password’ combination doesn’t fully define a user and your business requirements will define which fields define a user in your solution leading to the definition of your application’s ‘User Registration’ process. For example, if you are implementing a solution which requires a user to register an account for your online shopping site, you will clearly require a shipping address which is linked to the user’s electronic payment address. Therefore, capturing the user’s shipping address may be necessary during the ‘User Registration’ process since this may need to be passed as part of the payment authorization process. If this is the case, simply declare your additional field requirements as class properties in your custom ApplicationUser class as illustrated above. EF will take care of creating the table fields for you.
Customizing IdentityRole Table
Since the RBAC framework uses more fields to define a role than the default ASP.NET Identity role definition, we need to customize the default ASP.NET Identity IdentityRole table to include these extra fields. The fields are ‘RoleDescription’ and ‘IsSysAdmin’; the former field could be disregarded since its purpose is to store a descriptive for the roles whereas the latter is a mandatory requirement by the RBAC framework in order to determine resource authorizations.
Either way, we need to define a new class which inherits from IdentityRole and declare additional properties as required by our solution. We also need to implement the concept that a role can contain permissions by defining the property ICollection<PERMISSION PERMISSIONS including a class method that will check for a permission associated with the role. The Role/Permission concept remains a fundamental part of RBAC and provides the authorization part for our framework. We can extend our ApplicationRole class to include role based reporting (introduced in Part 2) or other role based features hence preserving the extensibility of the RBAC framework.
public class ApplicationRole : IdentityRole<int, ApplicationUserRole>
{
    public string RoleDescription { get; set; }
    public bool IsSysAdmin { get; set; }
    ...

    public virtual ICollection<PERMISSION> PERMISSIONS { get; set; }

    public bool IsPermissionInRole(string _permission)
    {
        bool _retVal = false;
        try
        {
            foreach (PERMISSION _perm in this.PERMISSIONS)
            {
                if (_perm.PermissionDescription == _permission)
                {
                    _retVal = true;
                    break;
                }
            }
        }
        catch (Exception)
        {
        }
        return _retVal;
    }
}
Permission Table
The PERMISSION class defines an application permission as per our original RBAC design and defines the Permissions table within our custom DbContext model.
[Table("PERMISSIONS")]
public class PERMISSION
{
    [Key]
    public int Permission_Id { get; set; }

    [Required]
    [StringLength(50)]
    public string PermissionDescription { get; set; }

    public virtual List<applicationrole> ROLES { get; set; }
}
The PERMISSION is referenced back to a ROLE via the List<ApplicationRole><applicationrole> declaration.
ApplicationUserRole Class
The ApplicationUserRole class inherits from IdentityUserRole and defines additional properties and methods as required by our solution.
public class ApplicationUserRole : IdentityUserRole<int>
{
    public ApplicationRole Role { get; set; }
    public bool IsSysAdmin { get { return this.Role.IsSysAdmin; } }

    public ApplicationUserRole() : base()
    { }

    public bool IsPermissionInRole(string _permission)
    {
        bool _retVal = false;
        try
        {
            _retVal = this.Role.IsPermissionInRole(_permission);
        }
        catch (Exception)
        {
        }
        return _retVal;
    }

    public bool IsSysAdmin { get { return this.Role.IsSysAdmin; } }
}
Customizing IdentityDbContext Database
To customize the default ASP.NET IdentityDbContext model and alter table relationships, we shall define a new DbContext class named RBACDbContext which inherits from the default IdentityDbContext class. The new class will define new tables overriding the model’s OnModelCreating where we shall configure the EF mappings and table relationships.
public class RBACDbContext : IdentityDbContext<ApplicationUser,
  ApplicationRole, int, ApplicationUserLogin, ApplicationUserRole, ApplicationUserClaim>
{
    public DbSet<PERMISSION> PERMISSIONS { get; set; }

    public RBACDbContext() : base("DefaultConnection")
    { }

    public static RBACDbContext Create()
    {
        return new RBACDbContext();
    }

    protected override void OnModelCreating(DbModelBuilder modelBuilder)
    {
          base.OnModelCreating(modelBuilder);

       modelBuilder.Entity<ApplicationUser>().ToTable("USERS").Property
                          (p => p.Id).HasColumnName("UserId");
       modelBuilder.Entity<ApplicationRole>().ToTable("ROLES").Property
                          (p => p.Id).HasColumnName("RoleId");
       modelBuilder.Entity<ApplicationUserRole>().ToTable("LNK_USER_ROLE");

       modelBuilder.Entity<ApplicationRole>().
       HasMany(c => c.PERMISSIONS).
       WithMany(p => p.ROLES).
       Map(
           m =>
           {
               m.MapLeftKey("RoleId");
               m.MapRightKey("PermissionId");
               m.ToTable("LNK_ROLE_PERMISSION");
           });
    }
 }
![]()

In addition to the modified default ASP.NET Identity tables, we have declared the additional PERMISSIONS table as required by the RBAC framework and have defined the table relationships in the overridden OnModelCreating method.
NOTE: If you wish to use a different table naming convention or use different names for primary key fields, specify your preferred table names and/or primary key field names in the OnModelCreating method as illustrated above.
ApplicationUserManager
Now that our RBACDbContext has been defined, we require to implement worker functions which provide CRUD (Create, Read, Update and Delete) operations on the database. These functions can then be used within our controllers to build functionality surrounding the maintenance of users. The ApplicationUserManager class is inherited from the UserManager class and forms CRUD operations for the ‘System Administration > Users’ screens.
public class ApplicationUserManager : UserManager<ApplicationUser, int>
{
    public ApplicationUserManager(IUserStore<ApplicationUser, int> store) : base(store)
    { }

    public static ApplicationUser GetUser(int _userId)
    {
        ...
    }

    public static ApplicationUser GetUser(RBACDbContext db, int _userId)
    {
        ...
    }

    public static List<ApplicationUser> GetUsers()
    {
        ...
    }

    public static bool UpdateUser(UserViewModel _user)
    {
        ...
    }

    public static bool DeleteUser(int _userId)
    {
        ...
    }

    public static bool AddUser2Role(int _userId, int _roleId)
    {
        ...
    }

    public static bool RemoveUser4Role(int _userId, int _roleId)
    {
        ...
    }

    ...
}
We can now construct CRUD screens for the maintenance of Users and the assignment of users to Roles; we simply use the functions exposed by the ApplicationUserManager class.
NOTE: There is no CreateUser method in our ApplicationUserManager class since we depend on the creation of users via the ‘Register’ feature of ASP.NET Identity; we don’t need to concern ourselves with encrypting the user’s password since the ASP.NET Identity framework takes care of this.
ApplicationRoleManager
The ApplicationRoleManager class is inherited from the RoleManager class and forms CRUD operations for the ‘System Administration > Roles/Permissions’ screens.
public class ApplicationRoleManager : RoleManager<ApplicationRole, int>
{
    public ApplicationRoleManager(IRoleStore<ApplicationRole, int> store) : base(store)
    { }

    public static List<ApplicationRole> GetRoles()
    {
        ...
    }

    public static ApplicationRole GetRole(int _roleId)
    {
        ...
    }

    public static bool CreateRole(ApplicationRole _role)
    {
        ...
    }

    public static bool UpdateRole(RoleViewModel _modifiedRole)
    {
        ...
    }

    public static bool DeleteRole(int _roleId)
    {
        ...
    }

    public static bool AddPermission2Role(int _roleId, int _permissionId)
    {
        ...
    }

    ...
}
We can now construct CRUD screens for the maintenance of Roles and Permissions; we simply use the functions exposed by the ApplicationRoleManager class. Refer to the sample project available for download for a fully working Roles Based Access Control application complete with maintenance screens.

![]()
[HttpGet]
[OutputCache(NoStore = true, Duration = 0, VaryByParam = "*")]
public PartialViewResult AddPermission2RoleReturnPartialView(int id, int permissionId)
{
    ApplicationRoleManager.AddPermission2Role(id, permissionId);
    return PartialView("_ListPermissions", ApplicationRoleManager.GetRole(id));
}
Putting It All Together
Now that we have customized our IdentityDbContext database context and have created classes which operate on the database to maintain Users, Roles and Permissions, we shall put all this together to operate as a single Authentication/Authorization framework.
Before we spend more time discussing how we plan to extend our authorization framework, we need to understand about the existing Framework itself. Security within .NET (not just ASP.NET) is based around the concept of a principal. A principal object is a representation of the security context of the user on whose behalf the code is running. So, if I am running a program, then the principal is my security context for the duration of that program. One level lower than the principal is the identity. The identity represents the user who is executing the code. Therefore, every principal has an identity. This idea of a common principal and identity is used in forms-based authentication, Windows authentication and to pass credentials to websites and remoting hosts in other aspects of .NET programming. Rather than implement our own security system, we can simply extend Microsoft's existing security framework. To allow us to easily adapt the existing security system, Microsoft have provided the IPrincipal and IIdentity interfaces.
We shall extend IPrincipal using extension methods to extend ASP.NET Identity’s existing role functionality. Our extension methods will provide new functionality to check for role permissions and system administrator statuses via the methods HasPermission and IsSysAdmin as illustrated by the IntelliSense screenshot for our updated interface.

To summarize, IIdentity is used for the user's authenticated identity, regardless of what roles they may have, and the reason to why IsAuthenticated has been implemented as a property on this class. IPrincipal is used to combine a user's identity with the authorized roles they have in a given security context. For that reason, we have extended the IPrincipal object with our new functionality based around authorization. This is one of the advantages of having an extensive, inheritable framework - once we get familiar with the framework, we find that a lot of our work is already done for us.
Additionally, you can also use a third-party login provider, like Facebook or Google, to get the user's identity, but you will not get a principal from those providers since they don't provide any roles. However, we can use our own application’s role-based authorization to apply roles to, say, FacebookIdentity or GoogleIdentity. Therefore, another application can expect a different principal, with its own roles.
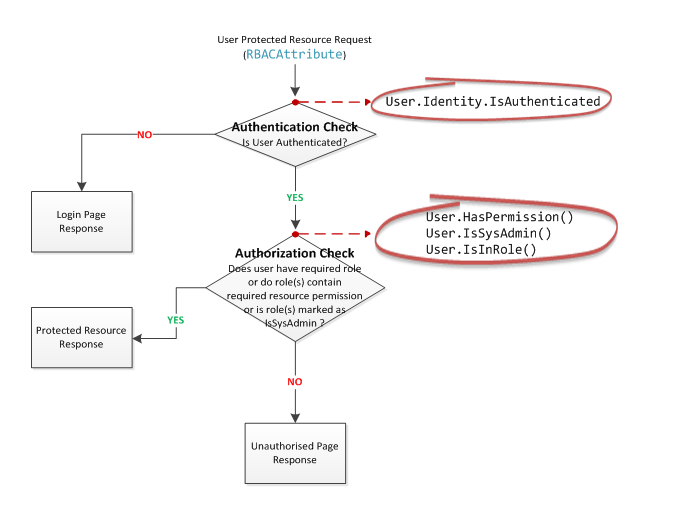
Now that we have the authentication functionality provided by ASP.NET Identity and our extended authorization functionality, we can refactor our RBACAttribute class in keeping with the following flow diagram.
Principal Identity Extension Methods
Since our ApplicationUser and ApplicationUserManager classes encapsulate functionality to evaluate a user’s roles/permissions, we need to expose this functionality to controller action methods and views whilst attempting to keep code changes to an absolute minimum. The simplest way is to expose our custom methods as ‘extension methods’ to the IPrincipal object.
public static class RBAC_ExtendedMethods_4_Principal
{
    public static int GetUserId(this IIdentity _identity)
    {
        int _retVal = 0;
        try
        {
            if (_identity != null && _identity.IsAuthenticated)
            {
                var ci = _identity as ClaimsIdentity;
                string _userId = ci != null ?
                                 ci.FindFirstValue(ClaimTypes.NameIdentifier) : null;

                if (!string.IsNullOrEmpty(_userId))
                {
                    _retVal = int.Parse(_userId);
                }
            }
        }
        catch (Exception)
        {
            throw;
        }
        return _retVal;
    }

    public static bool HasPermission(this IPrincipal _principal, string _requiredPermission)
    {
        bool _retVal = false;
        try
        {
            if (_principal != null && _principal.Identity.IsAuthenticated)
            {
                var ci = _principal.Identity as ClaimsIdentity;
                string _userId = ci != null ?
                                 ci.FindFirstValue(ClaimTypes.NameIdentifier) : null;

                if (!string.IsNullOrEmpty(_userId))
                {
                    ApplicationUser _authenticatedUser =
                                    ApplicationUserManager.GetUser(int.Parse(_userId));
                    _retVal = _authenticatedUser.IsPermissionInUserRoles(_requiredPermission);
                }
            }
        }
        catch (Exception)
        {
        }
        return _retVal;
    }

    public static bool IsSysAdmin(this IPrincipal _principal)
    {
        bool _retVal = false;
        try
        {
            if (_principal != null && _principal.Identity.IsAuthenticated)
            {
                var ci = _principal.Identity as ClaimsIdentity;
                string _userId = ci != null ?
                                 ci.FindFirstValue(ClaimTypes.NameIdentifier) : null;

                if (!string.IsNullOrEmpty(_userId))
                {
                    ApplicationUser _authenticatedUser =
                                    ApplicationUserManager.GetUser(int.Parse(_userId));
                    _retVal = _authenticatedUser.IsSysAdmin();
                }
            }
        }
        catch (Exception)
        {
        }
        return _retVal;
    }

    public static string FindFirstValue(this ClaimsIdentity identity, string claimType)
    {
        string _retVal = string.Empty;
        try
        {
            if (identity != null)
            {
                var claim = identity.FindFirst(claimType);
                _retVal = claim != null ? claim.Value : null;
            }
        }
        catch (Exception)
        {
        }
        return _retVal;
    }
}
Refactored RBACAttribute Class
Now that we have extended the IPrincipal object, we need to make changes to the RBACAttribute class as detailed below:
public class RBACAttribute : AuthorizeAttribute
{
  public override void OnAuthorization(AuthorizationContext filterContext)
  {
    try
    {
      if (!filterContext.HttpContext.Request.IsAuthenticated)
      {
        //Redirect user to login page if not yet authenticated.
        //This is a protected resource!
        filterContext.Result = new RedirectToRouteResult(new RouteValueDictionary(
                                   new { controller = "Account",
                                         action = "Login",
                                         returnUrl = ... }));
      }
      else
      {
        //Create permission string based on the requested controller name and
        //action name in the format 'controllername-action'
        string requiredPermission = String.Format("{0}-{1}",
                                      filterContext.ActionDescriptor.
                                      ControllerDescriptor.ControllerName,
                                      filterContext.ActionDescriptor.ActionName);

        if (!filterContext.HttpContext.User.HasPermission(requiredPermission)
                    & !filterContext.HttpContext.User.IsSysAdmin())
        {
          //User doesn't have the required permission and is not a SysAdmin,
          //return our custom 401 Unauthorised access error.  Since we are setting
          //filterContext.Result to contain an ActionResult page, the controller's
          //action will not be run.  The custom 401 Unauthorised access error will
          //be returned to the browser in response to the initial request.

          filterContext.Result = new RedirectToRouteResult(
                                   new RouteValueDictionary { { "action", "Index" },
                      { "controller", "Unauthorised" } });
        }
        //If the user has the permission to run the controller's action, the
        //filterContext.Result will be uninitialized and executing the controller's
        //action is dependant on whether filterContext.Result is uninitialized.
      }
    }
    catch (Exception ex)
    {
      filterContext.Result = new RedirectToRouteResult(new RouteValueDictionary(
                                new { controller = "Unauthorised",
                                      action = "Error", _errorMsg = ex.Message }));
    }
  }
}
As in our previous example, requests to access protected resources are checked against the requesting user’s permissions; any user not associated with the required permission is redirected to the ‘Unauthorised Request’ page.
However, before checking a user’s resource permission, the RBACAttribute class needs to check whether the requesting user has been authenticated. An unauthenticated user will be redirected to the login page; our original RBACAttribute class implemented for use within an intranet environment presumed the user must have been authenticated via Windows in order to have reached this point. Forms authentication requires that our application undertakes the necessary authentication checks and this part is undertaken by ASP.NET Identity.
NOTE: The RBACAttribute class is only triggered when the controller or controller action is decorated with the RBACAttribute attribute. Any resource that isn’t decorated with the attribute will permit access to the resource by an unauthenticated user. For some controllers or controller actions, this may be the desired outcome.
Restricting Access to MVC Controller Action Methods
Now it’s simply a matter of decorating your controller action methods with the RBACAttribute authorization filter to protect the resource; MVC allows you to omit the Attribute verb from the authorization attribute when decorating a controller’s action to simply use RBAC for those who prefer this naming convention. The authorization attribute instructs MVC to perform logic before the action method is called where logic checks whether the requesting user has been authenticated and has the required application permission to execute the controller’s action method.
[RBAC]
public ActionResult Reports()
{
    return View();
}
OR:
[RBACAttribute]
public ActionResult Reports()
{
    return View();
}
If a user attempts to access a controller action method decorated with this attribute, a check will be performed prior to executing the action method as follows:-
- If the user has not been authenticated, the user will be redirected to the ‘User Login’ page.
- If the user has been authenticated and the user’s role(s) do not contain the required resource permission, the user will be redirected to the ‘Unauthorized’ page as illustrated below.
- If the user has been authenticated and the user’s role(s) contain the required resource permission, the user is ‘allowed’ access to the resource.

Authentication Checks
To check whether a user has been authenticated from within a controller’s view, we simply reference the IsAuthenticated property exposed by the IIdentity object. This functionality is provided by ASP.NET Identity.

The above example displays the Register and Login menu links if the user hasn’t logged into the application otherwise the user’s name along with the Log off menu link is displayed. The LoginPartial.cshtml partial view references the IsAuthenticated property.

Authorization Checks
To check whether the authenticated user has a resource permission or assigned to a role marked as ‘System Administrator’, we simply call the HasPermission and IsSysAdmin methods exposed by our extension methods. This functionality is provided for us by the RBAC framework.

If a user logs into the application assigned to a role marked with ‘System Administrator’ (identified via the IsSysAdmin property in our customized ApplicationRole class), the ‘System Administration’ menu link will be displayed as illustrated in the given example. This check is performed via User.Identity.IsSysAdmin() but we can also check resource access for the authenticated user via User.Identity.HasPermission("controller-action") and likewise check if the user belongs to a role via User.IsInRole("Supervisor")

Sample Project
The sample project available for download was produced using Visual Studio 2013 where the target framework was set to .NET Framework 4.5.1; the project has not been tested using later versions of Visual Studio targeting newer frameworks but it should be possible to use a later version of Visual Studio if the target framework is set to .NET Framework 4.5.1. The project implements the AdminController which provides the necessary RBAC administration for Users, Roles and Permissions.
The RBAC administration is exposed via the ‘System Administration’ menu as displayed below and will only be visible to a user having a role that has the IsSysAdmin option enabled.
Please refer to Part 1 – Sample Project for an operative overview of the sample project or how to add RBAC functionality to your existing application.

RBAC Extended Methods
The RBAC functionality to Register and Login to a registered account has been defined in the RBAC_ExtendedMethods class as extended methods to the ControllerBase class. This will enable us to invoke the functionality inside our MVC controller methods by simply calling this.Register(...) and this.Login(...) which will each return a RBACStatus status code. The logic is driven by settings defined in the application’s configuration file.
public enum RBACStatus
{
    Success = 0,
    LockedOut = 1,
    RequiresVerification = 2,
    Failure = 3,
    EmailVerification = 4,
    PhoneVerification = 5,
    RequiresAccountActivation = 6,
    EmailUnconfirmed = 7,
    PhoneNumberUnconfirmed = 8,
    InvalidToken = 9,
}

public static class RBAC_ExtendedMethods
{
  public static RBACStatus Register
         (this ControllerBase controller, RegisterViewModel model, ...)
  {
    RBACStatus _retVal = RBACStatus.Failure;
    try
    {
      //Logic driven by settings defined in the application’s configuration file...
      int _userId = RBAC_ExtendedMethods.RegisterUser
                    (controller, model, userMngr, out _errors);
      if (_userId > -1)
      {
        model.Id = _userId;
        if (userMngr != null)
        {
          //Check if we require an Account Verification Email as part of our
          //registration process...
          bool IsAccountVerificationRequired =
               GetConfigSettingAsBool(cKey_AccountVerificationRequired);
          bool Is2FAEnabled = GetConfigSettingAsBool(cKey_2FAEnabled);
          string DeviceType = GetConfigSetting(cKey_2FADeviceType);

          if ((IsAccountVerificationRequired) || (Is2FAEnabled && DeviceType == c_EmailCode))
          {
            //Generate Email Confirmation Token
            _retVal = RBACStatus.Failure;
            if (SendOTP2Email(controller, userMngr, _userId, model.Email))
              _retVal = RBACStatus.RequiresAccountActivation;

            return _retVal;
          }
          else if (Is2FAEnabled && DeviceType == c_PhoneCode)
          {
            _retVal = RBACStatus.Failure;
           if (SendOTP2Phone(controller, userMngr, _userId, model.Mobile))
             _retVal = RBACStatus.PhoneVerification;

           return _retVal;
         }
       }
       _retVal = RBACStatus.Success;
     }
    }
    catch (Exception ex)
    {
      throw ex;
    }
    return _retVal;
  }

  public static RBACStatus Login(this ControllerBase controller, LoginViewModel model, ...)
  {
    RBACStatus _retVal = RBACStatus.Failure;
    _errors = new List<string>();
    try
    {
      var user = userMngr.FindByName(model.UserName);
      if (user != null)
      {
        var validCredentials = userMngr.Find(model.UserName, model.Password);
        if (userMngr.IsLockedOut(user.Id))
        {
          _errors.Add(string.Format(c_AccountLockout,
                      GetConfigSettingAsDouble(cKey_AccountLockoutTimeSpan)));
          return RBACStatus.LockedOut;
        }
        else if (userMngr.GetLockoutEnabled(user.Id) && validCredentials == null)
        {
          userMngr.AccessFailed(user.Id);
          if (userMngr.IsLockedOut(user.Id))
          {
            _errors.Add(string.Format(c_AccountLockout,
                        GetConfigSettingAsDouble(cKey_AccountLockoutTimeSpan)));
            return RBACStatus.LockedOut;
          }
          else
          {
            int _attemptsLeftB4Lockout = (GetConfigSettingAsInt
                                         (cKey_MaxFailedAccessAttemptsBeforeLockout) –
                                         userMngr.GetAccessFailedCount(user.Id));

            _errors.Add(string.Format(c_InvalidCredentials, _attemptsLeftB4Lockout));
            return _retVal;
          }
        }
        else if (validCredentials == null)
        {
          _errors.Add(c_InvalidLogin);
          return _retVal;
        }
        else
        {
          //Valid credentials entered,
          //we need to check whether email verification is required...
          bool IsAccountVerificationRequired =
               GetConfigSettingAsBool(cKey_AccountVerificationRequired);
          bool Is2FAEnabled = GetConfigSettingAsBool(cKey_2FAEnabled);
          string DeviceType = GetConfigSetting(cKey_2FADeviceType);

          if ((IsAccountVerificationRequired) || (Is2FAEnabled && DeviceType == c_EmailCode))
          {
            //Check if email verification has been confirmed!
            if (!userMngr.IsEmailConfirmed(user.Id))
            {
              //Display error message on login page, take no further action...
              _errors.Add(c_AccountEmailUnconfirmed);
              return RBACStatus.EmailUnconfirmed;
            }
          }
          else if (Is2FAEnabled && DeviceType == c_PhoneCode)
          {
            if (!userMngr.IsPhoneNumberConfirmed(user.Id))
            {
              _errors.Add(c_AccountPhoneNumberUnconfirmed);
              return RBACStatus.PhoneNumberUnconfirmed;
            }
          }

          bool _userLockoutEnabled = GetConfigSettingAsBool(cKey_UserLockoutEnabled);

          //Before we signin, check that our 2FAEnabled config setting agrees with
          //the database setting for this user
          if (Is2FAEnabled != userMngr.GetTwoFactorEnabled(user.Id))
          {
            userMngr.SetTwoFactorEnabled(user.Id, Is2FAEnabled);
          }

          _retVal = (RBACStatus)signInMngr.PasswordSignIn(model.UserName,
                                                          model.Password, model.RememberMe,
                                                          shouldLockout: _userLockoutEnabled);
          switch (_retVal)
          {
            case RBACStatus.Success:
            {
              userMngr.ResetAccessFailedCount(user.Id);
              break;
            }
            default:
            {
              _errors.Add(c_InvalidLogin);
              break;
            }
          }
        }
      }
      else
      {
        _errors.Add(c_InvalidUser);
      }
    }
    catch (Exception ex)
    {
      throw ex;
    }
    return _retVal;
  }

  public static bool SendOTP2Phone(this ControllerBase controller,
                                   ApplicationUserManager _userMngr, int _userId,
                                   string _phoneNumber)
  {
    bool _retVal = false;
    if (_userMngr.SmsService != null)
    {
      //Generate security code for phone confirmation
      var code = _userMngr.GenerateChangePhoneNumberToken(_userId, _phoneNumber);
      var message = new IdentityMessage
      {
        Destination = _phoneNumber,
        Body = "Your security code is: " + code
      };

      //Send the security code
      _userMngr.SmsService.Send(message);
      _retVal = true;
    }
    else
    {
      throw new Exception
      ("SMS Service has not been configured, unable to text notification...");
    }
    return _retVal;
  }

  ...
}
Database Initialization
The sample application will automatically create the database by default the very first time it is run. However, there are four different database initialization methods:
CreateDatabaseIfNotExists- This is default initializer. As the name suggests, it will create the database if none exists as per the configuration. However, if you change the model class and then run the application with this initializer, then it will throw an exception.DropCreateDatabaseIfModelChanges- This initializer drops an existing database and creates a new database, if your model classes (entity classes) have been changed. So you don't have to worry about maintaining your database schema, when your model classes change.DropCreateDatabaseAlways- As the name suggests, this initializer drops an existing database every time you run the application, irrespective of whether your model classes have changed or not. This will be useful, when you want fresh database, every time you run the application, like while you are developing the application.CustomDBInitializer- You can also create your own custom initializer, if any of the above doesn't satisfy your requirements or you want to do some other process that initializes the database using the above initializer.
To use one of the above database initialization methods, you have to set the Database Initializer type via Database.SetInitializer, as illustrated below:

Seed the Database with Initial Users
We can insert data into our database tables during the database initialization process. This will be important if you want to provide some test data for your application or to provide some default master data for your application.
To seed data into the database, we have to create a custom database initializer and override the Seed method. The following example shows how you can provide default data for the Users/Roles/Permissions tables during the initialization of the RBAC database.
public class RBACDatabaseInitializer : CreateDatabaseIfNotExists<RBACDbContext>
{
  private readonly string c_SysAdmin = "System Administrator";
  private readonly string c_DefaultUser = "Default User";

  protected override void Seed(RBACDbContext context)
  {
    //Create Default Roles...
    IList<ApplicationRole> defaultRoles = new List<ApplicationRole>();
    defaultRoles.Add(new ApplicationRole { Name = c_SysAdmin, RoleDescription = "..." });
    defaultRoles.Add(new ApplicationRole { Name = c_DefaultUser, RoleDescription = "..." });

    ApplicationRoleManager RoleManager = new ApplicationRoleManager(
                                                   new ApplicationRoleStore(context));
    foreach (ApplicationRole role in defaultRoles)
    {
      RoleManager.Create(role);
    }

    //Create Admin User...
    var user = new ApplicationUser { UserName = "Admin", ... };

    ApplicationUserManager UserManager = new ApplicationUserManager(
                                                     new ApplicationUserStore(context));
    var result = UserManager.Create(user, "Pa55w0rd");

    if (result.Succeeded)
    {
      //Add User to Admin Role...
      UserManager.AddToRole(user.Id, c_SysAdmin);
    }
    base.Seed(context);
  }
}
The sample project available for download uses the above method to insert several users into the database. This enables one to sign into the application using different users associated with different roles/permissions for demonstration purposes. The sample project initializes the database with the following users and associated roles/permissions.
| Application Users | ||||
| Username | Password | Roles Assigned | IsSysAdmin | Permissions Assigned |
| Admin | Pa55w0rd | System Administrator | Yes | None |
| Guest | Gu3st12 | Default User | No | Home-Reports |
| GuestNoRoles | Us3rNoRol3s | None | No | None |
The ‘System Administrator’ can create application roles with associated permissions and then assign users to these roles. Depending on your application requirements, you can either enable users to register themselves via the application’s ‘Register’ feature assigning a default role during the registration process or the ‘System Administrator’ registers the user upon request assigning roles as required. The above code snippet illustrates the creation of a user and the assignment of roles to that user via ApplicationUserManager and ApplicationRoleManager classes.
Authentication Models
Before we take a look at the sample code snippets, we need to understand the different authentication models.
Traditional Authentication
The ‘Traditional Authentication’ model offers the simplest authentication mechanism but is least secure. One of the largest problems with traditional username and password login is the need to maintain a password database. Whether encrypted or not, if the database is captured, it provides an attacker with a source to verify his guesses at speeds limited only by his hardware resources. As processing speeds of CPUs have increased, brute force attacks have become a real threat. Given enough time, a captured password database will fall.
Account lockout, (also known as Intruder Detection), is a feature of password security that disables a user's account when a certain number of failed logins occur due to wrong passwords being entered within a certain interval of time. The purpose behind account lockouts is to prevent attackers from using brute-force attempts to guess a user's password; too many incorrect guesses and the account is locked out. Once an account has been locked, that user will not be allowed to authenticate. The lockout may be temporary (automatically ending after a specified period of time) or permanent (remaining in effect until an administrator resets the user's password).

If you opt for the traditional authentication security system for your application, it’s highly recommended to use the account lockout feature of ASP.NET Identity, otherwise your application will fall target to brute force attacks.
Two-Factor Authentication (2FA)
Two-factor authentication (also known as two-step authentication) refers to authentication mechanisms where the two authentication elements fall under different categories with respect to "something you have" (possession), "something you are" (inherence), and "something you know" (knowledge).

A good example of this is the two-factor authentication required by GMail. After providing the password you've memorized, you're required to also provide the one-time code displayed on your phone. While the phone may appear to be "something you have", from a security perspective it's still "something you know". This is because the key to the authentication isn't the device itself, but rather information stored on the device which could in theory be copied by an attacker. So, by copying both your memorized password and the OTP configuration, an attacker could successfully impersonate you without actually stealing anything physical. Another good example is the withdrawal of money from a cash machine. Only the correct combination of a bank card (“something you have”) and a PIN (“something you know”) allows the transaction to be carried out. Likewise, this authentication mechanism can be compromised via ATM skimming and phishing where the attacker can impersonate you without actually stealing your physical bank card.
Mobile phone two-factor authentication was developed to provide an alternative method that would avoid such issues. This approach uses mobile devices such as mobile phones and smartphones to serve as "something you have". If users want to authenticate themselves, they can use their memorized password plus a one-time-valid, dynamic passcode consisting of digits. The code can be sent to their mobile device by SMS. The advantage of this method is there is no need for additional, dedicated tokens, as users tend to carry their mobile devices around at all times. Some professional two-factor authentication solutions also ensure that there is always a valid passcode available for users. If the user has already used a sequence of digits (passcode), this is automatically deleted and the system sends a new code to the mobile device. Additionally, if the new code is not entered within a specified time limit, the system automatically replaces it. This ensures that no old, previously used codes are left on mobile devices. For added security, it is possible to specify how many incorrect entries are permitted before the system blocks access.
To implement the ‘Two-factor Authentication’ feature in the sample project, configure the settings detailed below in the project’s Web.config file.
Multi-Factor Authentication (MFA)
Multi-factor authentication is a security system that requires more than one method of authentication from independent categories of credentials to verify the user's identity for a login or other transaction.
The point to multi-factor authentication, and the reason for the strict distinction, is that the attacker must successfully pull off two different types of theft to impersonate you: he must acquire both your knowledge and your physical device, for example. In the case of multi-step (but not multi-factor), the attacker needs only to only pull off one type of theft, just multiple times. So for example, he needs to steal two pieces of information, but no physical objects.
The type of multi-step authentication provided by Google or Facebook or Twitter is still strong enough to thwart most attackers, but from a purist point of view, it technically isn't multi-factor authentication.
User Registration
The ‘Traditional Authentication’ model offers the simplest registration process but is least secure. If you are serious about building an online website and keeping it safe, security is something you should not ignore especially if you are planning a collaborative blog or group blog feature since this will pose a serious risk to your online community from spammers and sploggers.
Simply allowing a user to register an account on your site with no verification checks, such as using a confirmation email to verify ownership of an email address, will lead to mass account registrations. The majority of such registrations will come from botnets, infected machines, malware and hackers. Without protection in place, your fledgling community runs the risk of being overrun by spammers trying to sell fake products. Since fake users can easily make up 98% of all new user account requests, it’s useful to have a game plan for stopping or slowing these fake registrations.
You should, at minimum, require a user to activate their account via an email sent to the address provided at signup. This simple check will weed out the sploggers and spammers who are using e-mail addresses harvested from the web that they do not have access to, but will not stop users who do have access to a working e-mail address.
In addition to using a confirmation email to verify ownership of an email address, you can also implement additional security on your registration form to help identify spambots as detailed below:
- Honeypots work by creating hidden fields on the registration form that spam bots can’t resist, then checking for input in those fields upon form submission.
- “Humanity tests” ask users to respond to randomized questions such as “What colour is space?” that should confuse a spambot.
- CAPTCHAs are ubiquitous and challenge the user to figure out what letters are shown in a distorted image.
The implementation of these additional security features on your registration form fall outside the scope of this article. However, which of these options you choose (you could technically employ all three) is a matter of preference. Honeypots have the advantage of being the least intrusive; “real” users won’t even know they’re there. Humanity tests might surprise your users because they’re unusual, but stop spambots effectively. CAPTCHAs are everywhere, so, while they might be annoying, at least they annoy your users in a familiar way. These three strategies will only stop spambots as human spammers will be able to defeat any of them.
Workflow Logic
The RBAC framework implements the following User Registration workflow logic where features such as Account Lockout and Two-Factor Authentication are configurable via the project’s Web.config file.
 | The first step in the User Registration process is a validation check to verify whether data fields, such as passwords, have been entered correctly. By default, the password policy in ASP.NET Identity requires a password with a minimum length of 6 characters with at least one non letter or digit character, at least one digit (‘0’-‘9’) and at least one uppercase (‘A’-‘Z’). The validation check enforces the use of strong passwords.
The password policy can be defined via configuration settings prepended with the Password keyword (e.g., The account check will ensure that the Username and email address specified by the user have not been used by previously registered accounts. Both the validation and account checks are carried out by ASP.NET Identity during the account creation process performed via the Once all checks have succeeded, a confirmation email token is generated by invoking ASP.NET Identity’s Finally, the user is invited to confirm the email address specified during the registration process by clicking on the link contained within the email. Confirming the email address will activate the account. |
A user can’t log into the website until the account has been activated via the unique activation link generated in the email. The e-mail verification feature to verify ownership of an email address will weed out fake users who are using fake e-mail addresses or e-mail addresses taken from the web that they do not have access to.
Register Extended Method
The ‘User Register’ form will post the form’s RegisterViewModel to the Account controller’s Register method. The Register method, invokes the Register extension method which is part of the RBAC framework; the method creates an account and (depending on your application’s configuration settings) sends out verification requests.
The following code sample illustrates invoking the extension method and processing the corresponding action result for the returned RBACStatus.
[HttpPost]
[AllowAnonymous]
[ValidateAntiForgeryToken]
public async Task<ActionResult> Register(RegisterViewModel model)
{
  if (ModelState.IsValid)
  {
    List<string> _errors = new List<string>();
    try
    {
      RBACStatus _retVal =   this.Register(model, this.UserManager,
                                           this.SignInManager, out _errors);
      switch (_retVal)
      {
        case RBACStatus.Success:
        {
          ViewBag.Message = "Your account has been created successfully.
          You can now continue and login...";
          return View("Confirmation");
        }
        case RBACStatus.RequiresAccountActivation:
        {
          ViewBag.Username = model.UserName;
          ViewBag.Email = model.Email;
          return View("ConfirmEmailSent");
        }
        case RBACStatus.EmailVerification:
        {
          return RedirectToAction
          ("RequestEmailVerification", new { Username = model.UserName });
        }
        case RBACStatus.PhoneVerification:
        {
          return RedirectToAction("OTP4PhoneVerification",
                 new { UserId = model.Id, phoneNumber = model.Mobile });            }
      }
    }
    catch (Exception ex)
    {
      AddErrors(new IdentityResult(ex.Message));
    }

    if (_errors.Count() > 0)
    {
      AddErrors(new IdentityResult(_errors));
    }
  }

  //If we got this far, something failed, redisplay form
  //Errors will be displayed back to the user
  //because we have set the ModelState object with our _errors list...
  return View(model);
}
Account Activation via Email Verification
To configure the e-mail verification feature to verify ownership of an email address in the sample project, configure the setting as detailed below in the project’s Web.config file.
<appSettings>
    ...
    <add key="AccountVerificationRequired" value="true" />
</appSettings>
By setting AccountVerificationRequired to true, we are configuring the application to enforce globally that every user created is subjected to account activation via a confirmation email to verify ownership of their email address. The email contains a token embedded in an activation link which points back to our website. To disable this feature, configure the setting as false or completely remove the setting from the project’s Web.config file.
NOTE: If two-factor authentication has been enabled and the two-factor authentication device type is configured as email, there is no need to configure this option as e-mail verification is mandatory for this configuration.

During the account registration process, an account activation email will be sent to the specified email address. The activation link will contain the userId for the account and a uniquely generated token code. Upon clicking on the activation link, both parameters are passed to our ASP.NET site invoking the ConfirmEmail action method in the Account controller.

Attempting to login without activating the account will result in an error as illustrated:
http://.../Account/ConfirmEmail?userId=104&code=p%2F3IHpCeF%2BajSQ70ghGE4mKWGn...

Clicking on the activate link in the email will set the EmailConfirmed field defined in the USERS table to true for the user account and display the illustrated confirmation screen.

To configure your Smtp Server settings for the e-mail verification feature, configure the following settings as detailed below in the project’s Web.config file.
<appsettings>
  ...
  <!-- Smtp Server Settings -->
  <add key="SmtpEMailFrom" value="admin@somedomain.com">
  <add key="SmtpServer" value="smtp.live.com">
  <add key="SmtpPort" value="587">
  <add key="SmtpUsername" value="youremailaddress">
  <add key="SmtpPassword" value="youraccountpassword">
  <add key="SmtpNetworkDeliveryMethodEnabled" value="true">
</appsettings>
<add key="SmtpEMailFrom" value="admin@somedomain.com"><add key="SmtpServer" value="smtp.live.com"><add key="SmtpPort" value="587"><add key="SmtpUsername" value="youremailaddress"><add key="SmtpPassword" value="youraccountpassword"><add key="SmtpNetworkDeliveryMethodEnabled" value="true">
The value for SmtpEMailFrom will define the from email address for any emails sent.
The SmtpServer setting specifies the name or IP address of the host SMTP mail server used for SMTP transactions. This can be an SMTP mail server on your corporate network or an SMTP mail server provided by your email service provider such as Hotmail or Gmail..
The integer value for SmtpPort specifies the port number to use to connect to the SMTP mail server..
The SmtpUsername setting specifies the user name to use for authentication to the SMTP mail server. Similarly, the SmtpPassword setting stores the password to use for authentication to the SMTP mail server..
The SmtpNetworkDeliveryMethodEnabled setting specifies whether the email is sent through the network to an SMTP server..
If you intend to use Hotmail, GMail or Yahoo as your Smpt provider rather than using your organisation’s mail server, you can use the following SmtpServer and SmtpPort settings as provided in the table:-
| Smtp Server Settings | ||||
| Provider | Smtp Server | Smtp Port | SSL | |
| Hotmail | smtp.live.com | 587 | Yes | |
| GMail | smtp.gmail.com | 587 | Yes | |
| Yahoo | smtp.mail.yahoo.com | 587 | Yes | |
Account Verification via Time-based One-Time Password (TOTP) Token using 2FA
To configure the Time-based One-Time Password (TOTP) using the Two-Factor Authentication (2FA) feature in the sample project, configure the settings as detailed below in the project’s Web.config file.
<appsettings>
    ...
    <!-- 2FA Settings -->
    <add key="2FAEnabled" value="true">
    <!-- 'Email Code' or 'Phone Code' -->
    <add key="2FADeviceType" value="Phone Code">
</appsettings>
The 2FAEnabled setting defines whether 2FA is enforced during the User Login process. Setting the value to true will globally enforce that every user created is subjected to 2FA.
The 2FADeviceType setting defines the device type for the Time-based One-Time Password (TOPT) token to be sent to. Currently, the sample project is implemented to support either e-mail or mobile device. Setting ‘Email Code’ will cause the token to be sent to the specified e-mail and setting ‘Phone Code’ will deliver the TOPT token via SMS to the specified mobile device. You will need to capture either an e-mail address or mobile phone number during the registration process depending on which delivery method you opt for in your solution.
Note: ASP.NET Identity uses an implementation of the RFC 6238 Time-based One-Time Password algorithm (TOTP) for generation of the PIN used for two factor authentication. The PIN generated is 6 digits in length and is valid for a period for 180 seconds (3 minutes). Where multiple PINs (aka Security Codes) are requested for an account, any one of the generated PINs can be used for the two-factor authentication process provided the PIN is entered within the time limit.

| The registration process will not continue until a valid security code is entered.
Entering a valid security code will complete the registration process and log the user into the website. The ASP.NET Identity framework will set the |  |
If a user attempts to log in without verifying their identity using the security code sent to their mobile device, the user will be redirected to the ‘Verify Phone Number’ page with an error message displayed (pictured below). A new security code will be sent to the phone number associated with the account (recall that security codes are time-based and the original security code sent to the user’s mobile phone may have expired).

User Login
Many login pages are targeted by hackers who want to gain access to your website or maybe even bring it down. Just as you lock your doors before leaving your house, you should also have a security system to serve as your website’s first line of defence against hacking attacks.
Switch to HTTPS
HTTPS or Hyper Text Transfer Protocol Secure is a secure communications protocol that is used to transfer sensitive information between a website and a web server. Ensuring your website uses the HTTPS protocol essentially means adding an encryption layer of TLS (Transport Layer Security) or SSL (Secure Sockets Layer) to your HTTP making your users’ and your own data extra secure from hacking attempts.
While HTTPS is a necessity for all online transactions, the rest of the website is usually on HTTP. However, all that is about to change with Google’s recent announcement that HTTPS will be a search ranking factor. Besides the security aspect of things, it now makes even more sense to shift your entire website to HTTPS to improve your search rankings simultaneously.

Password Strength
Brute-force attacks that try guessing username password combinations have multiplied at alarming rates over the last couple of years with thousands of attacks being detected on a daily basis across the web. Using strong passwords is an effective way to limit if not completely eliminate brute-force and dictionary attacks. Password strength is a measure of the effectiveness of a password in resisting guessing and brute-force attacks. Make sure your password policy is a combination of alphanumeric characters, symbols, upper and lower case characters and at least 12 characters long to prevent brute-force attacks. Using strong passwords lowers overall risk of a security breach, but strong passwords do not replace the need for other effective security controls such as account lockouts imposed when a number of failed login attempts occur.
Workflow Logic
The RBAC framework implements the following User Login workflow logic where features such as Account Lockout are configurable via the project’s Web.config file. However, if the workflow flow doesn’t meet your requirements you are free to tailor the workflow and implement bespoke logic as defined by your business requirements, but for most scenarios, the following workflow will suffice.
 | During the User Login process, the workflow will locate the account record via the userMngr.FindByName(UserName) method. After validating the entered password and before reporting the result of the validation check, the userMngr.IsLockedOut(user.Id) method is invoked to check whether the account has been locked-out. This feature can be disabled via the UserLockoutEnabled configuration setting defined in the project’s Web.config file.
In the event of an account being locked-out, an error message will be reported back to the user. Access to the site will not be permitted until the lockout expires (timed lockout) or is manually reset by the account administrator (permanent lockout). If an incorrect password is entered and the account lockout feature is configured, the failed login attempts counter will be incremented and the login attempts remaining reported back to the user. The number of failed login attempts permitted before the account is locked-out is defined via the If a correct password is entered and the account has not been locked-out, an email verification check is performed via the If the account has been verified and two-factor authentication is enabled, a security PIN will be generated and sent to the verified device type (i.e., email or phone). The PIN generated is 6 digits in length and is valid for a period for 180 seconds (3 minutes). Valid device types are obtained via the |
Validating the PIN submitted by the user is the final step in the workflow flow. We validate if the userId is present in the cookie, which shows that this is a valid request. We invoke the SignInMngr.TwoFactorSignInAsync(…) method to check if this is a valid PIN for this user. If so, we sign the user into the application; otherwise we report back an invalid code error. The user has 3 minutes to enter the correct PIN, otherwise a new PIN will need to be generated by repeating the login process again.
Login Extended Method
The ‘User Login’ form will post the form’s LoginViewModel to the Account controller’s Login method. The Login method, invokes the Login extension method which is part of the RBAC framework; the method performs checks as defined in the previous login workflow. A successful login will set the IsAuthenticated property exposed by the IIdentity object to true which is used to determine the authentication status of the current user.
[HttpPost]
[AllowAnonymous]
[ValidateAntiForgeryToken]
public async Task<actionresult> Login(LoginViewModel model, string returnUrl)
{
   if (ModelState.IsValid)
  {
    List<string> _errors = new List<string>();
    try
    {
      RBACStatus _retVal =
                 this.Login(model, this.UserManager, this.SignInManager, out _errors);
      switch (_retVal)
      {
        case RBACStatus.Success:
          return RedirectToLocal(returnUrl);
        case RBACStatus.EmailUnconfirmed:
        {
          //Do nothing, message will be display on login page...
          break;
        }
        case RBACStatus.PhoneNumberUnconfirmed:
        {
          var user = UserManager.FindByName(model.UserName);
          if (user != null)
          {
            if (this.SendOTP2Phone(this.UserManager, user.Id, user.PhoneNumber))
              return RedirectToAction
              ("OTP4PhoneVerification", new { UserId = user.Id, phoneNumber = ... });
          }
          break;
        }
        case RBACStatus.RequiresVerification:
          return RedirectToAction("SendSecurityCode",
                 new { ReturnUrl = returnUrl, RememberMe = model.RememberMe });
      }
    }
    ...
  }
  // If we reach this point, something failed, redisplay form displaying error message(s)...
  return View(model);
}</string>
A word of warning… It’s important to understand that the Http request arriving in the Login controller action will contain both the username and password as clear text in the Http request header. Anyone sniffing network traffic between you and the webserver will be able to view your username and password in clear text. This is clearly not secure and a major security breach! Any reputable website will force their users to login via SSL. The website owner will acquire and install an SSL certificate on their webserver forcing the login process to go via Https. To force a request to go via Https, we simply prepend the function with the [RequireHttps] attribute. This is an action filter that will ensure the arriving request is sent over a secure encrypted connection guaranteeing passwords are not sent using clear text.
[HttpPost]
[AllowAnonymous]
[RequireHttps]
public ActionResult Login(LoginModel model)
{
    ...
}

NOTE: Prepending a function with the <tt>[RequireHttps]</tt> attribute without installing an SSL certificate on the webserver will result in an exception when attempting to access the secure resource. Acquiring and installing an SSL certificate is not covered within this article since this is a topic in this own right.
Account Lockout Enabled
To implement the ‘Account Lockout’ feature in the sample project, configure the settings detailed below in the project’s Web.config file.
<appsettings>
    ...
    <!-- Account Lockout Settings -->
    <add key="UserLockoutEnabled" value="true">
    <add key="AccountLockoutTimeSpan" value="15">
    <add key="MaxFailedAccessAttemptsBeforeLockout" value="3">
</appsettings>
By setting UserLockoutEnabled to true, we are configuring the application to enforce globally that every user created is subject to lockouts if the user reaches the maximum failed login attempts.
The value for AccountLockoutTimeSpan is in minutes and the time the user has to wait before being allowed to login again after the maximum failed login attempts.
The MaxFailedAccessAttemptsBeforeLockout setting is the number of login attempts you allow the user to retry before a lockout.

If the user continues to enter an incorrect password for the specified amount of attempts, the account will be locked out with the following error message. The account lockout period can be decreased or increased or locked-out indefinitely until a password reset by the account administrator is undertaken.

2FA Enabled
To implement the ‘Two-factor Authentication’ feature in the sample project, configure the setting detailed below in the project’s Web.config file.
<appsettings>
    ...
    <!-- 2FA Settings -->
    <add key="2FAEnabled" value="true">
    <!-- 'Email Code' or 'Phone Code' -->
    <add key="2FADeviceType" value="Email Code">
 </appsettings>
During the Login process, after the user has correctly entered their username and password, the following 2FA screen will be displayed providing the registered two-factor authentication device type(s). The Two-Factor Authentication Provider dropdown will initially consist of the provider defined within the 2FADeviceType configuration setting. However, after the user has successfully verified 2FA via the security code, they can add a new device type to their account via their account management facility. Once the new device type has been verified, it will be available in future logins as a Two-Factor Authentication Provider.
public async Task<ActionResult> SendSecurityCode(string returnUrl, bool rememberMe)
{
  var userId = await SignInManager.GetVerifiedUserIdAsync();
  if (userId == null)
  {
    return View("Error");
  }

  var userFactors = await UserManager.GetValidTwoFactorProvidersAsync(userId);
  var factorOptions = userFactors.Select
      (purpose => new SelectListItem { Text = purpose, Value = purpose }).ToList();
  return View(new SendCodeViewModel
      { Providers = factorOptions, ReturnUrl = returnUrl, RememberMe = rememberMe });
}
Device types not verified for the account will not be displayed in the Two-Factor Authentication Provider dropdown.

As detailed in an earlier section, the e-mail server account settings to send a security code via e-mail are defined in the Smtp Server Settings section in the project’s Web.config file. Likewise, the SMS server account settings to send a security code via SMS are defined in the SMS Account Settings section as detailed below:
<appsettings>
    ...
    <!-- SMS Account Settings -->
    <add key="SMSSid" value="CB857cc79915e645eca614b79422de127f">
    <add key="SMSToken" value="f10a4768e71d008b68a61599297780bc">
    <add key="SMSFromPhone" value="+441784609586">
 </appsettings>
Security Code via Email
If the ‘Email Code’ is selected as the Two-Factor Authentication Provider, the security code will be sent via email.

Security Code via SMS

| If the ‘Phone Code’ is selected as the Two-Factor Authentication Provider, the security code will be sent via SMS to your mobile number. A mobile number can be a mandatory requirement necessary during the registration process including device verification or can be added to the account post registration. How the system is configured will be driven by your business processes. If you require account registrations to be verified via a mobile number instead of an email link, set the application’s configuration settings as follows: |
<appsettings>
    ...
    <add key="2FAEnabled" value="true">
    <add key="2FADeviceType" value="Phone Code">
    <add key="AccountVerificationRequired" value="true">
 </appsettings>
NOTE: The only 2FA provider available will be Phone Code. You will need to change the registration view Register.cshtml to include a mobile number field @Html.TextBoxFor(m => m.Mobile) defined in your data model RegisterViewModel which will need to be mandatory. Fields are made mandatory via the [Required] attribute for the data property in the data model being passed to the view.
If, on the other hand, you require that the account registration is verified via an email link and users have the option of adding a mobile number at a later date for 2FA, set the application’s configuration settings as follows:
<appsettings>
    ...
    <add key="2FAEnabled" value="true">
    <add key="2FADeviceType" value="Email Code">
    <add key="AccountVerificationRequired" value="true">
</appsettings>
Security Code Verification
The security code sent via the chosen delivery method (SMS or email) will need to be entered in order to verify the user’s identity.

Clicking on the Remember this browser check box will exempt a user from needing to use 2FA to log on with that computer and browser. Enabling 2FA and clicking on the Remember this browser will provide users with strong 2FA protection from malicious users trying to access their account, as long as they don't have access to the user’s computer. This can be done on any private machine used regularly. By not setting "Remember this browser" on computers they don't regularly use, they benefit from the added security of 2FA, and get the convenience of not having to go through 2FA on their own computer(s).
[HttpPost]
[AllowAnonymous]
[ValidateAntiForgeryToken]
public async Task<actionresult> VerifySecurityCode(VerifyCodeViewModel model)
{
    if (!ModelState.IsValid)
    {
        return View(model);
    }

    var result = await SignInManager.TwoFactorSignInAsync
                 (model.Provider, model.Code, isPersistent: model.RememberMe,
                 rememberBrowser: model.RememberBrowser);
    switch (result)
    {
        case SignInStatus.Success:
            return RedirectToLocal(model.ReturnUrl);
        case SignInStatus.LockedOut:
            return View("Lockout");
        case SignInStatus.Failure:
        default:
            ModelState.AddModelError("", "Invalid code.");
            return View(model);
        }
    }
}
Register a Trial SMS Account for Development Purposes
For development purposes, you can register as software developer with Twilio to programmatically make/receive phone calls and send/receive text messages using its web service APIs. Twilio is a cloud communications company based in San Francisco, California. Twilio's services are accessed over HTTP and are billed based on usage (software developer trial account is free but text messages are only sent to the phone specified during the account registration). Visit twilio to register a trial account.

Once an account has been registered, you will be provided with an Account SID, Auth Token and a Phone Number to send and receive calls and messages. The “Account SID” acts as a username and the “Auth Token” acts as a password. Copy these settings to the SMS Account Settings section in the project’s Web.config file as required. If you have registered a trial account, you will need to use the registered phone number for the mobile during the user registration process in the sample project as text messages will not be delivered to phone numbers other than the one registered.
Manage User Account
Once a user has logged into their account, the manage account settings section enables a user to change the account password and add/remove a phone number associated with 2FA provided that 2FA is enabled in the application configuration settings.

The password policy can be defined via configuration settings prepended with the Password keyword (detailed below) located in the project’s Web.config file. Moving hard coded values embedded in the IdentityConfig.cs file avoids the recompilation and redeployment of a project in the event of a password policy change.
<!—Password Policy Settings -->
<add key="PasswordRequiredLength" value="6">
<add key="PasswordRequireNonLetterOrDigit" value="true">
<add key="PasswordRequireDigit" value="true">
<add key="PasswordRequireLowercase" value="true">
<add key="PasswordRequireUppercase" value="true">
Change Password
The Change Password option enables a user to change their password. Password policy rules are enforced.

[HttpPost]
[ValidateAntiForgeryToken]
public async Task<ActionResult> ChangePassword(ChangePasswordViewModel model)
{
    ...

    var _retVal = await UserManager.ChangePasswordAsync(User.Identity.GetUserId(),
                                                        model.OldPassword,
                                                        model.NewPassword);
    if (_retVal.Succeeded)
    {
        var user = await UserManager.FindByIdAsync(User.Identity.GetUserId());
        if (user != null)
        {
            await SignInManager.SignInAsync(user, isPersistent: false, rememberBrowser: false);
        }
        return RedirectToAction
        ("Index", new { Message = ManageMessageId.ChangePasswordSuccess });
    }

    AddErrors(_retVal);
    return View(model);
}
By default, the password policy in ASP.NET Identity requires a password with a minimum length of 6 characters with at least one non letter or digit character, at least one digit (‘0’-‘9’) and at least one uppercase (‘A’-‘Z’). The validation check enforces the use of strong passwords.
Add Phone Number for Two-Factor Authentication (2FA)
With two-step verification enabled, your account is protected by an additional level of security. When logging in, you will need to enter both your password and a unique code from your mobile device. This will keep impostors out of your account, even if they have your password.

[HttpPost]
[ValidateAntiForgeryToken]
public ActionResult AddPhoneNumber(AddPhoneNumberViewModel model)
{
    ...

    // Generate token...
    try
    {
        if (this.SendOTP2Phone(UserManager, User.Identity.GetUserId(), model.Number))
            return RedirectToAction("VerifyPhoneNumber", new { PhoneNumber = model.Number });

    }
    catch (Exception ex)
    {
        AddErrors(new IdentityResult(ex.Message));
    }
    // If we reach this point, something failed, redisplay form displaying error message(s)...
    return View(model);
}
public static bool SendOTP2Phone
(this ControllerBase controller, ApplicationUserManager _userMngr,
int _userId, string _phoneNumber)
{
    bool _retVal = false;
    if (_userMngr.SmsService != null)
    {
        //Generate security code for phone confirmation
        var code = _userMngr.GenerateChangePhoneNumberToken(_userId, _phoneNumber);
        var message = new IdentityMessage
        {
            Destination = _phoneNumber,
            Body = "Your security code is: " + code
        };

        //Send the security code
        _userMngr.SmsService.Send(message);
        _retVal = true;
    }
    else
    {
        throw new Exception("SMS Service has not been configured,
                             unable to text notification...");
    }
    return _retVal;
}
With two-step verification enabled, your account is protected by an additional level of security. When logging in, you will need to enter both your password and a unique code from your mobile device. This will keep impostors out of your account, even if they have your password.

public async Task<ActionResult> VerifyPhoneNumber(VerifyPhoneNumberViewModel model)
{
    ...

    var result = await UserManager.ChangePhoneNumberAsync
                 (User.Identity.GetUserId(), model.PhoneNumber, model.Code);
    if (result.Succeeded)
    {
        var user = await UserManager.FindByIdAsync(User.Identity.GetUserId());
        if (user != null)
        {
            await SignInManager.SignInAsync(user, isPersistent: false, rememberBrowser: false);
        }
        return RedirectToAction("Index", new { Message = ManageMessageId.AddPhoneSuccess });
    }

    //If we got this far, something failed, redisplay form
    ModelState.AddModelError("", "Failed to verify phone");
    return View(model);
}

RBAC Authentication/Authorization Overview
The User Authentication process is undertaken by our application to provide a layer of security. Since the web application is internet based, the application is configured for Forms Authentication and IIS does not check that a user making an inbound request has been authenticated. Instead, the inbound request is routed to the MVC web application where authorization checks are undertaken by our application. It’s the responsibility of our application to check that a user has been authenticated before being allowed to continue to ‘protected’ resources otherwise the Login dialog box is presented to the requesting user.
The following diagram illustrates the RBAC Authentication/Authorization process for Internet applications.

An inbound request to our web application is initially handled by IIS which routes the request to our MVC web application. If the user has been authenticated, the request is then checked against the user’s rights and roles. A user’s right will decide whether the requested controller/action can be processed. An unauthenticated user is redirected to the Login page. However, an unprotected resource can still be accessed by an unauthenticated user since the authorization filter is not invoked; the authorization filter performs authentication and authorization checks. For example, you may have an internet site which displays product information and provides customer account management. Anybody should be permitted to view the company’s product information but only registered customers should be able to access their account information. Therefore, web resources relating to the company’s product information doesn’t need to be protected thus enabling any user to view the resource whereas web resources relating to customer account information unquestionably need to be protected.
Any user navigating directly to a customer account resource will be immediately redirected to a Login page in order to be authenticated. To protect a resource within our MVC application, recall that we decorate our controller’s action method or entire controller with the RBACAttribute attribute.
Conclusion
This solution forms an ideal framework for any internet application that requires user authentication/authorization based around dynamic self-contained Roles Based Access Control (RBAC) that is specific to the application.
The framework’s logic is driven by settings defined in the application’s configuration file. Introducing settings into the application’s configuration file which drives the framework’s logic avoids the recompilation and redeployment of an application if one decides to change the behaviour of the framework. It becomes a time consuming and costly affair when an application developer has to recompile and redeploy an application every time a change is required. The framework has been designed with extendibility in mind enabling the addition of new functionality and/or the modification of existing functionality.
The framework can be added to existing projects as well as new developments and once deployed, application roles/permissions will be self-maintaining and regulating via the application’s system administrator with little or no reliance on the application developer.
Finally, this solution is particularly suited for public facing internet applications where resources within an MVC application need to be protected at a granular level.
History
- 22nd May 2016: Initial version